How to Build a Partscaster
A step-by-step guide to building your own guitar from parts
Who doesn't dream of a custom guitar? Built to fit your playing, your style, and able to deliver the perfect tone—everything just right. Some pre-built or custom shop guitars have most of what you want, but that means settling for someone else's specs.
Watch the video: Build Your Dream Partscaster
Build along with author Dan Pertrzelka in StewMac’s shop! Experience the entire Partscaster process from picking your parts, drilling every hole, and wiring it up—Dan shows each step to build your dream guitar. Watch the video
A truly custom-built guitar may be out of reach, and a scratch-build a little more than you're ready to tackle. There is a middle ground that combines the ease of off-the-shelf components, and the flexibility to make it your own. Assembling a partscaster can give you the customized guitar you've dreamed of, and the joy of the building process, without starting from scratch. You can hit the exact specs, tone, and style you want, and learn a lot about lutherie and the finer details of guitar setup along the way. Best of all, building your own guitar comes with some serious bragging rights!
The partscaster was made possible in no small part because of the genius of the modular platform for guitars that Leo Fender helped pioneer. Fender's goal was to build guitars that were easy to repair—as it turns out, they're also easy to build and modify. Slab bodies and bolt-on necks, specifically the Strat and Tele with their standardized geometries, are great places to start.
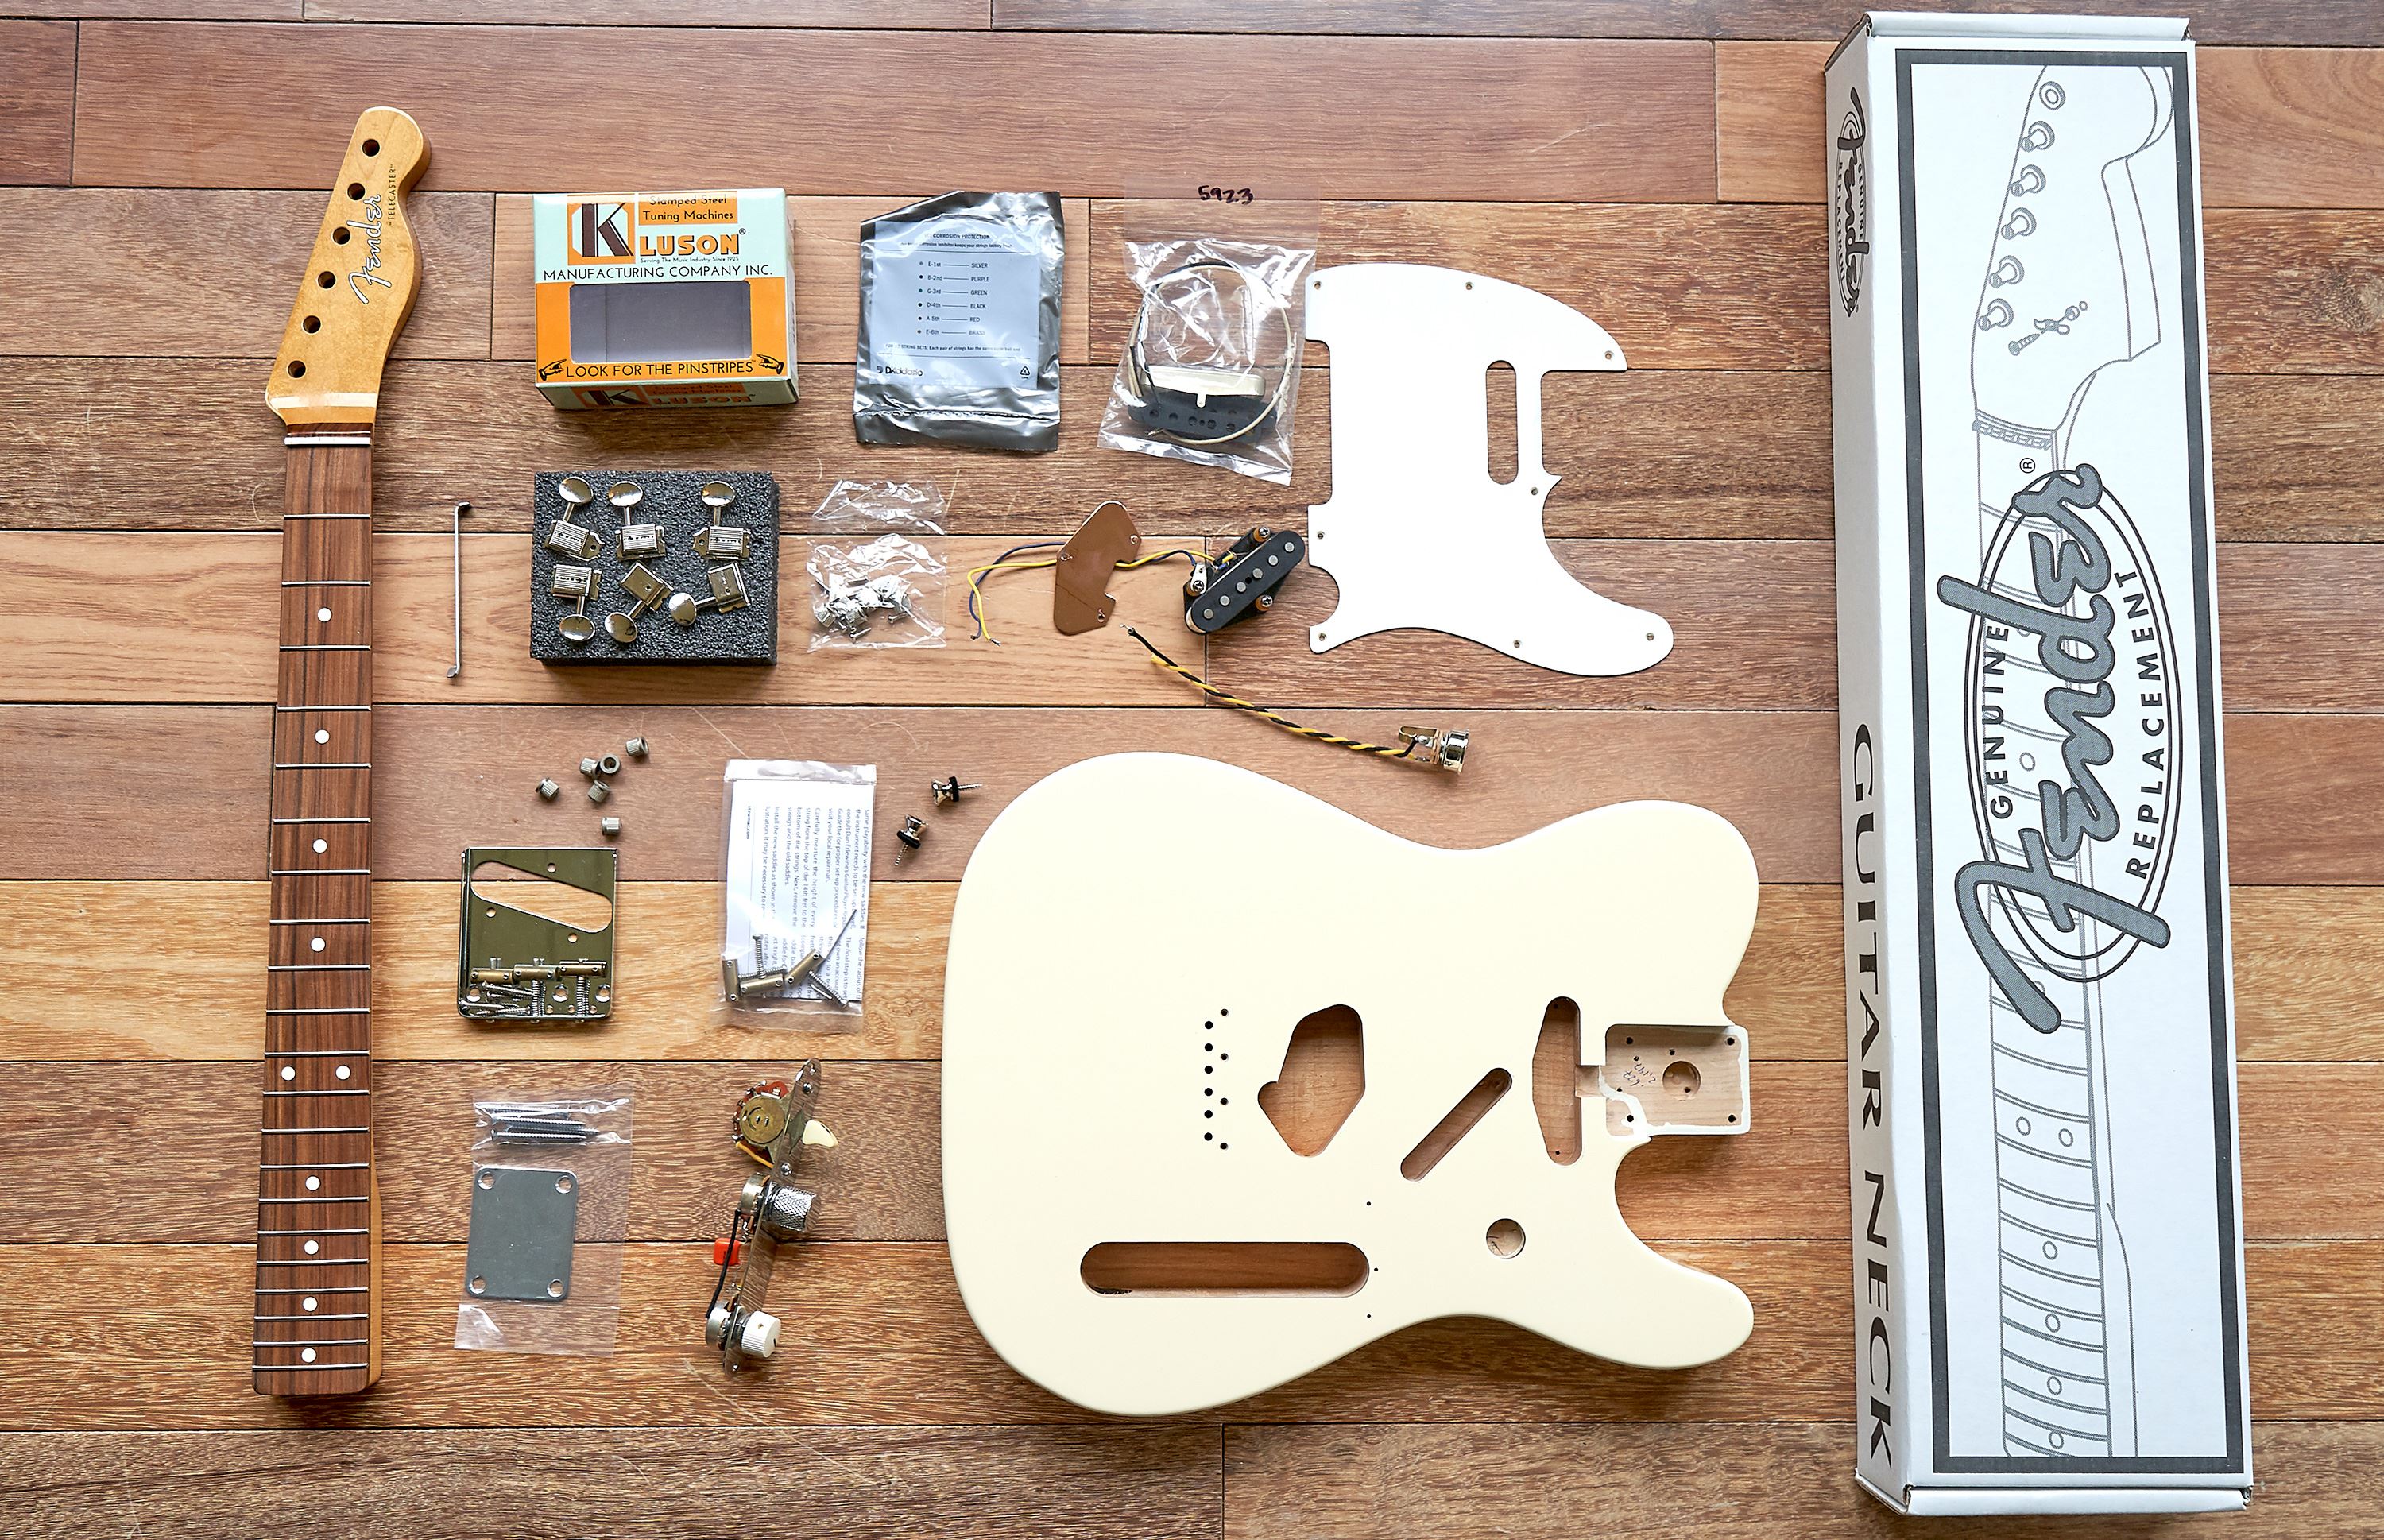
I've supplied a handy partscaster checklist with two pages; one for a T-style build and one for an S-style build. Both pages list all of the components you'll need to build a complete partscaster!
Partscaster Checklist
Here's the printable checklist of all the parts you'll need.
Picking Your Parts
Some big decisions (besides cosmetics) are neck shape, pickups, tone controls, body wood, fretboard radius, and material. Within those are countless options and combinations, allowing you a huge range of personalization. Take your time, imagine the sound you're looking for, and pick out the pieces to build your masterpiece.
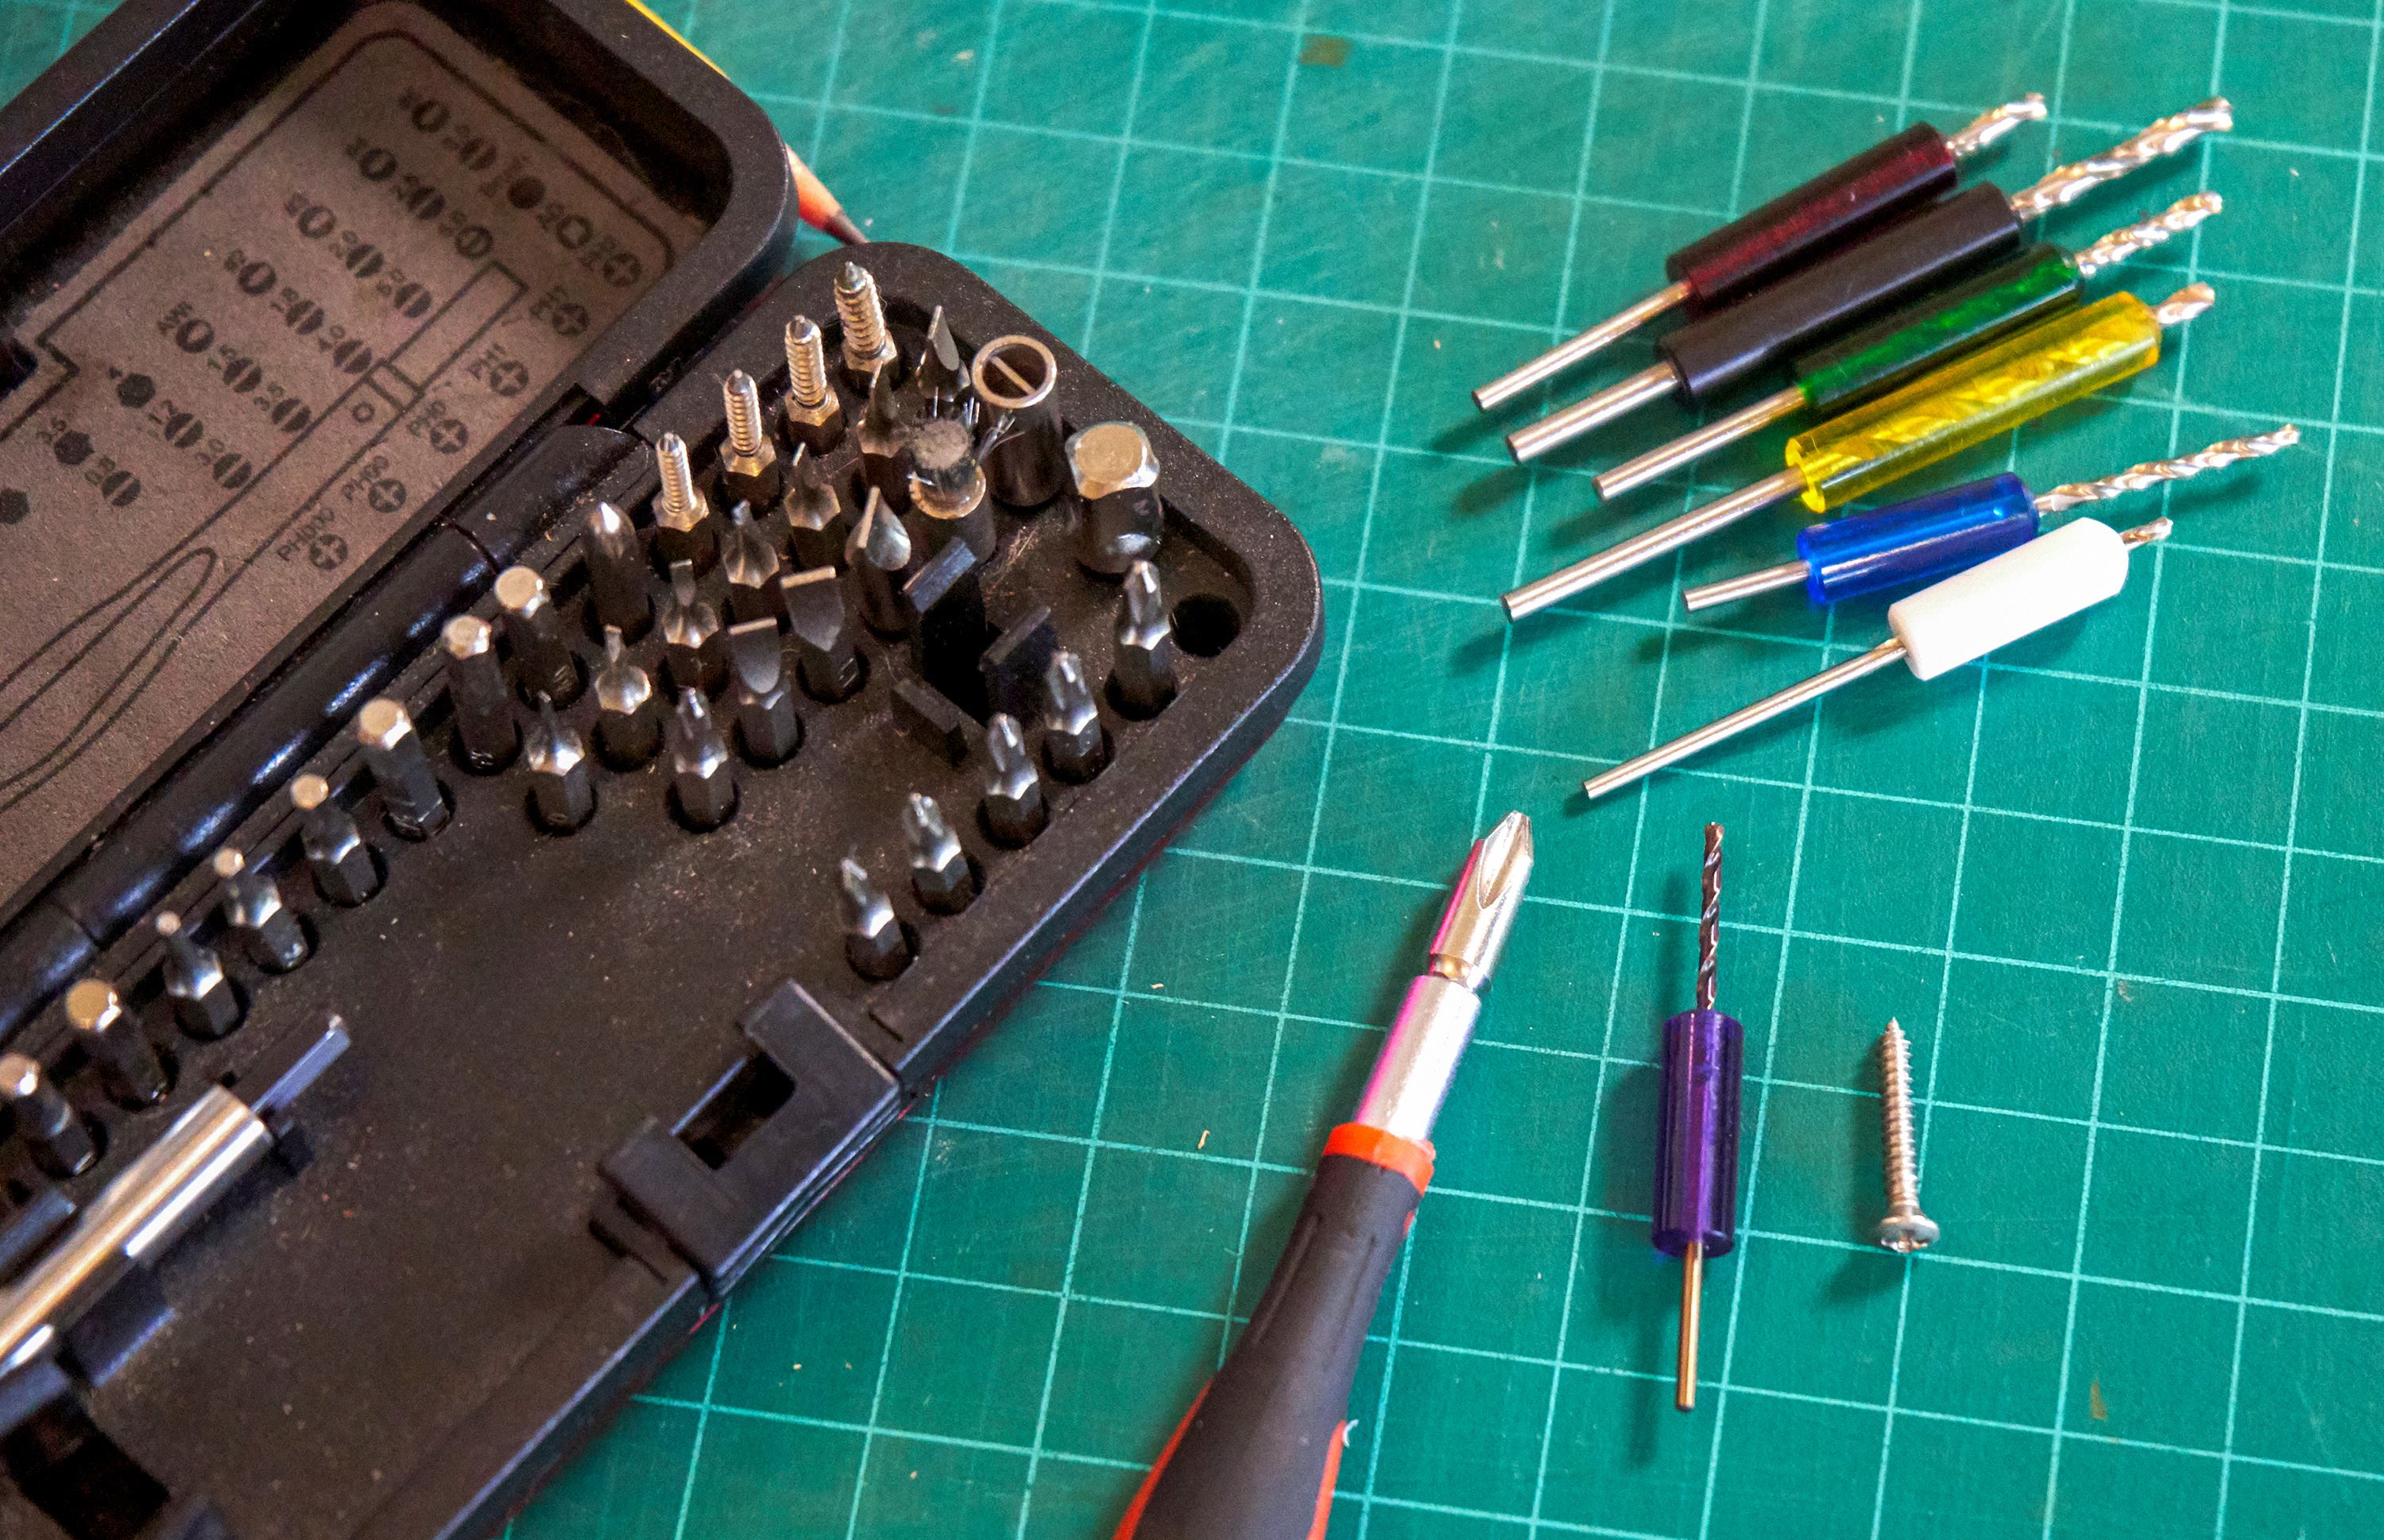
With your parts checklist complete, you'll want to take stock of a few key tools and supplies. When you use a finished body and neck (as shown in this guide) you only need a few tools to build your guitar.

Essential Tools and Supplies
- Screwdrivers, including Phillips #1 and #2, small flat heads
- Drill bit set (1/16" and 5/64" if building with a Fender body and neck as most of the big stuff is pre-drilled)
- 6" rule
- Metal straightedge
- Soldering iron and 60/40 solder
- Wire stripper
- Gauged Nut Slotting File Set that matches your favorite string gauges (light, medium, or heavy)
- Truss rod wrench to fit chosen neck
- Quality guitar tuner (or tuner app)
- Box end wrenches, small crescent wrench
- Wax for screws (beeswax or paraffin)
- Protective tape
Once you've got it built, these setup tools will really help you dial in the perfect set up and fine tune all the little details:
Nice-to-Have Tools and Supplies
- String Action Gauge
- 3M Flexible Polishing Papers or Micro Mesh Abrasives for nut and fret polishing
- Digital caliper
- Fret Rocker
- Fret crowning file (to match narrow, medium, or wide fret wire)
- Notched straightedge
- Radius block or Leveling Beam
- String Ferrule Installation Tool (for T-style build)
- Tuner Bushing Press
- Peghole reamer
- Tele Jack Installation Tool
- Understring Radius Gauges
- Guitar Tech Wrench Set or Nutdrivers for threaded tuners and jack installation
- No-Chip Tuner Hole Countersink
- Nut and Saddle Vise
- ColorTone Fretboard Finishing Oil or ColorTone Lemon Oil
- Thick super glue
Check the Neck Fit
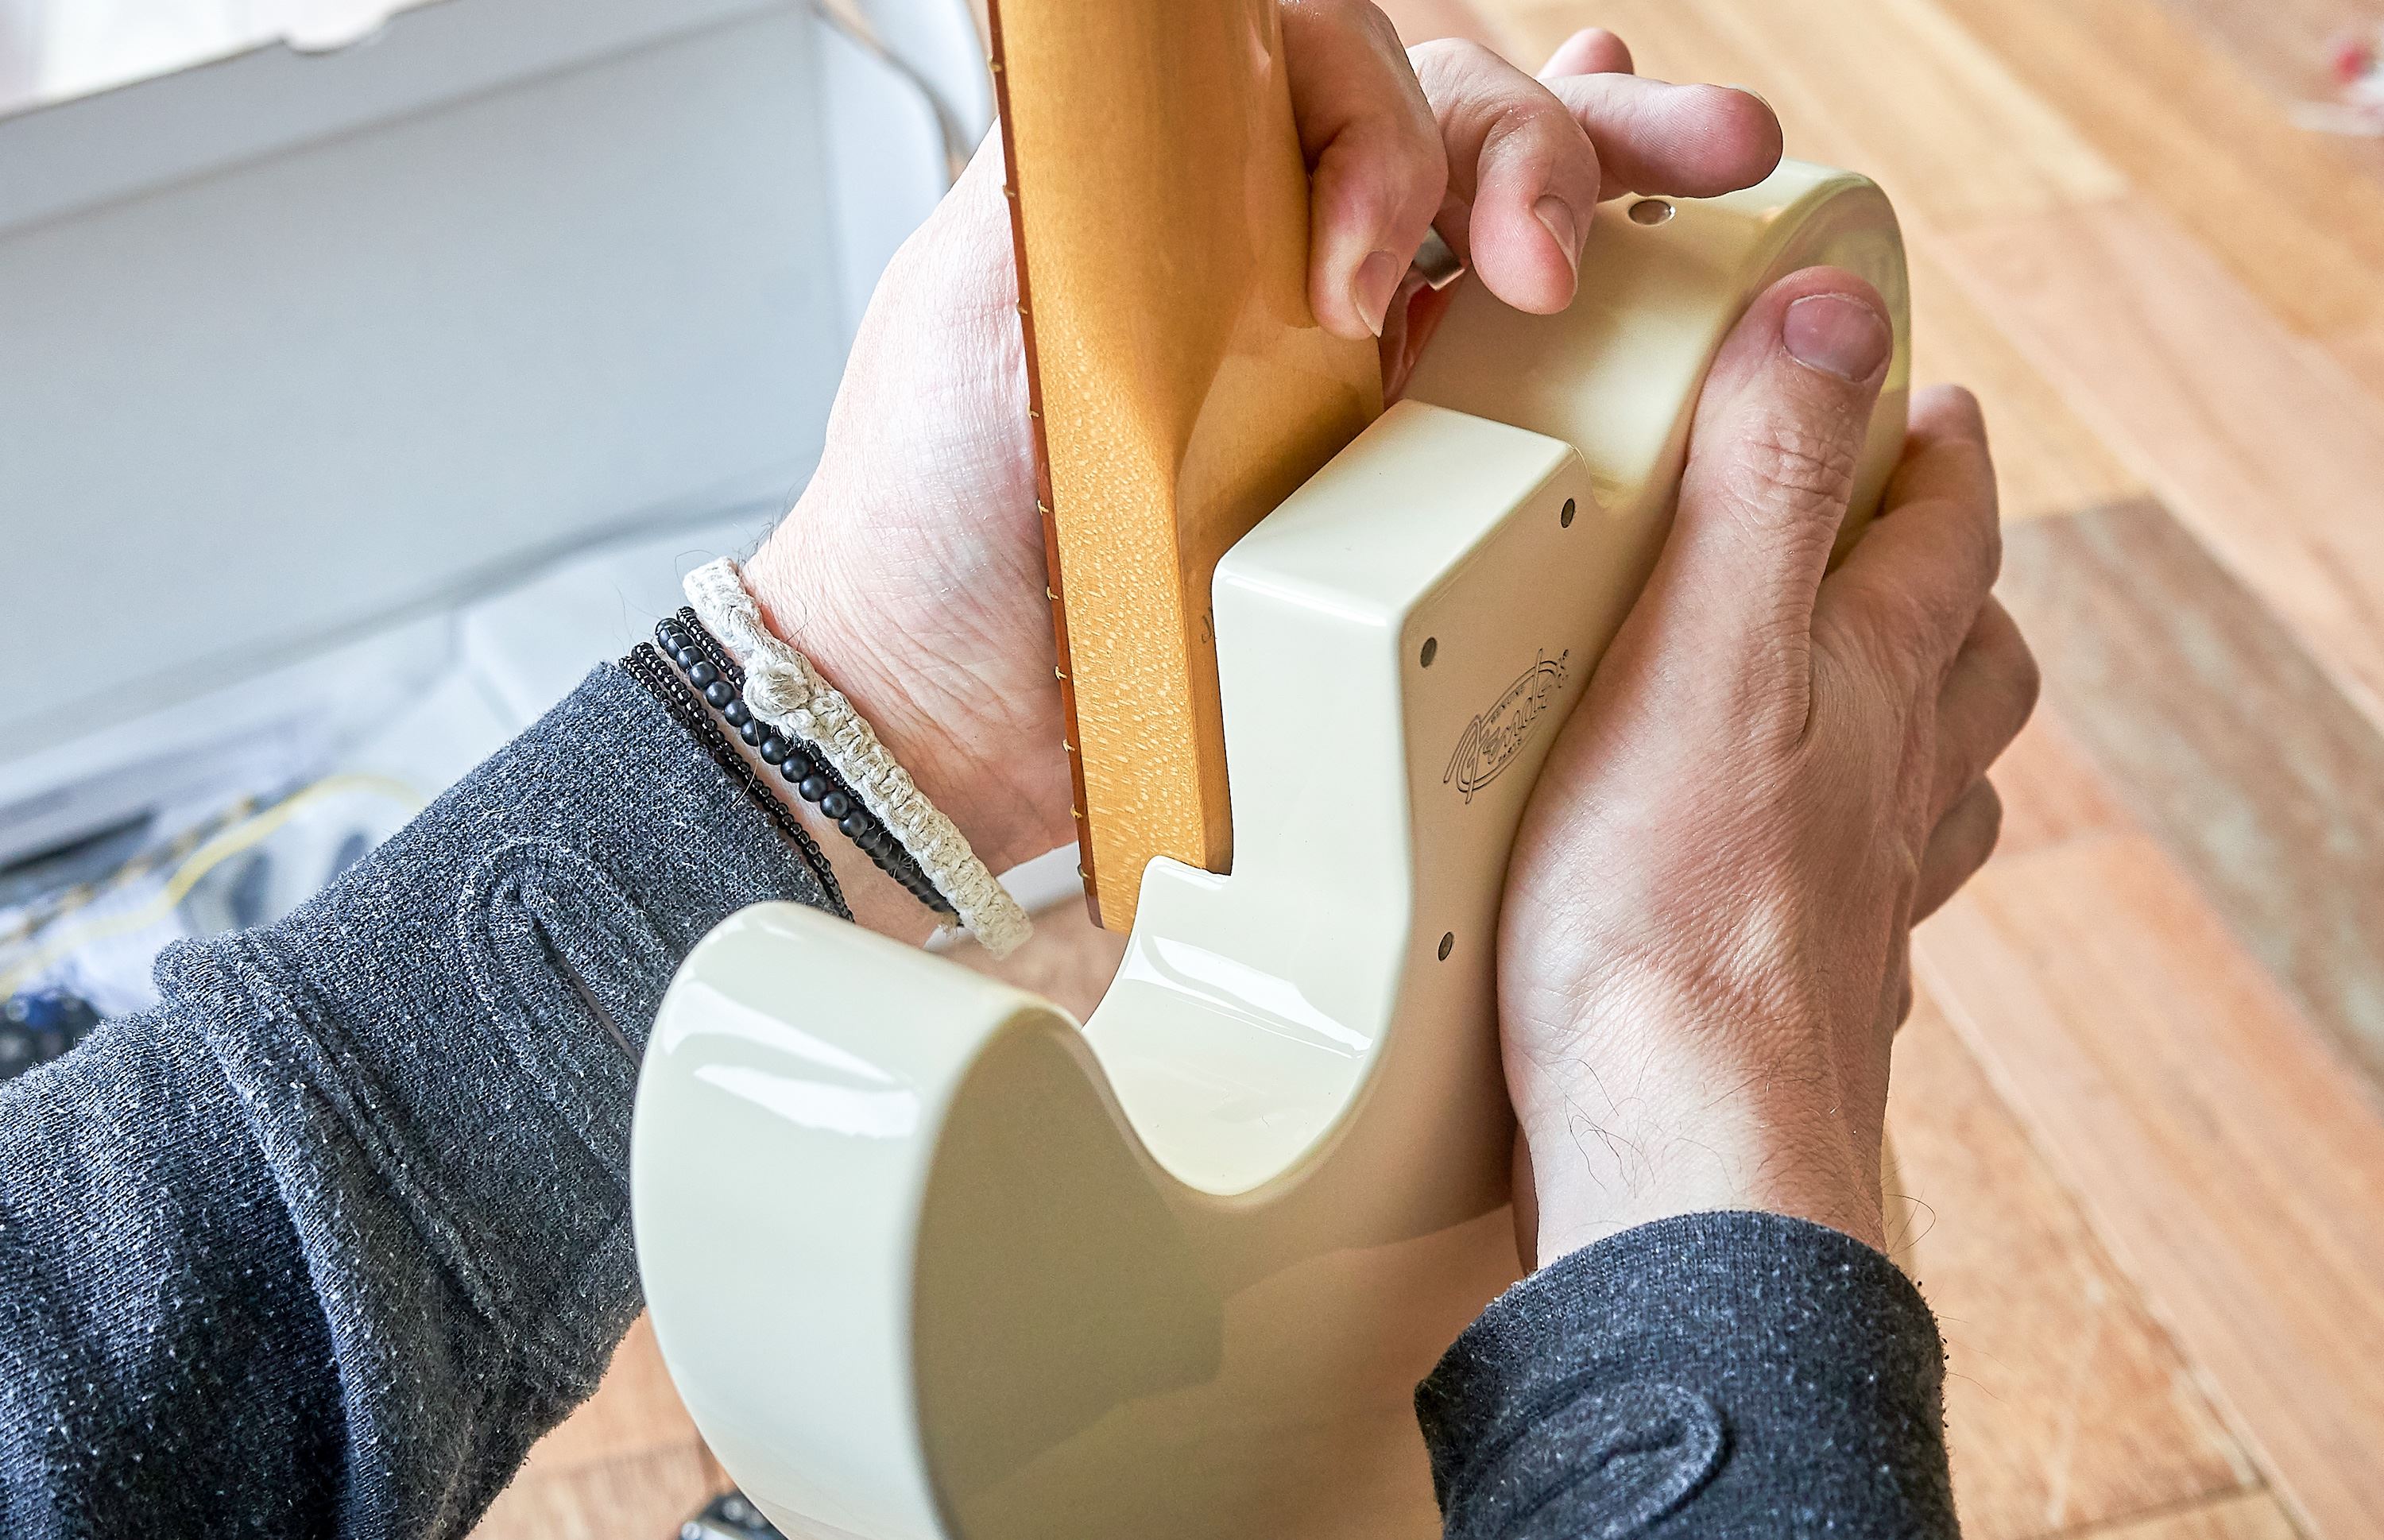
Before you install any hardware or drill any holes, check your neck fit. Tele/Strat necks and neck pockets are tapered and get wider toward the bridge, so you'll want to install a bolt-on neck by inserting it down into the body from the face of the guitar, rather than sliding it in along the axis of the strings. Never force a neck into place. We are looking for a snug fit, but any extra force could cause cracks in your finish around the neck during installation, or later when the wood shrinks/swells with temperature or humidity changes. If you have finished the neck or body yourself, some light clean-up of overspray in the neck pocket may be needed—just scrape with a sharp razor blade to clean up the pocket. It would be better to discover any neck fit issues now, before you've installed anything. The beauty of the modular system Leo Fender pioneered is that most builders and suppliers have followed his lead, and Fender-style necks and bodies usually fit well, with only some requiring a minor sanding or scraping. The new Fender Classics bodies and necks fit each other beautifully.
Finished bodies and necks from Fender
Choose from beautifully finished Stratocaster and Telecaster bodies
and necks in multiple colors.
However, keep in mind that the heel of Strats and Teles are different. A T-style neck will fit a S-style body, but the rounded end of an S-style neck usually won't fit the rectangular neck pocket on a T-style body.

Remember: S-style necks with curved heels won't fit into T-style bodies with flat heels!
There are two ways to check the neck alignment (or yaw) with the body. One method is to lay a straightedge down on either side of the neck. When doing this, lay some protective tape across the bridge area of the guitar, and draw a mark where the straightedge projects down either side of the neck, and check for alignment with the high and low E string holes in the body, or create a centerline mark and check for proper alignment.
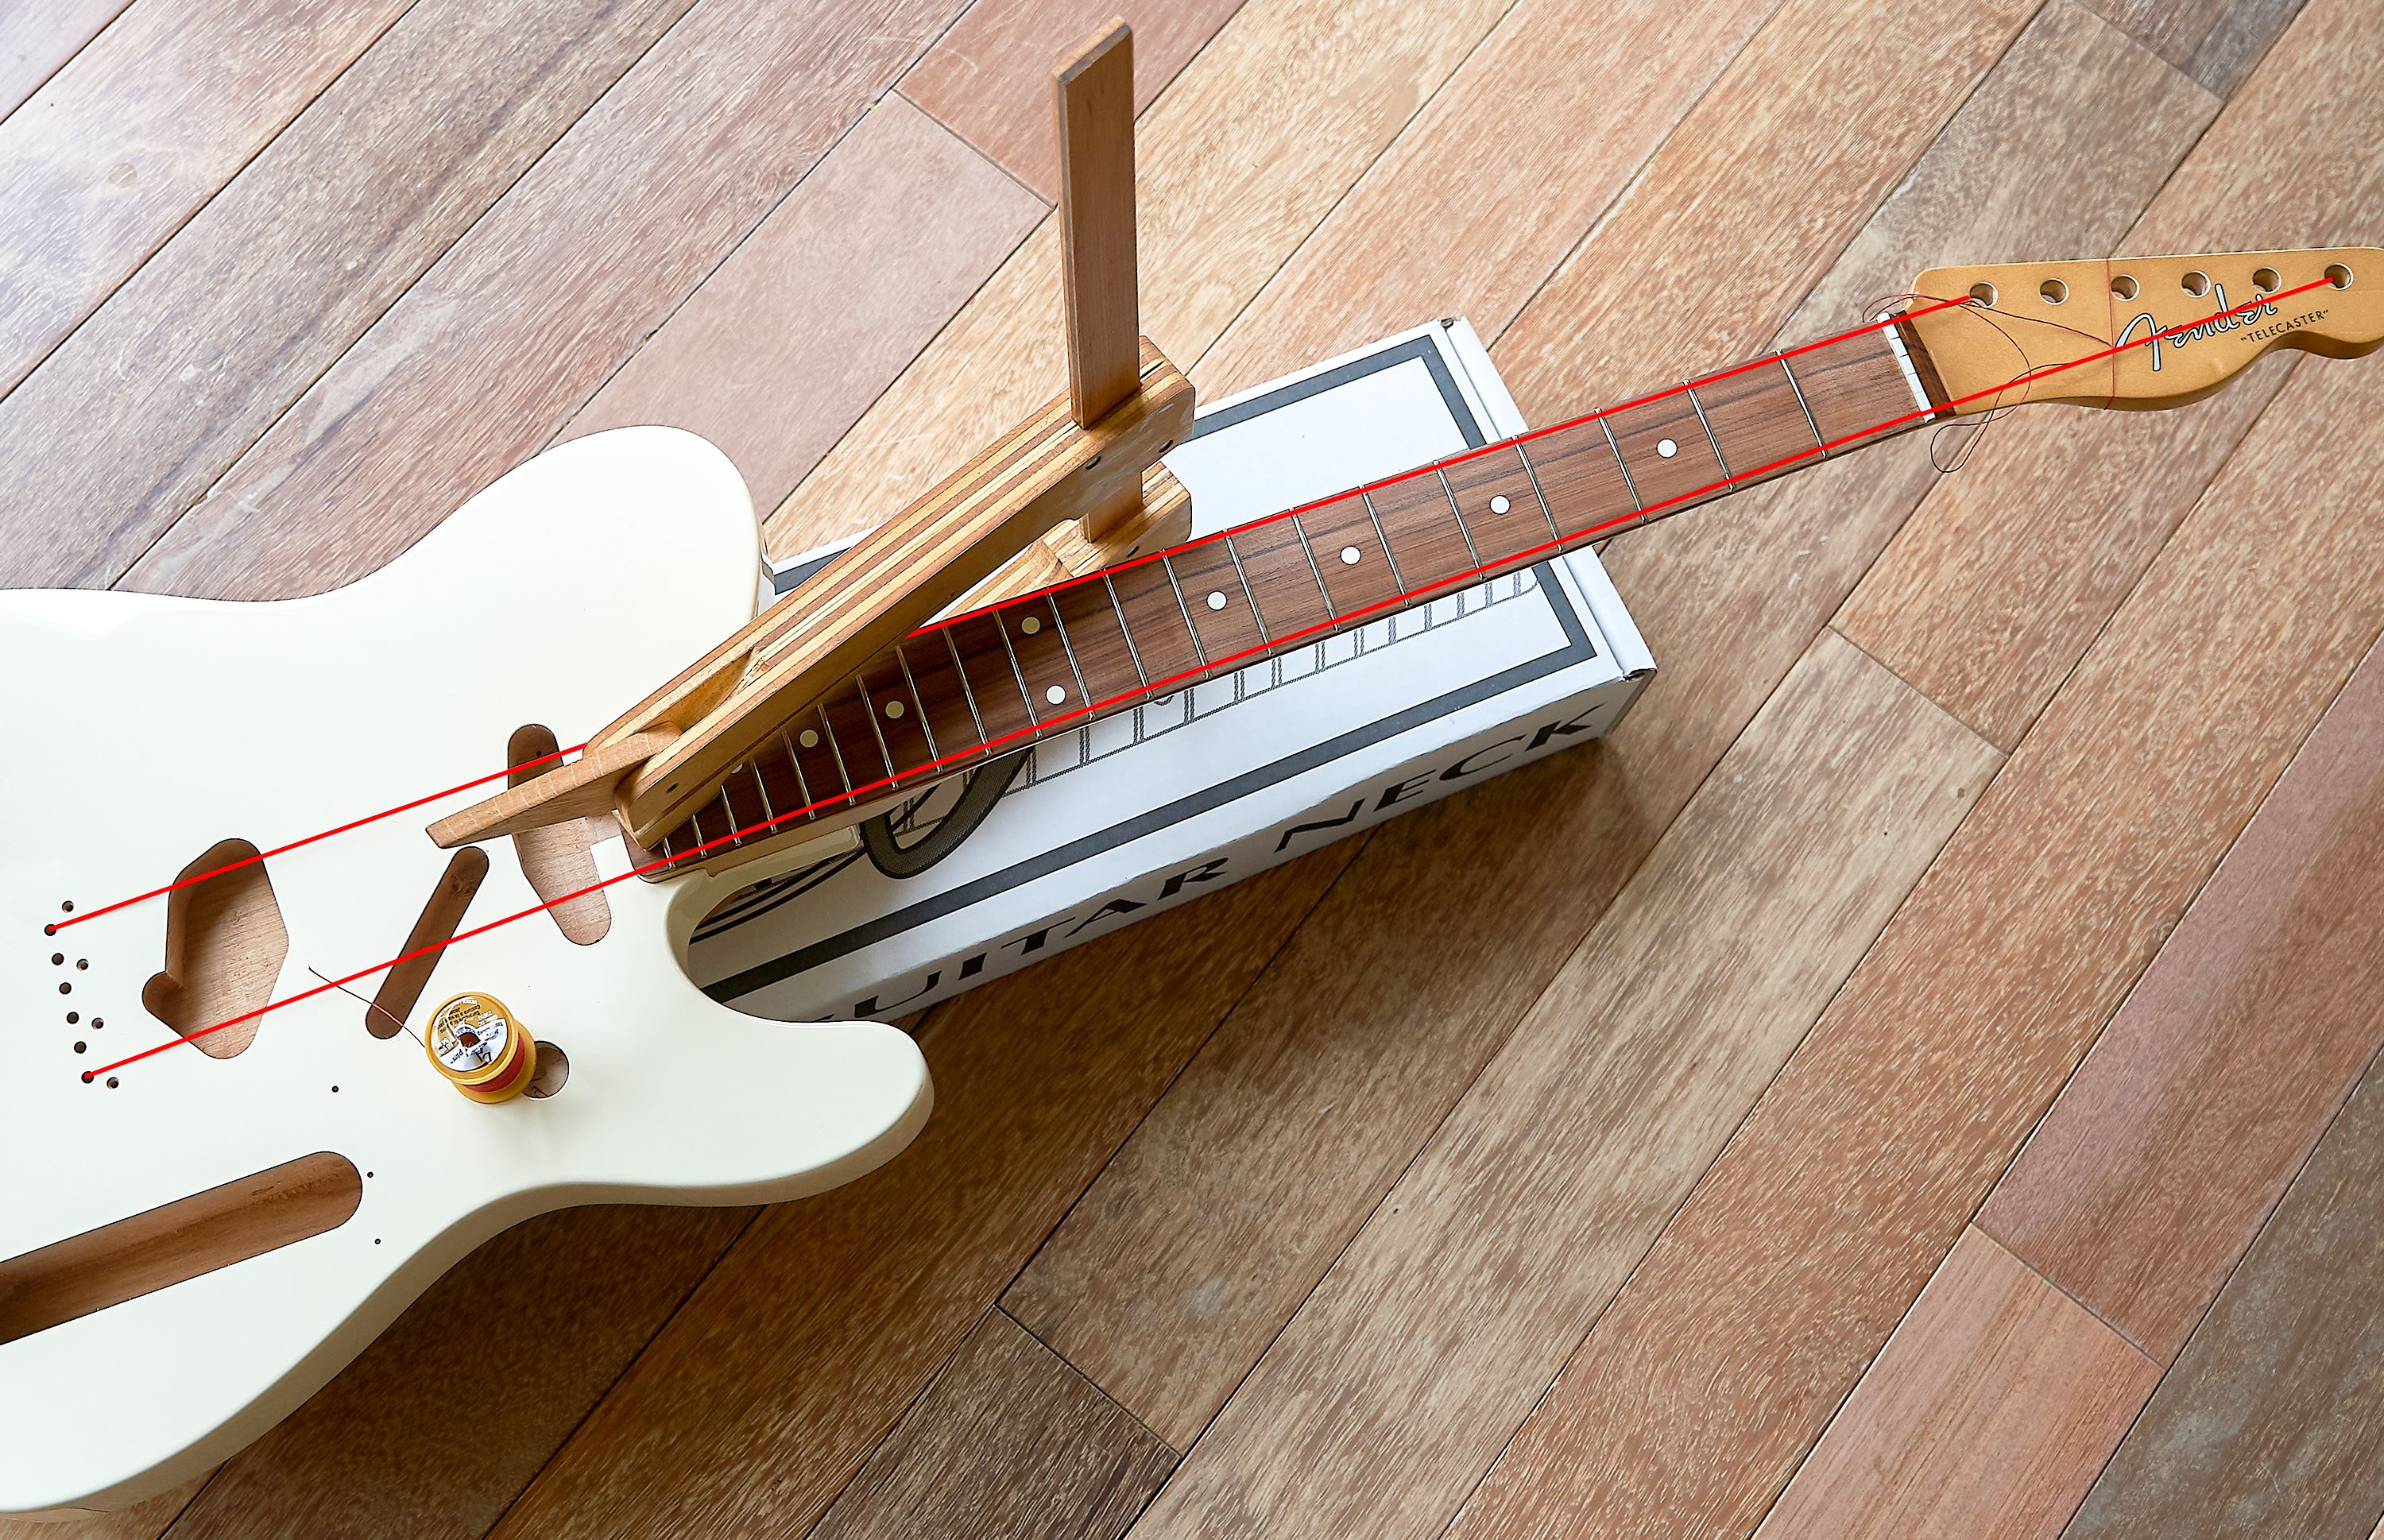
Another method is to string brightly colored thread or fine yarn through the high and low E holes in the body, and up through the high and low E string holes in the head stock. This roughly simulates the outer two strings and allows you to sight the yaw alignment of the neck. It's not uncommon for there to be a little play in the neck pocket allowing for small adjustments, so you just need to see that things align closely for now.
Next, plan your pilot holes. Some necks and bodies are pre-drilled, but some will require you to drill for neck attachment screws, tuner screws, pickguards, hardware, and more. Take a look at your body and neck and determine what holes you will need to drill. Almost everyone I know who works on instruments has a story where one time they were certain they could eyeball the depth of a hole they were drilling, only to have it end up with the bit drill coming through the back of the body or the front of the headstock. Don't be that builder—use a depth-stop. Bits with depth-stop collars are the best way to go because they ensure you hit the mark. If you don't have any, a common trick is to mark your desired depth on your bit with a piece of masking tape.
Before you drill, make sure to use the right size bit for the job. The hole needs to be only slightly smaller than the screw when mounting tuners, pickups, or pickguards. None of these really pull hard on the mounting screws, and a hole that's too small could cause problems like stripped screws, or worse, broken screws or headstock cracks—these really do happen! Measure the outside diameter of your screw (on the sharp points of the threads) with a caliper and size down about 0.020" or a little more for the pilot hole for hardwoods like maple, ash, and alder. Size down a little smaller in soft wood like mahogany. StewMac Depth-stop Drill Bits are wonderful, but you can use any set of small woodworking drill bits for your build. It never hurts to test your bit and screw combination on a piece of scrap wood before drilling a new neck or body.
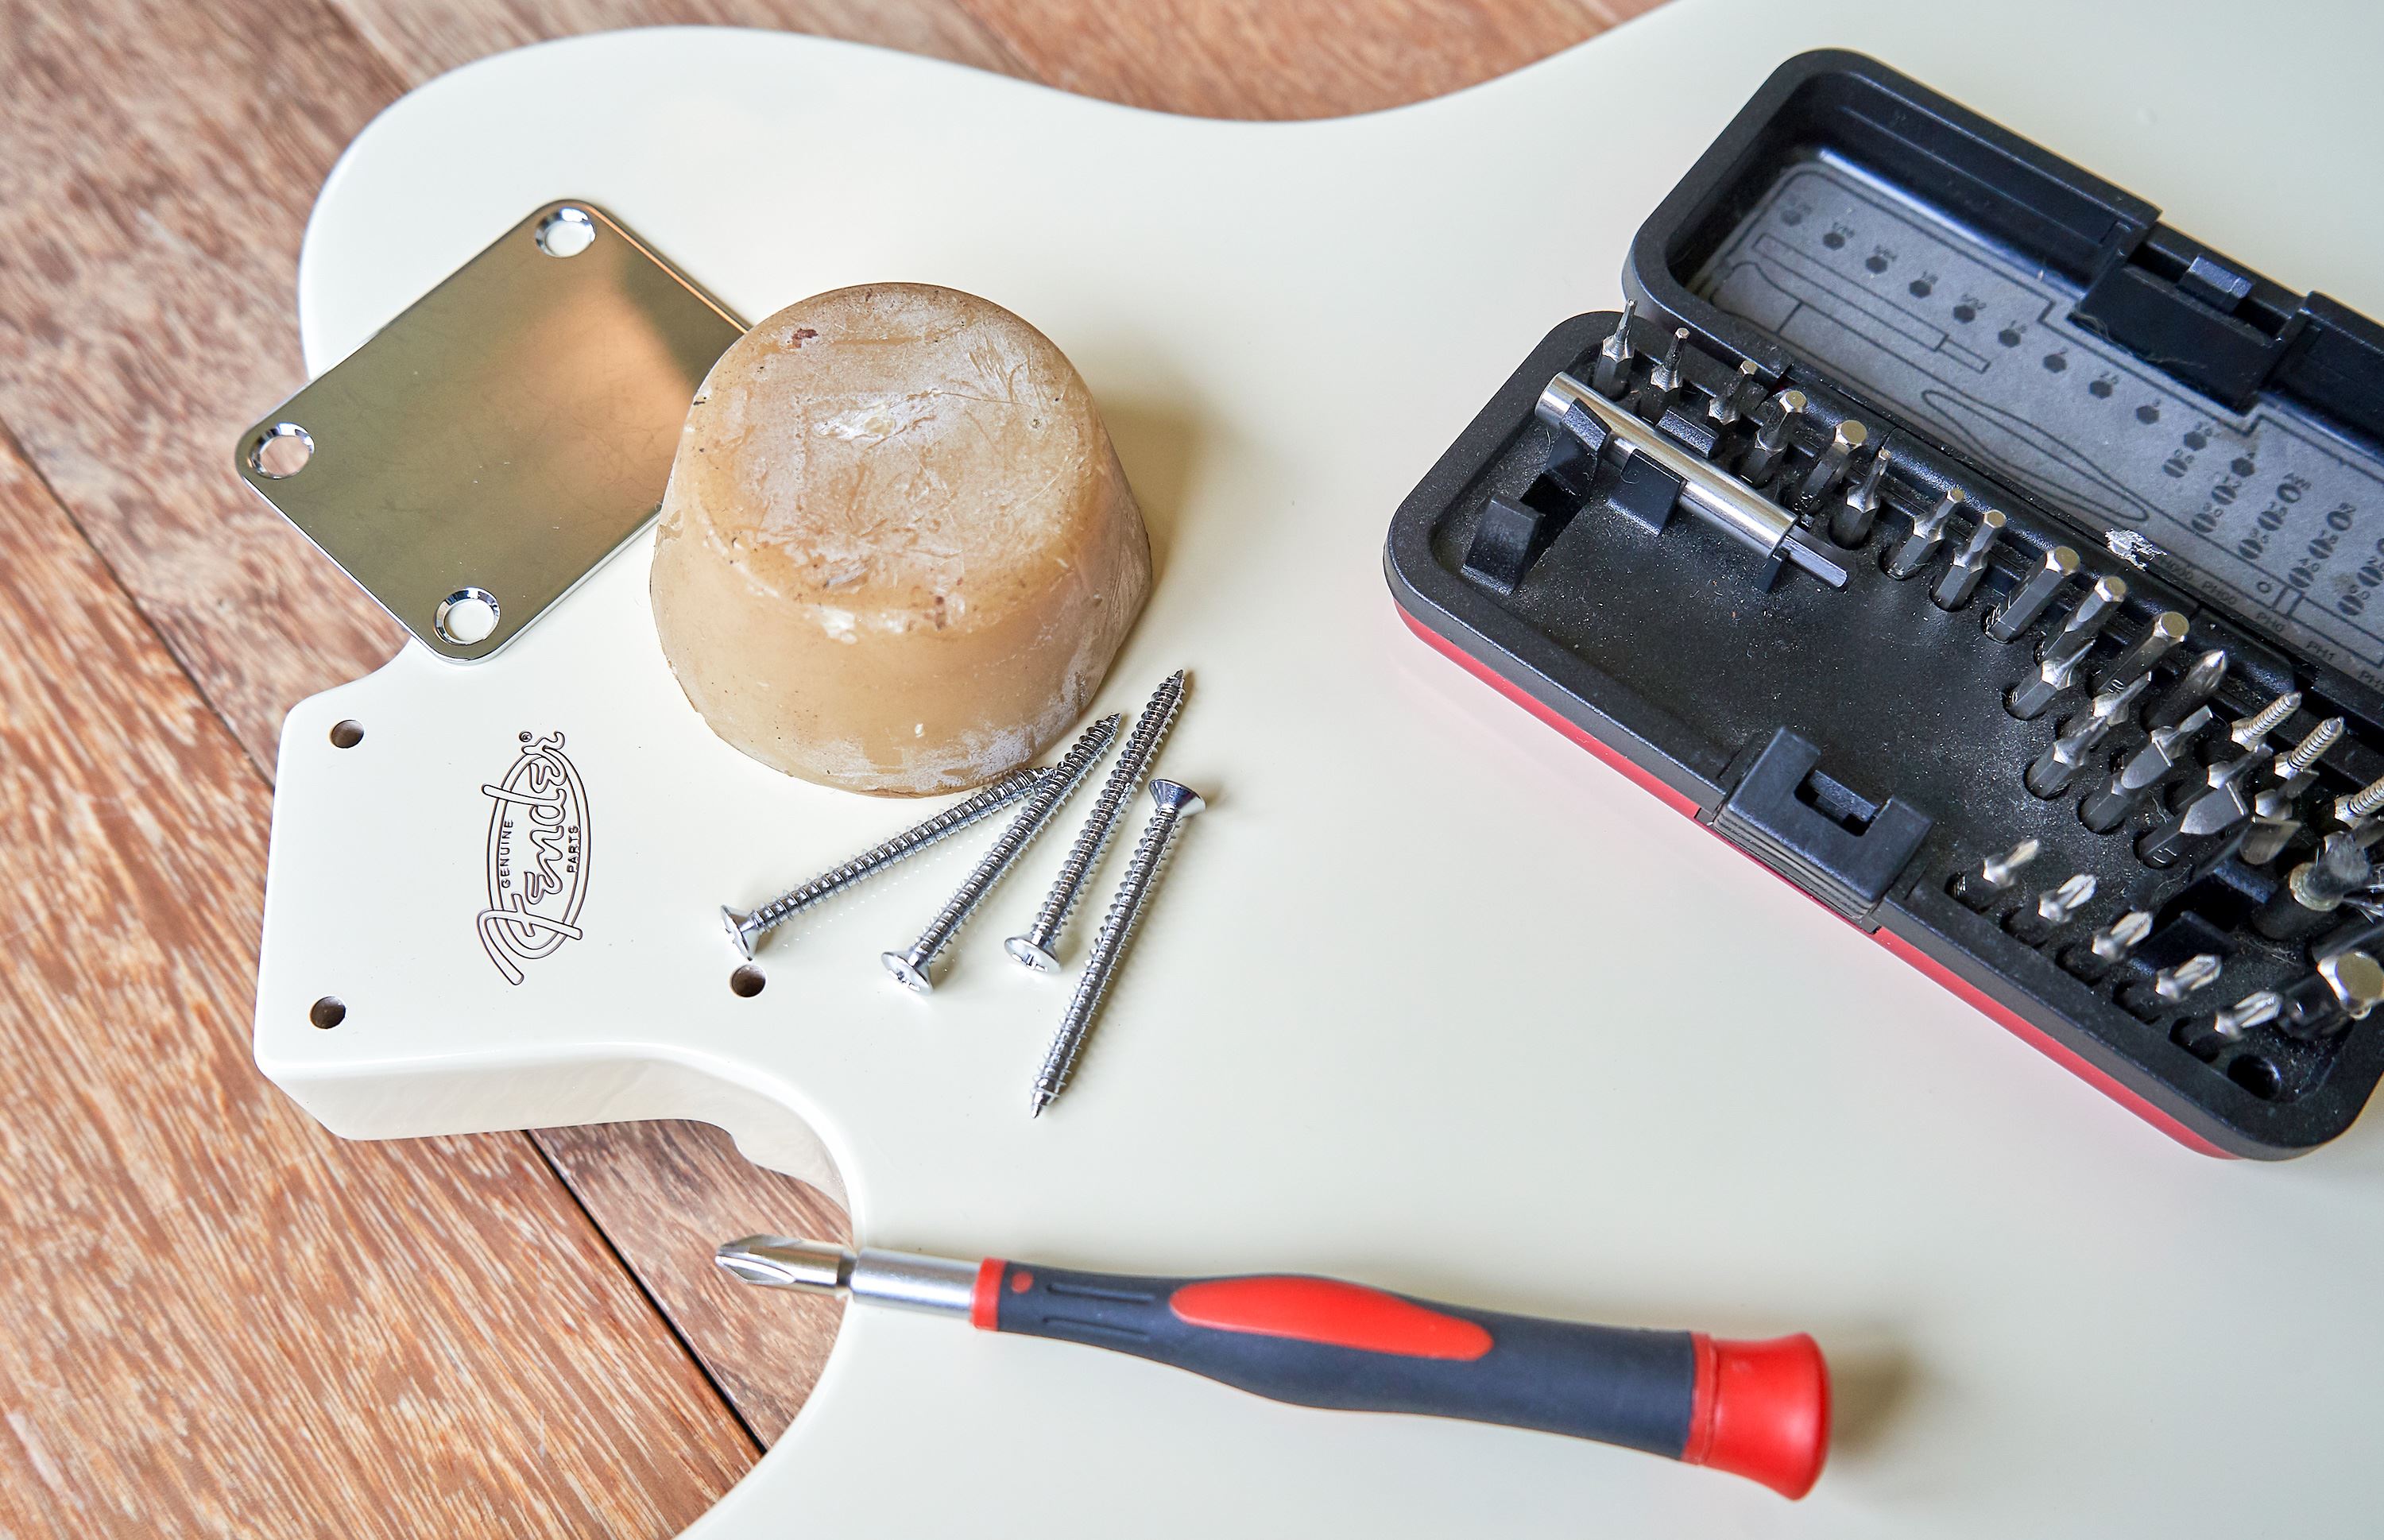
Next, wax your screws. Many of the screws on a guitar are small and get drilled into wood that’s pretty hard, which can be rough on them. The right-sized pilot hole is key, plus a little beeswax or paraffin wax on the threads of each new screw can make assembly go much smoother. Adding wax also helps reduce the risk of stripping heads or breaking threads. This is important because over the course of assembly, it's likely that many screws will be going in and back out at least a few times. When you first install a screw, turn it gently counter-clockwise (lefty-loosey) a few times to make sure the hole is nicely threaded and waxed. In addition, you'll want your screws to be snug, but not overtightened. Overtightening is what causes the heads of the screws to break.
Basic Assembly Outline:
Remember to check the neck fit before anything else
- Check truss rod nut—make sure it turns smoothly
Install the Tuners (don't install string tree yet)
- Install the bushings
- Install the tuning machines
- Mark and drill the mounting screws
Install the Hardware
- Press in string ferrules (for T-style build)
- Install strap buttons
- Install the bridge
- Mount the neck
Install the Bridge
- Assemble saddles before mounting the bridge
- Install trem hook and trem block (for S-style build)
- Install bridge pickup in the bridge assembly (for T-style build); don't forget the ground wire!
- Roughly set your intonation
Wire the Pickups
- Install the pre-wired pickguard
- Finalize your wiring
- Install output jack plate or cup
Set the Intonation
String Up for the First Time
Add the Finishing Touches
- String up your guitar
- Setup
- Adjust pickup height
Install the Tuners
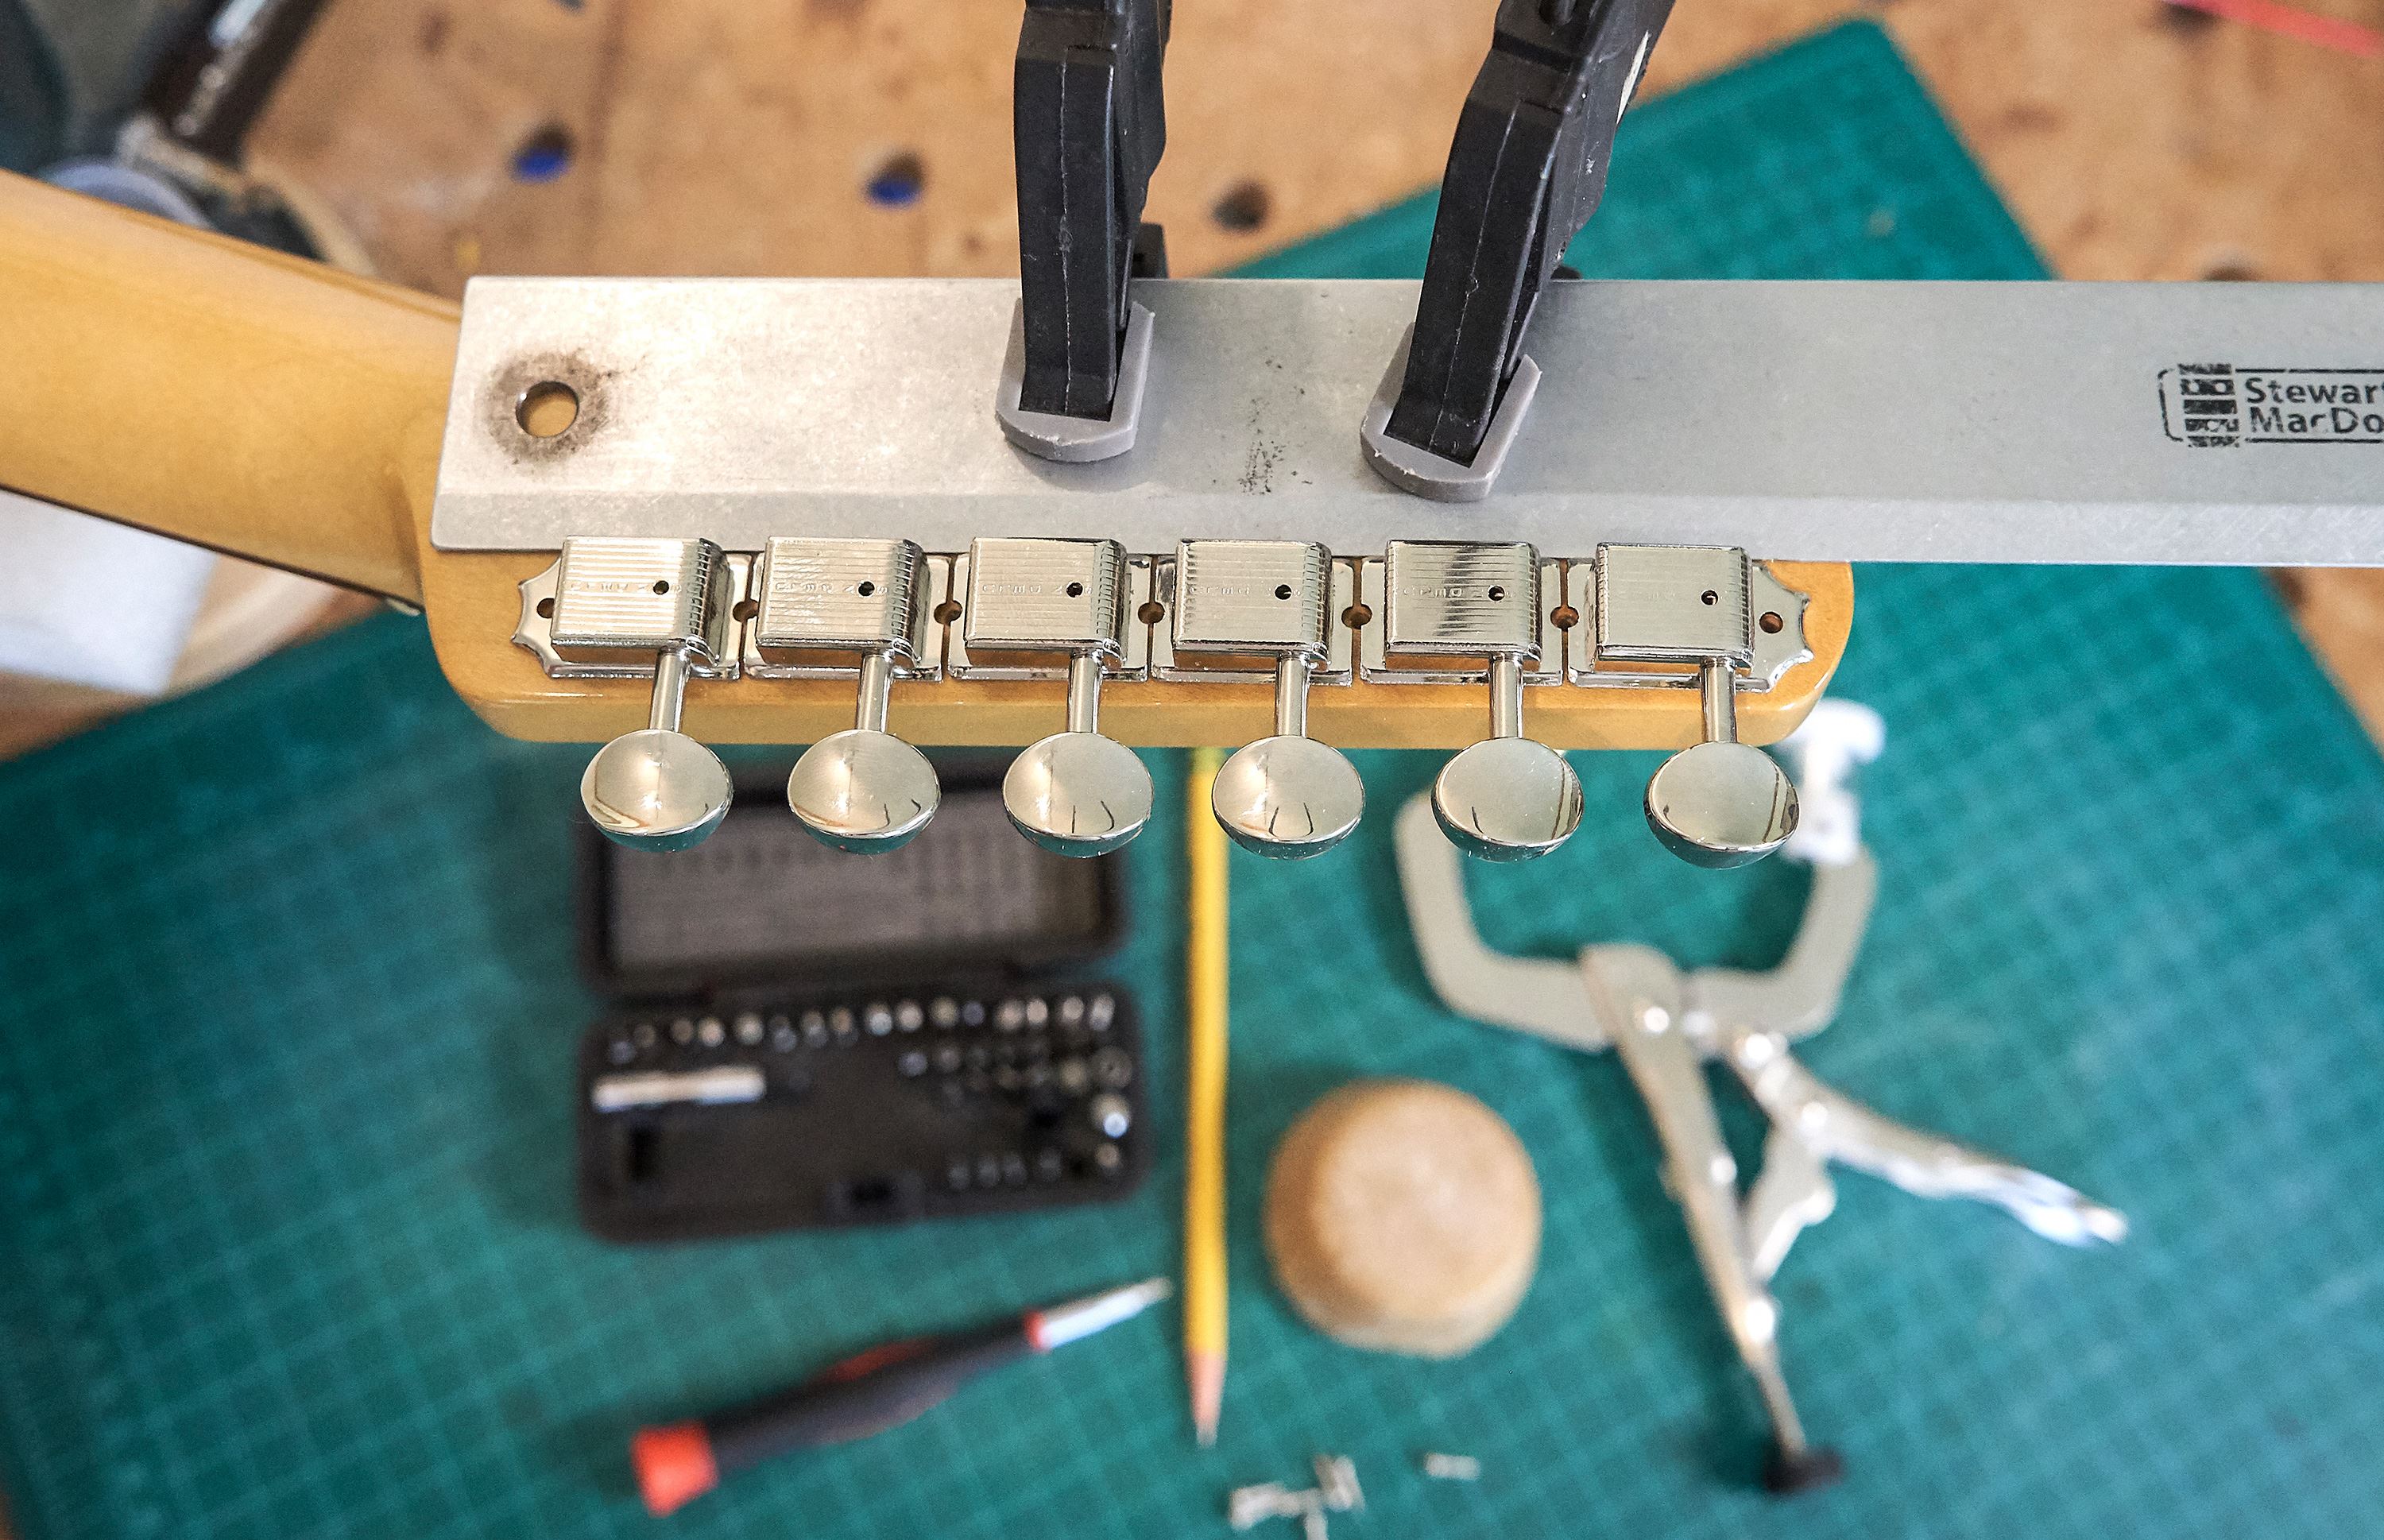
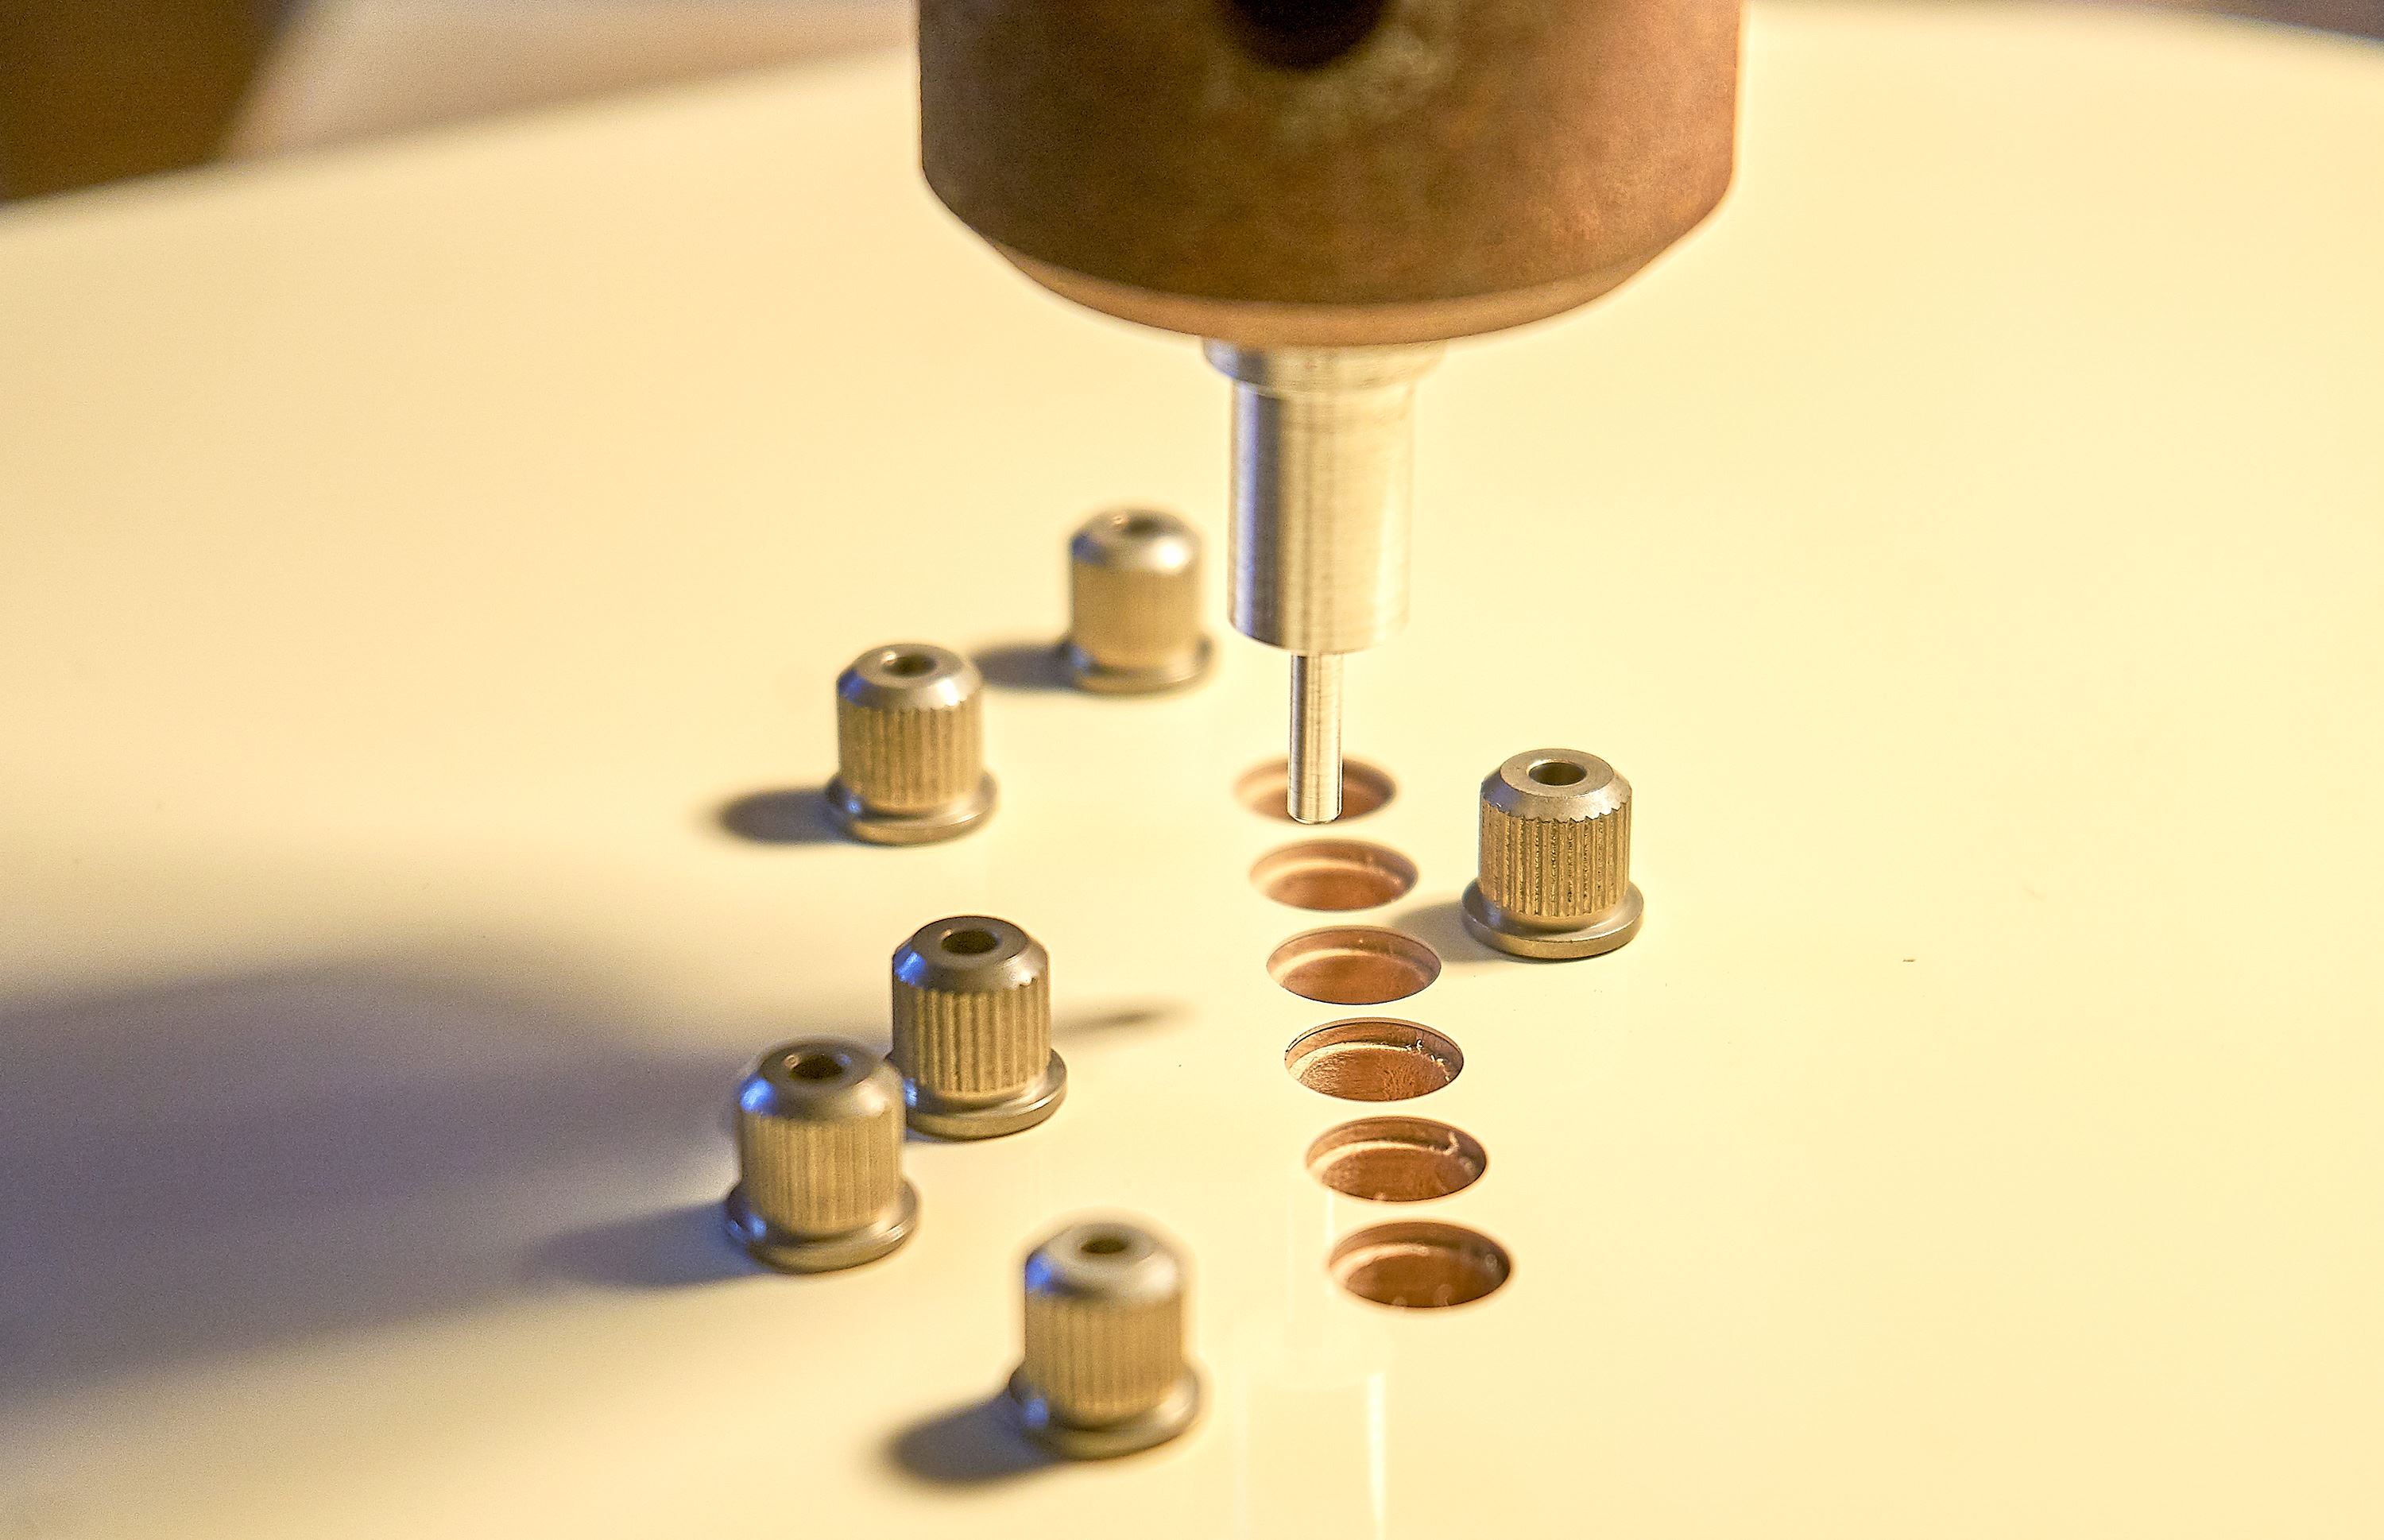
For tuners, make sure you know the peghole size you need, if the holes in the headstock are pre-drilled, and how they line up against your chosen tuners. As a general trend, vintage-style tuner bushings are sized for 11/32" (8.5mm) diameter pegholes, and modern-style tuners are sized for 10mm or 10.5mm pegholes. There are exceptions, but you are usually looking at one of those sizes. The nice thing is that 8.5mm holes can be reamed out to 10mm with a tapered reamer that is 9.98mm for a really nice fit. If your pegholes are oversized for the tuners you'd like to use, conversion bushings make it easy to size down to 8.5mm.
Find the perfect tuners for your project
Hundreds of models to choose from:
Fender | Waverly | Gotoh | Grover | Schaller | And more
Once you test-fit the neck in the body, you're ready to commit. If you have threaded tuner bushings, installation is especially easy. Insert the machines from the back of the headstock, and begin threading each bushing on from the front. Your 6" rule or straightedge can be gently clamped along the back of the headstock to help align all six tuners as you very gently tighten the bushings. Do not overtighten the bushings, as that can dent the peghead face—just snug is perfect.
For press-in bushings you have a couple of approaches. Whichever method you use to press them in, it's a good idea to measure the peg holes and bushings one last time to be sure they are not going to fit too tightly. If your bushings are just a hair loose, there is no shame in using a little thick super glue, wiped around the inside of the peghole, to tighten things up a few more thousandths. Don't glue the bushing in! Just use the super glue to size-down the hole—let it dry fully before inserting bushings. Press in the bushings next.
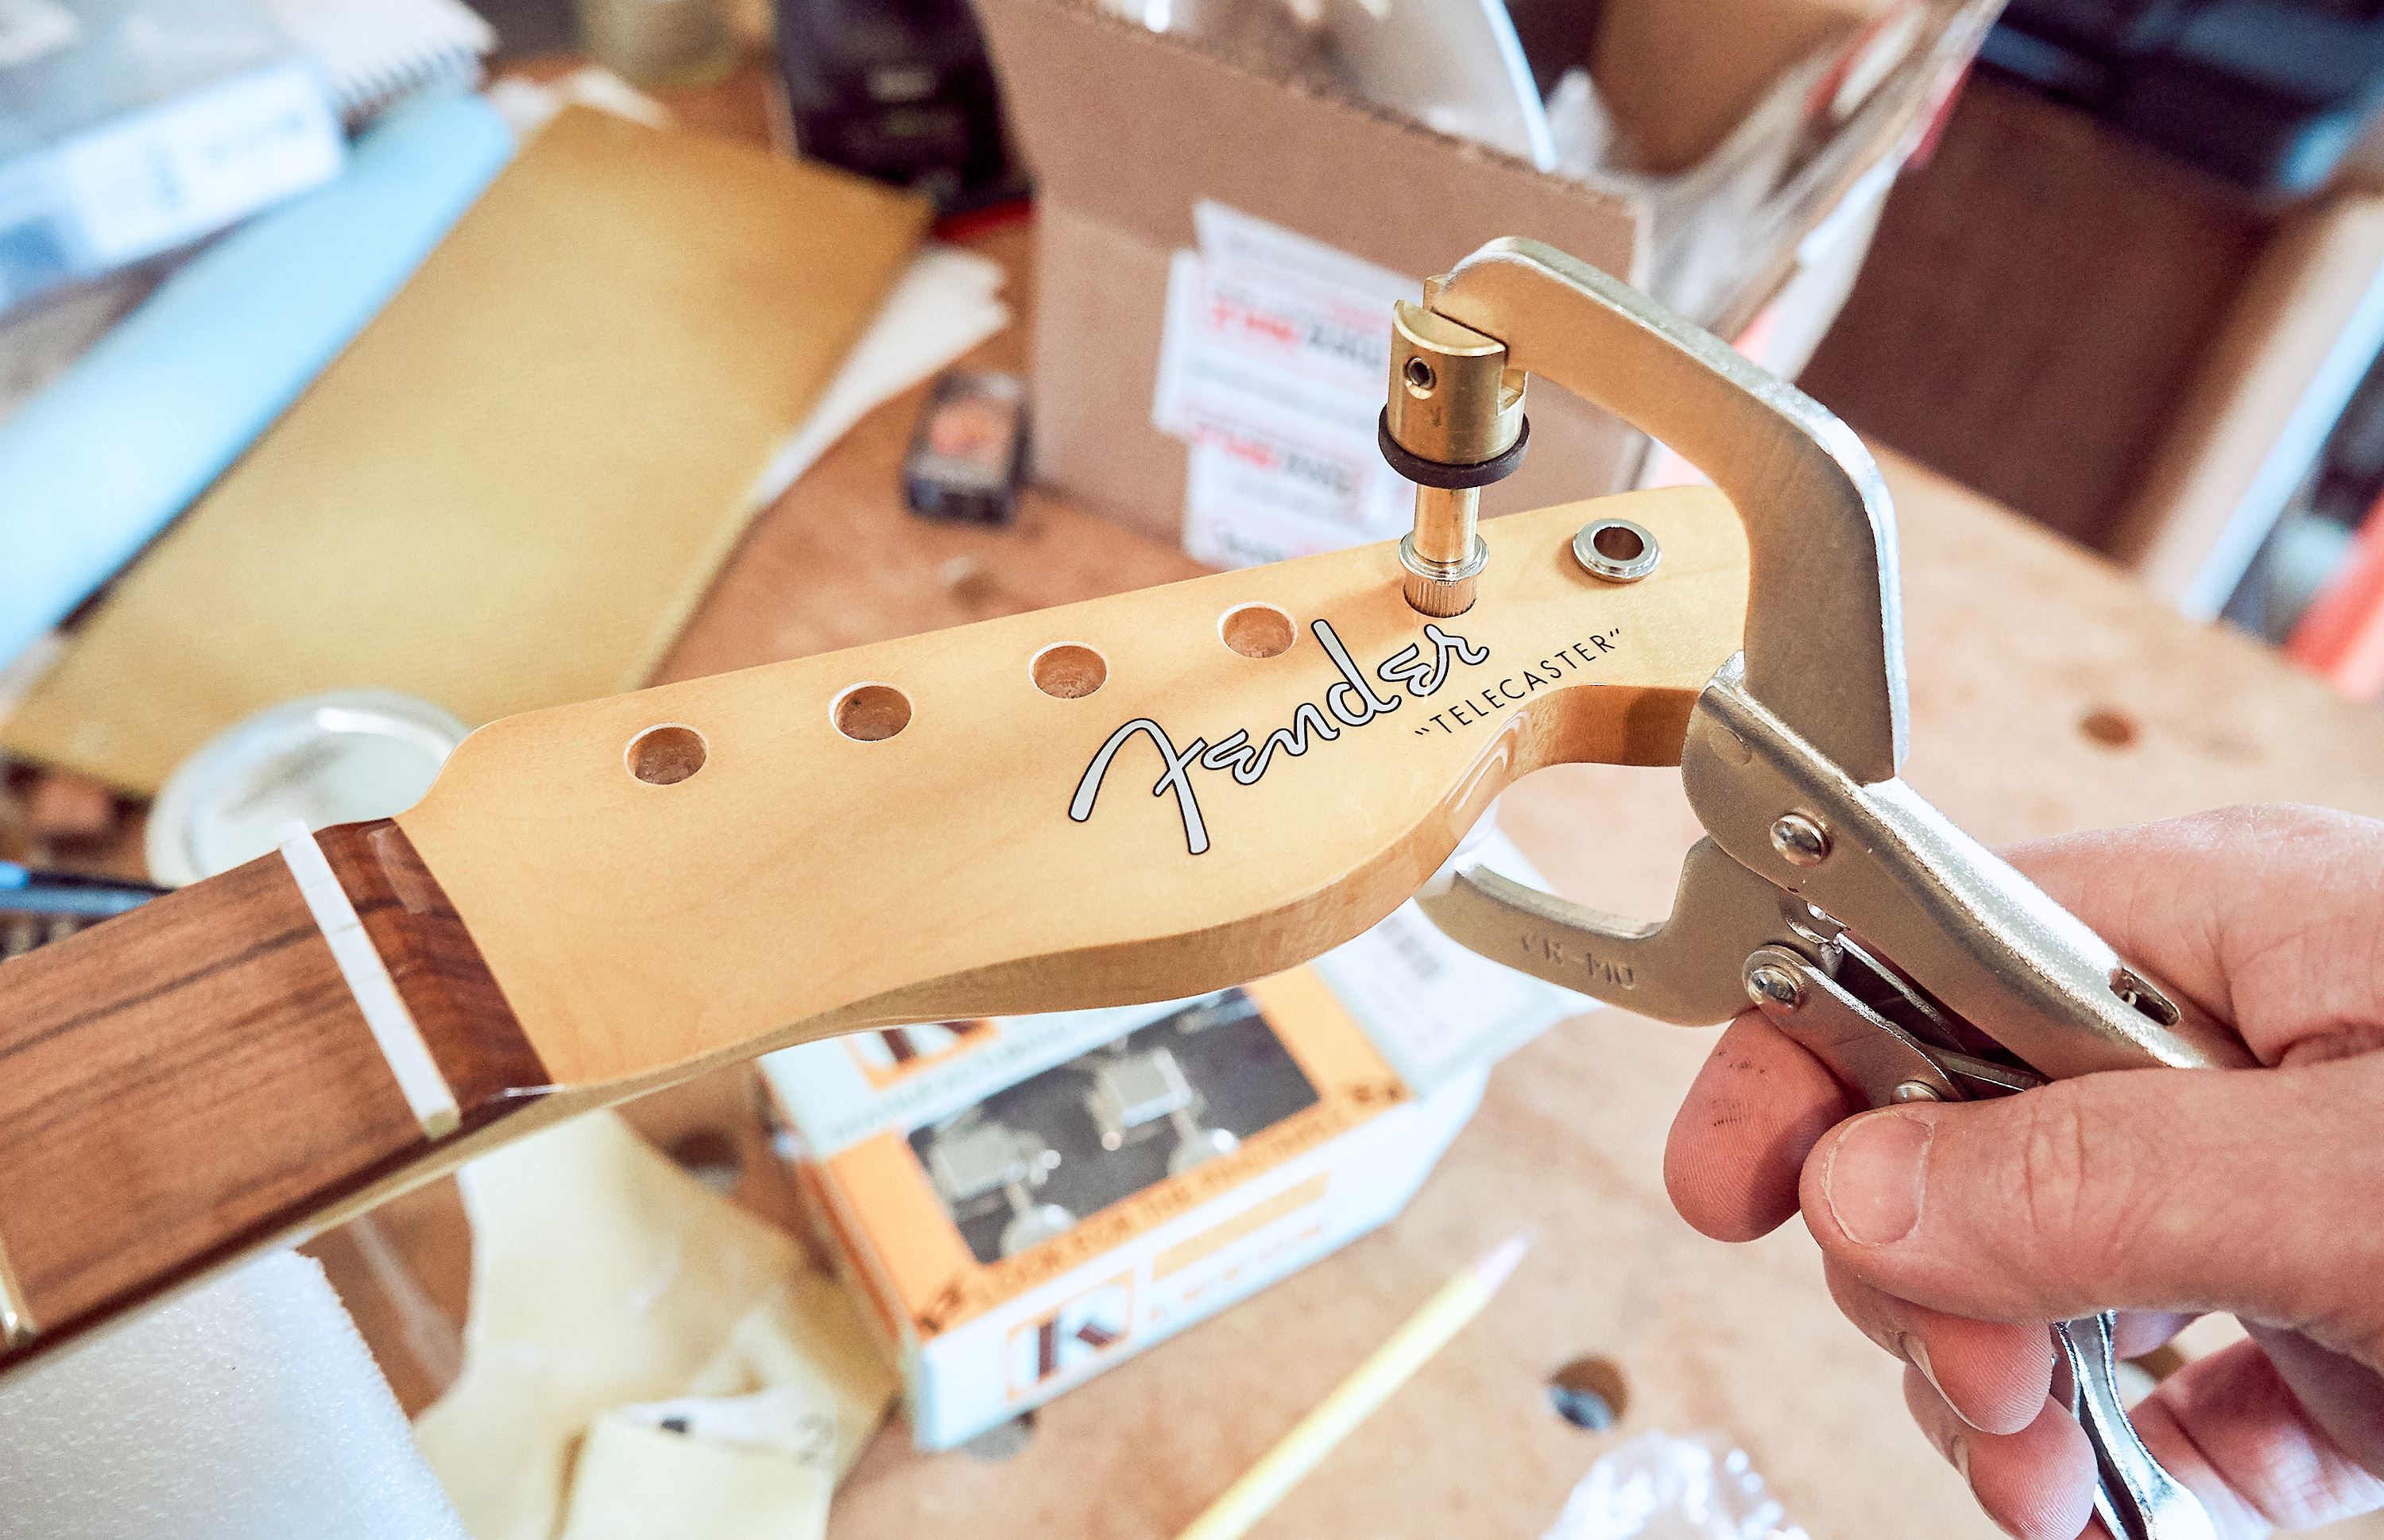
A Tuner Bushing Press makes quick work of it—gently and squarely driving the bushings in. If you don't have one, another option for pressing tuner bushings into place is a small vise like a Nut and Saddle Vise with smooth jaws. Put a little low-tack masking tape on the back side of the peghead to help protect it from the jaws. Just like the threaded bushings, you only want to press them in until the collar of the bushing touches the front of the peghead—don't overdo it.
Wait until later to install the string tree. It's tempting to do it now, but it's best to wait until the bridge, neck, and body are all together to ensure alignment to the strings.
Using tuners that won't quite fit? Conversion bushing can solve this quickly with no reaming or plugging the holes:
To convert from 10.5mm holes to 1/4" tuner shafts (vintage style) use
10.5mm Round Conversion Bushings.
To convert from 10mm holes to 1/4" tuner shafts (vintage style) use
3/8" Conversion Tuner Bushings.
If you're building with an old neck from another guitar, Erick Coleman demonstrates possible solutions for retrofitting tuners in the video below.
Upgrading Guitar Tuners: What You Need to Know
Will your new tuners be an easy fit or require more work?
Erick Coleman answers all your tuner installation questions in this video.
Installing Hardware
Now that the tuners are installed in the headstock, we can set the neck aside and move to the body. Installing string ferrules is easiest before any other hardware goes on the body, as the body will lay flat allowing for a square installation. A drill press with a String Ferrule Installation Tool works wonderfully—with the drill press set 90 degrees to the table, you can press the ferrules into place with a controlled pressure. Press them in until the lip just touches the body, too much pressure can crack the finish around the ferrules. Alternately, you can tap them in with a dowel and hammer. A short length of wooden dowel, fit down inside the ferrule, helps you keep them square to the body when tapping them in.
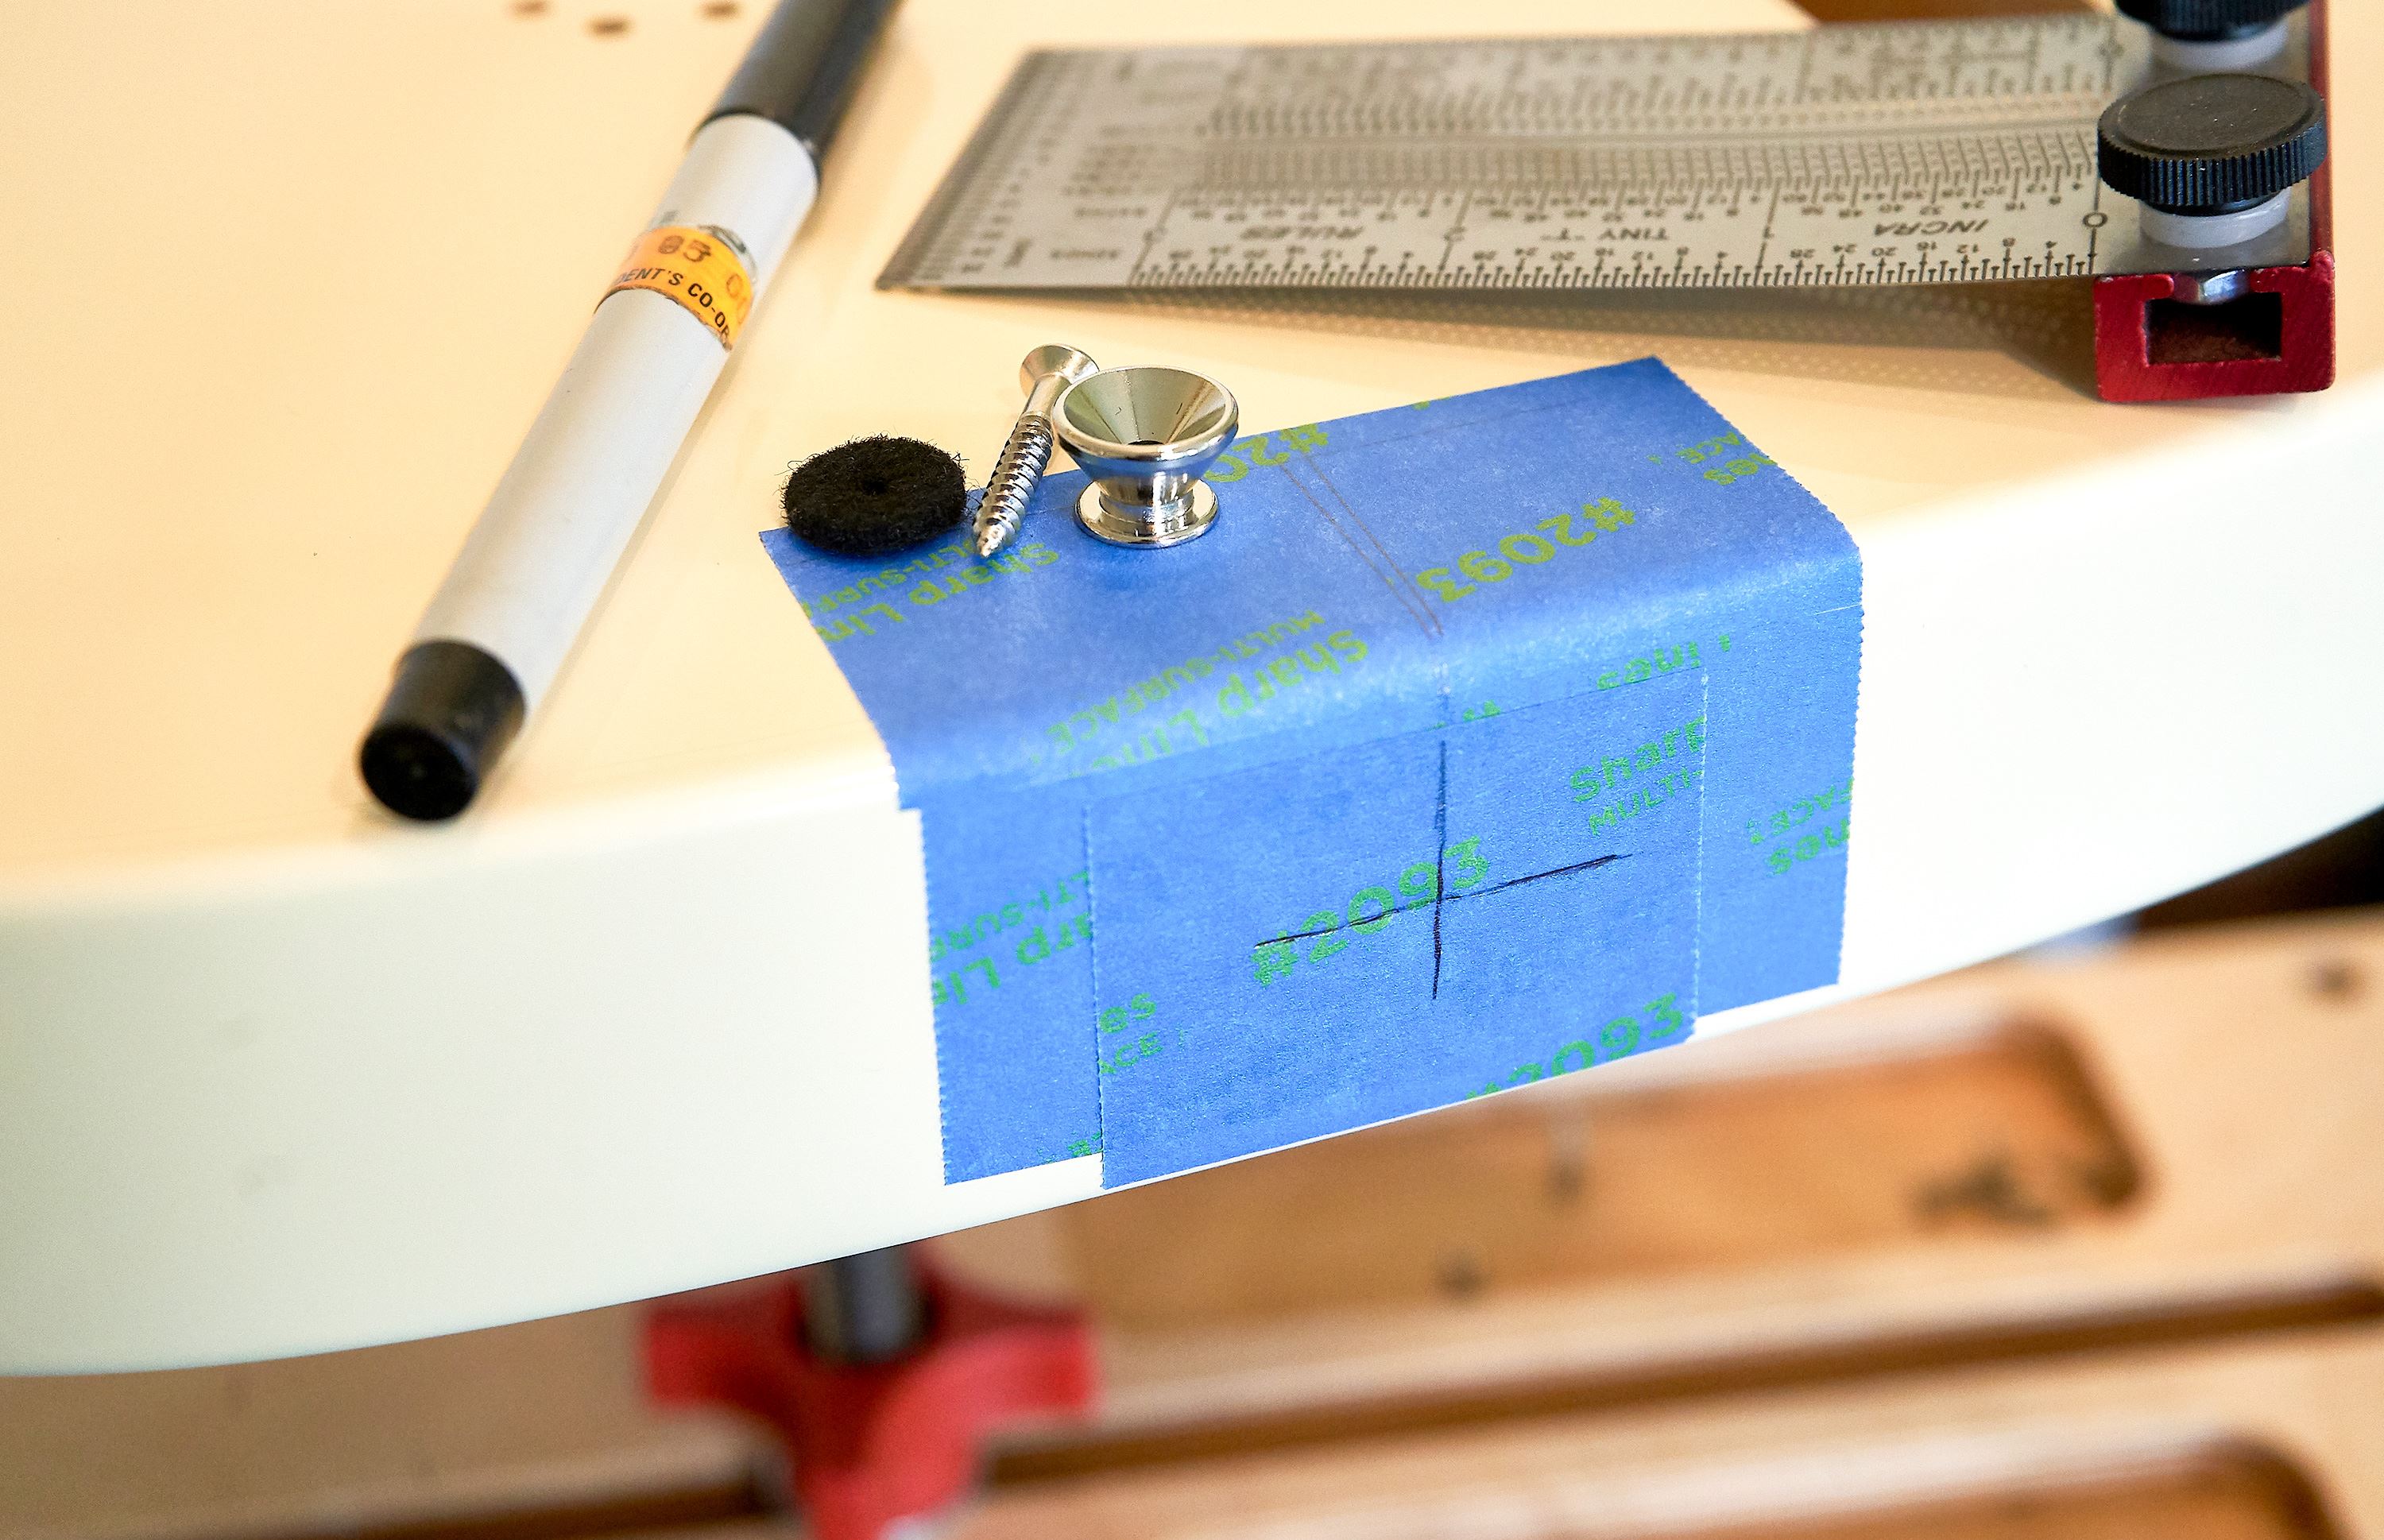
Official Fender Stratocaster and Telecaster bodies come with pre-drilled and chamfered strap button holes ready to go, but if your body is not pre-drilled, you'll need to mark and drill the holes. Placing a patch of low-tack tape over the area you want to install the strap buttons gives you a good surface to mark for drilling, without marring the finish. Most people install the strap button at the back for the guitar along the centerline of the body, but the choice is yours. For the top strap button, many choose the crest of the upper bout. Find where you think the guitar will balance best for you. Drill a pilot hole with a 7/64" bit, remove the tape and chamfer the hole with a countersink to help prevent finish chipping. Wax your strap button screws, and don't forget to use a felt washer between the button and the guitar body.
Keep your guitar secure
Find the strap buttons and locks that perfectly match your hardware
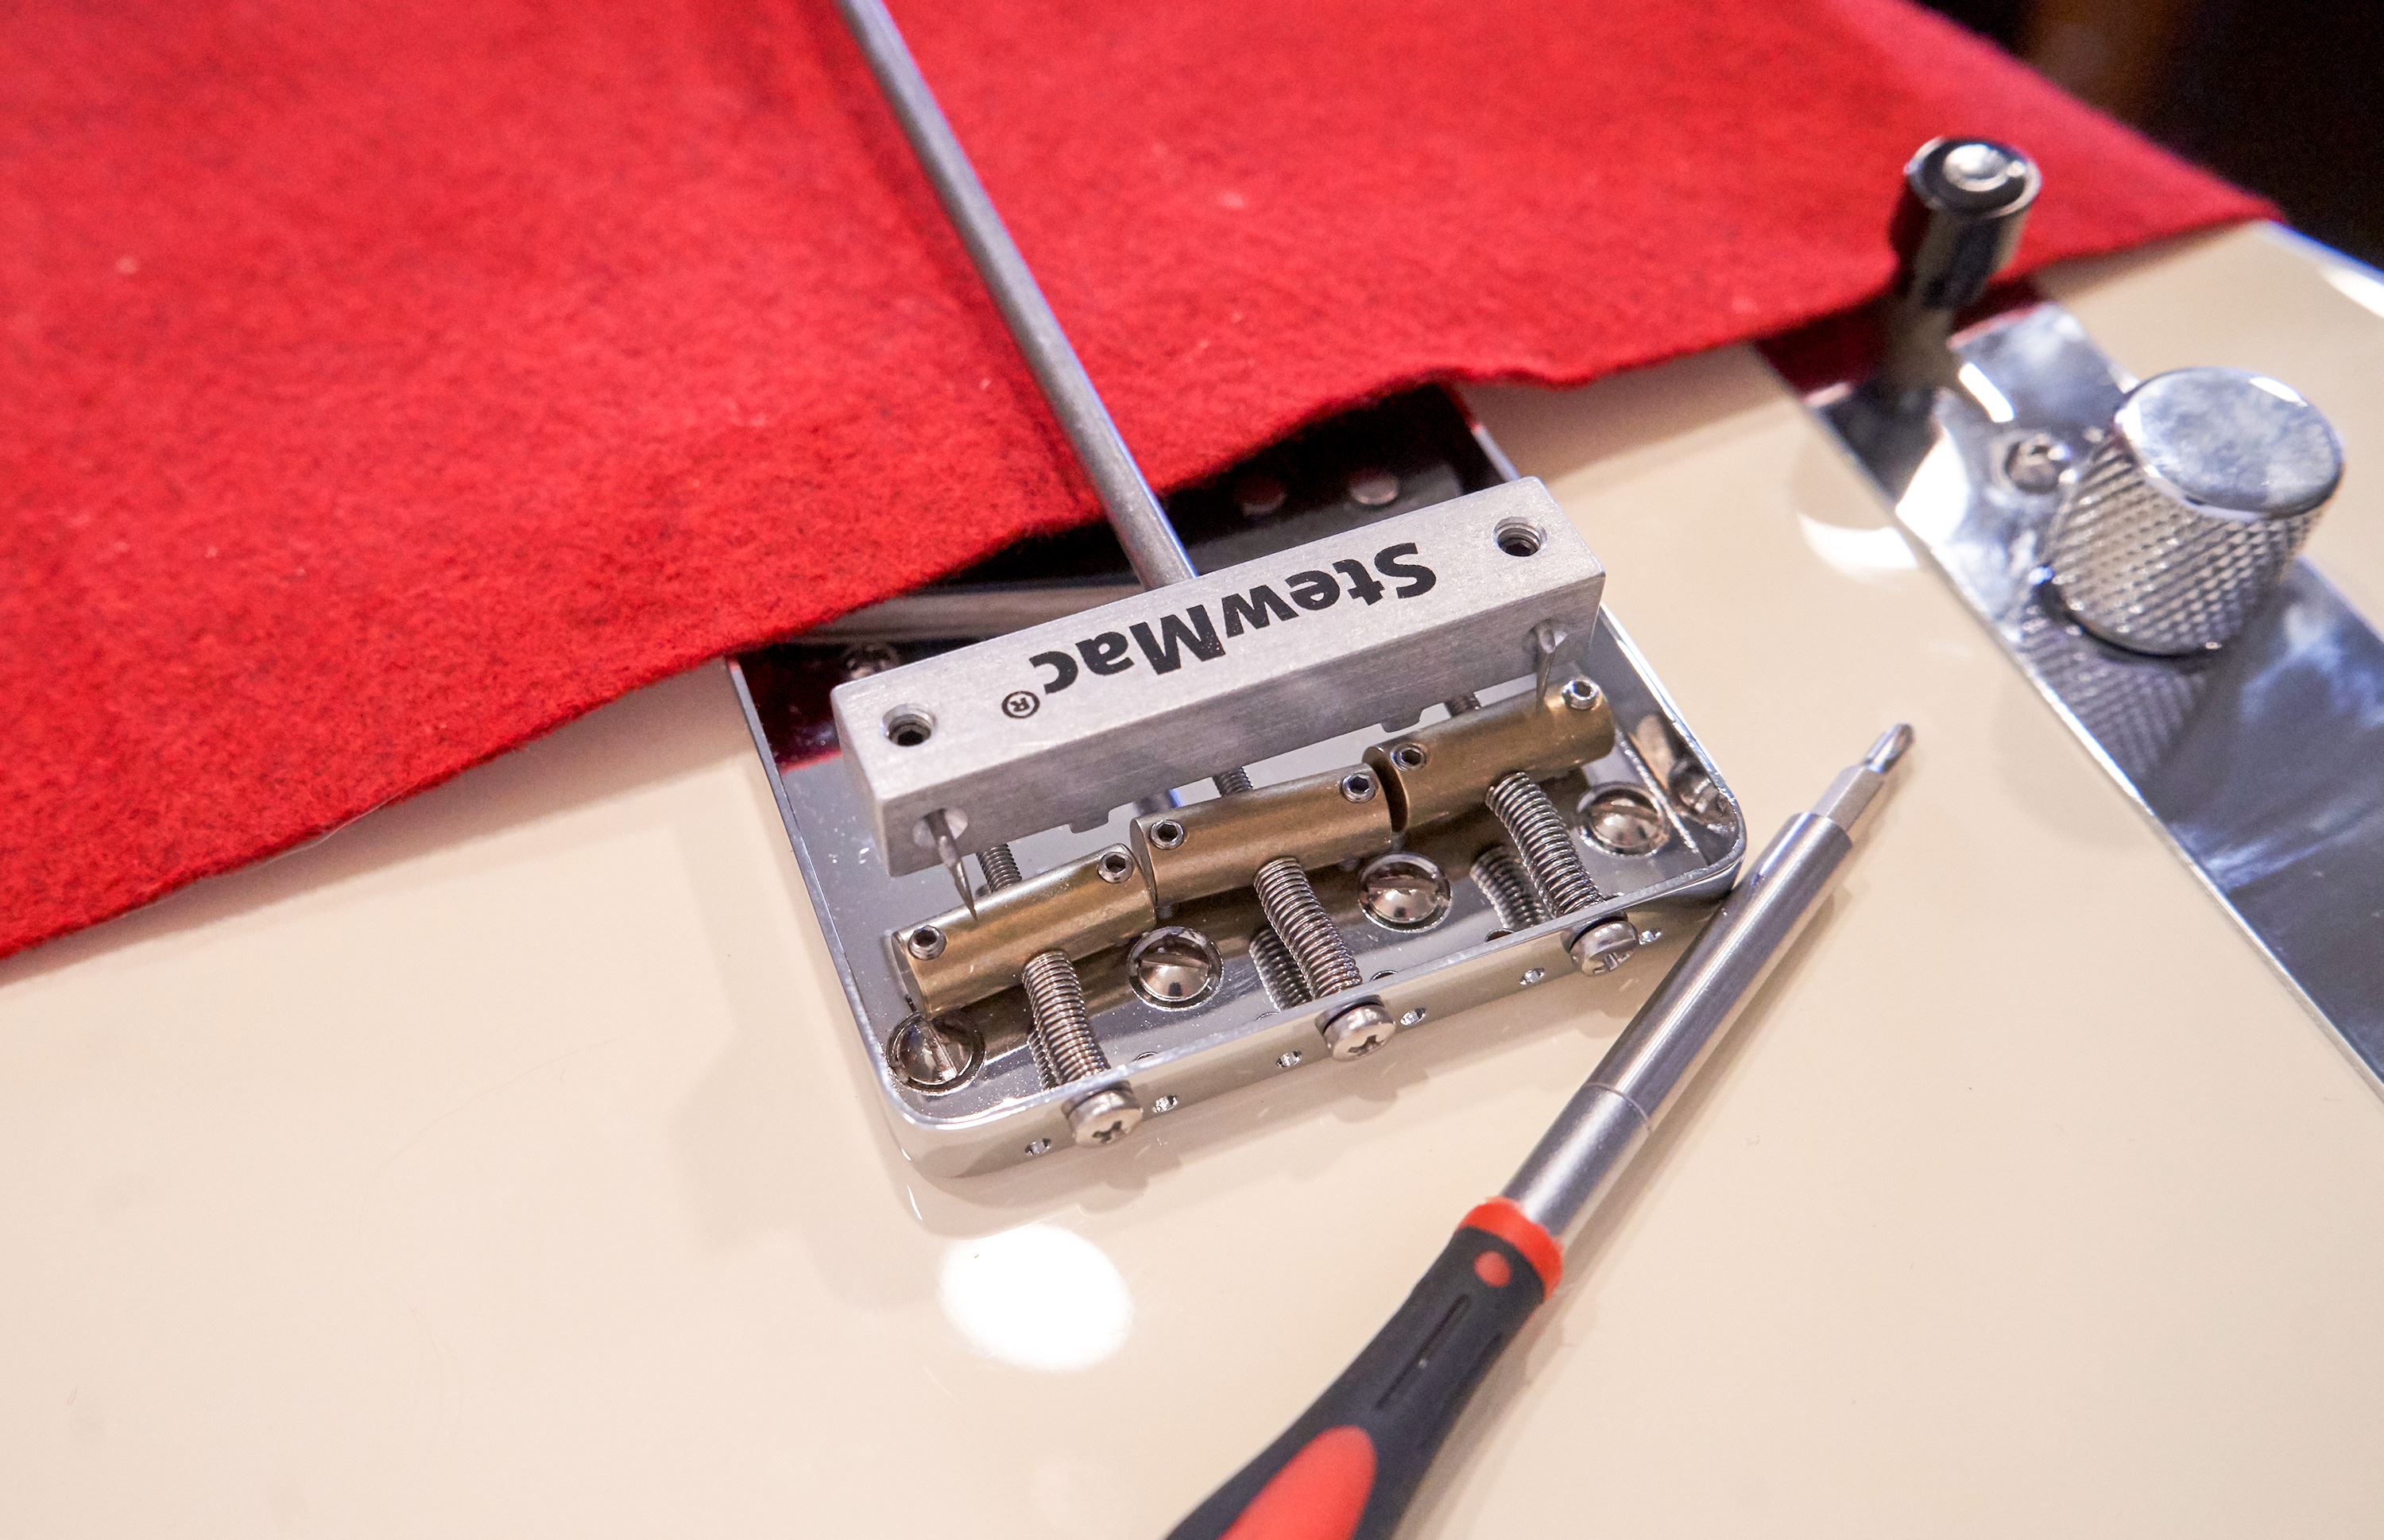
Install the Bridge
Now you can check the bridge mounting hole alignment. Make sure all of the holes in the bridge line up in the body, and that nothing is tilted or off center. You want to see light coming through the holes together with obstructions. If all looks good, install the saddles into the bridge now, as you're less likely to scratch the body. Wax the bridge screws and mount the bridge firmly to the body. As with almost all the other screws on the guitar, there is no need to crank them down. The bridge can be a little tighter than others because it doesn't need to resist the string pull—just don't over-do it.
Get the perfect bridge for your project
Dozens of models to choose from—see vintage-style Fender bridges
and other high performance models
After your bridge is installed, you can fit the pickguard and drill the mounting holes. In some cases fitting may be needed where the pickguard meets the neck—this is why it's best to fit the guard after the neck and bridge are in place. A sharp scraper, or sanding block and dowel wrapped with abrasive all work well for minor adjustments to the neck cut-out. Once you've got the pickguard aligned, tape it down with low-tack tape and mark the holes for drilling. One nice thing about the depth-stop bit set, is that their depth-stop collars have a tapered end that helps them self-center on the pickguard holes for a perfect fit. Just set your depth, leaving the pickguard in place, hold the depth-stop collar down against the countersunk hole in the pickguard, turn the bit in reverse to help create a centering mark, and then drill.
Your control plate or jack plates can be fit that same way. For a Tele, I prefer to test fit the pickguard and control plate at the same time—waiting to drill either until I know how they both want to line up.
Wiring the Pickups
Pre-wired pickguards and harnesses make partscaster builds so quick and easy, and can be great if you are new to reading wiring diagrams and soldering. You can still mod them with custom caps, or switching arrangements, but you have a nice foundation to build from. It's the quickest way to get playing.
Wiring your own partscaster from the ground-up gives you the most flexibility in customizing your tone. From uncommon pickup pairings, to tone control mods, this is where you can really affect the sound of your build. I built the Tele shown in this article with some old Mexican Fender pickups I scavenged from another guitar, but I have plans to wind some custom pickups to really bring this guitar to life. I'm starting with a classic 3-way switch, but doing the reverse mod to put the volume pot right up front for easier swells.
There are many great ways to wire both T-style and S-style guitars, here are two of the most common.
Wiring diagrams for T and S-style
These are the most common ways to wire these classic instruments
The tone caps and a treble-bleed circuit are also easy, low-risk mods to start with. Changing the values of the capacitors can have a noticeable impact on the tone, and range of control of your tone knob, allowing for greater personalization of your sound.
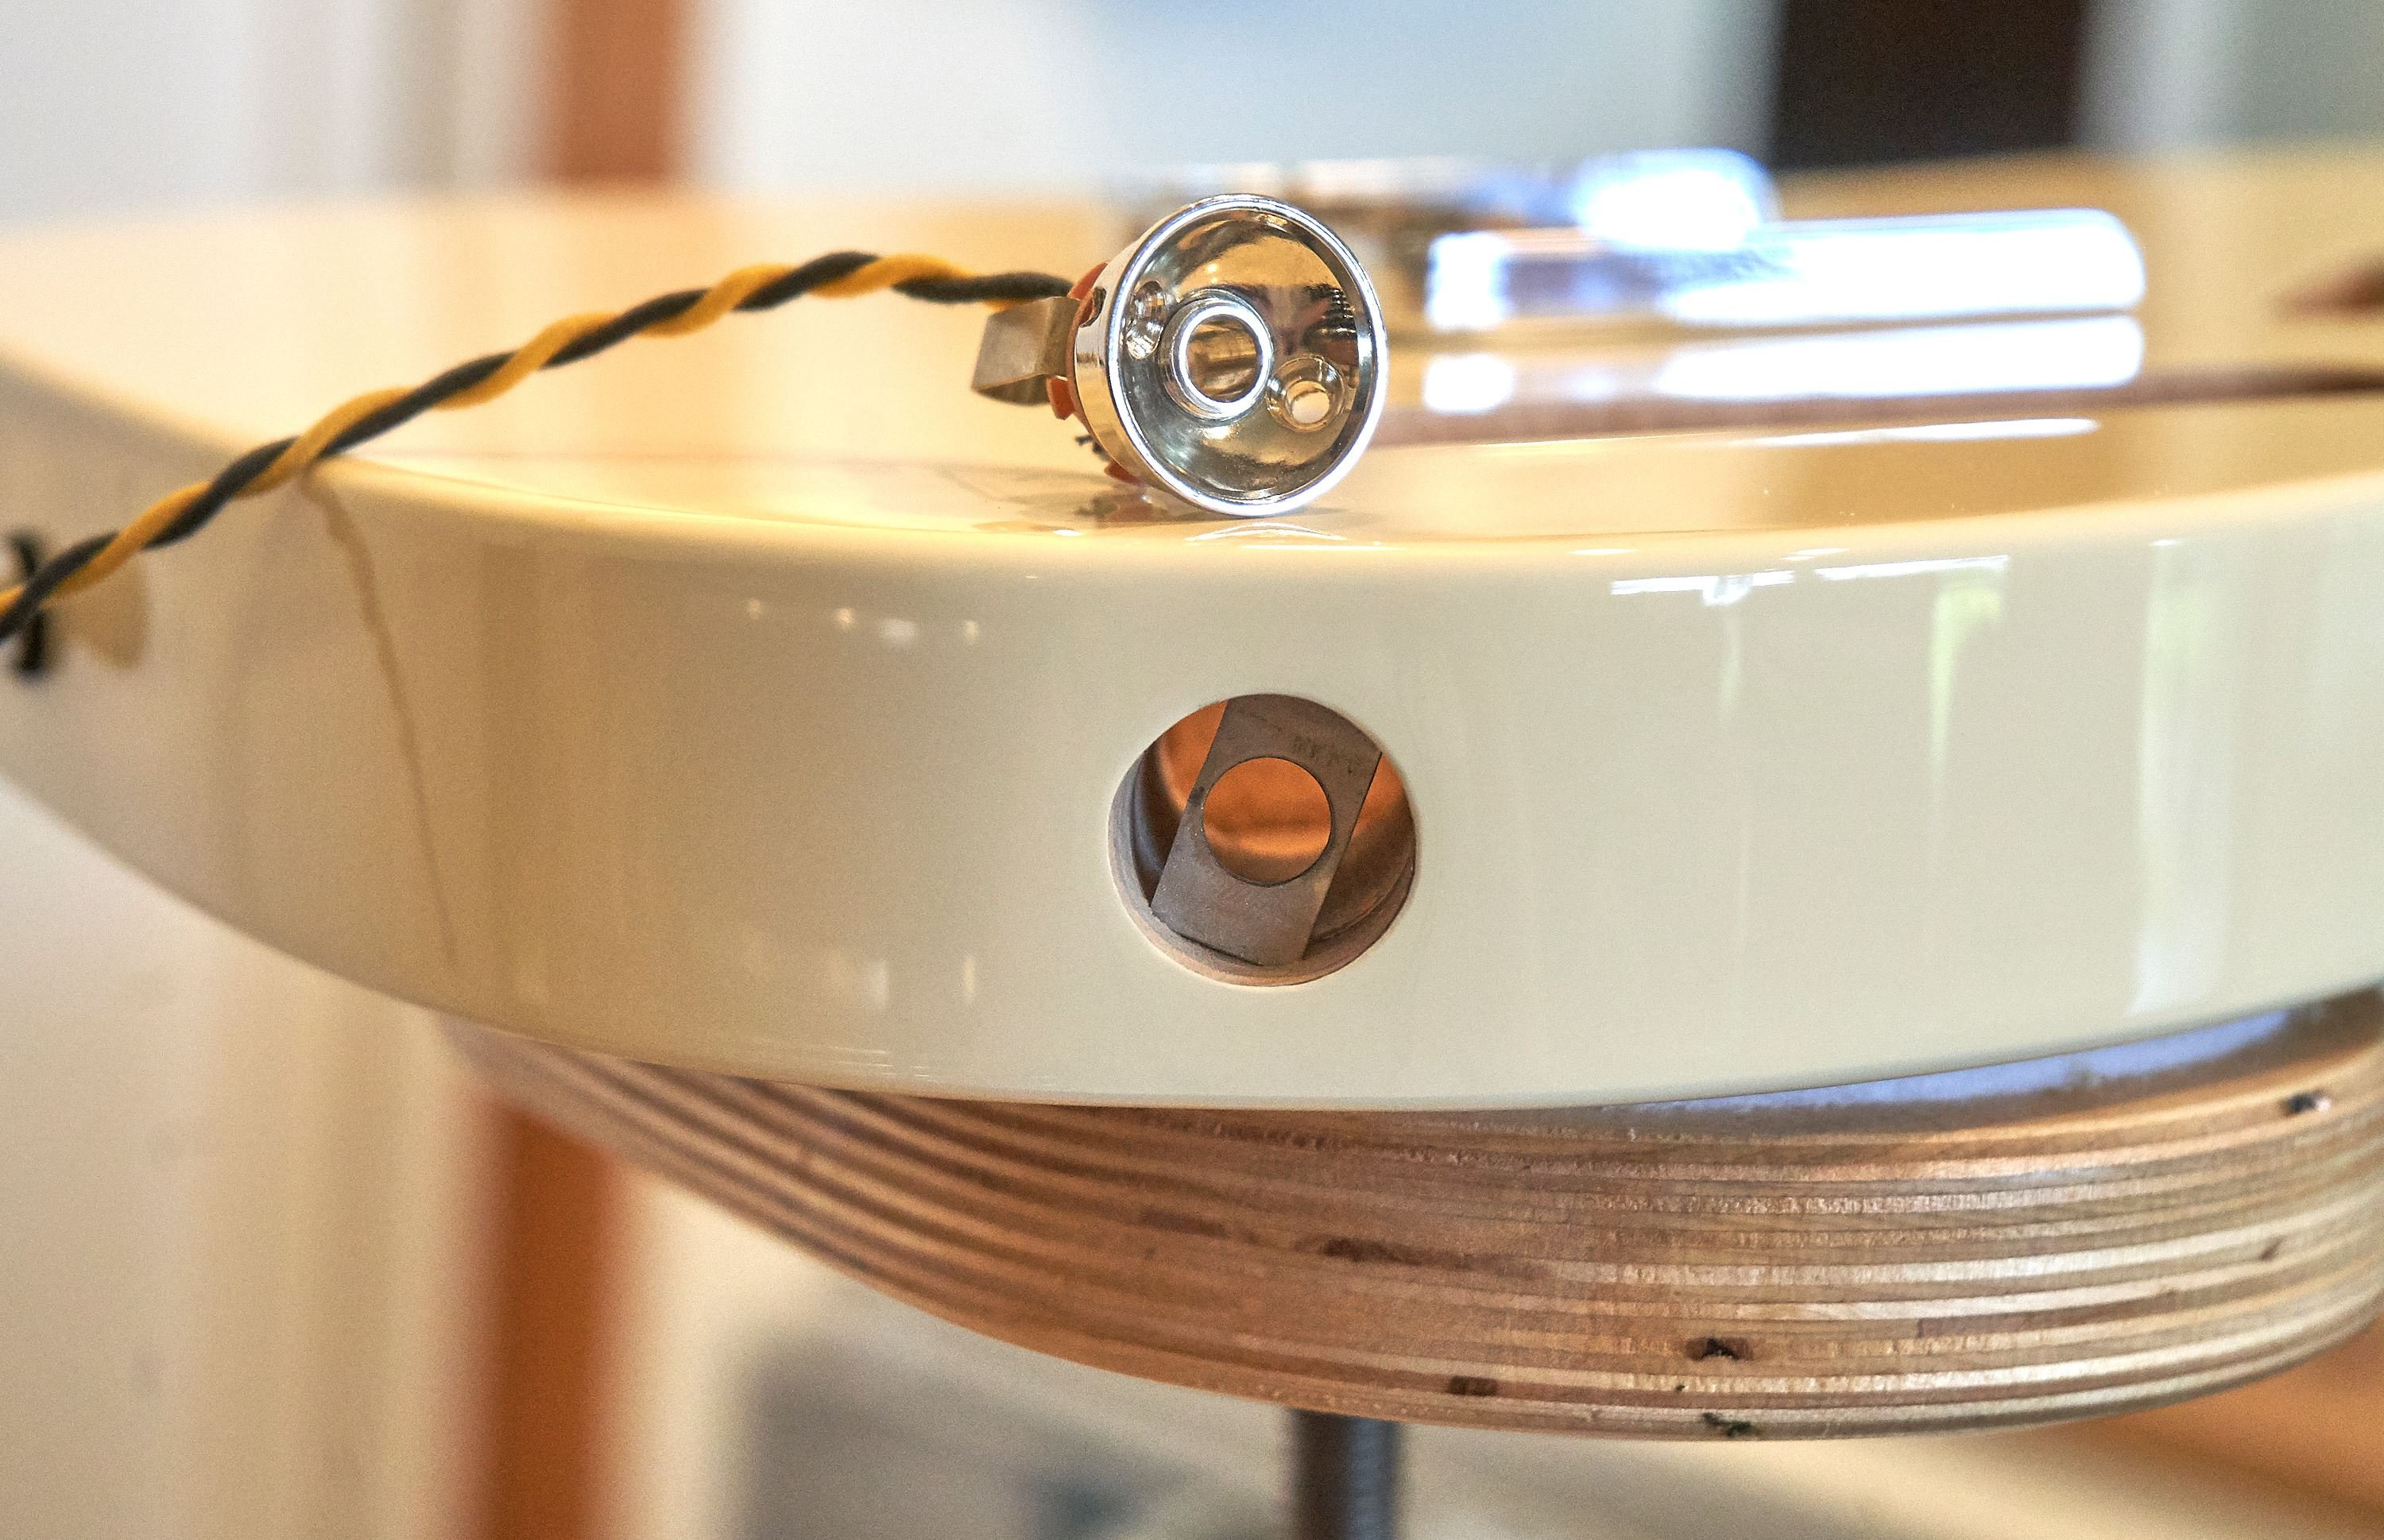
This Fender Telecaster body came with a preinstalled vintage style keeper plate—perfect, if you want to use a vintage style jack cup. On my Telecaster I wanted to use an Electrosocket Jack Mount and I used the Tele Jack Installation Tool to make quick work of extracting the retainer clip without any risk to the body. For an S-style guitar, the jack plate simply screws in place.
Take your time with the wiring, keep it clean, and tidy (you'll likely be back in here modding it again soon), but also know that it's low risk. Ground wires to the back of the pots are one area that risk poor connections due to cold solder joints—keep a close eye on those joints.
Setting Intonation
It's easy and much quicker to do a rough saddle adjustment without the strings on. You avoid the risk of scratching up your bridge where the saddle adjustment screws land. There are two ways to do the rough adjustment: with a precision rule, or with a Saddlematic.
With the precision rule, measure from the nut to the center of the 12th fret, and then flip the rule to measure from the center of the 12th fret to your saddle locations. (measure in line with where each string would lie). The distance from the nut to the 12th fret should be the same as the distance from the 12th fret to the bridge saddles. This is the starting point, you'll be fine-tuning when the strings are on. To get your rough intonation set, add about 1/16" on the high E and about 5/32" on the low E. Adjust your saddles to align with those measurements and you'll have a big head start when you string it up.
If you choose to use a Saddlematic, set it to length between the 12th fret and nut, and then flip it around and align your high and low E saddles with the indicator pins. This will get things really close for your initial setup.
You'll want to fine-tune your intonation after going through the full setup process.
String Up for the First Time
You likely have your own method for stringing up an electric guitar, but if you're looking for a refresher, Aaron demonstrates a clean approach in the video below that helps reduce the risk of scratching your headstock, or creating a rat's nest of extra windings. With 6-in-line tuners, I cut the fresh string off two-posts past the tuner—this gives almost the perfect number of windings at each post.
How to String an Electric Guitar
Looking for a fast, accurate method for stringing an electric guitar? Look no further.
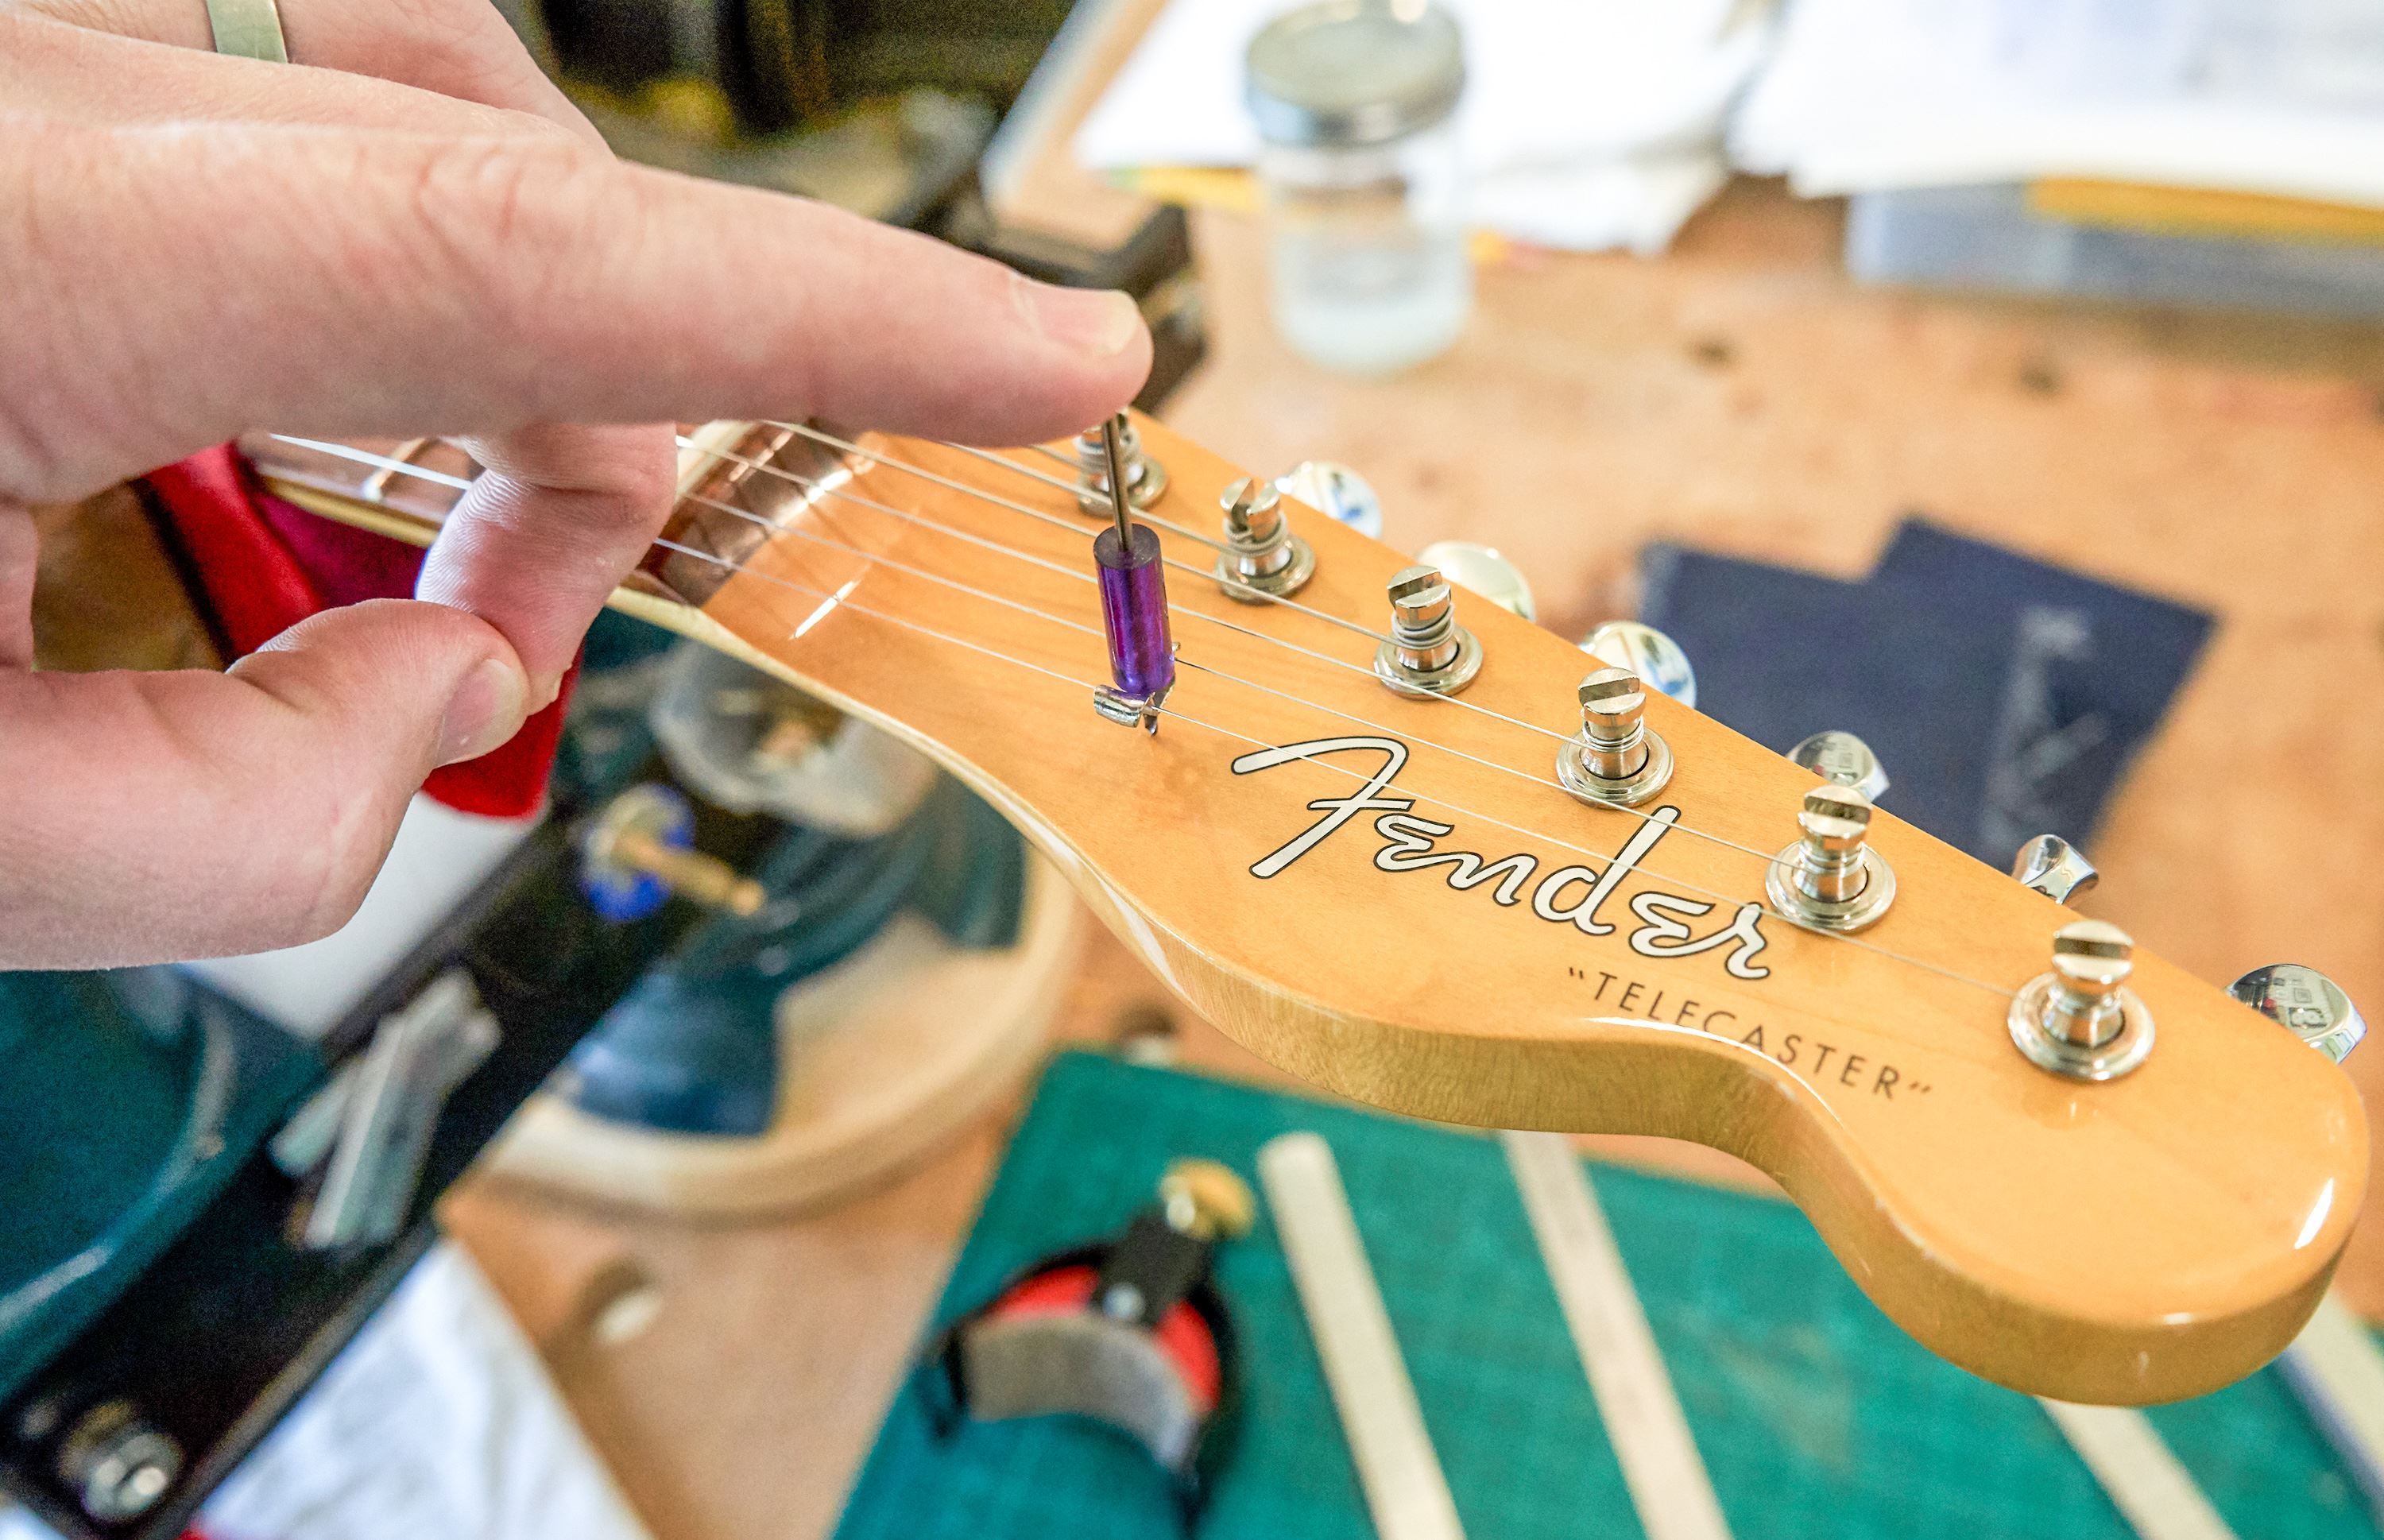
Now it's finally time to install the string tree. Convention has it that a string tree is used on the B and high E strings to approximate the same string tension on the nut across all six strings. I like to align my tree with the A string tuning post. As with all of the other holes to be drilled, use a depth-stop bit or masking tape mark, turn the bit in reverse first to help center it on your mark, and then drill your hole. After you drill the pilot hole, use a very light touch with the No-Chip Tuner Hole Countersink to add a slight taper to the hole. This will help prevent chipping the finish when installing the string tree.
Add the Finishing Touches
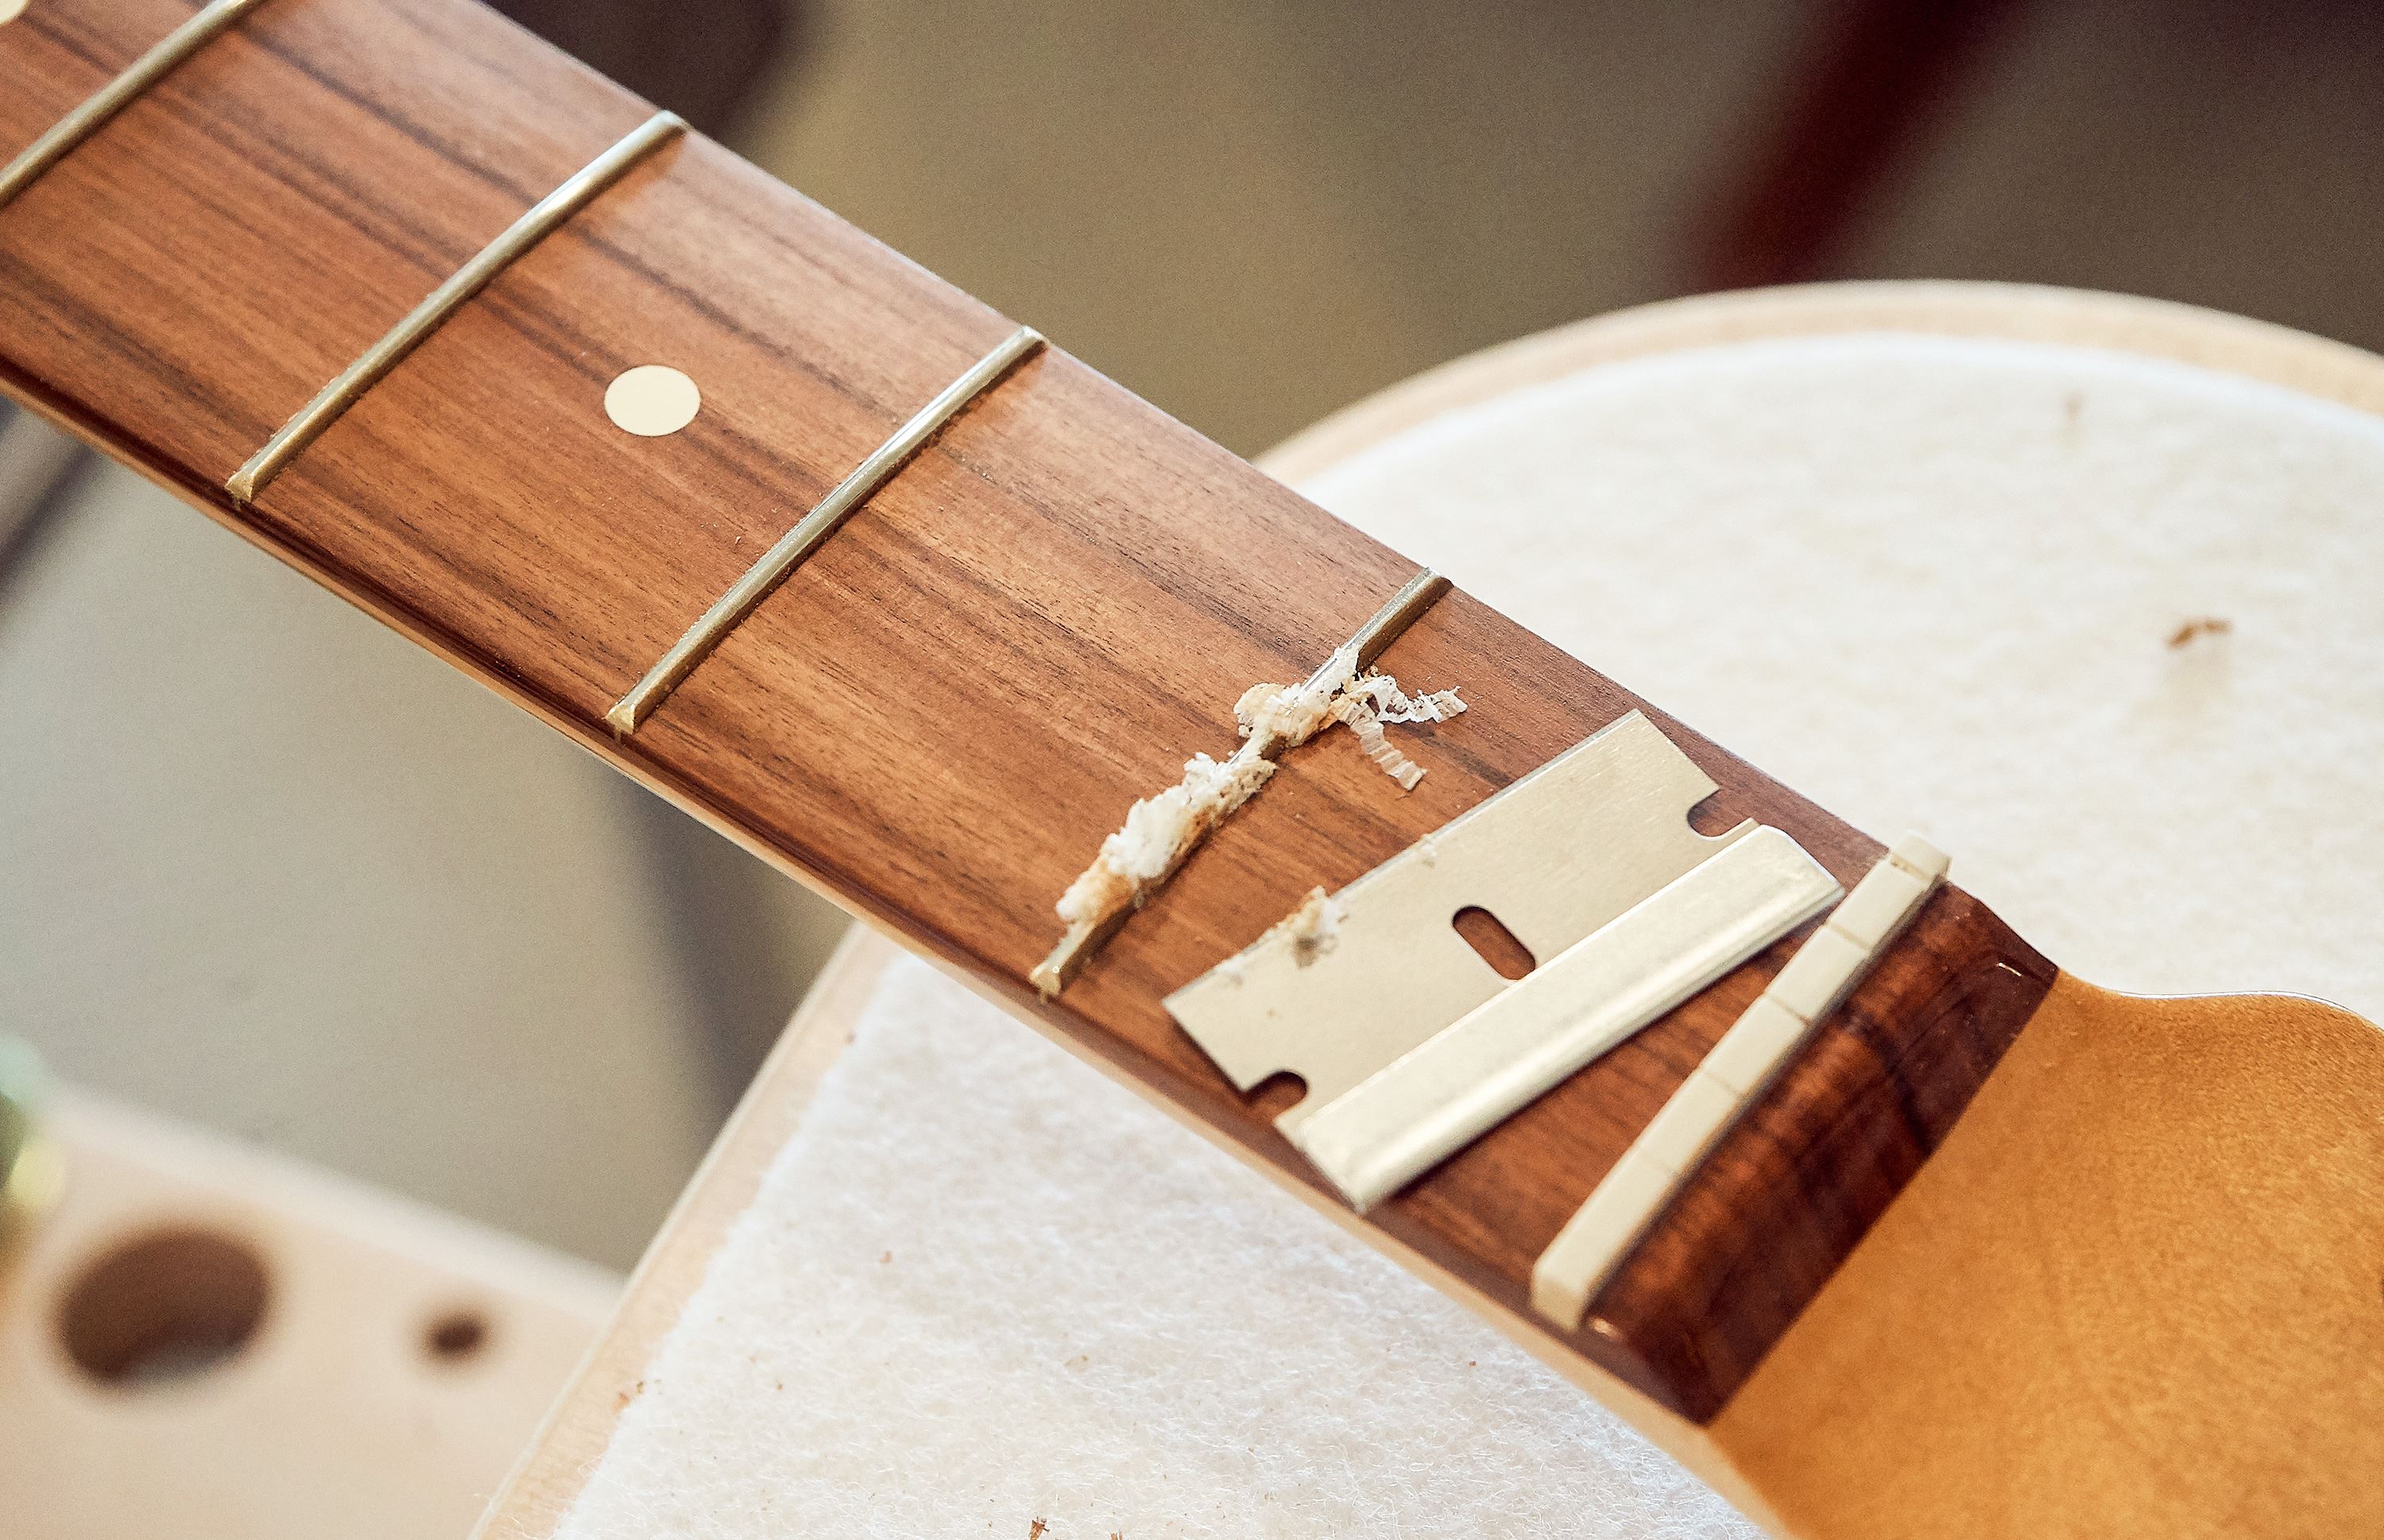
"Rolling the edges" is a great way to make a new neck feel a little more worn in. For rosewood or Pau Ferro neck, it's easy to take a razor blade, draw a burr on it with a screwdriver shaft, and then gently scrape the fingerboard edge between each fret. I like to feather it out a little as I approach each fret to avoid hard corners, not scalloping, just easing the edge to give it a softer, more played-in feel.
On the Fender necks with Pau Ferro fingerboards, I've found you can really bring the grain to life, and give them a nicer feel under your fingers with a very light razor scraping—gently scrape, with the grain, between each fret. This removes the little bit of overspray and leaves a highly polished surface. Treat the fretboard with a little ColorTone Fretboard Finishing Oil or ColorTone Lemon Oil and it will really bring out the grain.
Final Setup Checklist
A great setup is the difference between a playable guitar and an absolute joy to play. There is a method to the madness and an order that helps everything go smoothly. This is where taking your time and using the right tools can really pay off. We could write a whole article on set up, but Dan's book "How to Make Your Electric Guitar Play Great" is the best source to learn all of these tips and tricks. Here is the order of operations:
- Relief
- Action at the nut (adjust nut slot depth, be careful because it's easy to go lower, but more work to replace it if you go too low.)
- Saddle height—rough in to match the neck radius (7.5" or 9.5" on Fenders)
- Relief—check again
- Final string height at nut and 12th or 17th fret.
- Final intonation
Official Fender necks come with really nice fretwork, and can build a totally playable guitar. To really bring out the best in a new neck, it's worth doing a proper fret level (use a very light touch) and fret dress and polish. This will allow you lower, buzz-free action, and nothing beats the feel of freshly polished frets.
Fine tuning a new neck
Erick show you how to dial in a new neck straight out of the box
After all that tuning, tweaking, and adjustment, I like to put on a fresh set of strings, plug in… and rock out!
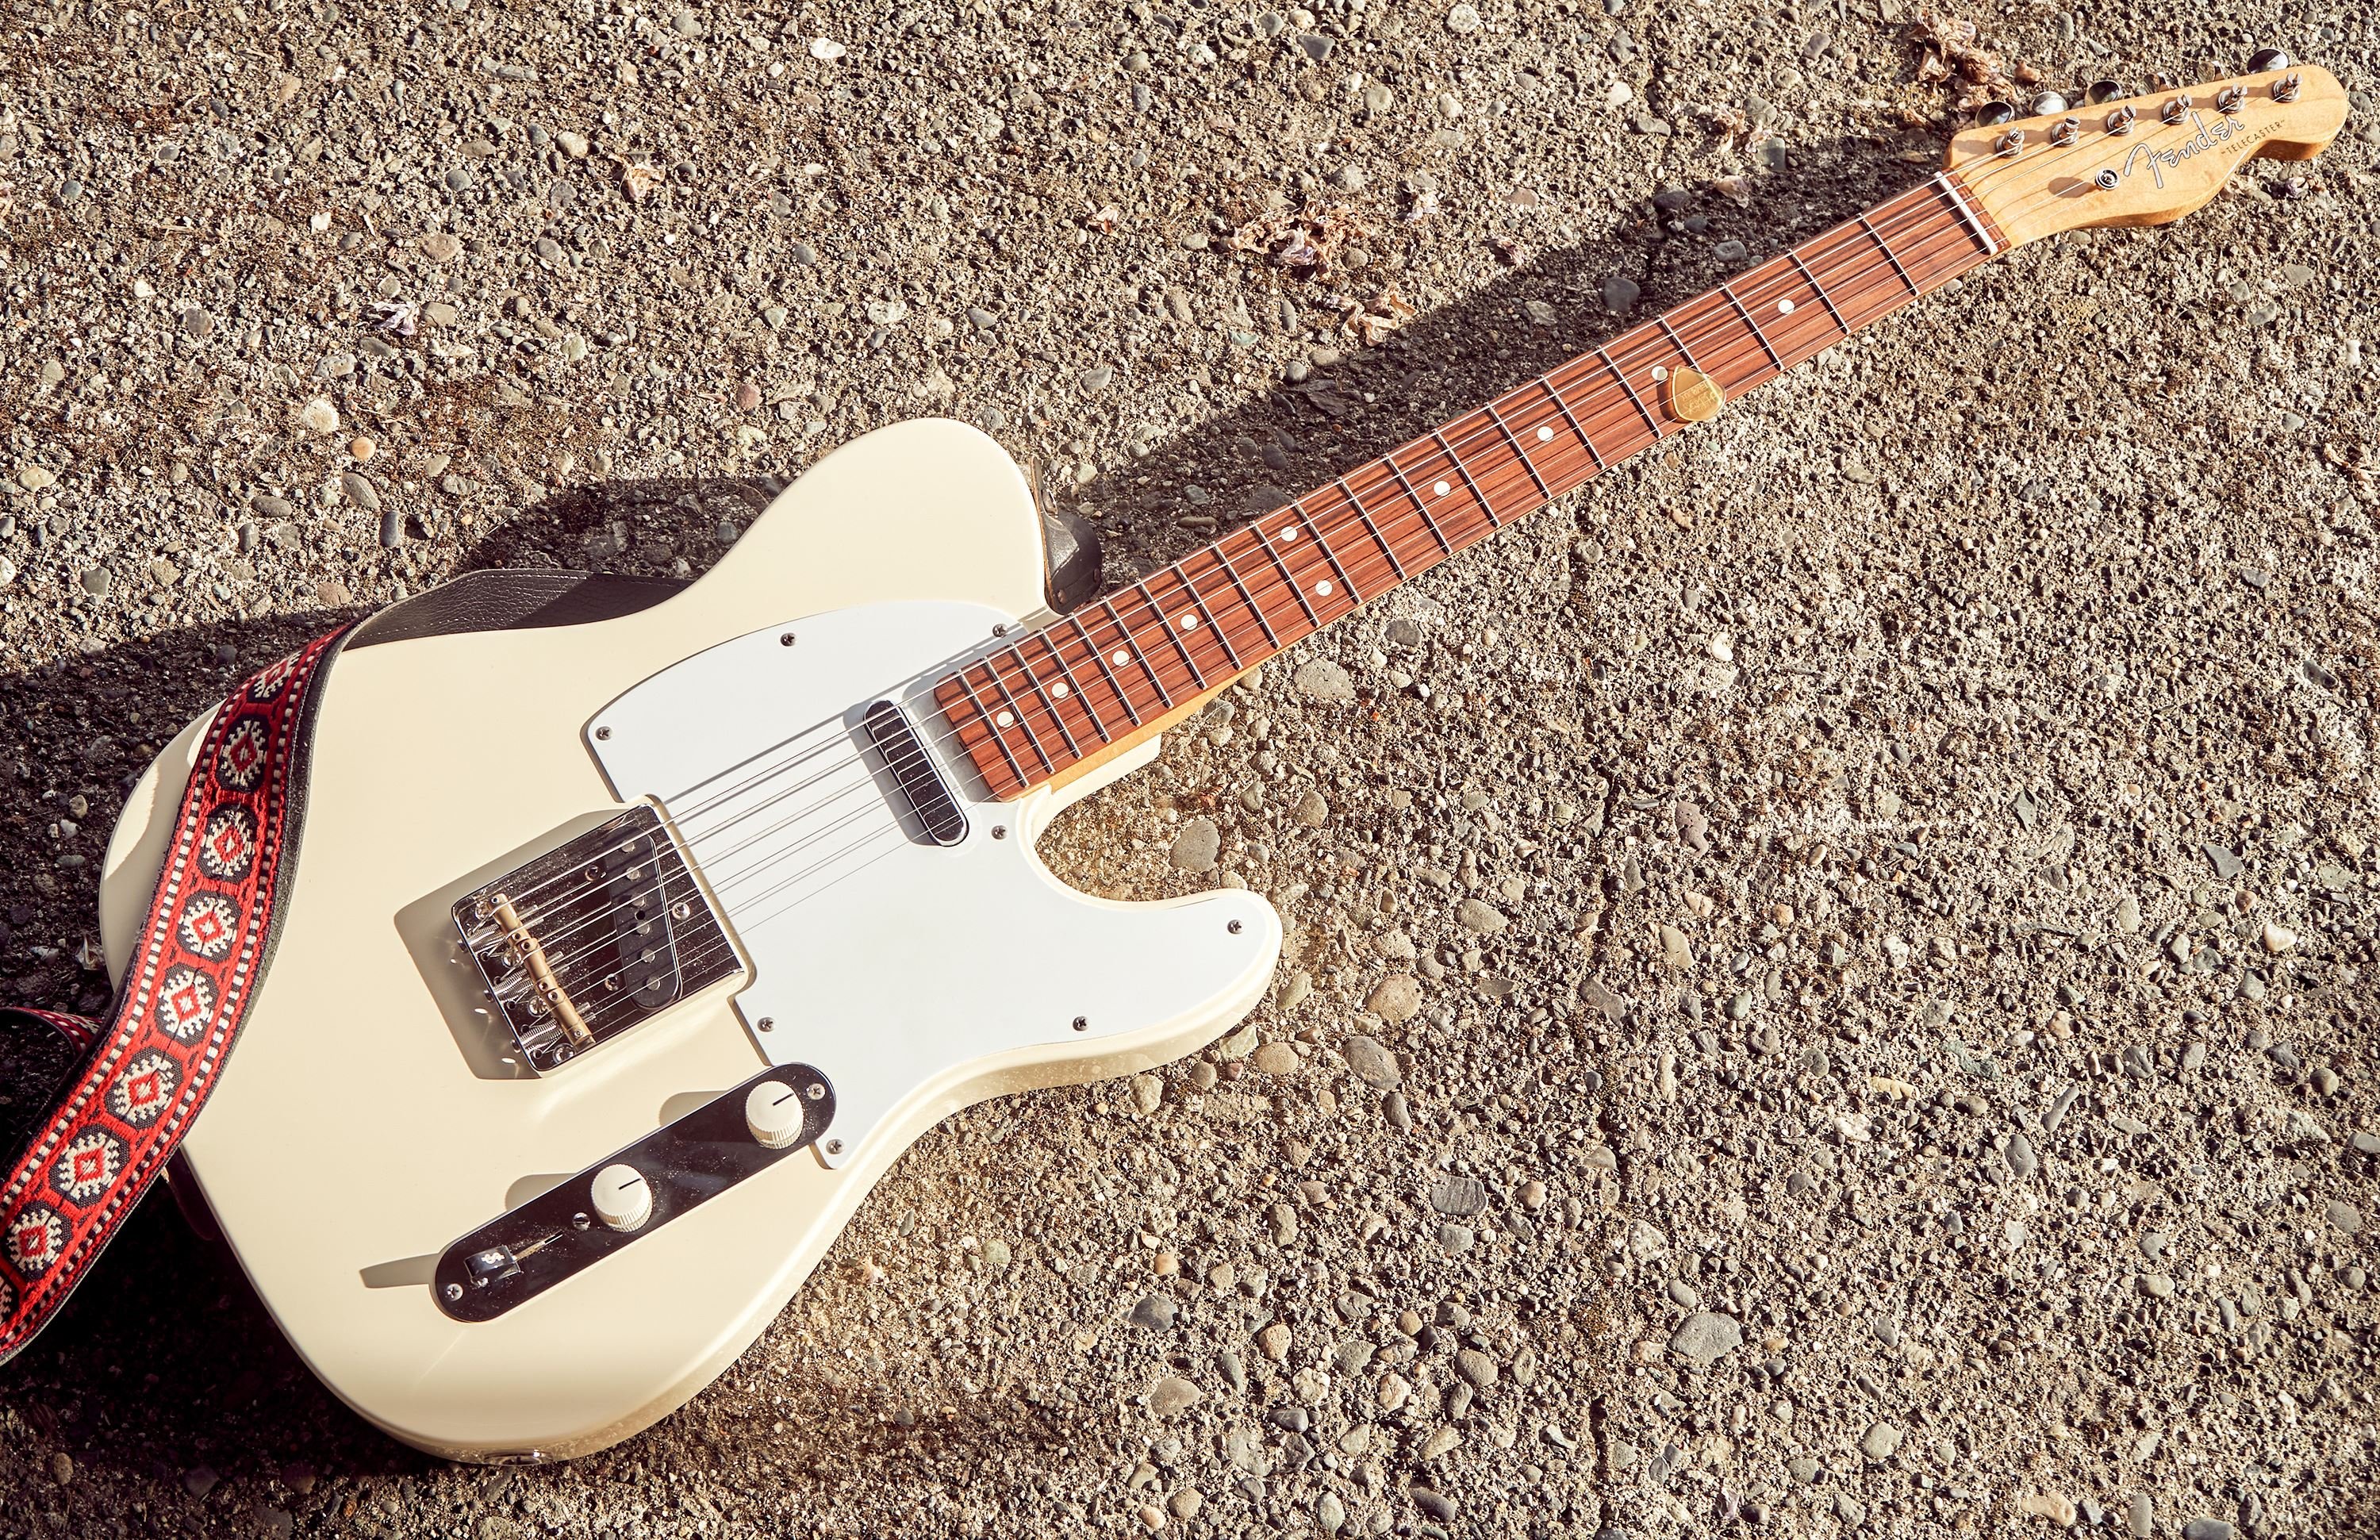
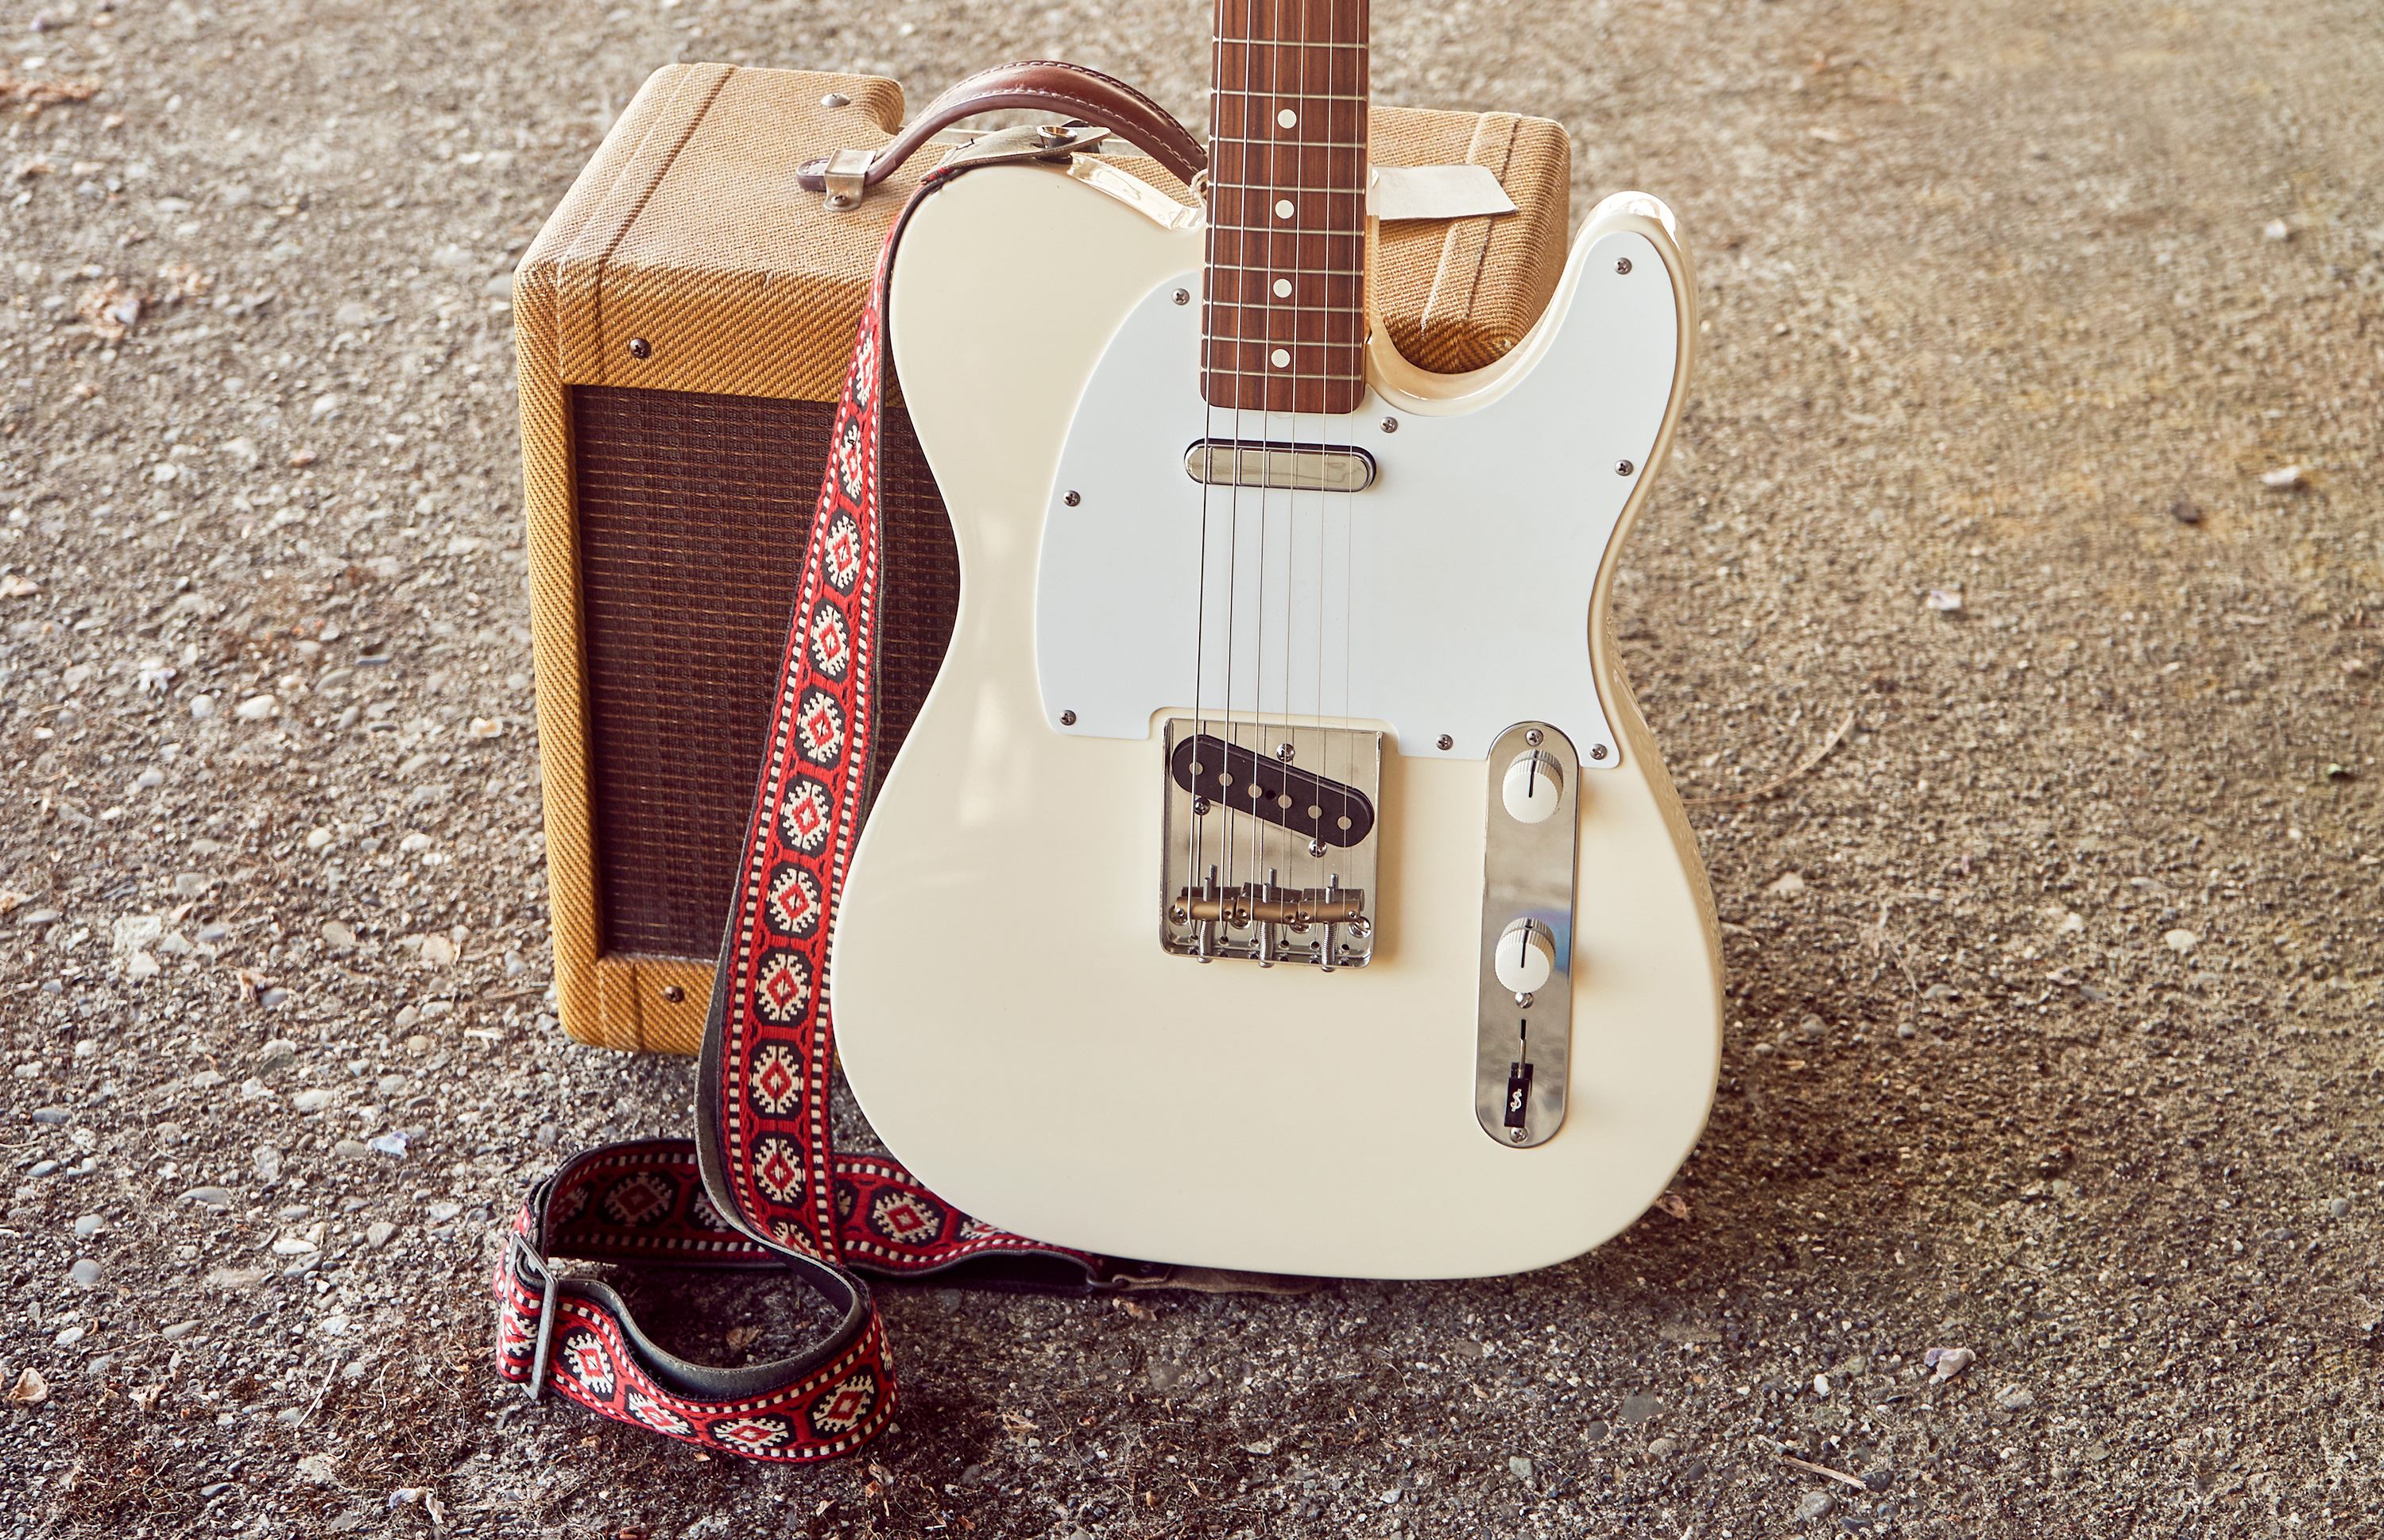
Here's a couple photos of my finished build: