Build Your Dream Partscaster Guitar
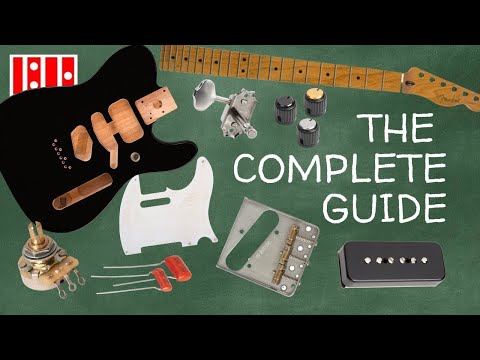
Building a Partscaster is a great way to get the customized guitar you've always dreamed of, and learn essential lutherie skills along the way. In this video, our guest Dan Petrzelka shows how to build a custom T-Style Partscaster, step-by-step, so you can follow along at home.
The article that inspired the video: How to Build a Partscaster
The original step-by-step building guide was written by Dan Petrzelka with all the details, pictures, measurements, and tool recommendations to make your build easy. There's even a checklist for assembly and setup—your new custom guitar will play great from the first strum! Read the article
Video Transcription
[on-screen text reads: StewMac]
Dan Petrzelka: Every single guitar that I built starts with a spark of inspiration. I have a habit of collecting guitar parts, even parts that aren't necessarily made for guitars, and eventually an idea starts forming in my head. Hands down one of my favorite projects is putting together a partscaster. I'm always coming up with new ideas for configurations. There's a reason so many people build and play partscasters. I'm talking Van Halen's Frankenstrat, Clapton's Blackie, Tom Morello's Arm the Homeless, Mason Stoops Tele, even Stevie Ray Vaughan's Number One. Strats and Teles were designed by Leo from the beginning to be easily assembled from a core set of parts.
It's a simple, but flexible system that fits so many styles of playing. That's why these projects are also the perfect place for beginners to start learning the craft of luthiery, the setup, electronics, all that great stuff.
Gathering parts
Starting right now I'm going to show you from start to finish how to build a Tele style partscaster so you can build one for yourself. No experience needed. What's special about this build is I'm here at StewMac, so I get to go shopping for all my extra parts in their enormous warehouse. I'm definitely going to need a little help finding my way around here.
Hey guys.
Stephanie: Hey.
Levi: Hey.
Dan Petrzelka: How's it going? Good. I'm Dan.
Levi: Levi.
Dan Petrzelka: Nice to meet you, Levi.
Levi: Nice to meet you.
Stephanie: Hi, Dan. Stephanie.
Dan Petrzelka: Stephanie, good to meet you. I'm here building a partscaster and I need some help finding my parts. I got a killer list here, but I'm hoping I can get some help around the warehouse, figuring out where things are at.
Levi: Right on. We can definitely help you out.
Dan Petrzelka: Awesome. Awesome.
Stephanie: So let's start off with everything located in A.
Dan Petrzelka: Okay. There's some saddles I was looking for that are an A22H.
Stephanie: All the even numbers are on one side of the aisle. Odd numbers are on the other.
Dan Petrzelka: Okay. 22. Then we got to be right in this zone.
Stephanie: Okay. And it starts from the top, A.
Dan Petrzelka: Oh. Right up here?
Stephanie: Yep.
Dan Petrzelka: Okay.
Stephanie: And H.
Dan Petrzelka: Cool.
Stephanie: What number?
Dan Petrzelka: 4959. Right there.
Stephanie: Bum, bum, bum.
Dan Petrzelka: Dual access saddles. Very cool. Well throw those in the cart. 5462.
Stephanie: Yes.
Dan Petrzelka: Perfect. BO8G.
Levi: BO8G.
Dan Petrzelka: Yes. I'm looking for some 500 K pots I want to experiment with. Right there.
Levi: Right here.
Dan Petrzelka: Sweet.
Stephanie: If you have any other questions, feel free to ask.
Dan Petrzelka: Cool. They're letting me loose in the warehouse. Going to run through the aisles, try to find all the parts for this build, and then we'll head up to the workshop and get this partscaster put together.
[Dan works his way through the warehouse finding parts and adding them to his cart]
Oh, here we go. Pickguards, top shelf. 3-way CRL switch. Switchcraft jacks. Here's the one meg CTS pot. Oh, so much good stuff. Must keep moving. Here you go though. Some Mallory 150s. More tone caps. Nickel wound strings. You got to get the XL 110s. We've got everything we need for the build. Let's get back to the shop.
Body and neck considerations
Okay. So here's my haul. I think I've got everything we need here. So let's start with a foundation of any great partscaster, your body and your neck. You maybe already have a body at home that you love, a neck that you've got in a trade or it just feels right, or maybe you're starting from zero and sourcing all the new parts for your build. Today we're working on a Tele. The Telecaster is a wonderful foundation for a partscaster build. You've got a classic body shape, classic neck profiles. It's one of the most simple builds with plenty of room for experimentation. You might think that the body's the first decision to make in a partscaster build, but the neck is your primary interface. It informs a lot of the decisions you'll make about hardware and the rest of the build process. In the Telecaster world, there's two main camps of necks.
There's vintage style and modern style. I love a vintage style neck. I like vintage style tuners, a tighter radius, and narrower frets, but you might like a more modern style build with a flatter fretboard radius and wider frets for faster playing. That decision is totally up to you, but this is one of the key decisions you want to make in your build to get the feel and the look you want to start from. Let's take a look at the body. On a Telecaster body, there's a lot more flexibility. We don't have to commit to modern or vintage style at the offset, but what we do need to consider is some of our configuration. A Tele body is a classic platform with a fixed bridge, room for two pickups, and a standardized control plate. While all of those elements are standard, there's still lots of room for exploration in a simple format.
Before we go any further, let's talk about one of the most critical steps and that's checking the neck to body fit within the neck pocket. When fitting this neck, do not slide in horizontally. We have a tapered neck into a tapered pocket. So you need to press down from the top. On one end of the extreme you could end up with a neck that slides in too easily. It's loose, it's sloppy, it leads to poor tone. On the other end of the spectrum, we have a body like this that's just a little bit snug and that's because we have just a little bit of extra paint here at the edge and we need to grab a razor blade to scrape that away to get the fit we want. You want to have a light touch. We're not powering through any of that paint, but we're just removing that lip so that the neck will slide in there.
Just a little bit of scraping on each side and in the corners here and I'm taking care to hold the razor blade nice and square to the neck pocket. I'm not tilting it up onto the surface of the body. Get right out to the edge of this point. This is the delicate part and you can often have a little bead of finish right here at this corner. Another test fit, pressing straight down from the top. We're just about there. So this neck fit is a little bit snug still and one place to check on a new neck is this lower edge at the heel of the neck. Sometimes you get a little lacquer or finish buildup right at that edge. Just using the same razor blade scraping technique. Just clean a little bit of finish back on that edge and see if that did it.
I just want to press straight down again. Perfect. A nice, snug fit just the way we want it. No slop, no tone sucking slop, and just snug enough that it stays in position without being tight. Another thing I like to check at the beginning of any build is the condition of the truss rod and the truss rod nut. Whether it's a vintage neck or a modern neck, you want to know that that nut is free and moving properly. On a vintage style Fender neck, you'll find that nut at the heel. On a modern style, you usually find it at the headstock. If it's a heel adjust truss rod nut like I have here, we'll go ahead and remove that and we'll do a little preventative maintenance. Nut comes out that easily. Take a Q-tip and a little bit of wax and we'll lubricate the threads.
This helps ensure for years down the road this nut will turn freely and will always have appropriate truss rod action adjustment. On these vintage style Fender necks, it takes a much larger flathead screwdriver than most people will have at home. It's important to use the right size screwdriver so we don't chew up that truss rod nut. And for now, we just go until it's snug. If it's a headstock adjust it could be a double action nut that's captive. Don't try to remove that. Just check that it'll loosen and re-tighten.
Choosing tuners
Next we've got to talk tuners, Tuning Machines, and installation. This is a step that can really trip people up. Whether you're building a partscaster or working on an upgrade, there's some complexities. So let's dig into it.
For my build with a vintage style neck, I've chosen Kluson tuners in the vintage style and I've given them even more the right look with a light relicing job. I love these tuners 'cause not only do they look the part, I love the fact that they have a split post. It makes for quick stringing and quick stringing changes. Now if you have a more modern neck like this roasted maple neck by Fender, you could choose a more modern tuning machine. Something like locking Fender tuners. These are great because they have a set screw, you dial in from the back of the tuning machine that locks the string at the post.
Vintage or modern tuning machine, that's totally up to you. It's all about your personal style and the aesthetic you're after. But more important than any aspect of style is fit. The primary difference between vintage and modern tuner is size. A vintage tuner hole is smaller, measuring around 11/32nds of an inch. A modern tuning hole is larger, measuring around 10 millimeters. First I'll show you the shortcut to determine which kind of tuner you need and for that, we look on the back of the headstock. On a modern version you'll see the two pinholes and these correspond to the two alignment pinholes on the tuning machine. If you have a vintage style neck, you'll see the single pilot holes in a line down your six in-line tuners.
Those correspond to the mounting screws on these tuners with no alignment pins. So that's a simple shortcut if you're working with an official Fender neck. But you might be working with a neck that doesn't already have the pilot holes pre-drilled. That's why we always want to measure the tuner holes on the front side of the peghead to be sure. There's two ways to take measurements. One would be using a precision ruler and the other, a caliper. As an example, we can take this metric ruler and check our modern neck. And if you look closely you can see we're right at one centimeter or 10 millimeters.
If we look at this vintage style neck, you can see that we're right around 11/32nds of an inch. My favorite way to make this measurement is using a precision caliper. And for this, we use the small inside diameter measuring points. You want to gently extend those on the inside diameter of that hole. And you can see we're just around 10 millimeters. On the other hand, if we take our vintage style neck, convert this over to thousands of an inch, we could take a measurement the same way. Small points gently on the inside diameter and we're right around 350, just a hair over 11/32nds. There's going to be a margin of error in there, but you'll know you're close. Now that we've done the measurements and now we've got the right tuning machines with the right size tuning bushings, we can move on to installation and the first part of installation is the tuning bushing.
Installing tuners
These are critical because they're the top bearing surface for your tuning post and they've got to be pressed in to the front of the peghead. The fine tune fitting is critical here because if it's too tight you can crack the peghead and if they're too loose you could end up with finish damage down the road. So let's take a close look at what's the acceptable fit.
So I've made up this little dummy peghead to talk about the fine details of variation within those holes. We know these are 11/32nd holes, but there'll be slight variations in the diameter of the tuner holes because of finish that's dropped into the hole, worn drill bits, or even slight variations in the castings for the tuner bushings themselves. It's real easy to tell when the bushing has no way of fitting in that hole. You can see, I can't even get it to center up and we know that's a no-go.
Area of concern is when we start finding a spot that you think that bushing can fit in. Here I can just get the tapered front end of the bushing to press in and you might be tempted to start using force to press that home, but you're almost guaranteed to crack your headstock by the time you get six of those pressed in. So in this next example is a bushing that's starting to fit a little further to its hole, but this is still a little too tight. This is finger pressure. It gets in with maybe a quarter inch to go, but if you were to drive all six home, we'd be in trouble. As we move down, I've got an example that's right about the depth I like to see. This is just light thumb pressure and we're less than an eighth inch to go and we're almost home.
As we move further down, we've got examples of two tuner bushings that are too loose. This one will stay in if I tip the peghead up, but it's easy to pull it out with my fingers. Long-term, that can shift in the hole and egg it out or damage the finish. And on the far end we have one that's obviously too loose. This falls out with just tipping the peghead. So our sweet spot is right here in the middle.
Now if your tuner bushings are too tight, you have a couple options for solving the problem. Sometimes it could be something as simple as a little extra lacquer around the hole and I like to use a bit like this, countersink, just slightly chamfer the entrance. Sometimes that gives you enough leeway to get the tuner bushing into the hole properly. If that hole is still too tight, there's a couple other options.
We could use a tapered reamer that very precisely and carefully removes wood from the hole. And we could just gently ream this out until the bushing fits. The other option is to wrap sandpaper on something like small screwdriver or wood dowel and gently sand inside the diameter of the hole until it opens up enough that we have a nice fit.
Okay. So let's talk about the tools we use to press in these tuner bushings. First up is a StewMac Tuner Bushing Press. Really precise way to press in tuner bushings. Also gives you the ability to remove them later if you need to. Another option is to use an F Clamp. Now this is a little bit bigger than I might usually use, but it's totally functional. This still allows you to provide perpendicular pressure in a really precise way to get that bushing driven in.
You could use a drill press to press them in or if this is your first partscaster build, there's an option to build a simple press using a quarter 20 bolt and wing nuts with some washers to protect the finish. So for the first bushing, I'll show you how to use the homemade tool. This is really simple, some hardware store parts. Set your bushing on there, finger pressure, still off the surface just a little bit, insert the bolt through the back, I have a nylon washer to protect that bushing, and a wingnut on the top. Let me just thread this down. I have a large washer on the backside, little rubber washer, to protect the back of the finish and we just gently screw this together. That was so easy. I think we'll just do them all with this thing. Perfect. Drop the next bushing on. We'll drive this one home too.
So this last one seems just a little bit loose, just wants to drop in even with the lightest finger pressure. So I'll show you a trick for using super glue to tighten up a tuner bushing hole that's just on the loose side. We don't want something sloppy. We can't turn a 10 millimeter into a three ace, but we can snug this up just a little bit for a better purchase. So I like to use these little glue applicators. It's got a perforated tip that holds just a little bit of glue and this is the number 30 thick super glue. And I just gently wipe a little around the inside and I'm carefully spreading that out. Go very easy. We don't want any big globs of glue inside here and not getting any on the surface of the peghead.
I'm going to add just a little bit more. Easy to add it. It's a little harder to take it away. So we'll go just a little bit at a time. Again, spreading it to a very thin coating in there. I'll hit this with the accelerator and we'll let it cure for a minute. Okay. We got that super glue to cure so let's test fit it and make sure this is just snug enough. Yeah. That feels right. So, use our little tool and we'll drive it home. Thread that wing nut on and gently press the bushing in. Cool. Okay. We've got the neck flipped over and we're ready to install our tuning machines. I'm fortunate that these pilot holes were already drilled in the neck I chose, but many necks aren't. If we didn't have our holes in there, we'd first drop all of our tuning machines through the bushings and this is in preparation for marking the spots to drill.
One thing that's really nice is to have all these tuning machines lined up perfectly before you start drilling any holes. And for that, use a small steel rule, press it up against that outside edge of the tuning machines and it'll force them all into perfect alignment, and use a small spring clamp to hold that in place. So now we've got them lined up and we'd want to mark where each of the mounting screw holes is going to be. Nice thing to do that with is an awl, but if you don't have an awl, you could use the exact drill bit you're going to drill the hole with and just gently turn it backwards by hand in the hole to mark the position.
So go through each of those mounting screw holes and mark the drill point. We'll then pull off our rule, pull out the tuning machines, and get ready to drill those holes. And what we're going to want to do is set a depth stop. We're going to be drilling these mounting screw holes and the key thing is we want to make sure we don't go through the face of the peghead and there's two ways we can do this. One is with these really nice Depth-stop Drill Bits and the way these work is when you chuck up that drill bit, you can compare it to the length of your tuner mounting screw and I just line it right up here on the bit, pressing that bit back into the chuck until I have the depth I want, and then chucking up the bit with a plastic collar right back against the jaws.
This gives you a nice step stop that'll spin and not mar any of your surfaces, but it'll prevent you from going too deep. If you don't have this step stop, you can use a little flag of tape, do the same thing, compare the depth of the screw and tape that little flag on there. This gives you a quick visual cue when you've hit the right depth without the risk of going through that peghead face.
So let's look at one of the finer details of how you size a pilot hole drill bit to the screw you've got. The key thing here is we're not drilling a hole to the outside diameter to the threads. We're trying to drill a hole that's approximately the diameter of the core of the screw. That'll give you enough purchase for the screw without risk of stripping the head. If you have fine enough caliber, you can measure the inside diameter of the screw. But you could also do this visually. Look for that shiny center on the screw, compare it to our drill bit.
We're done drilling our mounting holes, but I still like to use the steel rule to get a perfect alignment. Now we're ready to talk about the tuner mounting screws. These are delicate little Phillips head screws. We want to use a screwdriver that fits them really well. You don't want to try using a big number two Phillips and we also want to apply a little bit of wax to those threads to help lubricate them as we drive them for the first time into the hard maple of the neck. I like to use beeswax. I've got this little chunk I keep around the shop. Just a little bit on the threads is perfect and you'll feel how much easier it is to drive that screw home once you wax the threads.
It's also a good moment to check your pilot hole. If this is really hard to drive home, you might need to go up one size in your little bit. This feels just right. There's a little tension, not too hard. No risk of stripping it out. Let me bring it up snug. I'll go ahead and put the rest of these screws in. So there we've got our final tuning machine mounting screw driven home. Lined up beautifully. Feels good to get the tuners on there. We're ready for the next step.
String ferrules
So now we're ready to start installing hardware in our body. And for this we want to start on the backside of the guitar body with the String Ferrules. A Telecaster is strung through the back of the guitar, it's a through body stringing, and these metal inserts help protect the body from the ball ends of the string. We want to start here because the body will lay much nicer on the workbench without any hardware on the front. So let's flip it down and take a closer look. On a made in Mexico Fender body like this, you want to make sure you use Fender branded ferrules for the best fit. They're subtle differences in the lip and in the style of the hole that's been drilled and we want to make sure that these press home without chipping the paint. These started out as brand new Fender ferrules that it took a moment to relic so it fits the vibe of this build.
Let's talk about how to install these string ferrules. We need to press them squarely into the back of the body. I'm going to use a drill press today because that's my preferred method. If you don't have a drill press, don't worry. You can use a small wooden dowel that fits nicely in the back of the string ferrule. Line it up squarely with the body and we'll tap it in with a hammer. Key thing here is not to use a large hammer. We don't want to pound this in hard. We don't want to risk chipping the paint. This is a precise process that calls for a more delicate hammer. Something like a little Deadblow Fretting Hammer works great. I want to take a moment to talk a little bit more precisely about string ferrule fit. Some ferrules like these have a little lip around the edge and those can be pressed in where they sit flush with the body into a recessed hole like this.
But some holes are drilled straight and this lip is going to sit on the surface of the body. For a string ferrule with a lip and what I think looks like a recessed hole, I can do a quick check of the fit by flipping the ferrule upside down and seeing if it fits flush. This one will. So I know when we go to press it in, it's worth trying to drive it home flush with the body and we're ready to get after it. Line that up nicely in the hole, get our bit centered right in the center of the ferrule, and gently, slowly press it home. The key here is not to press so hard that we start creating a dimple around the string ferrule. We just want to go to where it's flush with the body and no further. Take your time here and go slow.
The mark of a really nice build can be how well these string ferrules are installed. We've got them all pressed in flush with the body with no dimpling or paint chips.
Strap buttons
Let's talk strap buttons. We're going to have to have some way to wear this great guitar we're building. There's lots of options for strap buttons. If you're someone who loves to jump around on stage, you might be looking at something like a locking strap. Since I'm going with a more vintage vibe on this partscaster build, I've chosen these old style non-locking strap buttons that came pre-reliced. They're going to look the perfect part on this build. For installing the strap buttons, we don't want to drive that screw straight into bare wood. We want to make sure we drill a pilot hole so we don't risk stripping the screw head or breaking off the screw.
Luckily this body already comes with the pilot holes pre-drilled, but if your body's not pre-drilled, I'll take you through the steps to show you how it's done. Find your approximate location. I'm choosing to put it in a very traditional spot on the upper horn on my Tele. Use some low tack tape. This is going to allow us to mark on the body without damaging the finish. I then use a small precision T-square to help me mark the center line from front to back on the body. So we mark the center line, put in our crosshair, and this gives us a perfect target for drilling that pilot hole. I like to choose a pilot hole drill bit that's even a little smaller than I might use for tuning machine mounting screws or other hardware on the body. You have to be able to trust these threads to hold.
The worst thing that can happen is for your strap button to pull out of the body. As we did before with the tuning machine mounting screws, we use a depth stop bit. So I've chosen my bit, I'll set my depth stop to match the length of the screw. Tighten the chuck and now we have precise control of that whole depth. So just like before, little wax on the threads, put the screw through the strap button. I like to use these little felt washers to protect the finish on the body from the strap button itself. And these just slide over the screw and we're ready to drive it home. Use a screwdriver that fits well. I like to go snug on these, but definitely not as tight as you can go. That felt washer provides a little bit of cushion so the strap button doesn't rattle. We want to make sure it's secure without risking stripping any threads. That feels just right.
Cool. We'll spin around and do the other side. Since we've pre-drilled a pilot hole, it'll go in nice and square, straight, without any risk of stripping. That's perfect. That should hold for years.
Body and neck alignment
So we're finally at the point that we need to bring our body and our neck together to start to see what this guitar really looks like and our first step in this process is to do a quick check on our neck alignment to make sure that things line up close enough to move forward with the process.
We'll want to have our neck, our body, our neck plate, and our neck mounting screws. For the neck mounting screws, be sure you use a big enough Phillips screwdriver. A Phillips number two fits most snug so we don't strip those screws out. And of course we want to have our beeswax to lube those threads.
So I'll go through quickly lube all the threads with wax. Now this neck has pre-drilled mounting holes as many partscaster necks you have will, but we still need to check the alignment of these holes to the holes in the neck pocket. For this, put our neck back in the neck pocket and I can just stand this up on the bench and I've got a drill bit that's just a little bit smaller than my screw diameter and an easy way to check is just to make sure that they go that full depth goes past the depth of the body here and we're looking good in each one of these holes. So we've got good alignment. If for some reason one of these holes is off, we'll have to take the neck out, drill the hole out, plug with a dowel, and re-drill that hole. Most of the time with a Fender Strat style or Tele style build, you're going to have perfect alignment, but always check that. You'll need your neck mounting screws and a neck plate.
I had this old neck plate kicking around my toolbox. It'll look the perfect part with the nicks and scratches for this build. Hold the neck plate in place and we'll just get these screws started in the neck. We don't want to go tight yet, we're just going snug. If this is a neck that's been threaded on a body before, one of the key steps is to actually turn the screw in reverse so it drops into the threads and then start driving it home. This neck has not been mounted before, so this is the first time the screws are going into fresh wood. And we'll just come up snug. This is not the final mounting of the neck. Just doing an early check of alignment with snug fitting of the screws. So we've got those just snug so that the neck won't move around at all, but it's got just enough that if we need to push it side to side, we can give it a little bit of movement.
So now we'll check the alignment. For this I like to use a piece of high visibility string, something like this orange cord, some bright fishing line, something that allows you to easily see the string on the body at this point to check that alignment. We'll string this string through the back of the body. Just push those through here, on the two outside strings, our high E and our low E string. So we have a continuous piece of string across the back of the body. This prevents us having to try to tie any fancy knots to hold this in place. We're not going to pull this up to any high tension. I'm just going to wrap that on as though it's a string [Dan wraps the string around the tuner post]. If you don't have any cord like this around, you could actually use actual guitar strings. I just like this 'cause it gives really high visibility example of what we're after here.
We're not looking for a final perfect alignment. We'll check that once we have the bridge on and we actually string up. What we are looking for is really close to equal spacing between that low E and high E and the outside of the fretboard. If needed, before you tighten the neck up, you can usually push it back and forth, either up or down just a little bit to get that alignment right. So as we look at our high visibility string here, we can see roughly equal spacing between the low E and the outside of the fretboard and the high E and the outside of the fretboard. And it proves that we're in a great spot to keep moving forward with the build.
The Bridge
We're really getting deep into it now. Let's talk about Telecaster bridges. You've got two primary options, the traditional three saddle Tele bridge and the six saddle bridge.
The main difference is right there in the name. A three saddle has three brass or steel saddles and three intonation adjustment screws, where the later style, six saddle, has an independent adjustment for each of your six strings. What that allows you to do is do more precise intonation adjustment on a six saddle with a more classic vintage look with the three saddle. I'm somebody who loves to be right in the middle. I love the look of a three saddle, but with better compensation. So instead of just the straight brass saddles, I like to use these Gotoh in-tune saddles that have offset string saddle slots and this helps us get the best intonation with the vintage look. Switching out these saddles from the old style to a compensated saddle is really straightforward. Just undo each of these screws, and move the screw, and go right down the line and take each of these out, and we have our new ones to place in here.
Intonation screw goes from the back, spring goes through [Dan pushes the screw through the back of the saddle then places the spring over the screw]. As you're putting these on, just make sure that you've got the heads up on your string height adjustment screws. Sometimes you can drop them in upside down. You could see, I even took time to relic the screws just a little bit at the back just so they look right on this old bridge I had kicking around. Perfect. Right a look at mountainous on the body.
So here's how we check that bridge fit on a Tele. On most vintage style Teles, we're going to have a common spacing of these four mounting screw holes between the body and the bridge. That's a pretty standardized measurement. If you've got a modern body with a modern Tele bridge, you might have some variation. There's crossover between the two. So check the measurements and that key measurement is outside screw mounting to outside screw mounting hole.
This I can just do a quick visual alignment. All four of those mounting screws line up and I've got alignment of the six through body string holes as well. So it's going to be a perfect fit.
The bridge pickup
So we're ready to mount this bridge plate, but before we do that, it's a great time to put our bridge pickup in place. Otherwise we're going to be pulling this off again in just a little bit. So let's take a close look at the bridge pickup I'm going to use on my build. This great Eric Daw custom wound Telecaster bridge pickup. I love these pickups. He lightly pots them, he winds them in the traditional Leo fashion, and he does a great relic treatment that'll look killer with his guitar. But I brought in another Telecaster bridge pickup to show you a difference in the ground wire. And if I turn them over, you can see one of the key differences and that's the metal plate on the back of the bridge pickup.
This Daw pickup has the traditional copper plated steel plate. This adds power, this adds bite. Great for the tone. This modern Fender pickup doesn't have that plate. So there's a tonal difference, but there's also a functional difference. We have to ground our bridge and our strings and this plate has a key roll in that. On the back of this pickup, you can clearly see the ground wire connecting from our ground solder here to the wire soldered to the base plate. This allows us to ground the bridge through the mounting screw that attaches to this plate. On this pickup, without a steel base plate, we have our ground wire connecting to this terminal that will ground to our bridge. And you must ensure when installing this pickup that the terminal is against the bottom of the metal bridge plate. That ensures your strings and bridge are grounded.
So there's two configurations you'll see. Let's get this bridge pickup mounted before we mount the bridge onto the guitar. We've got three mounting screws on a traditional Tele bridge. So you run a screw through the bridge. We then have these springs that hold tension on the pickup and allow us to adjust the height. So we put the spring on first. We'll start getting these loosely threaded. I just start each screw with a couple of turns and this last one could be a little tighter. You get the spring in there. And we can leave the pickup just mounted pretty low for now. Pickups on. We have a wiring hole that goes from the bridge pickup cavity into our control plate cavity. So carefully feed those wires through and gently pull those. Make sure nothing binds up. There should be plenty of room for that pickup and our wires, we can just tuck down there and we'll talk wiring later.
Before we actually mount that bridge to the body, we can do a quick test on our ground continuity just to confirm that we've got that ground wire hooked up correctly to the bridge. Most meters will have a setting that's a continuity test that sounds a little buzzer when you've got continuity and that just means we've got good electrical connection. So what I do is I hook one lead to the ground wire of my pickup, in most cases that's going to be the black wire, and take the other lead and touch it to the bridge. We hear a beep. We've got good continuity so we know we've got a ground connection. We've got our four bridge mounting screws that we're going to wax the thread as we've been doing on all the screws so far. So pre-wax those four. Now this can be as simple as using a large handheld screwdriver. A number two Phillips.
Nice big bit that fits tight in those threads, but there's always the risk when we're doing this screwing over the top of the guitar body of slipping and stabbing the top of the guitar. So I like to do something that maybe some people will think is a little more controversial. I use a driver to get the screws started, but this gives me a little bit more control and I have less risk of stabbing the top of the guitar. I like to do the outside two screws first. So just bring that right down close. I'll do the final tightening by hand.
Then, I'll switch over and finish these by hand. Still like the alignment. Everything's looking good. We go pretty snug. You don't have to go insanely tight on this, but it does hold our saddles, our bridge pickup. We want nice good contact with the body here for the best transfer of tone.
Approximating intonation
So we've got that bridge screwed down on our Tele, but I want to give you a hot tip on how to approximate our intonation before we go any further. It'll save us a bunch of time later in setup and it's using a tool that I always have around the shop that's usually used in acoustic guitar building, but works really well in quickly approximating intonation on electric guitars as well. And this is the Saddlematic. This tool works by helping you measure half of your scale length by placing this little block over your 12th fret and sliding this end of the tool up to the face of your nut.
You then flip it around, placing it back on the 12th fret, and we now have offset pointers at this end that show exactly where our saddle should be sitting. Those should give us approximately correct intonation. And I can see right now these saddles need to come back a little bit more. Before I even string up, I can just quickly bring them back into approximate position. Our high E's in position, bring our low E back, and we just look right where those pins are positioned, lift it up so it doesn't catch, and then we can set our center saddle approximately between those two and we should be right in the ballpark later when we do our final setup.
The neck pickup
So now we're ready to dive deep into electronics and the heart of our next decision on electronics will be our neck pickup. So I've got three bodies on the bench so we can talk a little bit about configurations you might have or mods you want to make and how it'll impact the neck pickup you can choose.
The first is a classic 60s Fender body. We've got the traditional single coil neck pickup and a traditional route for our bridge pickup. Control plate, neck pocket are the same. This is the most standard Tele configuration you're going to see. And if you're coming to the bench with a found body, something you already have in the shop, it's most likely going to look like this. Another option you might see are the new universally routed Fender bodies. This is the Fender deluxe. What they've done is done a much bigger pocket at the neck pickup, they've added a middle position, so you could do a Nashville style third pickup, and then a traditional bridge pickup and control play routing. And on the far end we've got my body. I took a classic 60s body and chose to route it out to give me a little additional room.
So the body style that you're working with can help inform what pickup you can choose. If you have a classic 60s style body with the traditional neck pickup route, you'll need to use a traditional Telecaster neck pickup shape. There's a lot of options out there for Fender Tele neck pickups. Many makers offer different covers, open, unplated, or no cover at all and different winds, but you're locked into that particular silhouette. Once we move over to the more universal, or a body that's been routed for Humbuckers, it opens up a lot more options and we can take a close look at those. Once we go to the bigger route, we of course can bring in something more spanky like a Stratocaster single-coil pickup in that neck. That's a classic sound that's fun to bring to a Telecaster and it fits right there. Of course, we have tons of options in the Humbucker space.
If you want something with more drive, fatter, fuller tone, that's a killer option in a neck pickup. We could bring in something more biting like a P-90. That could be really cool. The universal route allows that to fit in there. Or we could go with something much more esoteric. Things like a Lipstick Pickup or even a Filter'Tron. Might be the best of both worlds between hum canceling features of a Humbucker, but more of that brightness and detail of a single-coil. I think this is the kind of pickup that I want to go with for my build, something unique that you don't often see in a Tele. So you can see, there are a ton of great options in pickup styles and configurations you can choose from. We could do a 10 part series on pickups alone. We're not going that deep. Just know that there's a lot of models you can choose from, both big names and boutique makers and tons of room to explore the sound and the look that's right for you.
Control plate selection
So now we've got our bridge installed. We've selected a bridge pickup and a neck pickup. It's time to talk about the control plate and it consists of just a few simple components. We have a volume control, a tone control, a switch is how we switch between or combine in different ways our two pickups, a capacitor for our tone control, and sometimes a treble bleed. There are three main styles of switch that you'll see on a Telecaster control plate. The very original 3-way switch, which gives you neck combined pickups and bridge, a 4-way switch that adds an additional option for combining pickups, and then a 5-way switch, which gives you the ultimate number of options for configuring the combination of pickups. But that's it. It's that simple. So as you think about starting to wire up your control plate, you've got to find a schematic you're excited about. That could be informed by the pickups you've chosen or the switching configurations you want and you can find those schematics online, on forums, or there's a number of great books.
This is Eric Daw's new book Solid Sound that I helped design. We're really excited about it. There's a few top secret Telecaster wiring schematics in here that I'm particularly excited about. But if all of this is sounding like way too much electronics for you, there's always the option of some great pre-wired harnesses. There's 3-way and 4-way switching configurations with top quality components that are all soldered up and ready to go. So this is a great backup if you're not ready to dive in deep. The great thing about a Tele style partscaster is it's such a safe and easy place to learn guitar wiring and the worst that can go wrong is it doesn't work the first time. With soldering, you can always unsolder, re-solder, try again until you get it right. So let's build one of these together right now. The foundation is our control plate.
I chose a Relic one. There's a couple different styles. You can find one that's going to look best for your build. They all have the same configuration, two holes for pots and one switch position. So we got that. Next we want to pick our switch. I've chose to go with a 4-way. Just give me one other configuration option. We'll go with the 4-way switch. The next decision to make is Potentiometers and there's a few more considerations with regard to what potentiometer value you choose based on the pickups you're using. With the traditional two single-coil setup in a Fender guitar, we usually use a 250k pot, but you've probably also seen there's 500k and one meg pots that are used in guitar wiring. It's much more common to use a 500k pot with Humbuckers. The consideration here is that a 250k allows a few more of the high-end details to bleed to ground.
As you move up to higher values, 500k and one meg, you preserve more of that high-end detail. So a Humbucker is going to sound a little bit better with a 500k pot. At the upper end of the spectrum, you've seen jaguars and jazz masters that use one meg pots and that's part of how those have that bright high-end detail. It's really about the tone you're after. There's no right or wrong answer here. Feel free to experiment. And you could always unsolder those pots and swap in some new ones to see how they sound. Since I'm going to be going with a Filter'Tron pickup, it's a little bit closer to a Humbucker, I think I'm going to go with 500k pots and see if that preserves some of that high-end detail that I want to have. So we've got our switch and we've got our pots, let's talk capacitors.
Everyone loves to talk about tone capacitors in their guitar. There's lots of makes and models, both vintage ones that you can salvage or buy NOS from vintage silver Micah and film capacitors including ceramic capacitors to modern takes, modern ceramic, orange drops, paper and oil, or modern film. What really matters on your tone capacitor is the value. As you go up higher in value, higher microfarad, it's going to bleed more of your high-end detail off to ground as you turn down your tone control. To preserve more of that detail, you can use a smaller cap. When I choose a tone capacitor for a guitar, I like to preserve some of those high-end details for a more subtle tone roll off. My preference is to use something like a 0.02 or a 0.015 microfared, but you can pick anything you want from 0.05 to even less than 0.01 microfarad. Experiment a little. It's a really fun place to try it.
Wiring the control plate
Before we heat up our iron, I want to talk about one more decision to make and that's which direction we want our control plate. On a Telecaster, you can do the traditional setup with the pickup switch at the front, volume, and then tone in the back. Or we can do a reverse setup, which is my favorite that puts your volume control first, tone, and your pickup switch at the back. This gives me easier access to the volume control. It's the way I like to wire them. Make that decision, get the iron heated up, and we'll start soldering. Get this turned up pretty hot. I like to work hot when I'm soldering and we'll start wiring this up. Going to do it in reverse and we'll get the switch installed first. Melting screws in nice and snug. Cool.
We got our switch in and we'll get our potentiometers in their next. So we do nut, lock washer, flat washer, and then the nut. Take a moment to get that pot nice and square on the back of the control panel. As long as it's reasonably centered, it will fit in the control cavity, but if it's off center too much, it could hang up when we try to install it later. Just use a nut driver. Get this nice and snug [Dan tightens the nut down firmly]. This is something that can come loose down the line and really annoy the player. That looks good. Got this one. Tighten that up [Dan secures the pot to the control plate by tightening down the nut]. Clamp this up in the Nut and Saddle Vice to hold it while we work and we can start soldering. And we're going to start with what I call a safety ground. On a Telecaster control plate, we ground through the back of the pot and we actually use the control plate itself to do our grounding, but I like to do a backup ground between the two pots. Provides some mechanical support for the pots so even if those nuts come loose, they don't want to turn.
For that I like to use a little heavier gauge wire about that long, push back the cloth, and we'll take off the insulation. We're going to solder it in place on the side of these two pots. I like to use a little bit of denatured alcohol on a Q-tip just to make sure we've cleaned off any contaminants. Some of these pots ship with a light coating of oil on it or they just have some oxidation. Just going to do a little bit of pre-soldering on the side of the pot. One spot there. You can see by decreasing the side of the pot, you get really nice adhesion. Then we can bring in ground wire.
Side one. Put our second side on there. Nice and clean. No need for extra solder, big globs, anything. We just want nice, wet looking solder joints. Moving on to putting the tone cap on our pots. I like to use some pliers and just gently bend up these contacts. Gives us a little bit more room between them for our cap and also easier access for threading wires through them. And want to figure out how to fit this tone cap. So we need to go from this lug to the back of the pot to ground that end of the cap. This lead, we need to curve around and hit the center lug on our tone pot. So let's use a little bit of insulation. Cut off the section. Just push back cloth wire. So you just push it back, take the wire out, if we're careful we should be able to feed this onto the lug of our capacitor. There we go. This is going to work beautifully. Oh, it's going to fit perfect.
I'll just clean off the back of this pot right here. Trim off the excess wire. We'll throw a little solder on the back of the pot here, a little bit on this lug, and then we'll get right here at this end too [Dan solders the capacitor onto the pot lugs]. Looks good. All right. We got our capacitor on there. Let's keep going.
We're good to get the switch wired up to the potentiometers. So this is the main wire that runs from our switch over to the two controls. Of course you can use the traditional black and white cloth covered wire, but there's some fun colors available and it's nice to add a little bit of character and style to your wiring. You can get a lot of inspiration looking at photos online. There's a lot of different ways to route the wires to achieve the same schematic results. Take your time, look at some photos if you haven't done it before. I still look back at old work of mine and look at ways to improve it, make it look nicer, or do it more efficiently.
Should be just the right length between our lugs. So that's looking good right there. Put this piece of insulation back in the middle. Electronically this isn't necessary. I just think it looks really nice. It gives me very clean continuous runs. Going to tack that in place and we'll continue on. Here I'm just going to cut that insulation off. Going to tie two lugs together with this piece of wire. There we go. Now we just need to run a ground wire down this side from these two lugs down to the side of the pot. So I'm going to clean that side of the pot again. Good connection. Do some black wire for this one. Up through here. Connect these two lugs. There we go.
And that'll work beautifully. You always want to make sure you let the solder cool completely so that the wire doesn't move. Got two more lugs to tie together and then we'll have this one wrapped up. Sweet. So we've got it all soldered up. Things are looking clean, looking tight. Nice solder joints so we know it's going to sound good. Can't wait to get this wired up. So before we drop this into our body, I want to talk about another optional element that some people like to add and that's a treble bypass or treble bleed cap. One element that happens on a volume pot as you roll it down is you also lose high-end. And some people like to preserve that with the bypass cap. Simply solder it across these two lugs so it's very easy to add. One thing you could do is make up a little clip in test unit for your treble bypass.
Here I've got the cap and resistor hooked to some small alligator clips. And for testing the tone out later on, I can just clip it into the circuit and hear what it sounds like. Simple as that. This is a personal choice about the tone you're after and the style of playing. I chose not to add that on mine, but I might add it back later.
Installing the pickguard
The pickguard is the natural next step in our partscaster build and it's one of my favorite steps. This is where you get to decide how you're going to dress your guitar. This is all about expression and style. There's some functional considerations, but a lot of it is how you want it to look. One of the main reasons why this is the perfect point to bring in the pickguard is we want to make sure this is fitting between our neck that we've installed, the bridge that we've installed, and our control plate and we've got this wired up, but not mounted yet, but everything comes together at this moment and we want to check alignment. It's kind of a fun point to also bring in some knobs. It can really start to change the look of a guitar. This is a classic white three ply pickguard, but we could switch it out to something like a black three ply. That's cool.
Go with some older style knobs. Give it a little more character, those tall boys. Mint green that's also an eight hole pattern. These would be totally interchangeable. Do some red knobs with the mint green. Maybe a little bit too much of a Christmas vibe. Let's bling it up. White pearl. That's a little more classy looking. Some tortoise to bring out the red in those knobs. Here's a Bakelite Pickguard that I did a custom paint job on. They were taking it back more 50s style. It's pretty sweet. You see, there's a lot of options and you can completely change the look of the instrument just by switching out a pickguard. As we take a look at these, there's two main categories of pickguard mounting on a Telecaster style pickguard.
There's five hole and eight hole. What we're specifically talking about is the holes around the perimeter of the pickguard that screw it to the face of the guitar. So here's classic five hole and here's what we see in terms of a more modern eight hole configuration. It's pretty easy to switch between the two of them. If you're going from a five hole to an eight hole, we'll have to drill some additional mounting holes. If we're going back to a five hole, those other mounting holes are covered by the pickguard. So it's a really easy change to make with just a few holes to drill or a few holes to cover up. So you can see that both of these pickguards are mounted for a traditional single-coil Telecaster neck pickup. We might be looking at any number of other pickup options. So let's look at the implications there on other pickguards.
We could take a look at everything from an Esquire style pickguard with no neck pickup, a traditional single-coil or even something like a Humbucker. Number of these are available commercially. You can buy them pre-routed, but there's some configurations that you might have to do some custom modifications for. So here again is that custom pickguard I made for this build to house that Filter'Tron pickup. I took a regular single-coil routed pickguard, I 3D printed a router template, and did simple modification routed for that Filter'Tron. Pretty easy modification to customize this any way you need. I'm going to bring this pickguard in so we can look at the fine-tuned fitting before we start drilling. Brought the control panel in and it's not yet mounted. It's free in its cavity and our pickguard is also free to move. So these are two moving elements that we want to check our alignment and make sure we like how they sit.
Once we've got this in position, which I'm liking how this fits, everything looks square, we'll low tack tape this to the top of the guitar before we start marking our holes or drilling any holes. So I like to use a wider low tack tape. Low tack so we don't risk any damage to the finish, but I like to have some good coverage so it holds things securely in place. I like how this is sitting. Just make sure you don't cover any of the screw hole positions, but add some tape anywhere else you can to hold things securely down. I'm going to show a couple different options that you can use at home for marking the holes for your pickguard mounting. One of the first options would be to use a high contrast removable pencil. Something like this white pencil on a black body is going to make it easy to see.
Another option would be to use something like a center punch or an awl to very carefully mark the finish at the center of each of those holes. I'm going to show you a third option that I like to use on my bench and that's using these depth stop bits in kind of a unique way. Just like before, we're setting it to at least the depth of our screw and pushing the collar back against the jaws of the chuck. So we set that depth stop collar. When I slide it down, they have a tapered end and it fits perfectly in most counter sunk pickguard control plates. I get my drill squared to the body and I hold onto that depth stop collar. What I'm going to do is use that to self-center the drill bit and just drill straight into the body. Carefully pull it straight back out and we've got a nice centered hole, perfect depth for our screw.
The control plate has the same counter sunk holes. So we've got all the holes drilled. I'll get this tape off. One consideration when we've drilled new holes into finish is that we could get finish chipping when we drive home that screw to mount the control plate with pickguard. I like to use a counter sink bit like this to lightly chamfer those holes to ensure we don't get any chip out. This one has enough flutes that it's easy to spin by hand without any chatter. We don't need to use the drill. Just get all of these holes counter sunk just a little bit to remove that finish. There we go. So before we screw that pickguard down to the guitar body, we need to get our neck pickup mounted. We've got these two pickguards to show the primary ways that pickups are mounted on the neck of a Telecaster. Both of these are routed for traditional single-coil, but you see, this one is pre-drilled with the mounting screws in the pickguard.
In this one, the pickup actually hangs from the pickguard itself and you control the height through those two screws. In this case, there's not two holes drilled here. The pickup is actually screwed directly into the base of the pickup route. I've pre-drilled mine for pickup mounting, which I think is an easy way to adjust that height. You'll have different mounting approach based on the pickup you've chosen. I'll get this one mounted on the pickguard and I'll get this screwed down. So this is that pickguard mount. We've got our mounting screw, goes through the pickguard. Almost all pickups have either a spring, a piece of rubber tubing, or in some cases foam block from the back to help push that pickup up as we adjust the height. And I'll get this first leg mounted. The leg is what we call the little tab on the back of the pickup. And then we'll do the second one.
Almost all pickups that mount this way, it's kind of fiddly business to get that screw, the spring, the pickup, all lines. Those are threaded on there. I can keep the pickup sitting low for now and we get this pickguard screwed down to the guitar body. The one fiddly bit can just be running your pickguard wire through the access hole here. Little patience, little finesse, you'll feel that sink right down there. Sits beautifully. So we'll grab, again, our bees wax, paraffin wax, or furniture wax 'cause we're going to wax our mounting screws. Since this is the first time they're going in, we want to be nice and square to the body. Since we drilled the right size pilot hole, they go in easy. So just like that.
The output jack
So our next step is getting our output jack wired up and installed and there's two primary ways that you have an output jack installed in a Telecaster style body.
There's the vintage style cup that always comes loose. Those things are invariably troublesome, so I try to avoid them whenever I can. They're vintage correct in a historic instrument, but any newer instrument or a partscaster build, I love to use an Electrosocket Jack Mount. This screws into the same hole in the side of the body so it stays secure and the output jack stays secure within that socket. This is the absolute best way to go if you're doing a partscaster build.
So let's take a close look at that output jack and how we wire it up. If you look in here closely, we've got the sleeve, which is our ground and the tip, which is our hot connection. Usually we have corresponding colors. Our black wire is a ground. I like to actually curve it over and crimp it closed.
The main reason I like to do this is this is one area on a guitar that can have stress or movement if this jack ever turns, which an electrosocket shouldn't, but if it ever does, I want to make sure I have a secured connection so we always have a solid solder joint. And I'll just get this hot wire ready to go as well. Pull back that cloth covering, create a little loop, crimp this on. Grab my 60/40 solder and a hot iron and we'll solder these up. I'll do the same thing on the hot lead. While that solder cools, we don't want any movement. I pull nice tension back on the loop that I crimped. So those are secure. I like to just put a couple sleeves of heat shrink on here to keep things neat and tidy. It's a clean look. So let's get that socket installed on the side of the body.
Take our two leads, fish them down through the output jack hole, and up into the control panel area. Push that electrosocket jack down squarely against the body. It's nice to take time to get these screw holes lined up. We don't want to rotate this 90 degrees and be drilling or screwing out into the more shallow edges of the body. Going to take a depth stop bit set to match our installation screws. These are drilled at an angle here. We'll wax those threads, drive them in just like we've done the others [Dan tightens the screws on the output jack with a screwdriver]. So that's in.
Final wiring
We can start finishing up our control plate wiring. We're in the home stretch of our wiring. We've got our control plate ready, we've got all of our wires routed, and we're going to bring this together to finalize this step.
Just worth noting that we want to leave a little extra length on all of our wires. Gives us an opportunity to open this up in case we want to take a look at it, need to do any repairs or modifications down the road. So let's get into the soldering. One of the first things I like to do, bring our ground wires together here, push those back, and we're going to solder those to the back one of the pots. We've already cleaned the back of the pot and soldered here before so it's tinned and ready to go. I'm going to get these wires tinned just a little. Then we're going to stick them to the back of the pot. Again, you don't want a cold solder joint. You have to be able to hold this still while it cools. So we got that in. We have our output wire here. We've taken our time to get things right so far so don't rush this. You want good connections, you want clean wiring. Seems like that should work nicely.
Okay. So we've got our grounds and our output wired up. Now I'm going to do the final wiring of the hot leads of our pickup. This is critical to make sure you get those to the right lugs on the switch for the correct switching configuration. So take your time, check your schematic. Feel free to look up photos of other people who've wired the same output. It's nice to look at examples of how these go. Get that wiring right and double check. Okay. So we're going to get our bridge pickup hot lead wired in here.
I like to take my time with each solder joint and make sure I'm really happy with how it looks. There's no sense in rushing this. Some pickups have really nice robust 20 or 22 gauge cloth covered wire. Some pickups, like this Filter Tron, have a little bit more delicate wire so handle it accordingly. We don't want to go rough with it, break anything off, or fray anything. If you have any wires that haven't yet been soldered, if you can see the strands of a stranded wire, it's nice to pre-trim those before you try to solder them to another connection. Also leaves just a little extra solder on the wire. It helps when I make a connection to one of these lugs. Just have one more connection to make. Perfect.
Let's get this tucked in here and see how it fits. Don't just cram this control plate down. You can take time, push the wires down, check for stress, specific stress on any of the joints or wires that get caught on the side of the pots. That could be a key thing that hangs up as we bring this down against the body. I really like how that fits. We put in our two screws. Same thing we've been doing, wax those threads. Nice and square to the surface and just drive it straight in. Tighten it up. Our wiring is done.
Knobs and switch tips
So let's talk knobs and switch tips. This is the final component selection of our build and can really affect the character and style of your guitar. I've narrowed down my selection from the big bag I brought, but there's an incredible number of directions you could go from scrounging vintage knobs from old equipment or used stores to new production or reproduction.
There's a few considerations with knobs. You need to make sure that they're going to fit the shaft diameter of your volume and tone pot. Most often on a T style build, we're using shafts that are quarter inch. So as long as a knob will fit a quarter inch shaft, anything goes. This is the set that I'm really excited about. Has much more of that 50s vibe. Reminds me of something TK Smith might do. Fits kind of the energy of this. So once you get your knobs selected, we could look at some switch tips. There's the two classic top hat and barrel knobs that you see on a lot of Fender builds. Both of those are great, but there's a few other vintage style knobs you can find. These are two dollar sign ones I collected up over the years. Get that on there and you can kind of see how they look.
For that switch tip, you want just a snug fit. You need to be able to pull it off if you have to do any repairs or change the switch so you don't want to glue it on. I think this is my final selection, these cool 50s vintage vibe knobs. The dollar sign switch tip. I think this really brings the look together. So let's get these installed. To get those indicators aligned where you want them, I turn my knobs all the way to 10. Then you can position the indicator where you want it when you're turned up full volume. I've got a little tip for how to set the height on these knobs so they're not running on the control plate. That rubbing can just be an annoying sound or they can bind up. I grab a pick. You can really pick any thickness you want. And you take the pick with the knob still loose and set it under the knob.
And this gives us a simple little height gauge to get some clearance and this allows us to set both knobs at exactly the same height. Just a nice visual touch. And we'll get in here. Gently tighten up the set screws. There's no need to crank these tight. We don't want to strip them out. Locked in position. Cool. This is a pretty incredible moment. We've got our full guitar. We've made all of our component selections. We've got a neck that feels great and a body that I love and we're ready to move into setup mode.
Fret buffing and fretboard cleaning
This is a perfect time to take a moment to get that fretboard and your frets in beautiful shape. One of the first things we'll do is a light polish on the frets. A quick way to do it is just to use the fingerboard guard that surrounds the fret to protect the wood while I use some polishing papers to put a quick shine on these.
Just going to give these a light buff. Now we'll grab some fretboard finishing oil and just condition this new rosewood. If it's an older fretboard, there might be some finger grime to clean off if you want. If it's a newer fretboard, it may not have been oiled yet. It's nice to get that freshened up. Get that excess off of there. Clean next to each fret so we don't have oil on our fingers later. It's looking beautiful. It's time to grab your favorite pack of strings.
Final alignment
We're going to string up the low E and the high E and that gives us a final chance to check the alignment. I'm happy with where that's at. I'll snug up these neck screws. Before we put all of the strings on, there's a consideration to have. I've got a vintage style neck where the truss rod adjustment nut is at the heel of the neck.
My pickguard is in the way. So I'm going to loosen the strings a little, get that out of my way before we string up, knowing that we're going to have to adjust that truss rod nut on this first setup. Okay. We got the pickguard out of the way. Let's get the rest of the strings on. With the strings on, this is a perfect moment to install our string tree.
The string tree
A string tree is a piece of metal that pulls down on usually the high E, B string, sometimes the G-string as well. They screw to the face of the peghead and pull down on those strings to provide balanced tension across the nut. So with those strings on, I'd use an awl to mark where we want to drill. I like to place it just about in line with the A stringing post. Set a depth stop bit again.
This is another great place to use a countersink bit. Lightly chamfering that hole. Wax the screw threads again. With this particular string tree we're not going to drive that screw all the way down to the face of the headstock. This one actually floats up with the strings to give us balanced tension across all of them. So we're all tuned up and strung up at tension. Now we're going to start the setup.
Setup
There are four steps and it's the same four steps every time.
- We check the relief
- Check the action at the nut
- Check the action at the 12th fret
- Set intonation
Check the relief
So let's check the relief. I like to use a Neck Relief Gauge. Sits at the first fret and the 12th fret and it measures my relief at the fifth. So there's a wide range of opinions on the perfect relief setting and it depends mostly on player preference.
It's the feel you're looking for, the string gauge you're using, and the style of music you play. But usually we're anywhere between a perfectly flat fingerboard at zero to thousandths of relief up to at the high end, maybe 10 or 12 thousandths. So I like to see it in the middle of the range. Somewhere in the four to six thouandths range is a nice flat neck for my style of play. And if I look closely here, we're at just about nine and a half thousandths. That's a little bit more relief than I'd like to have. So I'm going to tighten the truss rod nut to straighten this neck out just a little bit. Just a little bit at a time and we'll check our relief again. I love this. We're sitting right at five thousandths. At this point in the setup that's probably a good spot to stop.
We want to let this neck figure out where it settles in. Over the next days it's going to continue to change so we get a nice sweet spot now, we know that we may have to make final adjustments as this guitar settles.
Check the action at the nut
So our next step in the process is check the action at the nut. You could use a String Action Gauge that has thousandths of an inch. You can get these in metric. You can also use Feeler Gauges. My preferred way in the process I've adapted to is using a Digital Nut Slotting Gauge that I use for measuring both the action at the nut and the action at the 12th fret. And you'll also see that I'm doing something that might be considered unconventional. I take a number of these measurements with a guitar laying down, not in the playing position. It allows me to use this digital indicator in the way that works for my process.
If you're going to use something like a string action gauge, it is great practice to do this in the playing position. Things change based on how you hold it. So that is best practice when you're using feeler gauges or string action gauge. This is a process I've adapted to and it works really well for me. So let's take those measurements so we can see where we're starting. We zero it with the string in a neutral position. Then I take and gently press down on either side of the indicator and it tells me how many thousandths of an inch are between the bottom of the string and the top of the fret. That's what we call the action at the nut. And I'll go through each string and write this down. So we're starting right now at 32 thousandths. That's wickedly high and we'll bring that down, but right now, just document it. Don't make any changes.
This point, none of these numbers mean anything specific. We haven't even done a rough setting of our action. We're just documenting where we are so we can see how things change.
Check the action at the 12th fret
So now we're down here at the 12th fret to check the action at the 12th fret. So we're going to go across the strings, check where we're at. I will make an adjustment this time as we're roughing in our action. The way I use the nut action gauge at the 12th fret is I press the string down against the 12th fret, I zero the indicator, and now I have a direct reading of my string height. Then down here at the bridge, I'm adjusting the saddle height and seeing real-time the change in my action. So I'm going to go into probably 66 to 68 thousandths on this low E for the first pass. Going to move to the A string and zero it.
We're starting down at 50. I want to bring this up. So we're probably at 64. This is approximating the same thing you do with the radius gauge. I'm just using the nut action gauge to take that measurement. There are a number of other ways including using a string action gauge to set the action at the 12th fret and you could follow your preferred method. So we just made our first big adjustment of our action at the 12th fret and that could change the string tuning. This is real important that you have it tuned to the pitch that you play 'cause that affects how much tension there is on the neck and what that relief setting is. We're back up to pitch. Tip the guitar up, check the relief. Again, I'll be really happy if this is right here around five thousandths. That's perfect. So there's not going to be any other major changes to relief.
Loosen up the strings, get this pickguard put back in and secured. Now we're ready to get back to the nut to do our action at the nut. This time we're going to take our nut files, get them adjusted properly. Since I'm going to be filing some of the bone nut, I like to put some low tack tape down over the rosewood fretboard. Also, just in a rare chance that I were to tip that nut file down too far toward the headstock, I put an additional piece of tape on the other side of the nut. The primary tools we want to use are a set of nut files that correspond to the string gauge you use. So look at how many thousandths of an inch each string is and make sure you have the corresponding file. There's a range of acceptable adjustments here for action at the nut.
A good range to look at for your action at the nut is approximately 20 thousandths of an inch between the top of the fret and the bottom of the string at the low E down to approximately 10 to 12 thousandths at the high E. So let's get into the measurements. Gently press down on each side of the string over the first fret. So we're at 32 thousandths. I'd like this to be much closer to 20. Maybe in that 20, 22 thousandths range. It's our low E. So we grab the correct nut file. I pull the string gently up out of the nut slot and out of the way. When we're filing nut slots, we want to gently tilt the file toward the peghead. We'd like to roughly match the break angle of the string. So I'm just going to tip this up just a little bit and take a file. We want to go very easy. New files like this one cut quick. There also could just be glue or debris in there that's giving us high nut action. So take a very light pass and start checking the impact. We came down about a thousandth of an inch so I know I can be a little bit more aggressive with it.
I like where that low E is sitting now. So I'm going to repeat that same process for each of the strings across the fretboard. Using the correct corresponding nut file, gently working down to my target number, and documenting those specs in my notebook. So I've got the action at the nut set just where I like it. We're now ready to move back down to the 12th fret. So we're back to having a few of these higher and a few lower than I like to have. So now I'll go back through and make some easy adjustments to get it dialed in where I like it. Okay. So we've got the relief set, we've got our action at the nut, and we've got our action at the 12th fret. So intonation is the final adjustment.
Set intonation
I do this in the standard playing position, like we all do, and we're comparing the open note to the 12th fret. Remember earlier how we used that Saddlematic to approximate where we wanted those saddles? We are almost dead on.
We're a few cents sharp on that G so we can talk about how to make that quick adjustment. If the fretted note at the 12th fret is sharp, we need to elongate the string and move the saddle back. If our fretted note at the 12th fret is flat, we need to shorten the string length and move the saddle forward. So we need to bring that G saddle back just a hair. This is a small adjustment. I'm not going to loosen the string to do it. We just come back of the saddle. To make that string a little bit longer past the 12th fret, we go clockwise and it just brings the saddle back just a hair.
We're dead on.
Pickup height
So the final adjustment we're going to talk about is pickup height. And again, there's a lot of variation and personal preference here. Too low and you'll have almost no output. If you go too high with your pickups, the magnetic pole can interfere with the strings and cause intonation issues or out of tune sounds. I suggest starting with the manufacturer's recommended pickup height. It's usually a good middle ground. Plug into your favorite amplifier and adjust to taste. There's a couple of ways we could measure our pickup height. We could use a String Action Gauge. It's easy to set it on top of the pickup and measure that height from the top of the pickup to the bottom of the string. A precision rule also works really nicely. We're most often measuring this in 64ths of an inch. I'll make a few adjustments as my starting point.
Bring this side up a little bit and we'll bring the trouble side up a little more too and we'll use that as our starting point. I'm going to make a quick adjustment on my bridge pickup as well. This is a really safe place to play with tonal adjustments on your guitars. Without even switching pickups, setting pickup height can change that response and that tone. Woo. We got it. This partscaster is dialed in. I love the way this is feeling. I cannot wait to get it plugged in and hear how this sounds. This guitar is ready to rock.
Dan Erlewine: Hey Dan, wait from me.
Dan Petrzelka: Oh, hey Dan.
Dan Erlewine: Welcome to StewMac.
Dan Petrzelka: Oh man. Thanks for having me.
Dan Erlewine: I heard about what's going on down here. You're putting a partscaster together.
Dan Petrzelka: Yeah. We've been putting this together, showing everyone how it's done.
Dan Erlewine: I love it.
Dan Petrzelka: Oh, it's been a lot of fun. You want me to throw it up on the bench, you take a look at it?
Dan Erlewine: Yeah. That's what I brought these for.
Dan Petrzelka: Get the proper inspection here.
Dan Erlewine: Wow.
Dan Petrzelka: Found a few parts down at the warehouse and brought a few parts from home.
Dan Erlewine: What are those?
Dan Petrzelka: Some cool vintage knobs. Little different style.
Dan Erlewine: What would they have come off of?
Dan Petrzelka: I don't know. Maybe an old radio I think.
Dan Erlewine: Gosh. That's awesome.
Dan Petrzelka: Dollar signs, switched it.
Dan Erlewine: I want to hear that. TV Jones with Tele pickup.
Dan Petrzelka: Yeah. Eric Daw wound that one. He does some custom wound pickups. That should sound incredible.
Dan Erlewine: I have two of these in a guitar that I built and I love this on them.
Dan Petrzelka: Those Filter Trons are pretty cool. Should we plug it, try it out?
Dan Erlewine: I would love to hear it.
Dan Petrzelka: I haven't heard it yet. This is the first time I've plugged this in. I think we should go through and make sure I got the wiring right. I threw a 4-way switch in it so we should have bridge pickup.
[Dan plays slow music on his partscaster]
Dan Erlewine: Wow.
Dan Petrzelka: There's that bridge pickup. That thing will get up and go. Both pickups in parallel, like a classic Tele would have.
[Dan plays slow music on his partscaster]
Neck pickup. Here's that filter tron.
[Dan plays slow music on his partscaster]
Dan Erlewine: Hello.
Dan Petrzelka: And then you get both in series for something a little hotter. Gives you a little more push.
[Dan plays slow music on his partscaster]
Dan Erlewine: It's awesome.
Dan Petrzelka: That's a pretty cool sound.
Dan Erlewine: That's incredible, Dan. The guitar you're playing and glad that you showed all the audience out there how fun and how good a guitar can be when you build a partscaster.
Dan Petrzelka: It's a really fun way to build your ideal guitar or just experiment with something new. Thanks for swinging by to check it out.
Dan Erlewine: You know I wanted to and I would hang around, but I have 10 fret jobs I got to do this afternoon. So I better get moving.
Dan Petrzelka: That's pretty wild to have Dan Erlewine stop by to check out my partscaster build. Hopefully you can see that there's so many possibilities and you found some inspiration in this whole process. This is the dream Tele that I've built for myself. Go out there and figure out what you want to build. Find some inspiration, find some parts, put it together. The options are limitless and you can keep improving and modifying your partscaster too. Fact, I think I saw a bigsby around here somewhere. That looks sweet. I got to get back to work.