How to strip a modern poly guitar finish
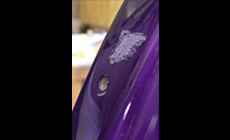
Geoff, the owner of this Fender Jazz Bass, says “It plays fine but I don't really like the color.” (No argument from me on that.)
“I wish it had a Fender sunburst,” he says, meaning the three-color ‘burst of so many 1960s Fenders. It’s a good look, created in nitrocellulose lacquer instead of the hard plastic coating that’s on there now. This stuff is essentially a sprayable epoxy, and it won't budge using traditional strippers. It’ll just turn into a nasty slurry, never giving you a clean strip. Sanding works, but man that’s messy and time consuming.
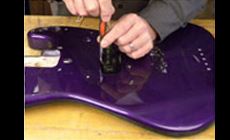
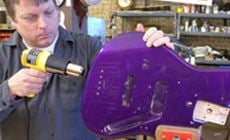
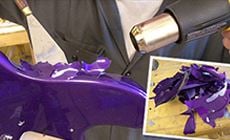
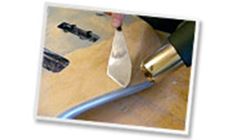
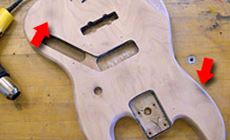
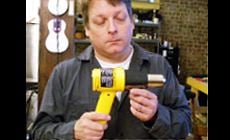
I’m going to use a super-simple method to remove this purple plastic armor: a good ol’ heat gun from the hardware store. Before you start stripping a solid color finish, ask yourself what's underneath. Often, manufacturers cover ugly, pieced-together bodies with solid colors. Look at this other solidbody I'm also refinishing this week: the body’s assembled from scraps. It’s a good thing this one’s getting an opaque finish. I explained to Geoff that we might find a good or bad surprise under his purple finish. If we’re in luck, he gets his sunburst. If it’s junky under there, we can spray a solid color he likes better than the purple. He decided to go for it, so I got the screwdrivers out and started removing parts… Starting with the heat gun on its lowest setting, I worked in the area of the rear strap button. I kept moving back and forth to avoid scorching the finish or wood underneath. Here I’m using a separation knife to test the finish for softness. Pretty quickly it became soft enough to work the sharp corner of the knife underneath. This was the first time I’d ever stripped a metallic finish, and I ran into something I hadn’t counted on: under the clear and purple coats was a metallic base coat. I kept at it, and the heat softened the metallic coat enough for an easy peel. Even so, this was going to take a little longer than I originally planned to strip down to the bare wood.
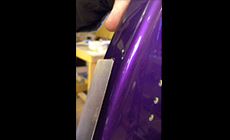
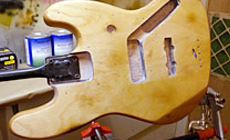
I switched to the bridge removal knife to remove the clear top and purple tint coats, heating small areas and working the knife underneath to lift and remove the finish. Remember to keep that gun moving to prevent burning the finish! After about 30 minutes I had the body stripped down to the metallic base coat. It looked similar to Fender's Inca Silver. It smelled like an acrylic, which is probably what it was. At this point, I could have switched to using conventional strippers, but I stuck with the heat gun to finish the job.
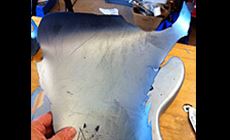
Like the topcoats, the silver peeled off in huge pieces! A final pass scraped off the remaining metallic finish and sealer bringing it down to bare wood.
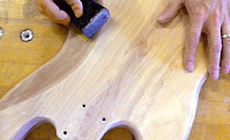
At this point I noticed that I did scorch the wood in a few places. Ouch! Lucky for me the scorches were pretty light, and in places where they'll be covered by the dark outer edges of the sunburst finish. Otherwise, I'd probably bleach the scorched areas back to their natural color. Time to prep the body for finishing. To remove as much remaining sealer and finish as possible I sanded with 120 grit, then followed that with 220. After sanding, I wiped the body with naphtha to remove any contaminants that might be on the surface.
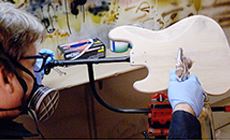
The factory sealer was probably poly-based, so I'd expect compatibility issues with my nitrocellulose topcoats. I needed to seal the wood to ensure that the nitro would stick without peeling or lifting later on. I've often used shellac for this, but recently I've started using ColorTone waterbase sealer because it goes over everything except oils, and it's compatible with nitro. It sprays on easy without mixing. I sprayed a couple of light coats and left the body to cure overnight.
After the sealer had cured, I level-sanded the finish with 400 grit. From this point, I'll go on to spraying the sunburst following the guidelines in our Guitar Finishing Step By Step book. Here's some good info on spraying a sunburst: a Trade Secrets article about spraying a 'burst using aerosol cans.
After shooting the color, I'll build my clear topcoats and let the body dry over a few weeks before buffing it out. This purple monster is going to look like a classic!
A heat gun is the quick way

Heat-stripping a poly finish

I’m happy to spray that 3-tone burst for Geoff, but I sure don’t look forward to stripping off this super-hard poly finish.
Do you really want to see what's under that finish?