Money talk: estimating prices for repair work
How I inspect a guitar to estimate my repair prices
Let’s talk about money
How I inspect a guitar to estimate my repair prices
This customer needed some pickups wired. He also asked what other work his guitar needed — and how much it would cost.
“Dan, while my guitar’s in your shop, please give it whatever it needs. The nut may need work... and check out the string buzz on the D and G strings.”
Sure – send it by UPS and pack it carefully!
But please don't send styrofoam popcorn!
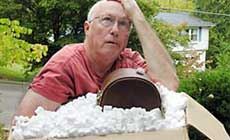
Phooey... popcorn.
I beg folks to use newspaper wads for packing material, but it’s a losing battle. This guitar arrived in a blizzard of popcorn. Oh well...
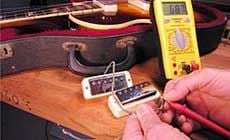
The job was to install a pair of vintage Gibson pickups the customer bought on eBay. I used a multimeter set to the 20k scale to see that they actually work: both pickups read near 6.9k. Their installation was quick and easy.
Let’s go through the inspection checklist:
I’ll show you the steps of a quick exam looking for repairs needed. After that, I'll list the estimated charges for the work.
Start with the electronics
1. I'll start by plugging the guitar into an amp to make sure that the pickups and controls work and aren’t noisy. If the pots sound a little scratchy, I'll use electronics cleaner on them. If they're tough to get at (like on a semi-hollowbody), a pot cleaning cap is a big help.
Read the neck
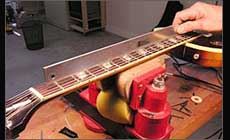
2. I’m checking to see if the neck’s straight, backbowed, or upbowed. I use the notched straightedge for this because it reads the surface of the fingerboard itself, unaffected by uneven frets.
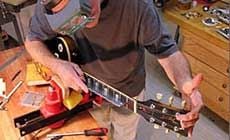
This neck is almost perfectly straight (a good sign). The frets are funky though: they’re too low and uneven — somebody’s done a bad refret job.
Read the frets
3. Next I use an 18" straightedge to double-check the neck. This reads the frets, not the wood, and I find that this straightedge doesn’t agree with the notched straightedge. This piece of information tells me that the frets are uneven.
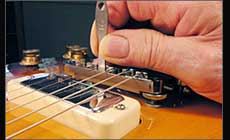
Does the truss rod work?
4. Check the truss rod. Here I’m using a 5/16" truss rod wrench. One of the truss rod cover screw holes was stripped out. With a plastic toothpick, I put a drop of superglue into it. The glue stiffens the wood so when the screw goes in later, the threads will hold.
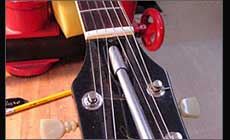
Loosen the rod until it’s just snug (no longer tight). Make a pencil mark on the wrench before you turn it. This lets you see how far it’s turning. The best-working truss rods only need about 1/4 or 1/3 turn. This one needed 3/4 turn to reach the “just snug” point, telling me it was overtightened.
Lubricate the threads of the adjusting nut and truss rod, and also the steel washer face that the nut bears against. Guitar Grease and petroleum jelly are both good for this.
Retighten the truss rod. I always clamp the neck into a slight backbow before tightening the rod. This makes the truss rod’s job easier: it doesn’t have to yank the neck back into line, it only has to hold it there.
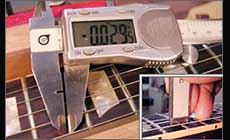
Measure the fret heights
5. The luthier’s caliper tells me these frets are about .029" (twenty-nine thousandths). For leveling frets on most guitars, that’s too low; we’d want a minimum of .038" to work with. This means there’s not enough there for a fret dressing. The guitar needs new frets.
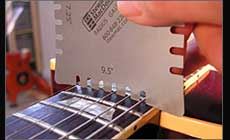
Check the fingerboard radius
6. Radius gauges show that this guitar has an irregular shape to the fingerboard: 10" radius at the first fret, and 9.5" farther up the board, and other radii at other points. This isn’t a “compound radius” that changes deliberately as you move up the neck — it’s just sloppy. If the customer agrees to a refret, I’ll give this guitar a uniform radius, doing the work in the neck jig.
Check It Out!
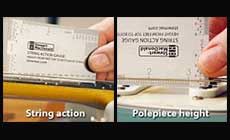
The String Action Gauge is like a “Swiss Army Ruler” for guitar inspections. It’s fast and accurate for measuring string heights, saddles, nuts, pickup polepieces, and everything else. Having left- and right-reading rulers is handy, too!
Inspect the bridge
7. The bridge has fatigued into a sunken concave shape, and the saddles are chewed up: they have double slots for every string.
The string break angle over the bridge is way too sharp: the tailpiece is set so low that the strings actually hit the body of the bridge behind the saddles. That’s got to be costing some tone.
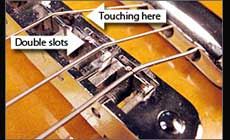
Checking the saddles with understring radius gauges reveals that the saddles are set up on a 16" radius — a whopping mismatch between the bridge and fingerboard. This guitar is definitely not playing the way it should be. Each saddle has been cut twice: there’s an extra, misplaced string slot in each of them. The guitar needs new saddles or a new bridge.
Record the string height
8. The last step is to make myself a note of the string action at the 12th fret. My customer said this is the string height he likes, so after a refret I can set it up to feel comfortable to him.
Okay, how much to charge for the work?
Repair prices vary, of course. Until your shop builds a strong reputation, your prices are pretty much set by your local competition. Once you’ve got more work than you can handle, your prices can be set higher. These figures give a good idea of charges at a well-established, but not high-end, shop:
| Services | |
|---|---|
| Refret using the neck jig | $325.00 |
| New bone nut | $75.00 |
| Install new bridge, cut and polish string slots in saddles | $25.00 |
| Clean electronics | $6.00 |
| Install vintage pickups and pots (supplied by customer) | $50.00 |
| Adjust action and intonation | $25.00 |
| Unpack/repack for shipping | $20.00 |
| Services Total | $526.00 |
| Parts | |
|---|---|
| Vintage bone nut blank (#6010-V) | $5.05 |
| Fretwire (3 pcs. #0141 @ $3.89 ea.) | $11.67 |
| Suppliers (Sandpaper, glue, steel wool, solvent/cleaner) | $6.00 |
| Nashville Bridge (#4502) | $25.43 |
| Parts Total | $48.15 |
I hope this information is helpful if you’re starting your own repair business.


