
AEROSOL GUITAR FINISHING COURSE | PART 1
Prepping the Foundation: Prep Sanding, Pore Filling and Sealer Coats

Tools for the Job


See Next Episode
"Is it really possible to get a great looking, pro quality finish on a guitar using only aerosol spray cans?"
Hello, we’re Chris and Matt from Driftwood Guitars. We traveled from our guitar shop in Florida to StewMac headquarters in Ohio with the mission to answer one of the most common questions new guitar makers and kit builders ask.
Spoiler alert: it can be done! And we’re going to show you exactly how to do it, on your very first try, right at home. It just takes a little patience, proper technique and an area to spray.
Chances are, you're here for one of two reasons. Either you're building a new guitar, whether from scratch or from a kit, that is currently at the stage that we luthiers call in the white. The major construction is complete, but it's just bare wood. And you're looking to apply an original finish.
Or you're here because you're looking to refinish an old guitar. Maybe you don't like the color of it, or it's got a scratch or a ding, or maybe you started a band and you guys want to have all matching instruments.
Either way, you've come to the right place because for both jobs, most of the process is the same. There's just a few extra prep steps on a refinish. We’re going to be doing a single one-color opaque finish. Finishing can get a lot more complicated when we're talking about things like staining the wood or doing multicolor sunbursts or even metallic finishes, so we’ll save those techniques for another series.
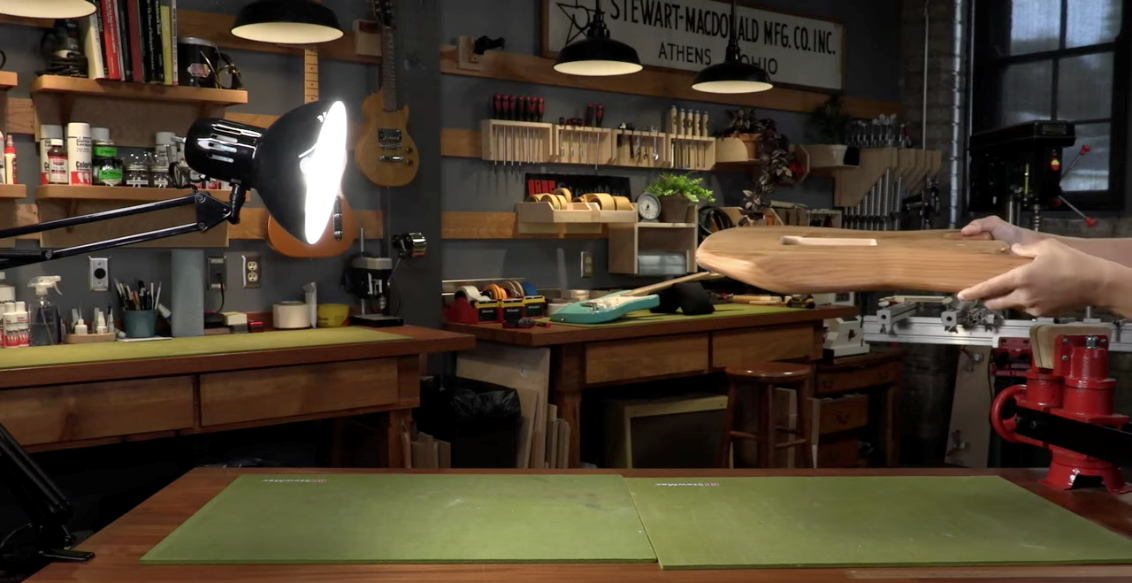
The main model we'll be working with is the Wilkinson 60s Vintage-S Guitar Kit from StewMac.
Wilkinson Guitar Kits
Build the guitar you've always wanted
A Great Finish Starts with Great Prep
If you stick with the techniques outlined here, you're going to end up with a completely amazing professional finish on your first attempt. But before we dive in, let's go over the general steps of any finishing project so that we can see the full picture from start to finish.
7 Steps of Finishing a Guitar:
- Sanding
- Pore fill
- Vinyl seal
- Color
- Clear coat
- Wet sand
- Buff out
Inspection, Fixing Dents & Prep Sanding
“Do the work now or do it later, but you're better off doing it now.”
The first thing that we need to do is sand the guitar. We'll get rid of any raised imperfections in the wood, as well as old paint if you're doing a refinish. It is important to note that you take your time and be very thorough in these first steps. If you can start off with a flatter surface now, you're going to be much more successful on the back end.
Before we sand, we're going to need to go over the neck and the body on the guitar and make sure that there are no defects in it that need repairing. If you've built your guitar from scratch, there are probably some small dents that you don't even notice until you get to this point, and that's just from banging it around in the shop. If you're working on a kit guitar like we've got here, it comes out of the box, looking like it is fully prepped. To the naked eye, it will seem perfectly smooth, but what we challenge you to do is really take your time and look at this guitar and ask yourself, "Do I have any opportunities to make this a little bit smoother or a little bit better?" Because this is our last opportunity to fix any issues with the wood before we start applying finish.
Remember: the more meticulous you are now, the less time you have to spend making corrections later.
Fixing a Dent
What You'll Need
Household Iron
Clean Lint Free Towels
Spray Bottle Filled with Distilled Water
If you do find a dent, it’s not the end of the world. The first thing you want to do when analyzing a dent is to recognize whether or not you have broken wood fibers in it. Broken fibers often require a filler of some sort, which we’ll cover a little bit later.
If you're lucky, the dent will be nice and smooth and you can use heat and steam to raise the wood back to the surface. A lot of luthiers use a soldering iron for this job, but what we use is an actual household iron and some shop towels. It's important that the towel or cloth that you use is lint free, it doesn't have any sort of dyes or stains in it, as well as any soaps or chemicals that can leach onto your wood.
We’re going to use a spray bottle filled with distilled or purified water, to ensure there are no trace chemicals or impurities in the water that might stain the wood.
So what you're going to do is preheat your iron to the highest temperature that you can. Then apply a little bit of water to the corner of the towel and place it on top of the dent, and then carefully iron, without applying much pressure.
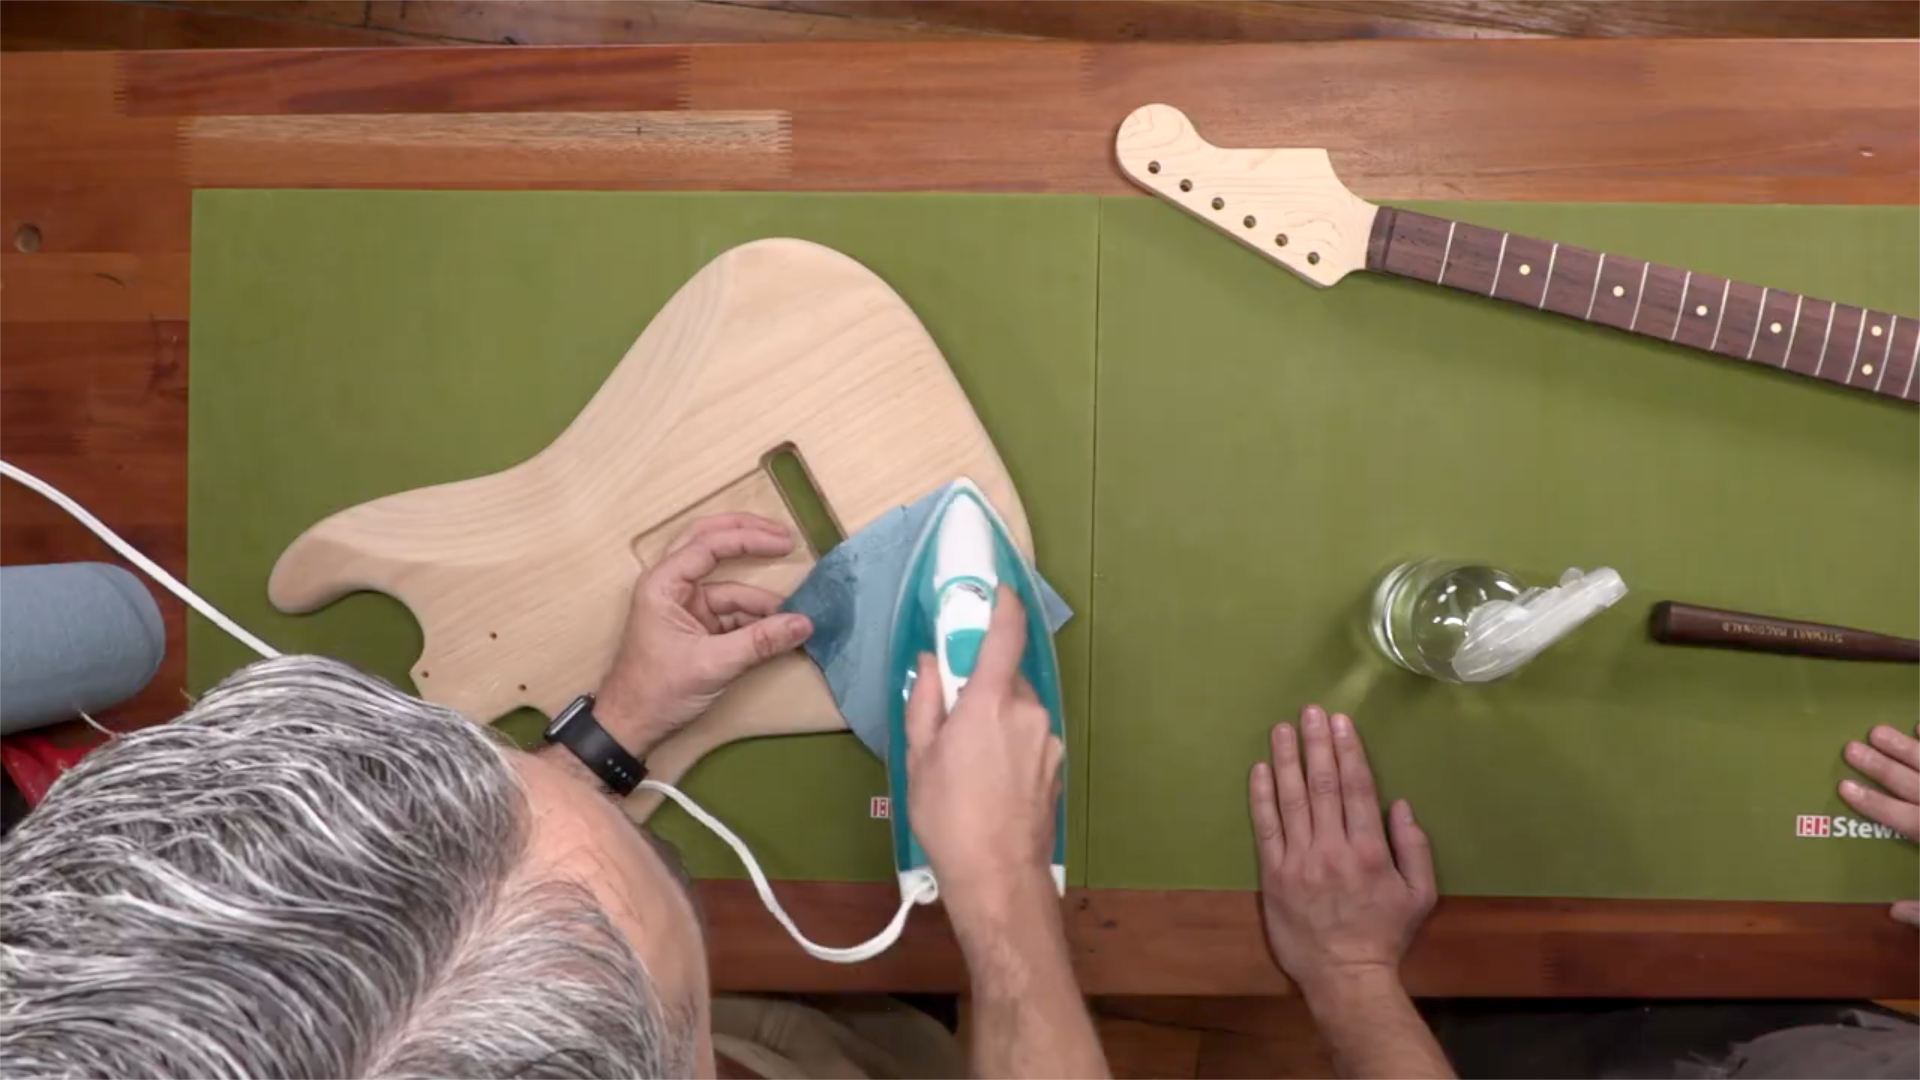
Notice that I have just the tip of the iron into that dent. I'm not laying the iron totally flat because I don't want to accidentally heat up a section of the body that I'm not trying to repair. Iron for about five to seven seconds and then check it. The quicker you address the dent after it happens, the easier it is going to be to fix, so don't wait. Now I'm going to flip the towel over and iron on the dry side, just for a few seconds, and that'll dry that moisture out of it.
If your dent is still there, don't be afraid to iron it again. Usually, the wood will take about four applications of steam to slowly release the dent. You're going to get less and less results from it the more you steam it, but if you're not able to get it out on the first try, you can do it again. Allow the area to dry completely before moving on.
Sanding Basics
What You'll Need
150, 180, 220, and 320-Grit 3M Gold Sandpaper
Foam Block
Respirator
Freehand Holder or Spray Stick
Glancing Light
Naphtha
Optional: Dual Action Sander
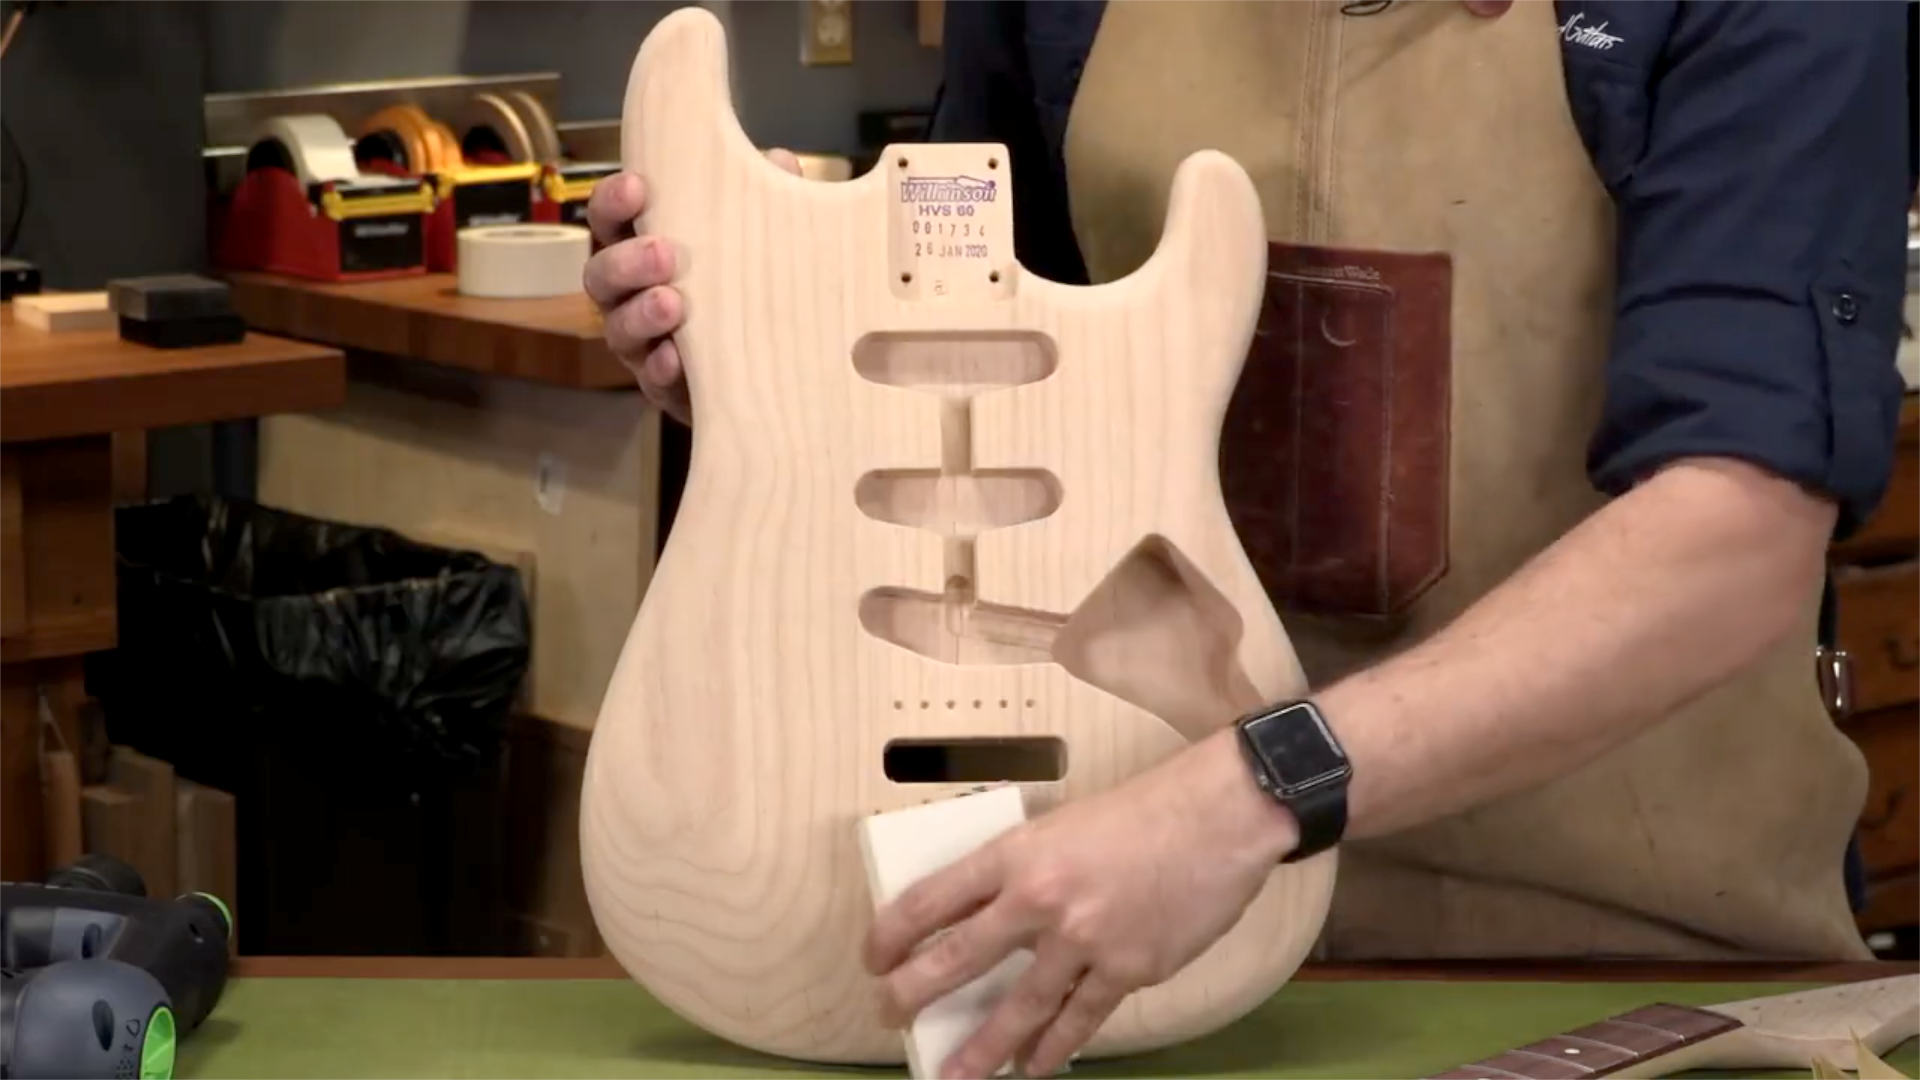
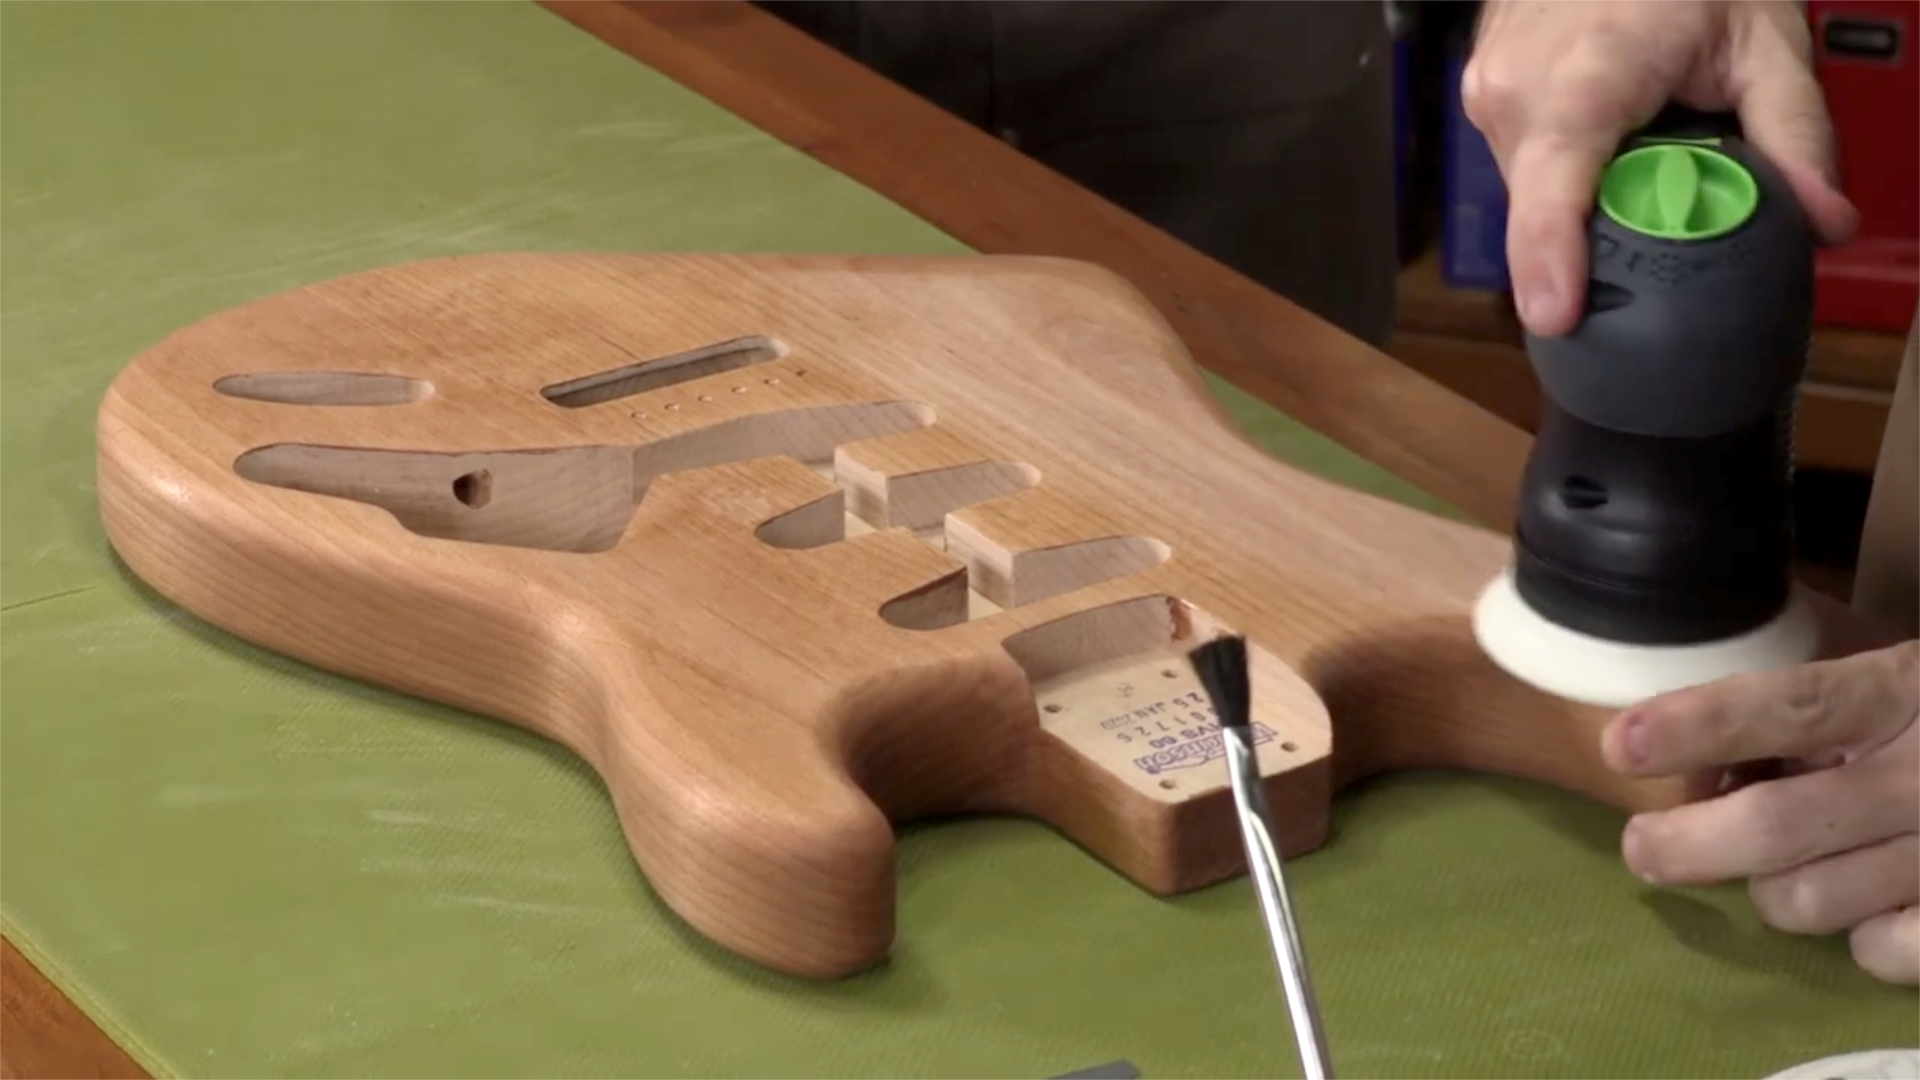
If I rub my hand on the surface I can feel that the grain is slightly raised in the area where we just did the steam out. So the next step is to use 220 grit sandpaper, with a nice little foam hard block. And all we're going to do is very lightly sand the top, just to knock down any of those little high fibers that we have on there. Now it is totally smooth, like the dent never happened.
On this job, for the curved edges of the body, we'll simply use flexible sheets of sandpaper and our fingers. For the top and bottom, because they're flat surfaces, we need to sandpaper against some kind of hard backer. And in this case, we're going to be using the dual action sander. If you don't have a dual action sander, you can use these pieces of foam that StewMac sells. You can also buy these at local hardware stores.
PRO TIP: If you use just your hand to back the sandpaper when sanding the top and bottom, the fatty part of your fingers end up digging into the wood a little bit more than other parts, and you're going to end up with a slightly wavy surface.
Now, let's get into the specifics of the sandpaper. First, the grit scale.
Where you start is going to depend on the quality of the wood that you're starting from. On a high quality kit like this, if you look at it and you think, "Man, this could just go straight into the paint booth right now," then you can probably start off with something like 220, and that's what we're going to do here.
If your instrument has little tool marks and deep sanding marks, you're going to want to start with something a little bit more coarse, like a 150 or a 180, and then work your way up. And if you have any really deep spots, you can get away with 80 grit, but it's really important to remember that those coarse sand papers can really hog away a lot of material, so you want to be very, very careful with that. Regardless of where you start, we're going to work our way up to 320 grit. Remember that we are not trying to make a smooth guitar, but what we're trying to do is to remove scratches.
Pro Tip: Make sure that your sandpaper has what's called a P-grit rating on it. And what that is, is a grading process that the sandpaper goes through to ensure that it's nice and uniform. Sandpaper that is not P-rated can have imperfections on it that could scratch your guitar.
Last and most importantly, safety. Saw dust is not good for the lungs, so get yourself a respirator. Once we get into the spraying portion of this project, we're going to need chemically rated respirators. So if you're going to buy one for that, you can also use it for this step as well.
Sanding The Guitar
If you look at this guitar that's in the white, you can actually see the grain lines on it going up and down the body.
Be sure when sanding to go parallel with the grain in nice even patterns. We don't want to be going perpendicular because you're going to have scratches that are incredibly difficult to remove. Also, make sure that you're applying nice, even pressure as you go. It's especially important if you're using a dual action sander that it's nice and flat planted, and that you're not rocking in any one direction or another, because you can dig into certain spots on it.
Keep in mind that right now we're just doing the top and the back and not trying to round it over on the edges. You want to make sure that you get nice and even smooth passes across the whole thing, so do the entire top in one single pass. It's important that you're never sitting still in any one spot. Keeping fluid motion is going to give you a nice fluid finish on here. By letting the sand do the work, you’ll end up with a much smoother surface that has less of that octagonal shape to the edges.
Anytime you're working with rounded edges or corners, those spots on the guitar sand a lot faster, and we certainly would not want to be using something that has a flat face to sand a curved face. Instead, we're going to tear up a piece of 320 grit sandpaper and use our hands.
Fold the sandpaper in half. Now you've got sandpaper touching your hand, and that gives you a little bit of grip on the backside where it's not going to slide out of your hand. Again, we want to make sure that we go parallel with the grain. We don't want to be perpendicular against it.
You may notice it's difficult to hold the guitar and sand at the same time. Here are a few methods that can help with that.
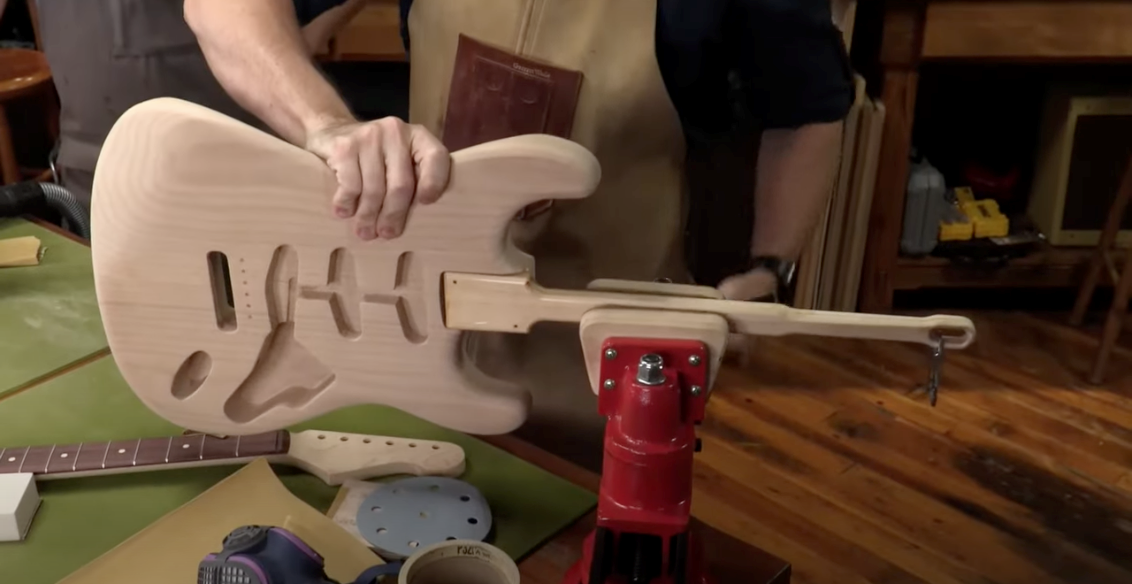
Back at our workshop, we use spray sticks. If you're doing a bolt-on style neck, you can just make one of these with just some scrap wood. All they do is fit inside the neck pocket, and you can screw it in. And if you don't have one of these, you can put the guitar body directly into a vice as long as it has soft jaws on it, or you could actually clamp the guitar very lightly to the work bench.
When sanding the sides, use the flat sides of your fingers on the flat side of the edge, and then round your hand to sand the curved edges.

Following the contours of the guitar will keep the natural shape intact. It's okay to take a few short, quick strokes if you need to, but overall, stay in fluid motion, and don't linger in any one spot.
How long this prep sand takes is going to depend on the species of wood that you're working on. The softer the wood, the shorter it usually takes. The alder body that we're using is in the middle. All right. I think that should do it.
What's important now is to know whether or not you're ready to move on the next grit. The way that we can do that is either by using one of these OptiVISORs, which will allow you to look at this guitar and see whether there's still scratch marks that you need to remove.
But the way that I recommend that you do it is by using a glancing light.
This is a process of having a light in your room somewhere so that the light's going to hit your guitar at an angle so that it creates shadows. You can use a cheap gooseneck light, or a clamp on reading light like we have here, or even just a window. It just needs to be shining at an angle. It's amazing how much more detail I can see because each little scratch mark is a valley where there's a shadow now, and it gives me the ability to really inspect my work.
So with a glancing light on, we'll just go around the whole guitar, and what we're looking for is any scratches that are deeper than the sandpaper. You can use the shading as a way to tell. Revisit any areas that need further sanding at this grit.
Once it passes inspection, you're ready to repeat the whole sanding process that we just did with the next grit up, working your way up the scale, up to 320.
PRO TIP: Depending on the type of wood that you're using, you might have some marks on it that look like scratches. Trust your hand. If it feels perfectly smooth, it might end up just being a dark spot inside the wood. Don't just sand because you see something, sand because you see and feel something.
Next, we need to get this completely cleaned off. We want to get rid of all of the saw dust in preparation for doing the pore fill. And we do that by using some naphtha, which is a very mild chemical that you can use for finishing. Apply the naphtha to a section of a shop towel, and wipe down the entire body. Make sure to flip and rotate the towel often, reapplying the naphtha, so that you’re using a clean portion of the towel and not just moving saw dust around. This is going to remove the dust as well as any oil from the wood. As the liquid penetrates, it's going to reveal any scratches that we may have missed.
PRO TIP: the oil from your hands or any oil that you might have on tools in your shop can really start to create adhesion issues with your finish when we get further on into the series. Make sure that your work area is away from any sort of lubricants or any oily tools.
Last, we're going to wipe it down with a tack cloth. You need something that's just very lightly tacky to gently wipe the guitar down with, and it's going to remove any dust or lint particles. Or you can use a little trick that I used back in the military, and that is just use some lacquer and spray it on a cloth very lightly, let it dry for just a few seconds. And then you can wipe it down with that. And that'll actually work as a makeshift tack cloth.
Now that the body is sanded, clean, and dust free, it just needs to dry and we’ll be ready for the pore fill. While we wait, let's prep the neck using the same process.
It is incredibly important that you don't change the geometry of the neck, particularly the area where it is going to be joined to the body.
Looking it over, this neck from the kit is almost done. So we're going to skip the 220 and go straight to 320.
We’re going to use the foam block on all of the flat areas, sanding with the grain, being careful not to round over any edges. There are nice hard edges here on the headstock, so be very careful you don't round those over too much.
Make sure you’re not getting any sandpaper or any marks on the frets. It's important that we keep that area untouched. If you have a two-tone neck like we do, you can accidentally drag saw dust into the crevice where the Rosewood fretboard meets the maple neck. You're going to need to remove that with compressed air.
Let's grab the naphtha so that we can get this thing nice and clean. Also, wipe down the fretboard real quick with that naphtha. We're going to let this dry for just a second and then we'll hit it with the tack cloth.
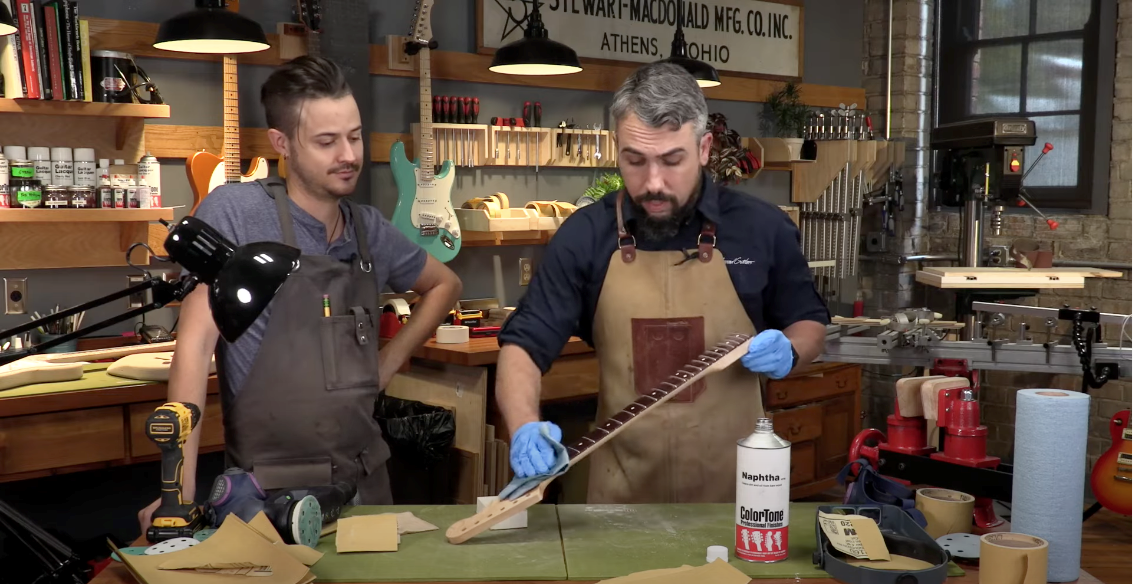
All right, this neck is officially clean. If you have a maple fretboard along with a maple neck, you're lucky because you don't have to do anything at this point. You're just going to spray the whole thing all at the same time. And so you can skip this next part. In this case, we have a Rosewood fretboard on this guitar, so we need to mask it off with tape.
Masking Off The Fingerboard
What You'll Need
Blue Painter's Tape
Nut or Saddle
Razor Blade
PRO TIP: We highly recommend using painter’s tape instead of masking tape. It will peel off more easily, whereas masking tape can get pretty messy.
Break off about a 12-inch piece of tape, and then loosely line it up along the long edge of the fretboard. Then, down towards the bottom where the frets are closer together, use a nut or a saddle and press the tape flush up against the edges of the fret on both sides so that they're completely sealed off.
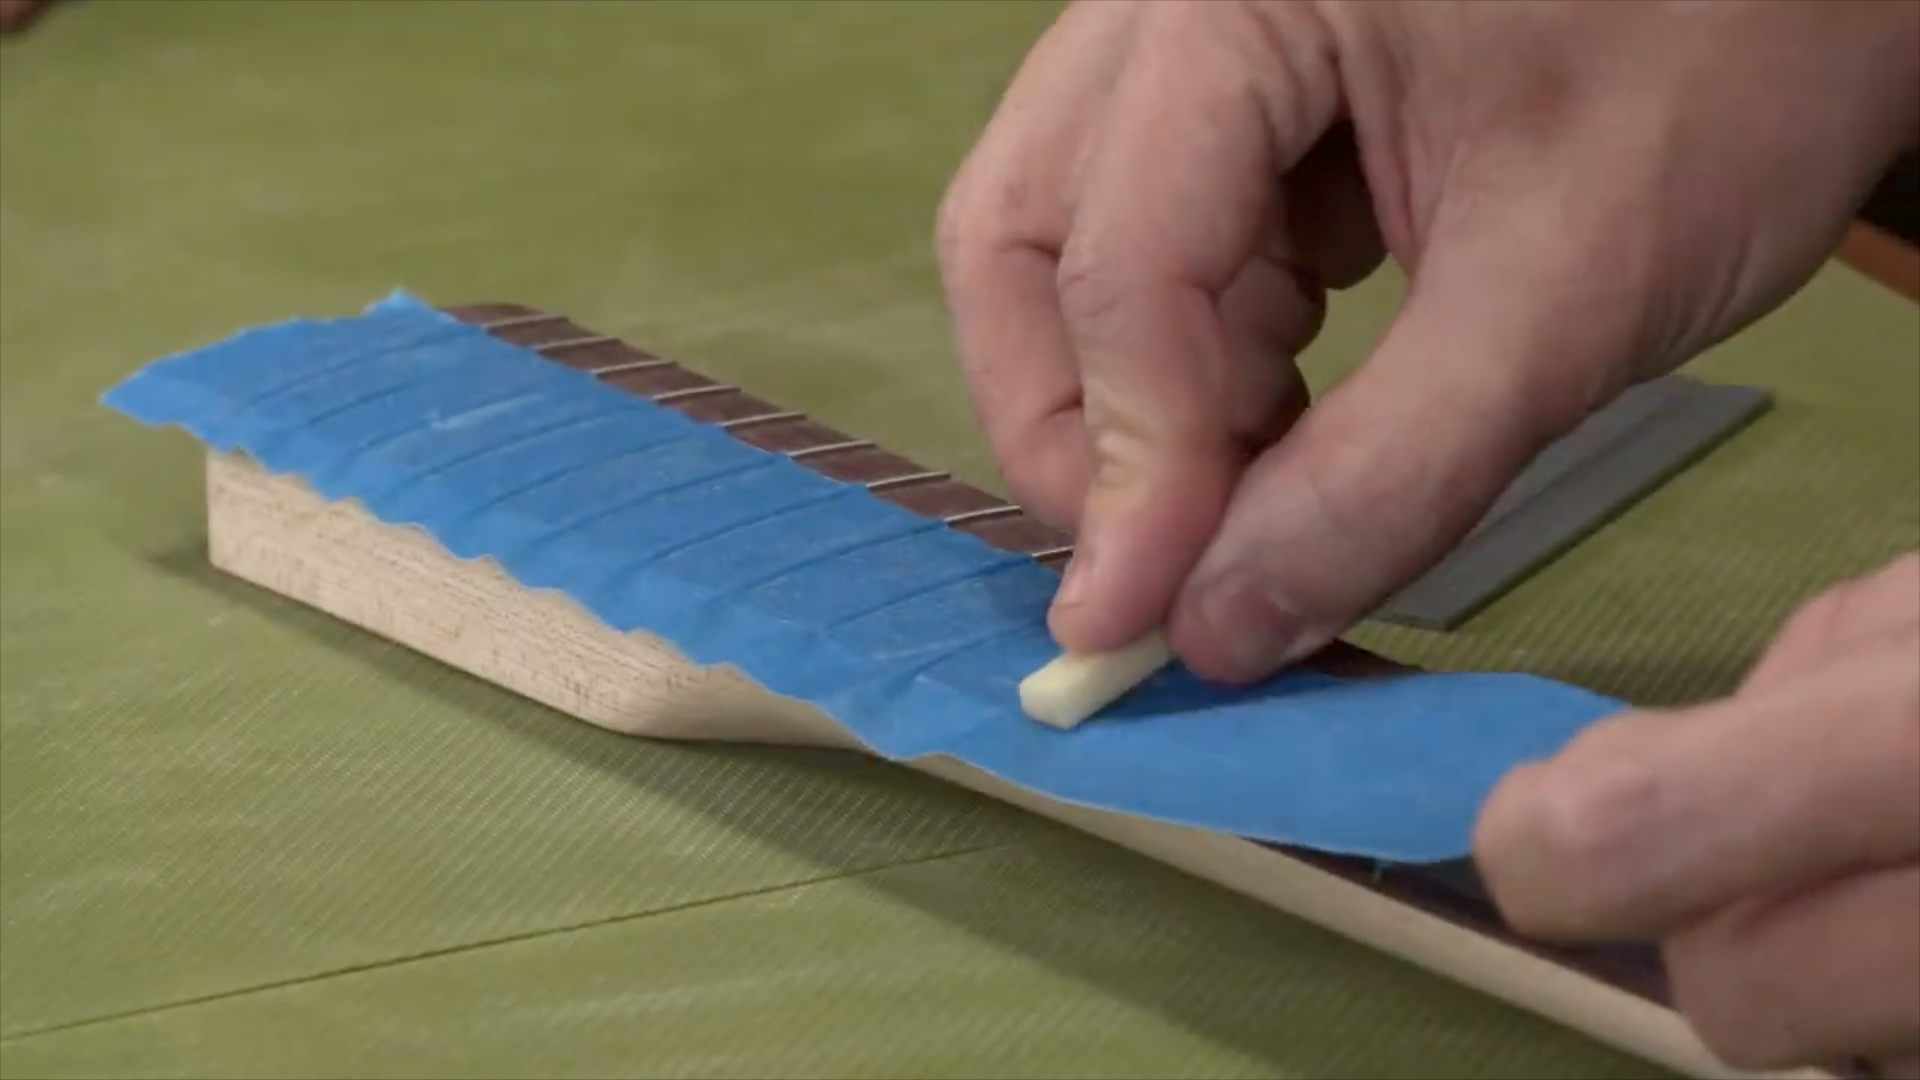
It's pretty straightforward. I know that this can seem annoying and time consuming, but trust us, it's worth it. It's going to save us a bunch of work on the back end, and you're going to be thanking your past self for being so meticulous. Once you get closer to the wider frets, you can switch over to a wider tool to do the pleating. We use just a small little three-inch rule. Once one side is completely taped off, we’re going to do the exact same thing on the other side.
If you happen to tear the tape, just take a little piece of tape and stick it right on top of it. We want to make sure that it's all completely sealed off. If you get wrinkles in the tape you’re going to want to tear that section off and redo it.
Next up we’re going to remove the excess tape. First, use a razor blade to get the bulk of the excess off, but don’t worry about getting it perfect.
PRO TIP: Don’t spend too much time with the razor blade. We'll just take some of the excess off around all the edges and then come back with a white foam block with 320 grit paper on it. We're going to do a pulling action down away from the fingerboard. We don't want to push because it's going to lift the masking tape.
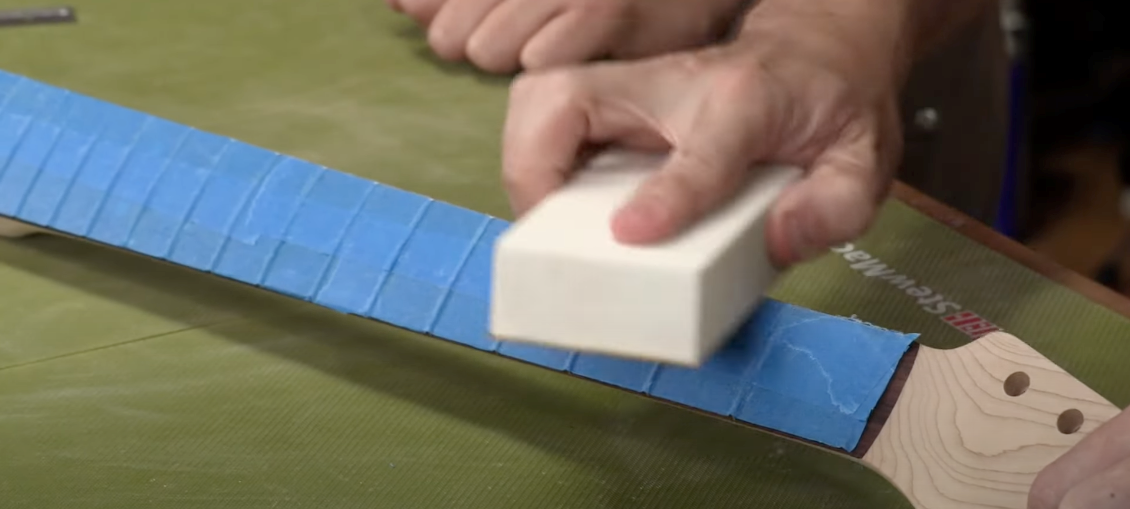
What you're going to end up with is a nice little feathered section and that'll come right off now, and you end up with this beautiful clean, crisp line.
What we need to do now is mask off the section where the nut is going to go on this guitar. Take a straight razor, cut to the headstock end of the nut slot so that it's protected a little bit.
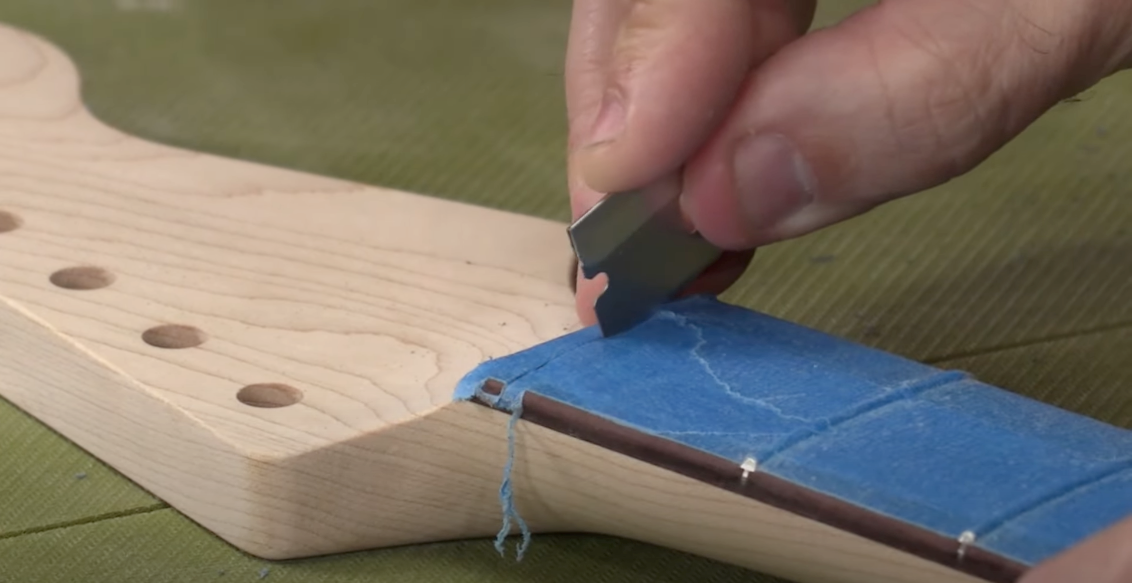
Double check that you have a beautiful seal all along the edges. Make sure that that's nice and clean. The masking tape is actually going to stay here for the duration of this entire project until we're ready to put strings on the guitar. That's another reason why you want to do a really good job with it.
Prep Steps If You Are REFINISHING A Guitar
What You'll Need
Mechanical Electric Sander
80, 120, 220, 320-Grit P-Grade Sandpaper Compatible with Sander
Super Glue
Aerosol Accelerator for Super Glue
If you’re not working with a kit or fresh build, you’re probably still asking, how do I refinish my guitar?
To prep a guitar for a new finish, we need to get the old finish off. There's two ways that you can go about doing this. One would be chemical stripping, which we’re not going to cover in this because that's not actually what I would recommend if this is your first time doing it. It can be dangerous for both you and the instrument.
What we recommend is doing a mechanical removal. Just sand it off. You want to do the top and back, if you can, with a mechanical electric sander, because it's going to be a lot faster. You want to start with either an 80 or 120 grit P-grade sandpaper, and then work your way all up to a 320 grit. taking your time to just slowly remove the color until just have a little bit of wood showing. The goal is to get as much of the old paint off while maintaining a flat and even surface.
At some point, the visible wood fibers become prevalent. And at that point, you want to stop. Those remaining spots of paint are actually revealing little dings or low spots in a guitar.
By stopping now, it allows us to use that paint as a natural filler, helping to create a nice flat surface that we're aiming for. Using the hand sanding techniques we discussed earlier, you're going to do the edges of the guitar, the cutaway, and the horns.
Next, we'll use that glancing light to identify any remaining dents, and use super glue to slowly fill in those low spots. Finally, use an accelerator to build those spots up so that it becomes very smooth again.
You're completely done with all of that prep work, and you actually get to skip what we're going to show next, which is the pore filling because the old finish on the guitar actually acts as your pore fill. So lucky for you, you get to just skip forward to Applying Vinyl Sealer.

Pore Filling
What You'll Need
Z-Poxy Finishing Resin
Mixing Cups
Grain Filler Leveler
“This is the absolute key to getting a glossy, perfectly smooth finish.”
Just like the pores in your skin, wood has pores in it as well. They're little dents in the wood where the cell structure has openings in it. Different species of wood have different pore sizes
Closed-Grain Woods:
- Maple, Basswood, Cherry
- Smooth to the touch
- Pores too small to see
Open-Grain Woods:
- Mahogany, Ash, Rosewood
- Rough to the touch
- Visible pores
Then there are woods that fall somewhere in the middle, like this alder wood kit that we’re working with. As you've probably guessed, if your guitar is one of those open-grain woods, you're going to need to do a pore fill. This is the absolute key to getting a glossy perfectly smooth finish.
PRO TIP: The thing about nitrocellulose finish, which is what we're going to be applying later, that's important to know, is that the bulk of what's inside that can is what is called VOCs, volatile organic compounds. Those VOCs are the things that actually suspend the nitrocellulose inside the can. During the drying process, the VOCs evaporate, causing the nitrocellulose finish to shrink back. So if you don't fill your pores, the nitro finish is going to shrink back into those pores. And you end up with visible marks on your guitar, all these little ridges.
To avoid all that, we're going to very slowly, over the course of several applications, add pore filling material into those pores until we get a nice even smooth surface. That way when we apply our lacquer finish, no matter how much time passes, as the finish shrinks back and becomes tighter and tighter adhered to the wood, we’ll get a really stable, smooth surface.
This is a mahogany body, a very open-pore wood, that was pore filled with only one coat of pore fill. The builder felt really good about it, sprayed the guitar, buffed out the guitar, and it looked good. But here we are after some time has passed. You get these visible finish marks where the finish has shrunk back into the pores.
If you're looking to get a really smooth glossy finish, this is not what we want it to look like.
In theory, we could probably get away with not doing a pore fill on this alder wood body, but we want to make sure we get the best finish possible. If you have a middle of the road wood like this, or if you’re a little bit confused on whether or not the wood of your guitar is open- or closed-grain, just go ahead and do the pore fill because it doesn't hurt anything and it's only going to give you a better product.
The neck on the other hand is a maple neck, and we're not going to need to do any pore filling on it because that's a closed-grain wood. The fingerboard is open-grain, but all we have is this slight visible line of Indian Rosewood there. And if you want to, you could put a little pore fill on that, but we don't have to.
There are lots of ways you can fill the grain in wood, including many traditional ways that we aren’t going to get into. Modern fillers include three different categories: water-based, oil-based, and then a two-part epoxy, which is the method we’ll be exploring.
Water-based grain fillers are usually a powder that you would mix with water. It is easy to apply, easy to clean up, can go with just about any type of finish as well. It doesn't have to be just for nitrocellulose. The downside to using a water based finish is that because it's water based, it takes a lot of time to dry. It can take several days, especially if you're in a humid area, like where we are from in Florida. So if you don't wait long enough, you'll think you've got a good pore fill, you'll do your lacquer, and then you'll get shrink back issues still.
Oil-based grain fillers are similar except instead of being water adhering it all together, you use oil. The downside is that it's really caustic, it smells bad. It can be hard to clean up. And once again, if you don't let it dry long enough, especially in humid environments, you're still going to end up with shrink back.
Two part epoxy is actually the method that I use on all of my electric and my acoustic guitars. It can be messy, but because it's chemically activated, you know that you're going to get a full cure and the shrink back on it is almost nonexistent.
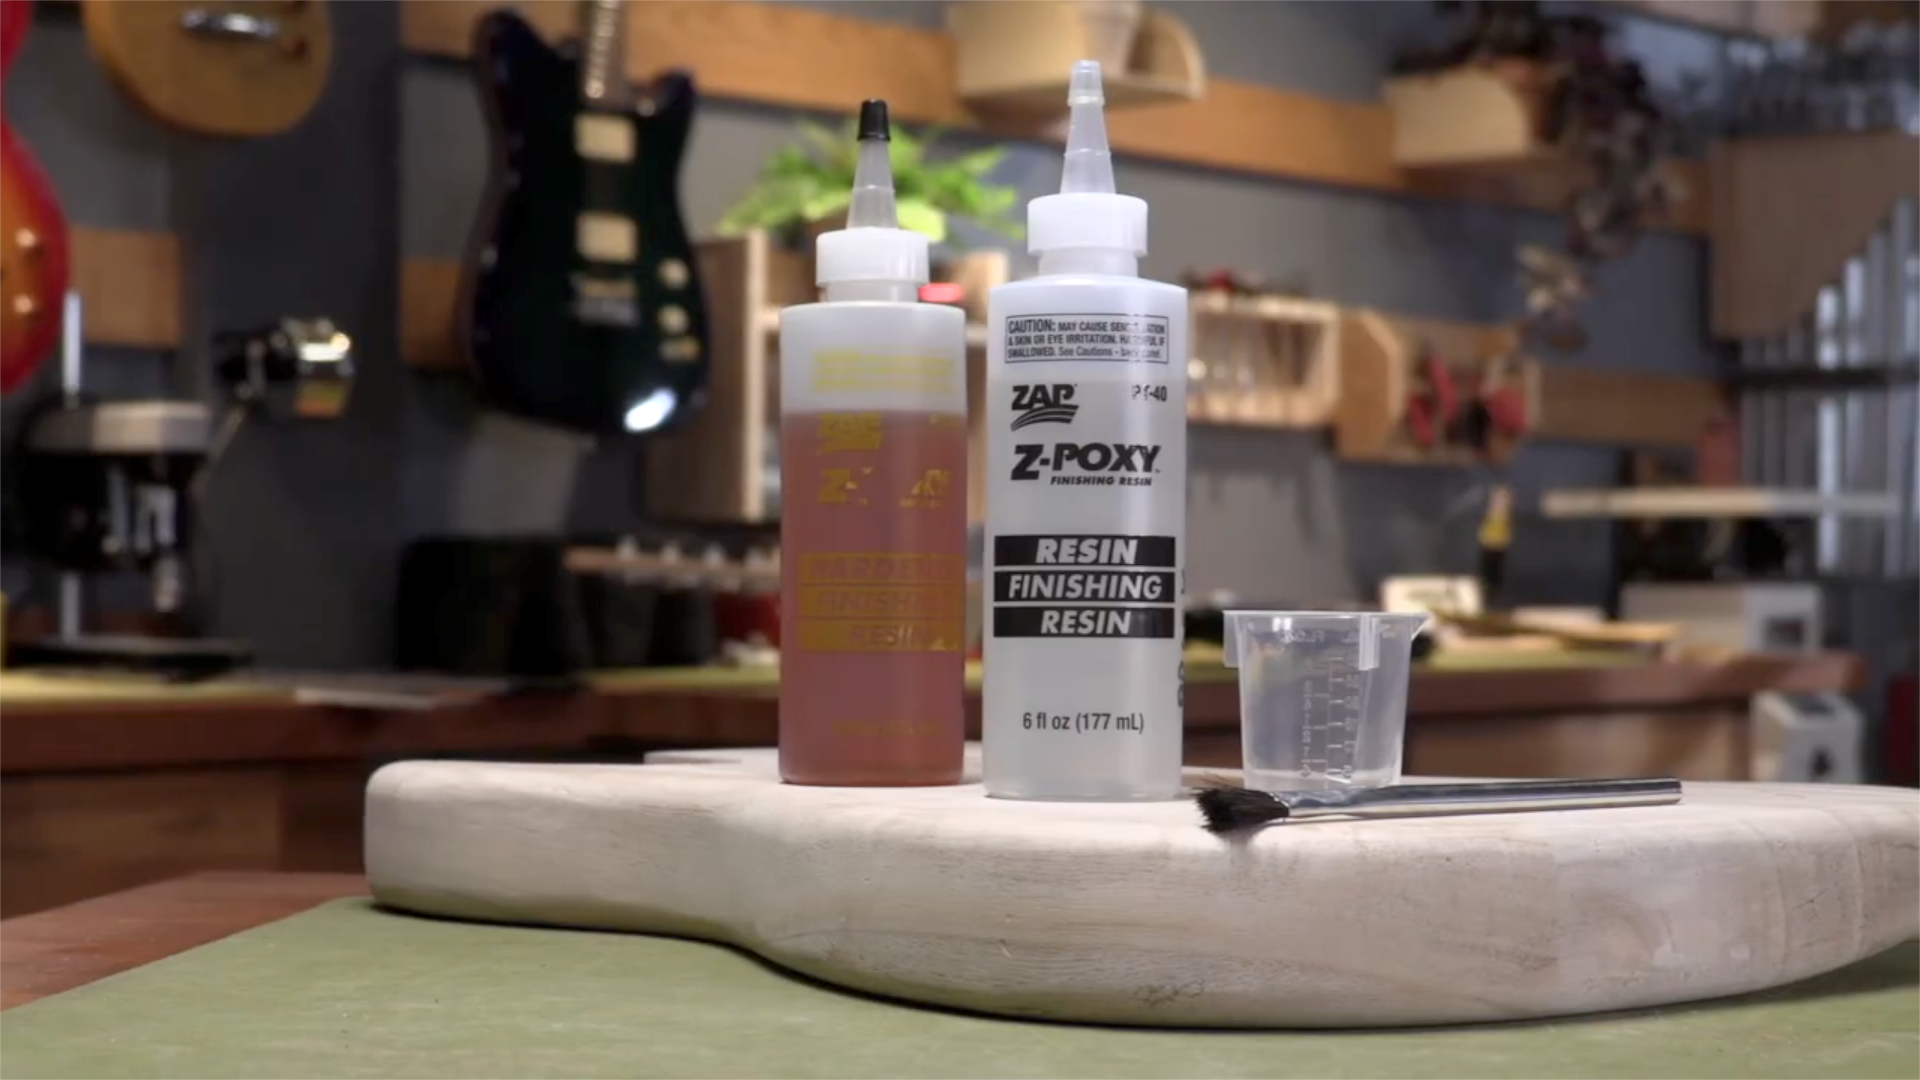
For this series, we're going to use up Z-Poxy because not just any two-part epoxy will work for this, you need to make sure that you're using what is referred to as a finishing resin. Z-Poxy comes in this three-minute dry time, as well as a 10-minute.
PRO TIP: If you mix up too much of it inside of a cup, you're going to end up with a thermal runaway effect and it can actually heat up and cure super-fast. So mix up as much as you think you'll need and not too much more, because it'll actually dry quicker in the cup than it will on the guitar, just because of that heat that it creates as it's curing.
Another perk to the Z-Poxy is that it doesn't require a whole lot of PPE, all we need is just some nice nitrile gloves and a small disposable mixing cup. You can use anything really, just remember that it is going to basically be trash after you're done. Lastly you need something to stir with. It can be a scrap piece of wood, a popsicle stick, in this case we have a little acid brush that we're just going to turn upside down and use to stir with.
We're just going to, side by side, pour both bottles into our mixing cup, getting a nice 50/50 mix.
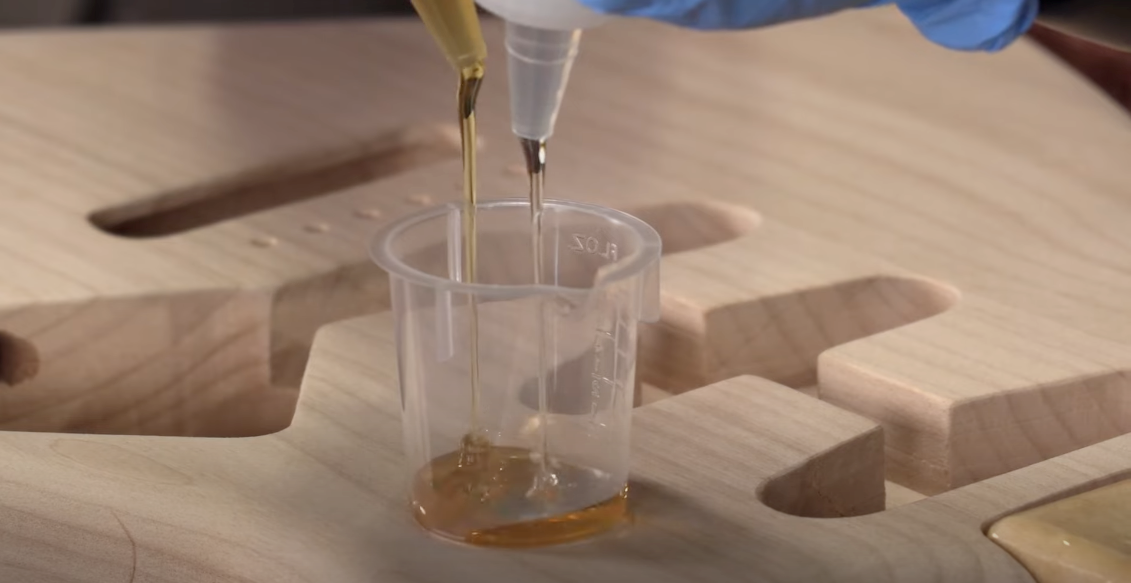
Don't be concerned by the fact that this is amber, it's not going to affect the color of the wood whatsoever.
You really want to take your time and mix this really, really good. If you apply your epoxy and keep coming back every hour wondering why your epoxy is not drying, it's because you either didn’t mix it enough, or you have not gotten the correct 50/50 ratio. Just take your time and mix it up really well.
We are now going to use a spreader. One edge is a slightly softer rubber and it contours to the wood, the other is a nice, clean, sharp edge, you can use to scrape. We swear by these things.
Applying The Pore Fill
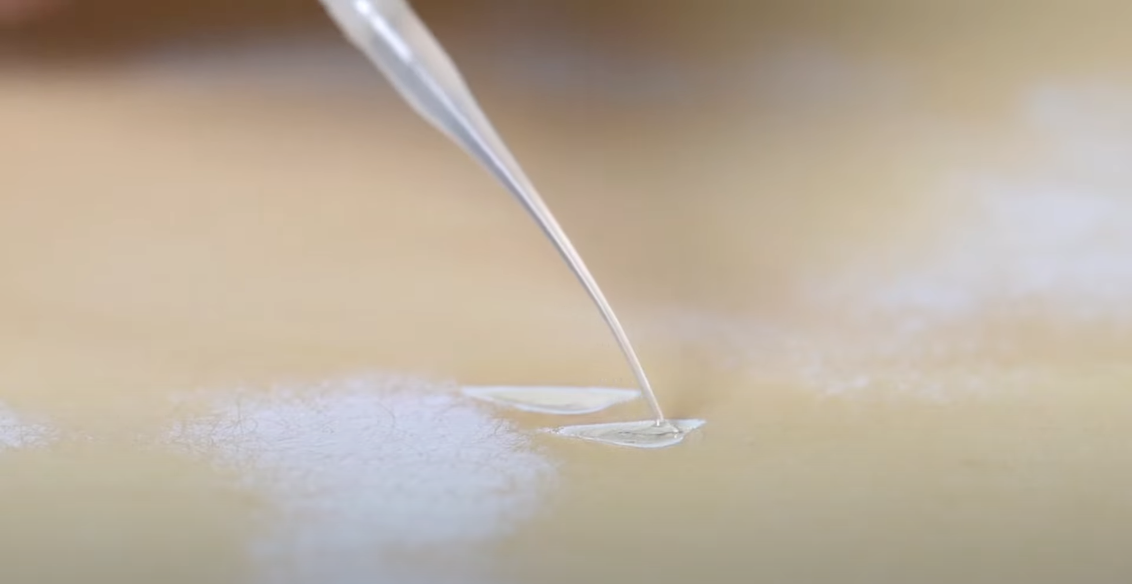
When doing an epoxy pore fill, there's three steps to each round of application.
We're going to slowly apply some epoxy down here. The wood is going to really soak up a lot of this epoxy, but that’s okay. The biggest mistake that people make on this step is they apply too much. We are not adding a layer of epoxy to the guitar. We are only wanting to get the epoxy into the pores.
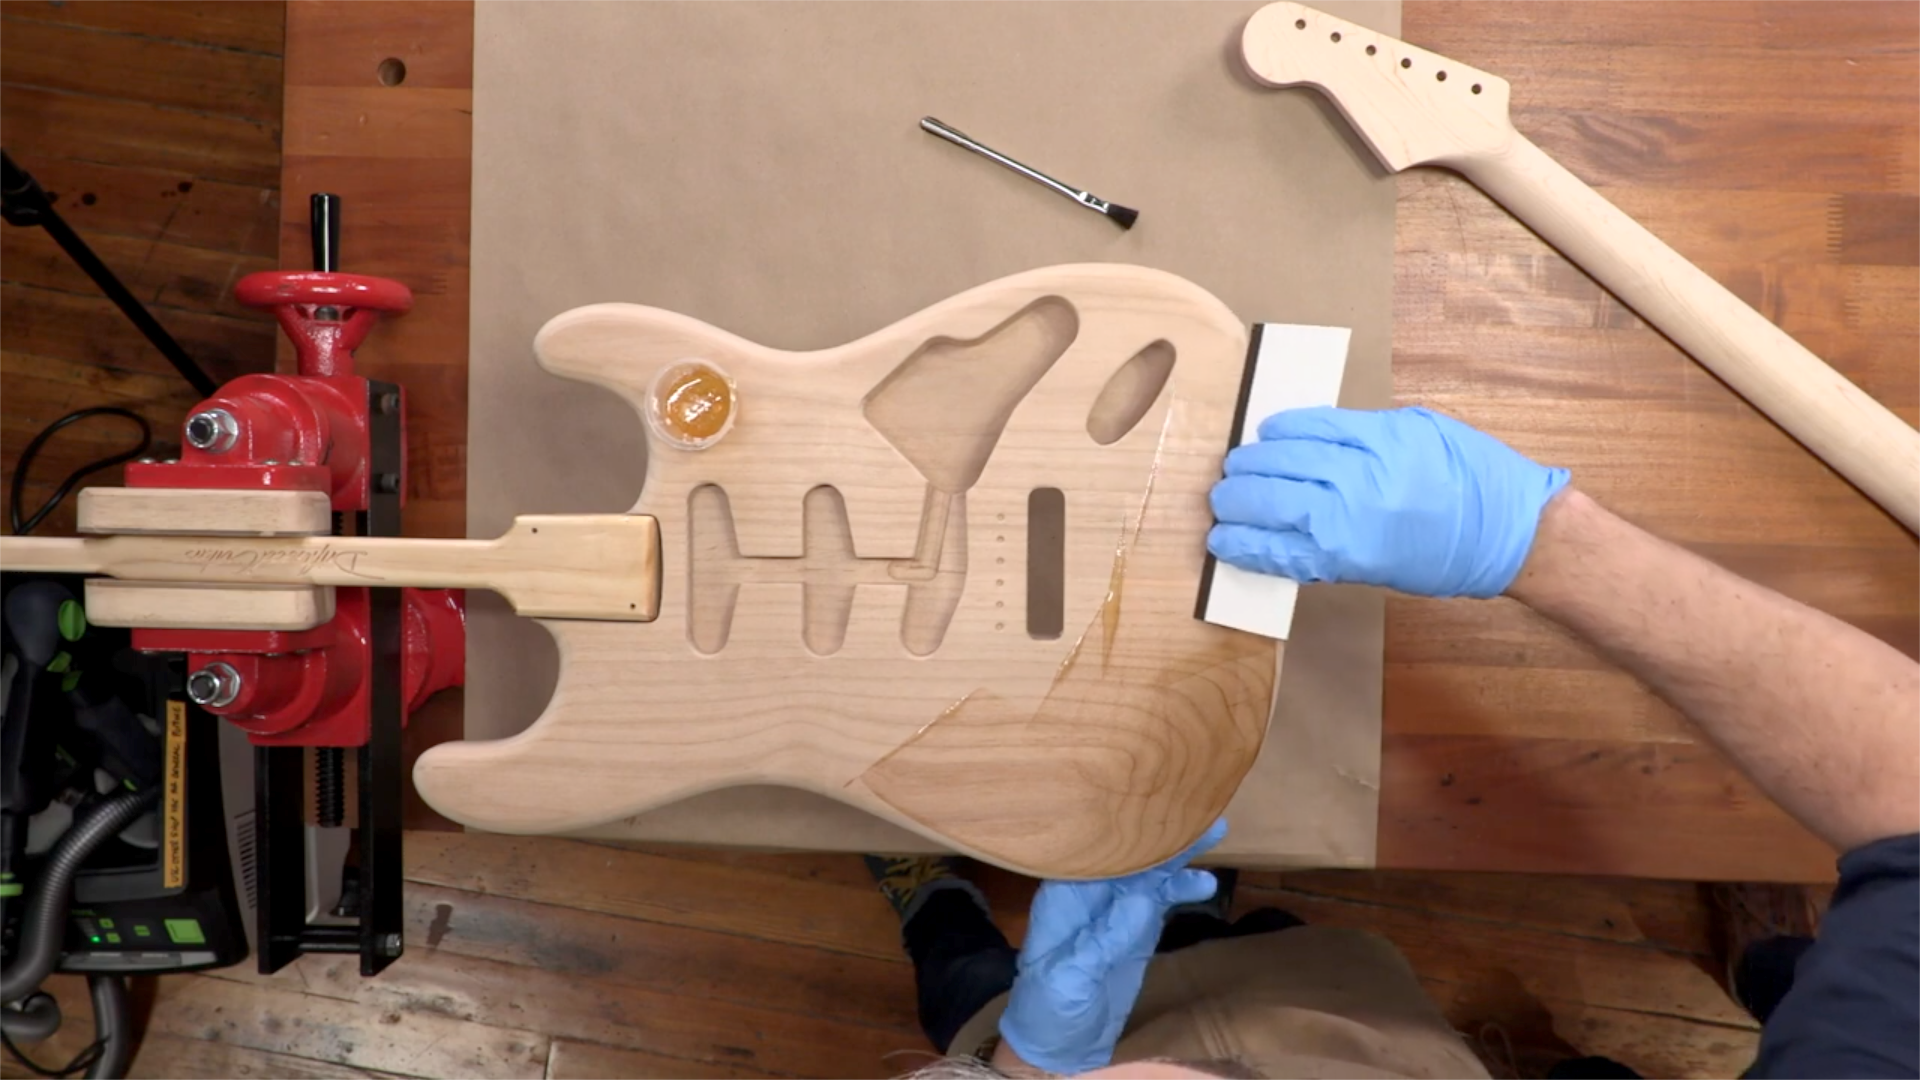
Taking your time and doing this right here and applying the correct amount of epoxy is going to save you a lot more sanding on the next step. If you have cavities, you always want to fall into them, don’t drag the spreader across the top. So we're just going to work ourselves around here. We're going to fall into this cavity and then we're going to fall into this cavity. Apply a little bit here. I'm not worrying about the edges of the guitar quite yet.
We’re going to use the spreader, run perpendicular to the grain, then run it at a 45 degree angle to the grain, then run it with the grain. You don't need to press hard. If you end up pushing down too hard, you might squeeze the epoxy down into the pour and pull it back out the other side. So it's a ballet, paying attention to all of those different things, trying to not be in too much of a hurry. A good reason why we prefer the 30-minute epoxy to the 10-minute. The quick dry can make you rush a little bit, because you feel like you’re in a time crunch.
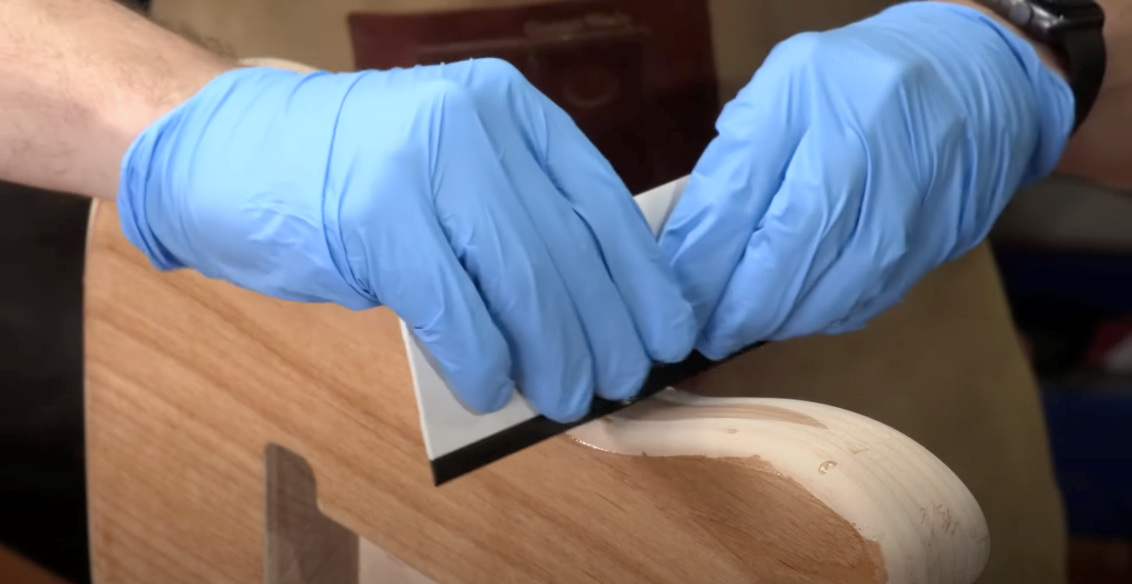
We want to make sure that we're only getting the epoxy into the pore and that there’s not a whole layer of epoxy just sitting on top of the surface. To do that, start with a clean spreader, and a roll of paper towels is always good to have close by. Using the rubber side do a nice even pass across the entire length of the guitar body, wiping off the excess epoxy after each pass.
It's important to do these long even passes to eliminate spots where you’ve stopped and started, creating ridges of epoxy. On the edges there's nowhere that you can run a flat spreader on it. You can just use your finger, get a little epoxy on there, and just use your gloved finger to get it in place. And then we use the spreader to make sure that everything is smooth.
Now we’ll repeat those three steps on the back of the body. If we didn't have this spray stick that we are using to hold the guitar in the vice, we would have to wait for the front to dry, before moving on to the back.
The sides of this S-style body are kind of rounded and flat. We’re going to use the spreader just here in the flats, use a smaller spreader if you've got one. The epoxy kind of squeezes itself out onto the sides, and then you can take your finger and spread the stuff that's on the sides onto the guitar. This is where these spreaders that StewMac sells come in handy because this soft rubber on the leading edge conforms to the shape.
PRO TIP: Lacquer is really expensive and really time consuming, while epoxy is not. It may seem tedious, but if you do this job correctly, it's going to save you a lot of lacquer. If you don't do a proper pore fill you've got to probably apply three to four times the amount of lacquer that you would if you did do a pore fill. Then you're going to end up sanding all of that lacquer off to basically be the pore filler for you.
Now for the horns. I'm going to pour some epoxy down in here, remembering that this is end grain and it's going to be thirsty, it's going to soak up quite a bit. If there's anywhere on these guitars where you're going to have issues with defects in the wood or any sort of chip outs, it's going to be in this spot, so you can let this epoxy do a lot of the heavy lifting for you.
If you're using a holding stick, make sure that you're not gluing the holding stick to your guitar with the epoxy. If your epoxy is starting to cure up, get a little bit more gelatinous, don't get in a hurry, just mix yourself up a new batch because it's when you get in a hurry that you start to mess up.
How do we know that the Z-Poxy is dry? You'll want to take some of that Z-Poxy and bring it up the side of the cup so that it's a little thinner, and then wait till that dries. And when that thin layer on the side of the cup is dry, we know that thin layer on the guitar is dry too.
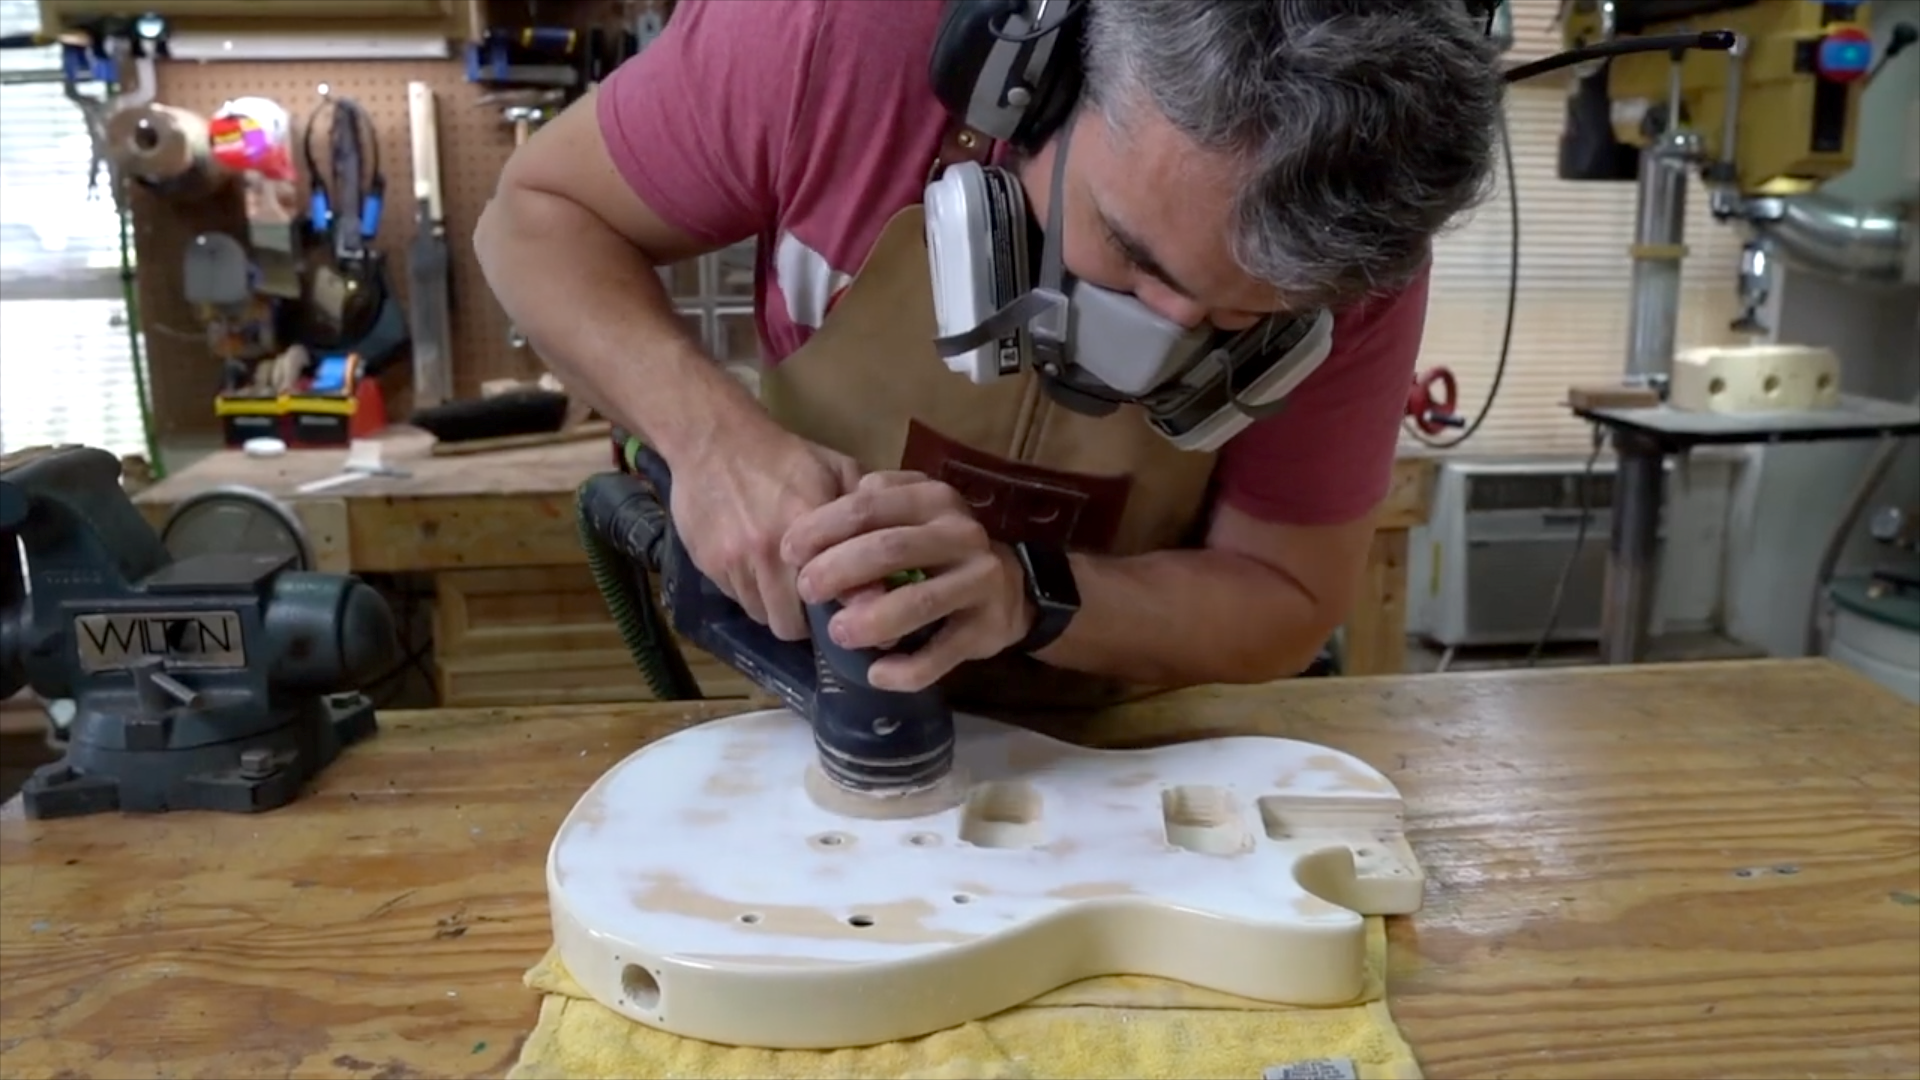
Sanding The Pore Fill
All right, here we are six hours later. We've pulled the guitar off of the holding stick and you can see that it's nice and dry.
Now for another sanding. As it stands, we filled the pores, which is great, but we also have a very thin layer of pore fill across the surface of the wood. So the next step is to sand that layer off and just kiss the top of the surface of the wood so that we end up with a really nice flat surface. We also need to be cautious not to over-sand during this step and go all the way down to bare wood as well.
We’re using a 220-grit paper, anything coarser than this is actually going to create scratches that we then have to remove later on. Sanding it down till we get just a little glint of light colored wood, which is that bare wood. The darker wood is the wood that has pore fill over the top of it. And we kind of want to strike that balance between the two just getting into the bare wood, but still leaving the pore filler inside of the pores.
If you need to, you can use that glancing light method that we used earlier and look at it and see if you see any shiny spots. Shiny spots are the spots where the sandpaper hasn't hit it yet.
Inspecting The Pore Fill
After sanding the front and back we’ll switch over to just loose papers and we're going to hit these edges, knocking down any high spots of the epoxy. Following that balancing act between getting down to the bare wood and still leaving epoxy pore filler.
These edges and these round parts are the parts that sand way faster. So be careful not to take off too much. The spots on the end grain of the guitar is where that epoxy most likely got soaked really deep into the wood, it’s not going to require very much sanding at all.
Keep using that glancing light to check for shiny spots, which tells us that this spot hasn't been sanded. As we mentioned earlier, trust your hand. Sometimes you’ll find raised spots with your bare finger tips that you can’t see in the light.
If you look at your guitar and there's all kinds of spots all over the whole thing where you see a little glimpse of light, that's the pores still being too low. The pore filler is not raised up to a nice level place. That’s when you know you’ll need a second or possibly third coat. If you're using mahogany or another open-grain wood, the pores are very open and soak up a lot more of the epoxy, and it's going to require more pore filling. If you have even the slightest doubt with it, apply a second and even third coat. It's going to be worth it.

Applying Vinyl Sealer
What You'll Need
Guitar Finishing Step-By-Step
ColorTone Vinyl Sealer
Spray Nozzles
400-Grit 3M Gold Sandpaper
“We do this to create a solid surface for the color and clear coats to adhere to that's impenetrable so that we can get the smooth uniform finish that we're going for.”
The lacquer process begins with a sealer coat. This is designed to seal the wood, and it's going to create a barrier between the color coats, the clear coats and the wood.
PRO TIP: If you skip this step certain parts of the wood are going to drink up your color coat more than other parts and you're going to end up with a very blotchy looking surface. Don't think of the vinyl sealer as a clear coat, think of it as a primer coat.
If you’re refinishing a guitar the seal coat is especially important. Your guitar already looks blotchy after all that sanding. We have to spray that seal coat so that we get a very smooth and even look as we apply the color coats moving forward.
Spraying Safety & Logistics
Good ventilation is absolutely the top priority once we start spraying. For those of you thinking, "Oh, I'll just do it outside," because that's what we all think, we have to think about things like wind and humidity and temperature and all sorts of other variables. The last thing that you want is you spray your coat and it's looking good and then a giant gnat flies right into it and sticks to it.
Back at our workshop in Florida, we actually have a full, dedicated paint booth. It's about 10 foot long by six foot wide with good intake and exhaust fans that are all explosion proof, including all of the lighting. It took several months to put it all together and it cost quite a bit of money. Those of you at home, you might be thinking, "Well, I don't have a full, dedicated paint booth and I certainly don't want to build one just for this one project." The good news is there's a lot of really good solutions and you can have a good temporary paint booth set up. The easy thing to do is just type in "temporary paint booth" online and you're going to find a lot of different solutions out there. Personally, I actually bought this book that StewMac sells, Guitar Finishing Step-By-Step. I still use it occasionally and I recommend it to folks all the time as a way to get into guitar finishing.
Well, there's a section in this book that talks about ways that we can safely spray aerosols and do it right there at home without a lot of cost and commitment. And it's actually written by a local legend, Mr. Dan Erlewine in Athens. And this is Matt and my first time here and we thought, "Well, wouldn't it be cool to go give Dan a visit and see what he has to say about an at-home ventilation system."
Dan’s working in a small studio, with an 18-inch exhaust fan installed in the corner where he paints. He uses magnets to hold filters in place over the fan.
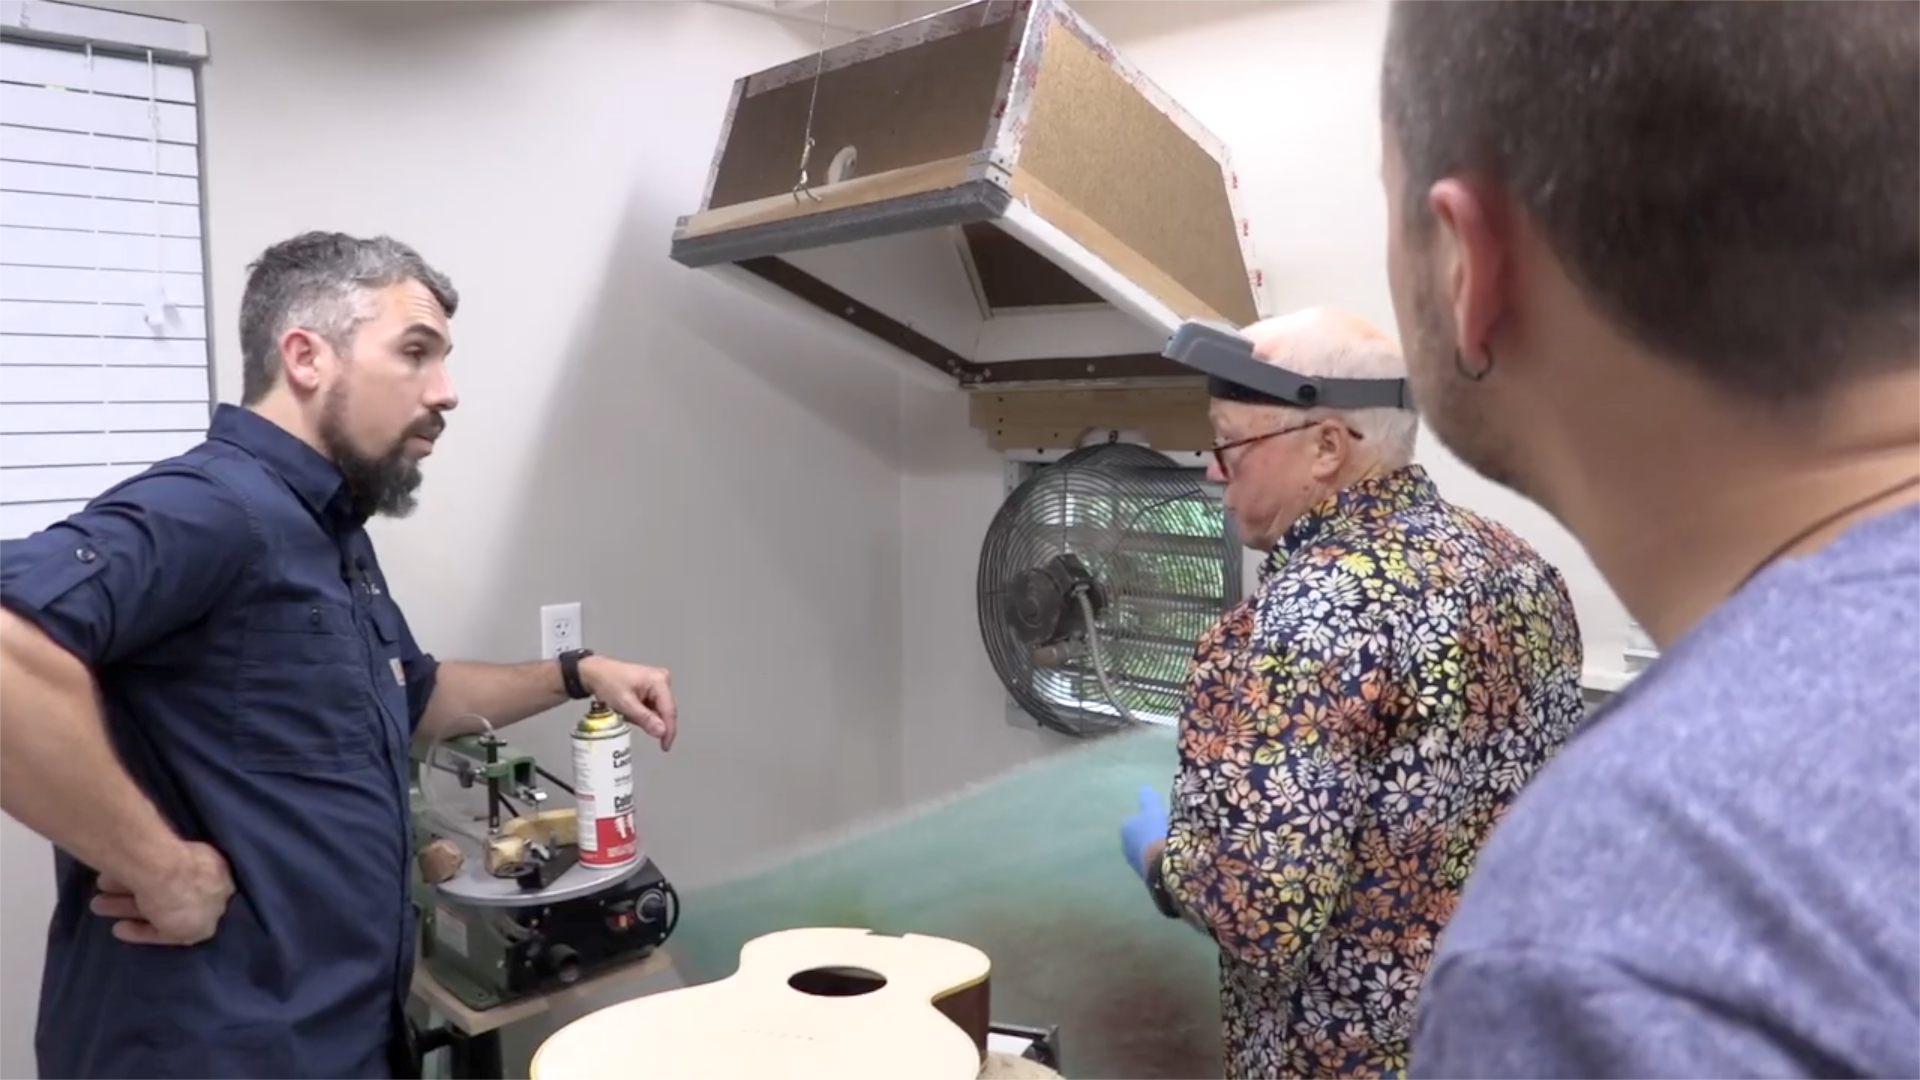
“You just need good ventilation. You don't want to get a fire.” - Dan Erlewine
It’s good to see that even somebody who works at the level that Dan does is able to get by with a paint booth that just does what it needs to do. It’s a great way to illustrate to you at home that you don't need a full paint booth.
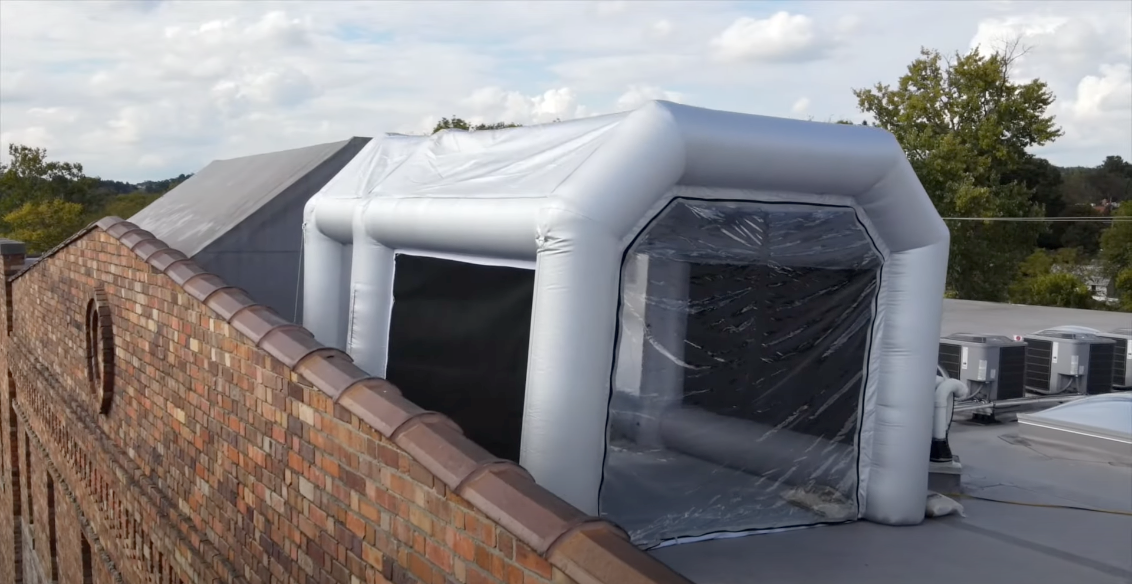
But we're lucky because here at StewMac, the wonderful folks have provided us with an inflatable paint booth that's actually up on the roof of the building here and we’re really excited to try this thing out.
Choosing The Right Finish
PRO TIP: When it comes to choosing the exact product that you're going to be using for your project, what I want to emphasize is that you need to stick within that same brand's product line. The worst thing that can happen and I see happen all too often is that somebody will start using one brand's vinyl sealer and then another brand's color, and then another brand's clear coat. And what ends up happening is that you have some incompatibility in there chemically, and you'll end up with these artifacts that happen on the finish and you're going to have to start completely over.
We are actually going to use this ColorTone line of products because ColorTone is compatible for instruments specifically. And you might think lacquer is lacquer, but they’re not all the same. A really good instrument lacquer is going to allow a certain level of flexibility so that we don't lose the tonality of the instrument. We don't want it to be so stiff that it actually changes the tone of our guitar. It's also designed to be used in different environments where it might be more humid or more cold. it's a fantastic product that we know is going to work well.
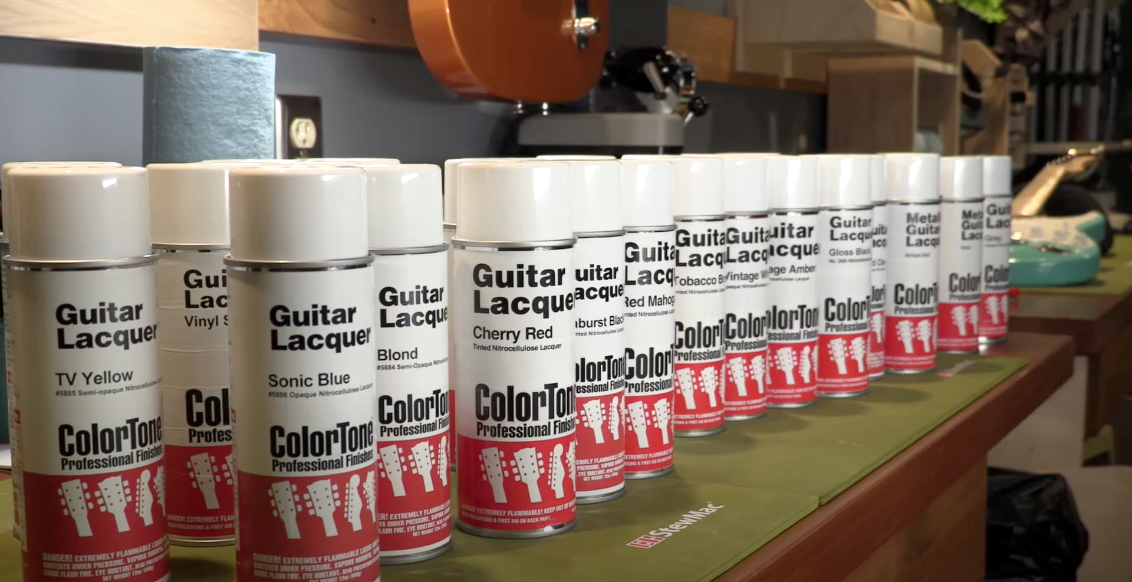
The cool thing about them too, is that the color line includes some of the most popular colors in the guitar world. So you don't have to worry about it being just slightly different than what you expected. They also sell everything from the vinyl sealer through the lacquer so that we know that we're going to be successful.
Tips For Spraying Aerosols
PRO TIP: There are two things you can do to improve the accuracy and performance you’ll get from an aerosol can.
1. Heating up the cans. Before you spray, fill up a bowl or a bucket or your sink with hot water, around 150 degrees. Use a thermometer because we don't want to make it too hot. You're going to want to submerge the cans almost to the top, but leaving the lid and the spray nozzle out of the water. Let them soak for about 15 to 20 minutes before you spray. This increases the pressure inside the can and it actually increases the viscosity of the fluids and just greatly improves the amount of atomization of the fluid as it comes out of the tip. You get much better flow.
2. The second improvement is upgrading the actual nozzle that you use. StewMac sells these spray nozzles. These are fantastic, and will give you beautiful atomization. They give you the control to spray horizontally or vertically out of the nozzle, which is a game changer.
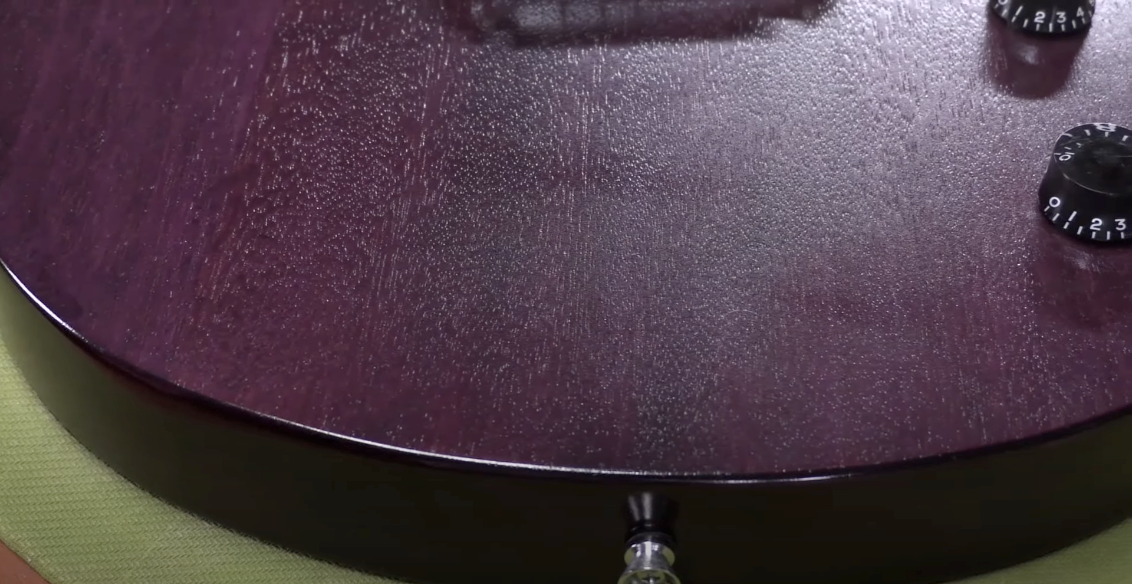
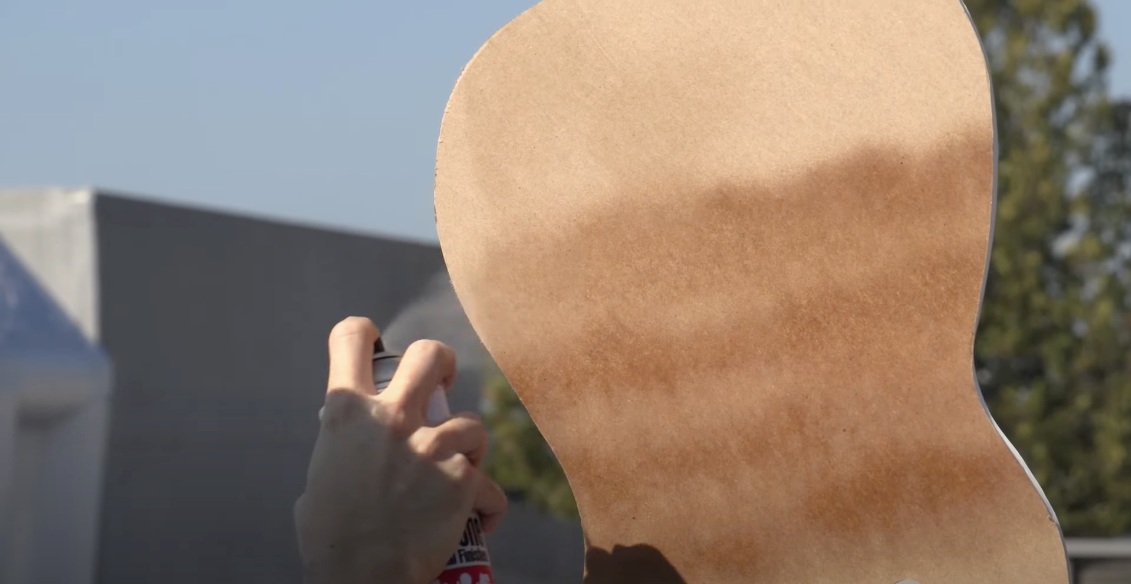
With those two upgrades to a simple aerosol can, you’re setting yourself up for success. To illustrate the difference, we did a little comparison.
 Room temperature can with factory nozzle
  Heated can with upgraded spray nozzle
As you can see the droplets coming out of the heated can are much finer, avoiding that blotchy, orange-peel look in the first photo.
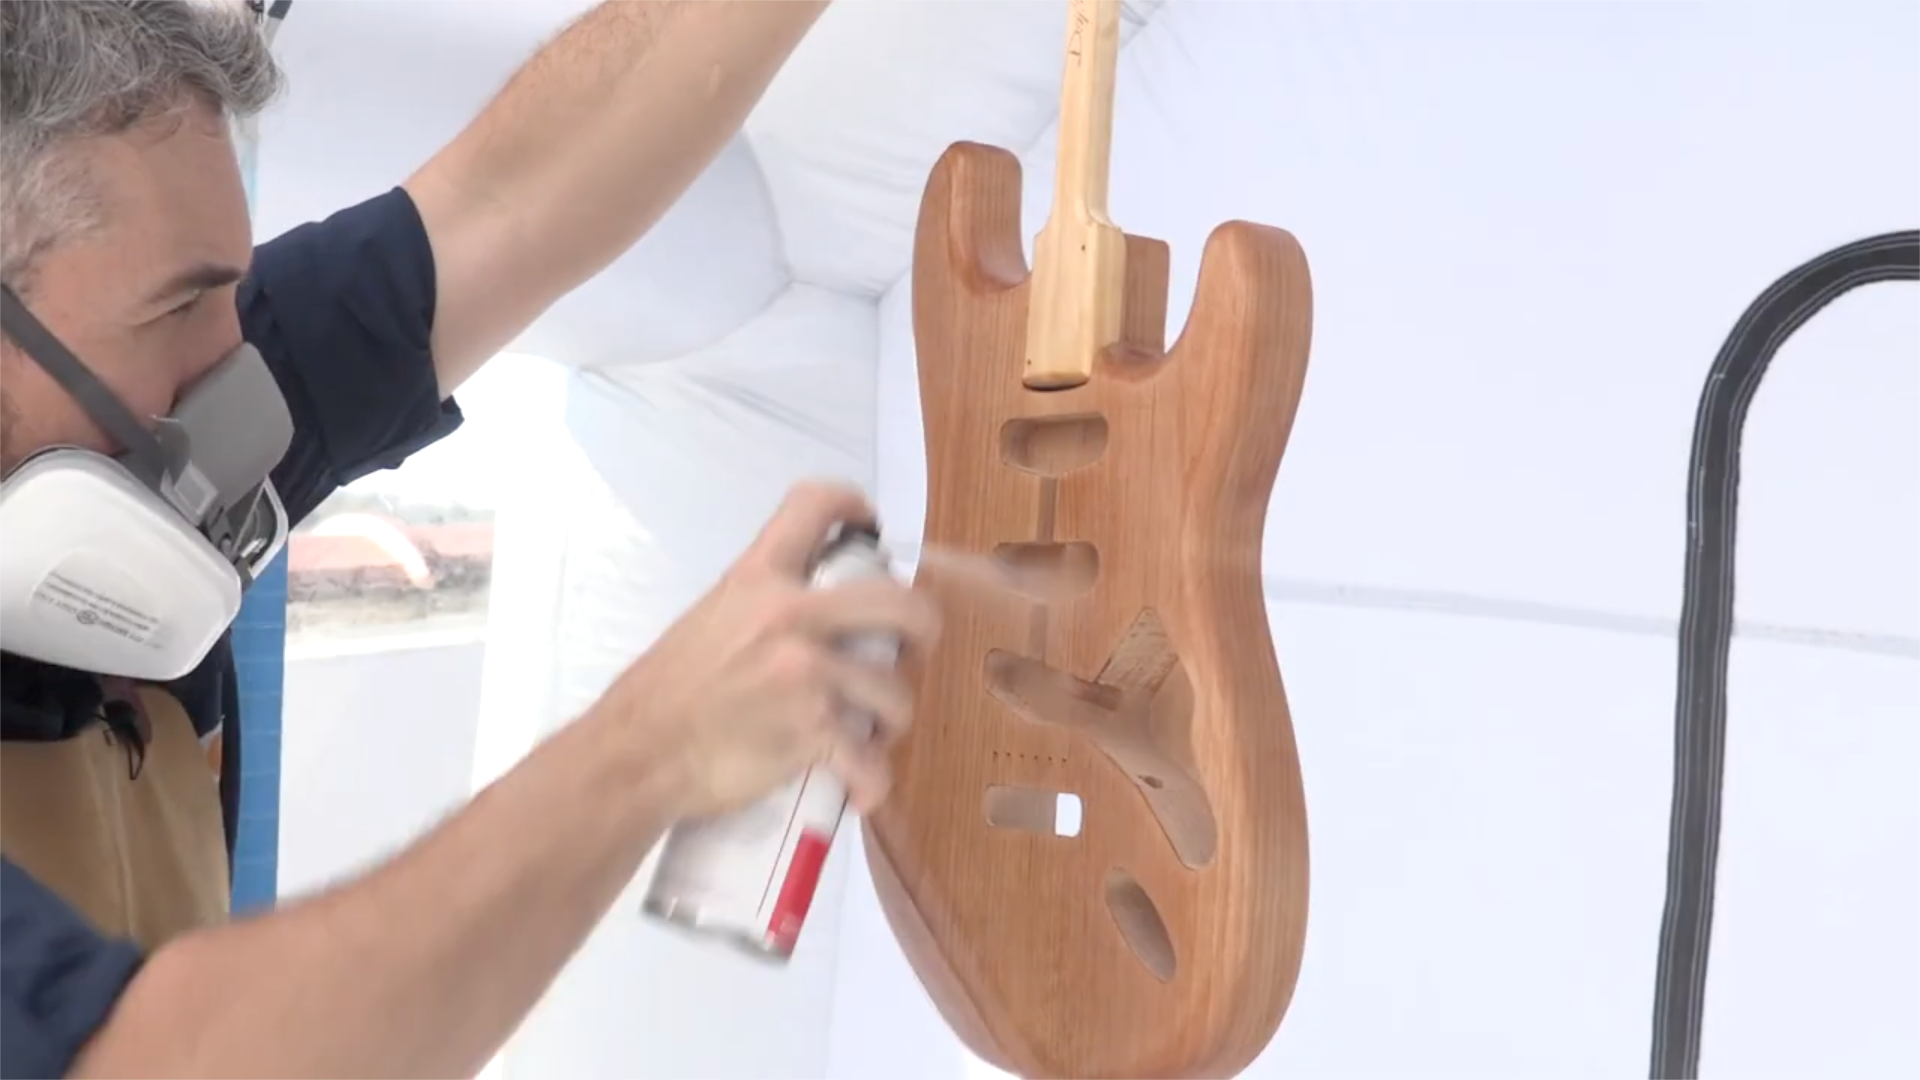
Spraying The Vinyl Sealer
Before you spray, make sure to wipe down your instrument with tack cloth, to make sure there’s no dust particles clinging to the wood when you start spraying.
It's important that you have your feet nicely planted and you've got a solid foundation. Stand parallel with the surface of the guitar.
Do nice, even passes at a steady speed, holding your hand about 12 to 18 inches away from the guitar. Overlap each pass by fifty percent. Be careful not to move your arm in a pendulum arc, because then the nozzle is far away from the product, then too close to it, and then far away from it again. Keep that distance even.
It’s important not to start and stop spraying on the surface of the guitar. If you’re working left to right, begin spraying to the left of the body, pass all the way across and then release the nozzle once you’re completely to the right of it.
PRO TIP: It’s very useful just to have a little bit of brown packing paper close by to test out your spraying, because it really is going to show you what it looks like, and you don't have to waste paint on your guitar.
Keep a conscious count going on inside your head and get a nice rhythm going as you do it to help create even, clean work. Not too fast, not too slow. You can actually see the marks here where we have that nice 50% overlap, and we have a nice, consistent look.
Remember this is going to be a multi-coat process and we're going to slowly get to the end line, we're not going to get there in one step. So patience and rhythm are key.
Rotate the nozzle when you’re ready to do passes in the vertical position, on the sides and cutaway areas. The cutaway areas on the S-style guitar can be a little complicated. Short spritzes are the best way to get in there. It's really easy to build up too much finish and create sags in that area. So just take your time, don't get too crazy with it. Now that we have our first coat of vinyl seal applied to the guitar body, let's spray the neck.
We're going to do two to three coats of vinyl sealer total. So now that we have that first one on there, we want to wait a MINIMUM OF ONE HOUR before we put that next coat on. So for us, it's lunchtime. I recommend not staring at this guitar waiting for it to dry. Go find something to occupy yourself so that you don't have a tendency to apply the next coat too early. So we’re going to go grab some food, and come back and do a full second coat, wait a couple more hours, and apply the third.
All right. We've successfully sprayed the three coats on here yesterday and we've let it dry overnight. Let it dry overnight to ensure that it's fully dry before we do this next step. Remember, patience is crucial. What you should see is a very nice uniform, kind of matte finish on the guitar. Make sure there aren't any spots where you can clearly see that the vinyl sealer has soaked into the wood or is really sitting on top over here. You don't have any runs or sags.
Sanding The Vinyl Sealer Coat
So before we move on to color, we need to do a knock-down sanding. And we're going to do this many times throughout the process. It's not the same as we have done before. What we're trying to do here is knock down those little bitty specs of dust that found their way onto the surface. Because no matter how good your paint booth is, that's going to happen.
We’re going to use 400-grit sandpaper, and very lightly, almost with no pressure whatsoever, let it float across the surface. All that’s happening is we’re knocking down the finish just to get rid of any hairs or dust that are inside of it. We should just get a nice little dust coat on top. And you don't even have to be concerned about grain direction or anything while you do this.
This is a step that you often don't see in instruction books, but it's something that ensures you're going to be successful down the road, and saves you some trouble as you move along with the paint process.
Afterwards, wipe it down with a tack cloth. Get it nice and clean again, because obviously now we've introduced all this dust.
What's Next?
With that, we’re ready to move on to the next step of the process. Click here for part two of this video and article, where we’ll show you how to apply the color coat.