How to Fix a Loose Acoustic Guitar Bridge
If your acoustic guitar has a loose bridge and you’re wondering how to fix it yourself, this video is for you. Tech Gene Imbody demonstrates step-by-step how to fix an acoustic guitar bridge that is lifting off the top of the guitar.
Video Transcription
[on-screen text reads: StewMac]
Common reasons bridges come loose
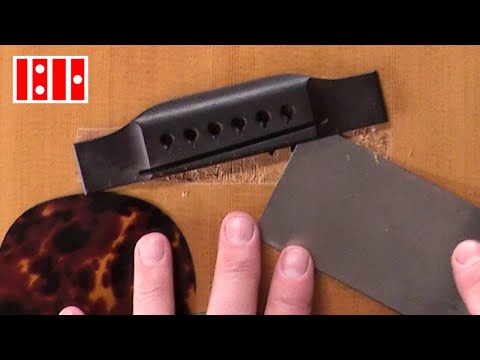
Gene Imbody: Today I'm going to show you how to do one of the most common repairs for an acoustic guitar, the bridge reglue. Check this out. This bridge is actually lifting away from the top. You can see it. That's no good, and it needs to be fixed immediately. Luthiers like me love jobs like this. It's a little bit scary looking and most people are a little bit hesitant to take it on themselves, but if you know what you're doing, you have the right tools, a lot of times it's a piece of cake and a great money maker. So let's get into it. The guitar I'm working on today was built from one of our OM guitar kits, and we use it for lots of different pictures and videos. Sometimes it just sits up for people to play on their break. StewMac, in case you didn't know, is in a very old 120 year old brick building.
It's hard to control the humidity, there's temperature fluctuations, this guitar has been put through the ringer. And the changes that happen have caused this bridge to start lifting. That's pretty common. In fact, that's the most common reason, environmental factors. The other reason is the tension of the pull of the strings. Your strings anchor to the bridge plate on the inside of the guitar. The bridge pins keep your ball-ends properly seated on this plate, and that distributes the force of the strings out evenly to the top. As your pins wear out, the strings creep up inside of the bridge plate and they put undue force on the bottom of this bridge. Take a look at these [Gene sets 3 pins on the guitar body that look worn out]. That's starting to show bad signs. You start to get a pin that looks like a mangled pulled tooth, you are overdue for a new set of pins. So take a look at the pins in this guitar.
Slots are still in pretty good shape, so I don't think that's the case here. We just need to reglue this bridge. Another big reason the bridge comes off on guitars is what you find on a lot of budget model guitars. A lot of import guitars. There's too much finish or a complete finish underneath this bridge. They've actually just glued the wood right down to the finish. That will stick long enough for you to buy the guitar, but eventually it's going to come off. We'll talk about that later.
Tools needed for the job
Okay, so let's talk about some of the tools and supplies. You're going to need to do a bridge reglue. First, you need a way to remove the bridge. Sometimes they come off completely by themselves, but you don't really want that because when that happens, it usually takes finish and chunks of wood with it and you have a whole other problem to contend with. A lot of times it's like the one we're dealing with today, so you're going to need some sort of palette knife to remove it the rest of the way. For me, nothing beats our bridge removal spatula [on-screen text reads: Bridge Spatula]. It's got a thin, flexible blade, but it's very stiff and sharp. This big blocky handle makes it easy to control and the width makes it less likely that you're going to dig into the top as we work through this bridge. It's really the right tool for the job.
So obviously we're going to need some glue and there are a lot of different choices. Today we're going to use just regular Titebond. This is what I use most of the time. This is probably the glue that was used on just about every guitar you've ever touched. It has a long shelf life. It has a long open working time. It's incredibly strong. You can undo it with heat. Another option is Titebond III. Titebond III is a little bit stronger. I will use this on jobs where I know the guitar is going to be put through some abuse, maybe with a touring musician. Now my favorite glue is Hide Glue. You can't beat hot Hide Glue for its tone, for its workability. It's very strong. It can be undone and reused an infinite number of times, but for this specific job, a bridge reglue on this specific guitar, I don't think Hide Glue is necessary.
It's harder to work with. You have to heat it up. It doesn't give you much open working time, so you have to be quick. There's just more opportunity for failure in this and it's really not required. We're also going to need some clamps and some cauls. Now the cauls are there to protect the bridge plate from the clamps and the top of the bridge from the clamps. It also distributes the force evenly so that we get a reliable joint. You could totally make your own cauls. Check out some of these I've made myself out of plywood for different size bridge plates. This one's covered in wax to protect it from sticking to the guitar, this one's cut out of nylon. Here's one for a classical guitar that's notched for the fan bracing pattern.
But we do have versions of our own here at StewMac that fit a variety of different guitars. They're metal, they're sturdy. They'll last you a lifetime. This is the 3-in-1 caul [on-screen text reads: StewMac 3-In-1 Bridge Caul]. It fits the bridge plate on the inside of the guitar. This is our bridge clamping caul [on-screen text reads: StewMac Bridge Clamp Caul]. So this goes on the inside, this goes along the top, this creates a great union between all of your pieces and it really spreads the force out and distributes it evenly to give you a very reliable bridge joint.
Now the last thing we need is the way to undo the remaining glue joint on the guitar. In some very rare cases, you can just get the knife to go through the joint as is. In most cases, you're going to need some heat to soften that glue. Heat is actually a little bit safer because it softens the glue and it allows everything to come apart nice and cleanly. This is a 250 watt infrared heat lamp. We're going to use it in conjunction with this reflector. Now, this isn't your normal, off the shelf hardware store reflector. This is what's called a brooder's lamp. It has a heavy duty ceramic socket and a big gauge cord that's capable of dealing with the heat and the wattage that this lamp draws. It may seem crazy to a lot of you that I would go anywhere near a guitar with a lamp that puts out heat like this thing does, but by the end of this video, I'm going to show you that not only is this safe, it's the best way to do this job.
Prep work to remove the bridge
Okay, let's get into this. The first thing we're going to need to do is make a mask for the top of this guitar. Obviously, we've got a lot of heat coming out of this lamp, and the only thing I want to see is the piece that I want to heat up. We're going to start with a piece of corrugated cardboard. I don't like to use anything solid because it conducts heat too easily. The airspace in this corrugation is an important insulation factor in all of this [Gene holds the cardboard up so you can see the airspace from a cross-section view of the sides]. We have to transfer the shape of this bridge onto our cardboard as accurately as possible. We're going to start by measuring the length. It's pretty much right at six inches. On my cardboard, I'm going to mark out six inches. So there's the front of our bridge. Now I want to measure the end of our wings [Gene measures the length of the very end of the bridge with a Luthier's Digital Caliper]. So we got about one inch on our length, we have the front of our bridge.
Now we need to transfer this curving line of the back. Now we're going to do that by making a mark about every half inch along this bridge [Gene marks a line every inch on the bridge using a white pencil]. So we're going to take these half inch lines and transfer them here [Gene marks the 1 inch lines on the bridge mask]. And then, we can use our caliper to take a measurement at each one of these and transfer that onto our mask. So we end up with a dotted line and I'm just going to connect that. Now I know this doesn't look perfect. It doesn't have to be. This is just a frame of reference and I'm going to cut inside this line and we're going to fit it to the bridge here after we get it all cut out. Okay, I can force this cardboard around the outside of the bridge and push it into place. We really kind of want to create a seal with this cardboard almost flaring up around the bridges.
So that's all I really need at this stage. I've got all of the bridge exposed [cardboard mask is laying flat on the guitar body, and the bridge is exposed], so we're just going to take some copper tape. This is good for sealing up any gaps we may have. We're adding some extra insulation in some areas where we might need it [Gene applies two strips of copper tape to the cardboard mask along the width of the bridge, one strip on each side]. All right, so that looks pretty good [Gene applies two small strips of copper tape to the cardboard mask, one along each end of the bridge]. Now I'm going to take some Double-stick Tape and lay it around the top of this so that we can adhere some reflective bubble wrap insulation. This adds insulation value to everything, but it protects our cardboard from the lamp too [Gene cuts out the bubble wrap insulation from around the bridge area on the mask so the bridge is exposed]. Last thing I'm going to do is seal up these edges with some more tape [Gene applies small strips of copper tape to seal up the edges surrounding the bridge hole on the mask]. And there we have our mask [Gene sits the mask on top of the guitar so the bridge is exposed through the top of the mask].
Okay, let's mark the location of this bridge as it sits. So we have a location to put it back to. This also allows us to score the finish around the edge so that we can remove any paint that might be underneath it. I'm just going to carefully come in here. Don't press too hard. I don't want to crack the lacquer, I just want to leave a good sharp mark.
[Gene runs an exacto knife around the border of the bridge leaving a clean mark all the way around]
Okay. The other thing I like to do is mark it with tape. It gives me a really easy to see visual to keep this bridge in the ballpark when we put it back on it [Gene applies tape around the entire border of the bridge]. Stick this to my shirt a couple of times to remove a little bit of the tackiness. I don't want to pull up any finish. Another little trick I like to do is fold over the end of any piece of tape I put down. That gives me a handle to pull it back up later without digging my fingernail into the top to rip it up.
The last thing I want to do is dress out my Bridge Spatula. You can see this one's been used a little bit and there's some scratches and some tape marks on it. So let's clean this up and make it even safer for our finish. I'm just going to lay down some self-adhesive sandpaper here. The first thing I want to do is cut a little bit of a knife edge to the front of this spatula. The sharper it is, the better it's going to go through the glue. So I'm going to take it face down on my self-adhesive sandpaper and just drag it back on the top. Not on the bottom, just on the top. I want to create a ramp.
I'm going to take some higher grits of sandpaper. Just take out some of these scratches and clean this up. So for the bottom of the spatula, I'm going to use some micro mesh pads to polish it out. I want to break any possible sharp edges. I want to feel for any nicks or deep scratches, anything that could cut into this finish, I want to take care of right now.
Okay, that looks pretty good. So let's talk about the scary part of this job. This is where we heat up the bridge so that we can get the glue joint to about 140 degrees. That's where most wood glues start to soften and let loose, but in order to do that, we're going to heat the top of this bridge even hotter than that. In my experience, it's somewhere in the neighborhood of 200, 250 degrees. There are different ways of doing that. A lot of pro shops will have custom-made blankets that fit the top of the bridge. There are specially made irons that we carry that can do that, but this is the way I learned when I was first starting out over 25 years ago at Woodsong's Lutherie in Boulder, Colorado. John Eaton showed me how to do this, and it's the way I still do it to this day.
Let's talk about some safety precautions. Rule number one, never walk away from this lamp while it's on. You have to have a good place like this clamp we have here to quickly be able to attach it and get it out of your hands. We're going to keep a power strip up here with a switch on it so that we can get to it quickly. We're going to keep a fire extinguisher around just in case. We're going to have some thick, heavy towels that we can lay over top of the guitar for extra protection and to have just in case we need to grab something hot in a hurry.
Okay, let's talk a little bit about this lamp. These come in a couple of different wattages. This one's 250. It puts out a lot of heat, but up close to the bulb, it's very directional. We can focus it right on the top of this bridge. It decreases exponentially the further way we get. I also want to keep a couple of chisels and a good scraper handy. I'll tell you why here in a moment. Now we're ready to heat this thing up.
Bridge removal
I'm going to lay some towels out here just as some extra caution [Gene lays down a couple of towels over the top of the guitar body, leaving the bridge exposed]. It's always good to cover any surface you're not going to be working on. Let's get our mask on here [Gene sets the mask over the top of the guitar, exposing the bridge through the hole in the mask]
Let's get our light on.
And I get very close here, right down to the top [Gene holds the heat lamp over the top of the bridge]. I'm going to be within a few inches, so we're going to just start out and let it start cooking up here, and we're going to keep it moving because I want to heat this bridge up evenly. I don't want any one spot significantly hotter than the other. I'm always watching to make sure that my mask doesn't slide and expose any finish. Okay, we've been at this for a little more than five minutes or so here, so let's just see where we're at. Now you can just feel this and see it's getting pretty hot, but I like to use a thermometer to really know where we're at [Gene uses an infrared laser thermometer to measure temperature]. Yeah, top of my bridge is about 250 degrees, which is good. Like I said earlier, to get the glue joint to around 140 degrees, we're going to need to get the top of the bridge well over 200. So, I'm going to come in through the back into the separation just gently [Gene gently works the Bridge Spatula along the edges of the bridge].
The worst thing you can do here is force this knife. I don't want to go anywhere that the glue doesn't want to let me. You could push this knife all the way through to the other side. You could lever this bridge off the top and cause other damage. It's getting soft. This feels pretty good, and if we can look through the bridge pin holes here, you can see my knife is slowly scooting through the open holes. So right there doesn't want to go. I'm not going to make it. Okay, so as we work on this and test the glue joint, it's actively cooling down, so we're going to have to heat it back up here because as soon as that glue falls below 140 degrees, it starts to get like chewing gum again. One thing I should have mentioned too, I sometimes like to keep a pair of sunglasses around for doing this. That infrared light is kind of hard on the eyes.
[Gene slowly works the heat lamp up and down the bridge again]
Okay, we've been at this for about another five minutes or so. We've got a little more than 10 minutes into this, I think. Let's see where we're at. Oh, yeah, you can see my knife going through the holes pretty cleanly. I'm almost all the way to the front here. I tell you what, this tape I laid down, I'm going to pull it back up. I like to leave it on there if I can. It's a good quick way to mark this bridge, but it's still glued so tightly along the front edge, it's making it hard for me to get under there. So you also have to be careful to not dig into the wood. You can grab grain and you can start diving into the top rather than going through the glue joint. Almost got to be even extra patient towards the end because it's really close to wanting to give, and if I force it that last little bit, it can be a problem. So we want it to basically fall off of here. This thing is about ready to come off. I can feel it. There we go. Look at that. Perfect.
Cleaning the bridge surface
Okay, so right away while we're still warm, I'm going to come in and scrape off any glue little fibers of wood while the glue is still soft. It comes off a lot easier while it's warm. Being careful not to remove any ebony, I just want that little bit of spruce [Gene uses a chisel to scrape the wood and glue off of the bottom of the bridge]. Okay, I got the majority of it off of there. Let's check the top, too. I don't want to pull up wood, but some of these little shiny bits of glue, little chunks of ebony that stayed behind [Gene gently uses the chisel to remove ebony and glue from the bridge area on the guitar body]. We scored around this bridge. If there was finish inside that line we scored, we would have to take a chisel and carefully remove to where we scored. We don't want any paint left underneath that bridge. And like I said, on less expensive guitars, a lot of budget guitars, they will paint under here and just glue right down to the paint, and now it's a lot of effort at this point to go through and remove all of that paint.
You might have to use some paint stripper. I've even had to use a router to route off thicker finishes on more budget guitars. So this is pretty clean. This bridge ought to reglue nice and easy, and we should be good. Okay, we have our bench cleaned up a little bit here because we're getting ready to start the next phase of this operation, which is getting the bridge glued back to the guitar. As you remember, I had to remove the tape as we were doing this because it was getting in the way. I want to add that back. I like the visual of having that tape there so that I can quickly judge the position. We're going to insert a couple of these bridge alignment pins to get us in the ballpark. I'm going to add a couple of bridge clamps. Get this snug down on here [Gene installs two bridge clamps to hold the bridge firmly in place].
All right, let's add our tape back [Gene applies tape around the length and width of the bridge on all square sides]. Okay, now let's finish cleaning up both of these surfaces. We'll prep this to do our reglue. So what I have here is just a simple block of plywood that I've shaped a radius into one side covered with 80 grit self-stick sandpaper everywhere. This is going to allow me to come in and sand all of this clean with a couple of different sizes and shapes so I can really get into all the corners and get this all cleaned up [Gene sands the bridge area on the guitar]. Let's switch to the bridge now and we'll get it cleaned up [Gene sands the bottom of the bridge].
Good uniform appearance, no shiny spots or dark spots. The last thing I want to do is score both of these pieces. I don't have to go super deep, I'm just leaving a line and I don't exit anywhere. If you do that, you're going to leave marks on the outside of the bridge. This, theoretically, gives us a little more gluing surface, gives the glue a better opportunity to bite. I like doing it mostly because the checkerboard pattern I'm going to cut in the bottom of this bridge and on the top helps to keep these two parts from sliding when I glue them together. So let's check the fit of these two pieces. Line it up here with my tape, and that looks great. I'm not putting any pressure on this bridge and it's sitting flat everywhere. You have to really pay attention because what we have here is a flat surface that we're gluing to a round surface.
Flat top guitars aren't actually flat. There's a radius to the top of these, so it's like gluing this flat piece onto a basketball. It's not going to touch everywhere, so if it's bad enough, I'll actually spend the time to try and transfer as closely as I can this curve into the bottom of the bridge. Now, in many cases that's not really necessary and it's not going to be here, but just keep in mind that it's something you want to pay attention to. So the bottom of our bridge is all cleaned. It's all scored. It's ready to go back together. But check this out, and I was so excited to get to this point that I forgot to show you a really cool feature of our bridge clamping caul. Well, you can place this on the caul and engage these screws into the bridge pin holes, and it gives you a really nice holder.
[Gene attaches the bridge to the StewMac bridge clamping caul]
I can even lock it in my vice, and I could have done all that work right here, nice and stable, nice and safe, but you may not have this caul or you may be working on a bridge that doesn't fit this caul so it's good to be able to do both ways, but this is a great option.
Dry clamping the bridge
So what I'm going to do next is a dry clamp. I want to clamp this all in place and get all my cauls ready, and that's going to allow us to double check our fit everywhere. But more importantly, it's going to give us an opportunity to practice without the pressure of working around the timing of our glue. The first thing I want to do is get my caul in place and we're going to use one swivel clamp in the middle. Now, I don't want to use three if I don't have to.
These are very heavy clamps and I don't like the weight of all three of those heavy clamps. If I need some extra pressure on the wings, which is pretty common, I'm going to use some Camless Clamps for that. They're much lighter, so let me give you a little trick for how to get this in place because it's a little cumbersome. Take my clamp and extend it. I'm going to reach in the sound hole carefully and find my position here where this needs to go. I'm going to butt it up into the X brace. Then with one hand, I'm going to hold it and insert my clamp, trying not to bump the sound hole. And then I'm going to find the bridge. Once I hit it, you're going to be able to hear it, hear it here. [clamp makes clacking noise] Hear that?
So there I'm on my caul and I'm going to use this clamp to pull up and hold the caul in place while I pull out my other hand. So as long as I keep tension on this clamp, it's going to hold that caul where I need it to be. So I'm going to carefully lower it. All right, so that's in place. I'm going to put this along the top [Gene sets the bridge clamp caul on top of the bridge]. All right, just a little tension now to hold everything together [Gene tightens the clamp on the caul]. Not much. There we go. Drop the mirror in place here [Gene sets the mirror down into the sound hole]. Let's look inside and make sure our caul is exactly where we want it. Everything looks good. Our clamp is reasonably centered on our bridge plate. The thing I like about this caul is it has these wings, these feet here that extend over our X braces. That allows me the ability to clamp without damaging my braces, and this is going to give us a nice solid surface to clamp against.
Our bridge plate caul is in place. Everything looks good in there. Let's take a look at the caul on the top of our bridge. So I have two adjustable feet on the ends of this caul that are controlled by these set screws in the top. I can lower those down to just touch the top of the bridge, and later I can use those to exert a little extra pressure where I need them. The screws in the center, as we talked about earlier, are for attaching the bridge to the caul to work on the base. So I'm just going to back those out of there. I don't want those engaged when I do my actual clamping. Since our fit is so good on this one, I think we could glue this bridge just like this and we would be good. But for extra insurance, I do like to add a couple of extra clamps out on the wings just to keep this caul level and to keep our pressure even.
Okay, so let's just look all the way around, make sure there's no gaps, make sure we're lined up with our tape and our score line. This looks great. I think we're good. Time to do it for real now.
Bridge reglue
First thing I want to do is get some glue on the bridge. We're going to use a little more glue than we actually need. I want to make sure I use enough glue that we get some solid squeeze out all the way around here. It's pretty good. I'm going to set this aside. It's okay to give this stuff a few minutes to set up. It'll be less likely to slide on us once it starts to tack up a little bit so the other thing I'm going to do before I start spreading glue around on the top of this guitar, I'm going to put a towel on the inside so that I don't drip glue through the sound hole all over the back of the guitar.
All right, spread this around [Gene evenly applies the Titebond glue to the prepped bridge area of the guitar body with a brush]. I'm not being overly neat right here because we're going to have glue squeeze out all over the top of this guitar and we're going to clean it up. So, okay. Let's use our locating pins to get us in shape. Just a little hand pressure, and that's what I want to see there. See all that glue that squeezes out? Let's wipe off the excess we don't need here. Okay, looks good. Want to remove any glue that's squeezing out onto the bridge plate too, and we'll use a Q-tip with a little water on it to clean out the holes. If I were doing this with Hide Glue, I would just about be out of time already, but Titebond gives us more than enough working time.
Another cool trick I like to do is use my ruler to really get in the corners here. Wrap a damp towel around it. All right, it doesn't have to be perfect at this point because we're going to put clamp pressure on here and we're going to get even more squeeze out. This is already starting to tack up. I can feel that this bridge is already not wanting to slide as easily as it did. No problems. We still have plenty of time here. Okay, let's get our clamp and our cauls in place.
And pull up with the clamp. Hold the caul in place, getting the hand out of there. Now, make sure that we are touching the tape on all three sides. All right, so let's get a little bit of pressure on here. You can over clamp a bridge and you can squeeze out most all of the glue. Too much pressure will actually weaken the joint. You won't have enough glue in there. Not enough pressure isn't good, but too much is bad too. So right there, we just got me a little more squeeze out. Let's engage the wings here. Oh, yeah, I can see some squeeze out right away from that. That's looking really good. Kind of clean that up and then we'll get our other two clamps in place.
Just enough pressure right now to hold it in place [Gene installs the sound hole clamps to the bridge caul]. That looks pretty good. Okay, I'm really comfortable with my location. I'm right to the edges of my tape, so I'm just going to pull it off now. I don't need it. I still pull it at an angle nice and slowly so I can make sure I'm not doing any damage here. Okay. I like to push down on it in certain spots. If I can push on it and watch glue squeeze out and when I let up, if it sucks back in, I know I'm not down all the way. Okay, so right there, it's really hard to see, but there's just the slightest amount of suction here. I can see a little bubble wanting to pop in and out of that glue squeeze out. It's not terrible. Let's just put a little more pressure on here.
There we go. I can see I got just a little more squeeze out and I pushed another air bubble out through that glue. One last cleanup around here [Gene cleans up around the base of the bridge with a Q-tip]. It'll come off later if I miss it. It's not a big deal, but the more you can clean up while it's wet, the easier it will be. Get a good shot of everything. Make sure you don't have any glue residue anywhere. Okay, we're good. I'm going to let this sit in clamps overnight. We're going to check it tomorrow and see how we did.
Final clean up
Okay, so we've been sitting in clamps, drying for about 24 hours now. Really, you can remove these clamps after about 12 hours. I'll let them sit overnight. I just wait 24 hours before I stress the glue joint with strings.
This looks great. It's down everywhere. I don't see any gaps. It's exactly where we placed it. Let's take a quick look inside. That looks good. I didn't drip any glue anywhere. Great. Let's check the fit of our bridge pins now [Gene gently sets the pins down into the bridge pin holes]. So yeah, that's what I expected. You can see how that pin is sitting up high? You can get some glue in here that's hard to clean up to begin with. The moisture and the glue can make the slot swell a little bit. So I'm going to use a reamer here. This is our five degree reamer to fit our pins, and I'm going to turn it backwards. If you turn it backwards, it burnishes more than it cuts, so it just cleans out any loose glue and presses those swollen wood fibers back together without actually removing any wood because these pins fit pretty good to begin with, and just like that.
So it doesn't take much. Just a little bit of cleanup in each one of these holes. I want to clean these out until they drop easily right down to the collar, but I don't want them loose either. Great.
[Gene spins the reamer backwards in each of the bridge pin holes]
Okay, last one here.
[Gene gently taps a bridge pin into the first bridge pin hole]
Okay, I have these holes reamed again for the bridge pins. Last thing I'm going to do is clean up a little bit of this glue residue we still have left. Some little minor scratch marks. We'll take a little of the clean and shine here, soften that glue back up. We could also use some warm water or whatever your favorite guitar polish is. If we did a good job cleaning up and we were neat with our glue, it shouldn't be excessive. All right. Last thing I'm going to do is just put a little bit of lemon oil on this bridge. The heat from the infrared lamp tends to dry out wood a little bit.
This one's not bad, but not a bad idea to keep the wood hydrated. I'm going to let that soak in for a minute. Wipe off the excess. Let's get it strung up.
[acoustic guitar music plays]
That's great. It's holding tune really well. Bridge has no gaps. It's right where I wanted it to be. This thing is good. Not only is it good now, but it should be good forever. Maintain humidity on it, keep it out of extremes of temperature, never leave it in a hot car, and you should be good for a lifetime on one of these. So thanks for joining us today, and we'll see you at the bench next time.


