Binding and fretting a Red Diamond mandolin fingerboard
Fretting a bound mandolin fingerboard

Here's my two-step technique for fingerboard binding and fretting on my Red Diamond mandolins.
The frets go in before the neck goes on
I fret the fingerboard before gluing it to the neck. This is a flexible way to work, and gives clean results even with multiple bindings and overhanging frets like the example I'll show you here.
First step: the binding
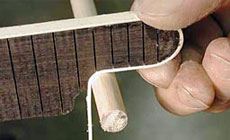
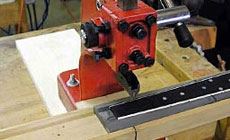
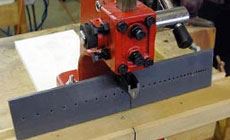
Starting with a pre-slotted fingerboard, I rout it with our ball bearing router bit to the shape of the board minus the thickness of the binding. I use a router table, following an acrylic pattern fastened to the fingerboard with double-stick tape.

After shaping the board, I bind it with single white binding. The binding is a little taller than the board itself; I sand away the extra height after the glue has dried for a few hours.
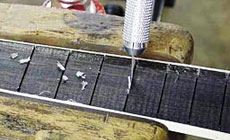
I use our fret slot cleaning tool to pull the nearly hardened binding glue from the fret slots. (Don't wait too long or this job becomes unnecessarily difficult!)
Install position dots and sand them flush with the surface.
Here comes the good part: multiple bindings
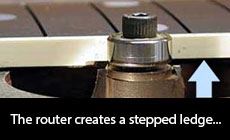
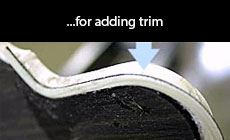
I rout the bottom edge of the fingerboard, binding and all, creating a recessed ledge for adding trim at the bottom of the main binding. Adjust the router bit to accommodate the binding plus a small allowance for glue.
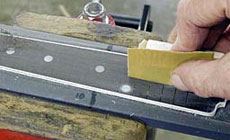
Here I'm using a .020 white and .020 black trim under the solid white edge binding. (I laminate them with our binding laminator.)
When the glue has set, smooth the two bindings so they're flush to each other. Install the side dots, clean everything up, and you're ready to install the frets!
Second step: the frets
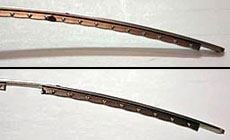
I bend the fretwire with the FretBender to give it a radius before cutting the frets to length. I'm using a radiused fingerboard, and I overbend the wire just a bit. This encourages the fret ends to stay down.
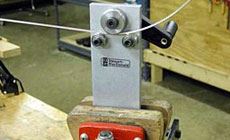
I use our fret arbor press with a special cradle I made for holding the mandolin fingerboard.
I've modified several fretting tools for mandolin use. This holding fixture has holes drilled through it at each fret position. The holes drop onto a register pin, quickly and accurately aligning each fret slot under the arbor press. I don't even have to think about it; the fret caul lands right over the fret slot. One less thing to worry about.
Okay, let's install some frets
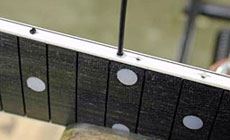
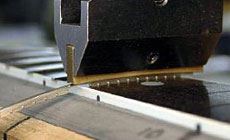
I start by clipping back the tang under one end of the fretwire using the Fret Tang Nipper. This creates the overhang needed for the crown of the fret to sit on top of the edge binding.
With a pen I mark where to nip the tang on the other side, deducting 1/32” to allow for board shrinkage. This eliminates those annoying little bumps where the fret ends try to push the binding away from the fretboard.

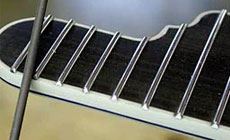
I press the fret in, then clip the excess wire flush to the binding. This leaves the overhanging fret crown ready for installing the next fret. It's fast and efficient.
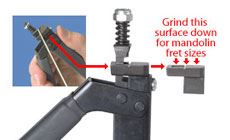
Two tools I modify for mandolin work:
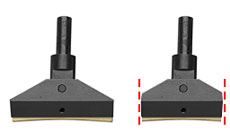
With a hacksaw I cut the ends off the fret press caul so it's mando-width instead of guitar-width.
To adapt the original Fret Tang Nipper for mando fretwire, I use my belt sander to carefully grind .017" –.020" from the top surface of the tool’s cutting anvil. (This can be accessed by removing the nut, spring and hold-down from the end of the tool, then taking out the Phillips screw that holds the cutting anvil.
UPDATE:
Our Deluxe Fret Tang Nipper fits ALL sizes of fretwire, no modification necessary!
Trim and file the fret ends with a fret end dressing file for a comfortable feel.
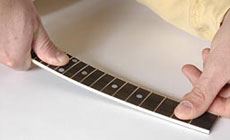
The fingerboard's ready to be installed except for one last thing: it needs a massage!
The fret tang barbs pressed into the slots cause the board to back-bow into a curve. To flatten it for gluing, massage the board by lifting one end, gently bending it in the opposite curve. This presses the barbs into the fret slot walls, and the board will lay quite flat. Now you're ready to install your completely fretted board!

For Red Diamond vintage models, I choose Waverly mandolin machines in silver. I use the longer post spacing (1920s Loar style). The antique silver and vintage engraving feel exactly right. - Don


