Tool Tutorial - ELEVATE Variable Mortise & Tendon Routing Jig
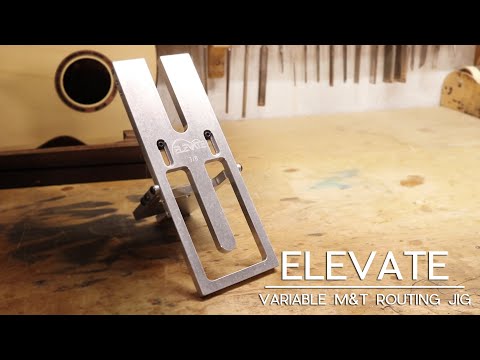
The ELEVATE Variable M&T Routing Jig makes it simple to route the body connection joint regardless of the neck set angle. With a sliding router stop that forms both the mortise and tenon as well as multiple side screw positions, this variable version of the classic M&T Routing Jig gives the user a wide range of joint length options.
Video Transcription
[Luthier and ELEVATE Inventor Chris Ensor appears on screen.]
Chris Ensor: The Elevate Variable M&T Routing Jig makes it simple to route the body connection joint regardless of the neck set angle. The jig hinges to match the geometry of your instrument's body and neck. You can also easily adjust the length of the joint to suit your build with the turn of two screws. The result is a snug fitting mortis and tendon joint.
That's also compatible with the Elevate Variable M&T Drilling Jig. There are two standard sizes of the jig. The question is, which should you use? Ideally, you'll use the widest joint you can with your heel shape. What this typically means is that if you build with a traditional cone style heel, you'll pick the three quarter inch variant, and if you build with a modern full width heel, the seven eighths inch is the one for you. I'm building with a full width heel on this guitar, so I'll be using the seven eighths.
Assembling the Jig
Chris Ensor: Assembling the jig is simple. It ships in two pieces. There are two screws on the side of the template. These are what are used to connect the angle plate. Remove them from the template, attach the angle plate, and lightly fasten it with the screws you just removed, there's no need to snug them down just yet.
The Variable M&T Routing Jig is intended to be used after the neck angle has been set. There are multiple ways of centering the jig. The simplest way is to mark the body and neck for where the mortis and tendon need to be located. Then the jig is aligned in this location.
Alternatively, the jig can be aligned with the center line of the neck and body using the center line indicating edge on the jigs angle plate. Lastly, if you've already cut the truss rod slot and the heel into square to the neck center line, you can use the included centering pin and the centering hole in the angle plate to align the jig to the neck. For an extra bit of insurance, there's an optional accessory that helps align the jig when riding the mortise in the body.
The Alignment Checker
Chris Ensor: The Alignment Checker - This little guy has three centering indicators. The pointed end, the slot in the middle, and the vertical extension. The point and slot can be used on the sides to align with your pencil mark and the vertical extension checks that the jig is aligned with the center of the top. It's super handy.
To set the length of the joint you want to use, first mark the maximum length of the mortis on the body in pencil. Now loosen the two screws on the routing template. Align the jig on the body and adjust the template to match your line. Then lock everything back in place.
Once the jig has been aligned and centered, pivot the top routing surface to match the angle of the body. Then lock this angle in place with the screws on the side of the jig. Clamp everything down, set your bit depth and you're ready to route.
Routing Technique
Chris Ensor: When routing, there are two methods I suggest. The first is to trace the shape of the joint and take multiple depths of cut. With this method, you start with a short bit, but you may have to switch to a longer bit to finish the cut depending on your desired depth. The important thing is that the bearing is always in contact with the jig.
The second method is to take a full depth cut and take small bites at a time. This is the method I'm using on this instrument.
When you're done with the body, remove the angle plate and move it to the neck position. Repeat the previous steps for setting the jig to the angle of the neck and then route the tendon. There's no need to change the length of the joint. The jig is designed to leave a small gap lengthwise so as to avoid any length interference regardless of the set angle. Once the fingerboard is added to the neck, it will serve as the length indexing point.
The resulting mortis and tendon are intended to be a tight fit and in some cases may require a small amount of trimming. The joint should be snug, but not too tight.
The Elevate Variable M&T Routing Jig makes it simple to route mortise and tendon joints that match the geometry of your instruments at yours today at www.elevateluthery.com (or right here at www.stewmac.com).