Pickup Routing Template for Jazz Bass
With these templates you’ll create pickup cavities as precisely as any major guitar manufacturers.
To watch a short video showing how to use these templates, visit: stewmac.com/item/v-2262 When possible, rout the cavities in your bass body while it’s still a rectangular blank—before cutting the body shape. Choose one edge of the workpiece as your reference edge for measuring to establish a centerline. Measuring and routing are easier on the flat planes of a body blank than on the curved surfaces of a shaped body. Choose one edge of the workpiece as your reference edge. Measure from this edge to find the center, and pencil a centerline down the length of the body. Aligned with the middle of the neck, this is the line your pickup will center on. Determine the location of your pickup, and mark the middle of the pickup on the centerline. Using a square, carefly pencil a line across the centerline at a right angle. These two perpendicular lines are for positioning your templates and routing the cavity, so be sure they’re square. Use double-stick tape (StewMac item #1689) to fasten the Holes template to the body. Align the centerlines on the template with the penciled lines on your bass body. Press the tape down firmly so the template stays put while you’re drilling. Use a drill press to create accurate #10 diameter holes for the cavity corners. Drill these holes 3/4" deep into the body. A piece of tape on your drill bit makes a simple depth guide. Your drill will pass through the 3/8" template before contacting the wood, so set your tape at 1-1/8" (3/8" template + 3/4" into the wood = 1-1/8" total). Drill the 1/16" diameter mounting screw holes, 1-1/4" deep. Use a thin putty knife, or StewMac’s #4466 Bridge Spatula to lift the double-stick-taped template from the bass body. Insert the two steel index pins in the upper left and lower right corner holes. These pins may slide into place, or they may need to be gently tapped in with a hammer. Put double-stick tape on the Pickup Template. Drop the template over the index pins, aligning it with the holes you’ve drilled. Press it firmly onto the body so it won’t move during routing. Remove the index pins. Use a 3/8" diameter template bit, such as StewMac’s #0583 Ball Bearing Router Bit. The bearing diameter is the same as the cutter, so as the bearing follows the template the cutter routs a hole of exactly the same shape. Set your router to cut a 3/8" deep first pass (keep the thickness of the template in mind as you set the depth). Our template material is thick enough to allow the bearing to contact the template on this shallow first cut, and also on the 5/8" deep final pass. When using a plunge router, raise the bit above the wood and turn the router on before starting the cut. Let the bit get up to speed before carefully lowering it into the wood. If the bit is touching the wood when you turn it on, the router will lurch unexpectedly. With a non-plunge router, touch the back edge of the router base to the workpiece, tipping the router so the bit isn’t touching the wood. Don’t try to rout the final depth in one pass. You’ll have better control and better results by routing a 3/8" deep first pass. Follow the edge of the template before removing the wood in the middle. When the first pass is complete, turn off the router while it’s still in the cavity. Let it come to a stop without touching the wood or template before lifting it out. This protects against damaging the cavity wall or the template. Vacuum the cavity to see that the first pass is uniformly cleared out. Adjust the cutter bit for the final depth of 5/8" and rout the second pass. Remove the Router Template and your pickup cavity is complete.
Instructions
Rout the body blank before shaping
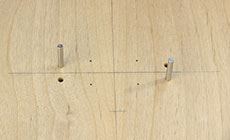
Mark the centerline and pickup location

Position the Holes template

Drill the holes
Remove the template and insert the index pins
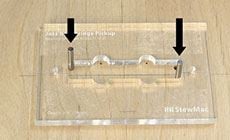
Position the Pickup template
Prepare your router and bit

Start the router above the wood
Rout in two passes


