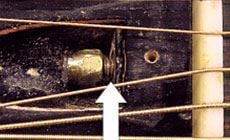
A sign of truss rod trouble, and an easy solution.
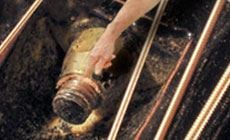
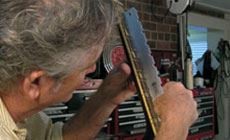
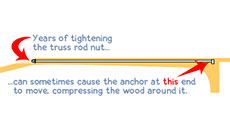
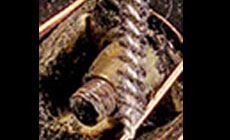
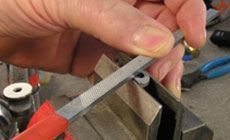
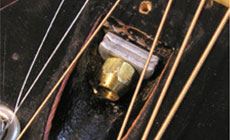
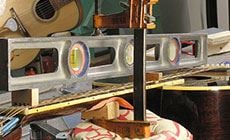
This '52 Gibson Southern Jumbo belongs to my pal Spencer Bohren from New Orleans (that's him below). Spencer's one of the best singer-guitarists you'll hear. When he comes to town we do a trade: Spencer teaches me guitar and I teach him how to work on them. The latest thing Spencer learned in my shop was this easy fix for a worn out truss rod. The problem was too-high action: sighting the neck showed an upbow. Reading with a notched straightedge showed about .020" of relief (that's the gap between the fingerboard and the straightedge). Normally, tightening the truss rod would pull the neck back into line, but this rod seemed to be as tight as it could go. You can see about 1/8" of rusty truss rod sticking out of the adjusting nut; that's a sign that the truss rod's been tightened to its maximum and beyond. For that much of the thread to come through, the anchor at the other end of the rod must have pulled forward, compressing the wood in front of it. When this happens, the rod's lost its ability to tighten and straighten the neck further. Years of tightening the truss rod nut can sometimes cause the anchor at the end to move, compressing the wood around it. This truss rod problem is far more common than people realize, so always check to see if the truss rod works before buying an old guitar. When you encounter it, a simple fix that works most of the time is just adding a washer or two behind the adjusting nut. While I took these photos, Spencer cleaned the rusty threads with a small, stiff brush from a spray gun cleaning kit. He lubed them with petroleum jelly on a toothpick. Now the nut will come off with less chance of binding up and snapping off the end of the truss rod. He backed off the nut with a 5/16" (Gibson size) truss rod wrench, and cleaned/lubed the threads inside it. He used the threading die from a Truss Rod Rescue Kit to clean the exposed truss rod threads. The adjusting nut threaded back on without a hitch. Spencer stopped when the nut was flush with the end of the threaded rod, leaving this 1/8" gap remaining. To prove that the rod had pulled forward, Spencer gave it a tap with a steel punch. Yep, the rod shifted back into the neck by 1/8", just as we suspected. To take up the slack, Spencer used two Gibson style half-moon washers. These washers come with barbs for grabbing wood; holding it in a saddle vise, Spencer filed the barbs off the washer that will press against the existing factory washer. Sliding the two washers over the end of the rod, he adjusted the neck in the way that I taught him: by “helping the rod adjust,” and not asking that skinny little metal rod to do all the work. You've seen me show this often, but here's the idea: Completely loosen the truss rod. Put a rigid bar over the fretboard, sitting up on spacers (notched to fit over the strings). I always use this old carpenter's level. Clamp the neck to pull it straight (or into a slight backbow) and tighten the adjusting nut. With any luck, when you upclamp the neck it will be straight or with slight relief the way you want. This “lutherie lesson” didn't take Spencer very long. Now it's time for my guitar lesson. I think that's going to take a lot longer...This is a warning sign of truss rod trouble.


Step 1
Step 2
Step 3