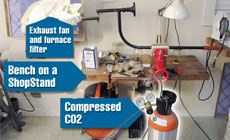
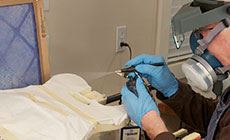
Dan Erlewine's low-tech "spray booth" for a small shop
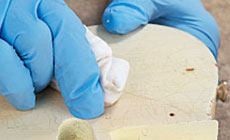
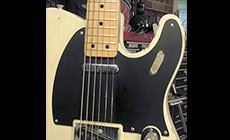
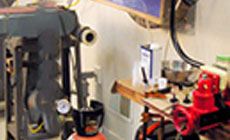
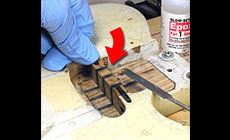
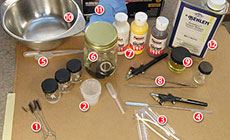
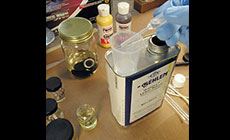
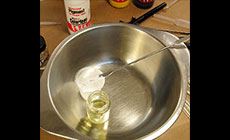
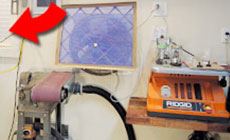
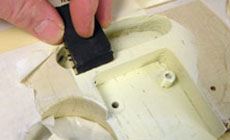
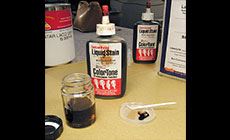
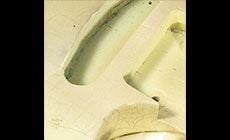
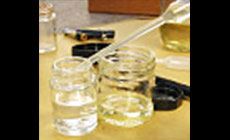
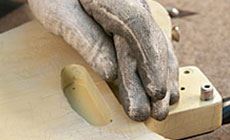
My low-tech "spray booth" is simply this small area of my shop The replacement patch was a combination of maple and carbon fiber — not good looking, but strong as heck. Today I’m going to finish the job by spraying a lacquer touchup so the repair virtually disappears. This is a small finishing job that I can do without big spray equipment. Nearly all of my finish work consists of small touchups I do right here in my shop. I set up a low-tech “spray booth” by temporarily clearing some floor space next to my exhaust fan. In the wall is my 18" explosion-proof exhaust fan, used mainly for evacuating sawdust. My belt sander usually stands in front of it, so any sanding dust missed by my vacuum blows outdoors through the fan. My fan isn’t designed for spray finishing, but for small jobs it’s perfect. I put a furnace filter over it, to catch overspray. A 1" repair magnet holds the filter to the fan motor. I open a window or two for an air intake. A ShopStand-mounted bench holds what I need for sanding, routing or spraying. I don’t usually have a repair vise on there, but today it’s holding the Freehand holder. My air supply is a pressure-regulated tank of carbon dioxide. I have an air compressor on hand, but this CO2 tank is convenient and quiet. I only need to refill the tank once or twice a year. Here’s what I’ll need: (1) small brushes from the spray gun cleaning kit (2) mixing cups (3) cotton swabs (4) spatula for mixing color into lacquer (5) pipettes (6) jar for lacquer reducer (thinner) that I dump jar lids and airbrushes into (7) white/yellow/brown pigments for mixing off-white blonde (8) long tweezers (9) small jar of clear lacquer (10) mixing bowl (11) nitrile gloves (12) lacquer thinner. - cutting them to different lengths for different uses. With the tiny end clipped off, a pipette can suck up a lot of fluid fast. It will suck in a heavier-viscosity fluid like lacquer, whereas it won’t through the tiny pipette tip. Most importantly, you don’t have to pour the thinner or lacquer from the can and spill it all over the place. As a first step, I’ll cut the thick ColorTone white into the thinner, then I’ll add that mix to the lacquer. A little pigment goes a long way. After that, I’ll use tiny specks of yellow and brown pigment to create the off-white color. The Freehand holder makes spraying easy. Without it, holding a body while spraying ties up one of your hands. For airbrushing I need both hands: my right hand holds the airbrush while my left keeps the air hose from catching on the work and ruining my aim. I keep all the mess in this bowl. Here, I’m cleaning the airbrush with a pipette full of reducer (lacquer thinner). You really have to clean the airbrush after each round of spraying, especially with color. Otherwise the pigment will clog the tip. Don’t put off cleaning your airbrush; you’ll want to skip this step, but don’t get lazy! Most of the time, I use my belt sander and spindle sander here next to this fan, so this temporary “spray booth” is not a dust-free zone. Opening the window (marked by the arrow) for ventilation always raises a little dust, so this spot isn’t clean enough for spraying whole necks or bodies. But it works fine for little touchups like the one I’m doing today. Here’s the base coat. It’s not a perfect color match, but it’s a good starting point for this quick-and-dirty touchup job. (I'd spend more time color-matching if this repair weren’t hidden by the pickguard.) I’ve peeled back some of the mask, and am sanding with 800-grit Fre-cut sandpaper to feather the hard masking line. Clear lacquer with a small amount of medium-brown ColorTone stain makes a toner — a very light, see-though layer of color. This toner will just add a touch of amber, simulating the original clear topcoat, which to my eye is slightly brownish-red. The last coat is a wet “flash coat” that adds a little gloss and melts the previous coats together. For this, I use thinner with a small amount of clear lacquer added. When the thinner flashes off (evaporates), it leaves just a little bit of lacquer for shine on the surface. With an X-Acto knife, I added cracks to match the aged look of the surrounding finish. This cracking is called “crazing” or “checking.” I'm glad it’s there — it helps distract the eye from the transition between my touchup and the old finish. I wiped my knife scratches with the fingers of a blackened glove that I use for metalwork. The black rubbed into the checking, making it show up like the surrounding cracks. I removed a little bit of overspray from the flash coat using swirl remover. With the pickguard back on, the guitar’s ready to go. When somebody removes this pickguard someday, I wonder if they'll even notice this touchup hidden under there?Touchup spraying in the repair shop
In my previous Trade Secrets story, I replaced a broken chunk of wood in Bill Kirchen’s Telecaster.
I used to maintain a dedicated spray room, but not anymore.
Getting ready to spray this touchup
I use pipettes like crazy
Here’s my mixing sink

Matching the relic finish

Last step: