How to make a string nut for the first time
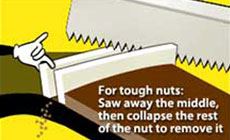
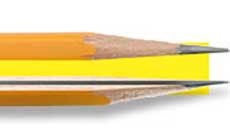
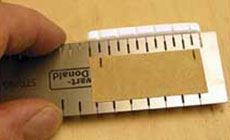
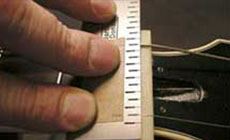
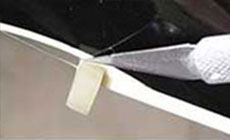
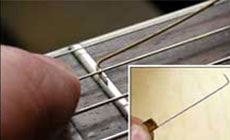
Nut making basics for better tone, better string spacing and no open-string buzzes. Cracked nut. Poor string spacing. Hollow plastic nut sapping tone. Nut slots are too low, causing fret buzz on open strings. If you’re nervous about replacing the string nut, you’ve got company: customers ask me questions about this all the time. Trust me, making a nut is no big deal. Okay, let’s get the hardest part over with: if you’ve got a stubborn nut, it’s easy to chip out wood or damage the finish when removing it. Usually you can simply score the lacquer around the nut with an X-Acto knife, then give the nut a very light tap with a hammer to loosen it. Once in a while the lacquer’s way too thick for this, making it necessary to saw through the nut itself to collapse it to avoid any damage. Once you have removed the old nut, clean any old glue or gunk from the slot. Micro chisels are good for this. You want a clean slot so your new nut will seat properly. If the bottom of the clean slot is uneven, I’ll level it with a nut seating file A laptop computer with a DVD drive brings Dan Erlewine’s complete library of guitar repair DVDs to your benchtop. Nut Making Step-by-Step is a good place to start. So is Fret Basics, and Dan’s Maintenance and Setup series. Now let’s fit the nut blank to the slot. You’ll sand it to the right thickness, and it’s important to maintain a square bottom and leading edge for a proper fit against the bottom of the slot and the fretboard. A small belt sander is great for this, but you can get there just fine with some Stikit paper face up on your bench. That’s how I’m thickness sanding here — notice the way I’m using a small square to help me keep every edge true. The nut blank will be lots taller than needed, so we’ll file it down. Here’s a neat trick I learned from Frank Ford: I’ve sanded a pencil until it’s a half-pencil. By sliding it on the fret tops, the pencil exactly marks the fret heights on the nut. Use shaping files to bring the height down to just above your pencil line while roughing in the shape of the nut. (Use your old nut as a model.) Leave yourself a little extra height to allow room for correction as you fine-tune the slot positions. You can always file a little deeper, so creep up slowly on your slot depth. For good string positioning, mark the location of the two E strings from your old nut on a piece of tape. Match these positions to marks on the string spacing rule, and it will locate the rest of the string slots for you. Mark the string locations on your nut blank and place it in the slot, held in place with your two E strings. Cut shallow starter slots to mark each string location. I start with the high E and work my way across the nut. Before cutting the B slot, I’ll double check with the string spacing rule. Cool and careful does it, and I’ve soon got six slots started. It’s a good idea to choose slotting files in sizes to match your string gauge, or just slightly larger. I cut my own string slots a couple thousandths of an inch oversize, to keep the strings from binding in their slots while I’m tuning or bending strings. Don’t go much beyond this, though; you don’t want sloppy slots. If you don't have a file to match the string diameter, use a smaller file and rock it side to side to open the slot to the desired size. (For example, a .035" file will cut a .036" slot by moving it around a bit.) Now your starter slots are cut, and it’s time to lower them. How low should you go? Slot depth is a matter of preference. A player with a light touch can get away with low action at the nut (.010" or lower). I play with a pretty heavy hand, so I like my string action around .017" to .020" at the nut. You can measure the string height above the first fret by making a feeler gauge out of a guitar string. Bend a dogleg in a string of the thickness you like, and drag that between your strings and the first fret. When you’ve reached a snug fit, it’s time to stop filing. When the nut slots are where you want ’em, strum the guitar for awhile. Wait long enough to make sure it’s playing the way you want it to. Then it’s time to finish the nut. Use a pencil or knife point to mark the width, then trim it to size with a gauged saw. Use your shaping files to trim off the excess height. After the final shaping and trimming, use polishing papers to buff the nut to the desired polish. Use just a little bit of Titebond glue to hold the nut in place. This will hold the nut, but it’ll still be easy to remove sometime down the road. String the guitar up to pitch to hold the nut in place while the glue dries. Let it sit several hours to allow for a good cure. For in-depth nut making details, check out Dan Erlewine’s DVD Nutmaking, Step By Step. There you go, now you can get back to playing your guitar!Let’s talk nuts!

Why you might need a new nut
Step 1: Remove the old nut
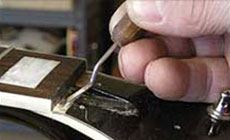
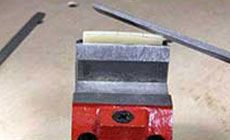
Step 2: Clean the slot
Check it out!

Go to school on nut making, right in your own shop!
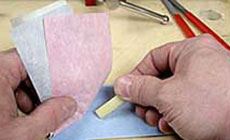
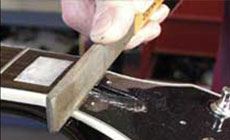
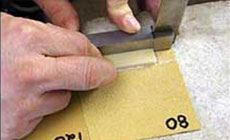
Step 3: Fit the blank
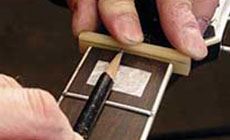


Step 4: File the slots


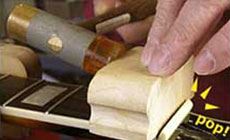
Step 5: Shape and buff
Step 6: Glue it in