How to Build a Cigar Box Guitar Kit
If you’re a first-time builder, welcome to guitar building! The Cigar Box Guitar Kit is a great way to start. With basic tools you'll build an instrument to be really proud of. You’ll learn how to build the body, attach the neck, and wire the electronics. After you build it, we’ll show you how to set it up to play perfectly.
Download PDF
Recommended tools and supplies
TOOLSFret leveling tool (#4642 or #0862) Sanding block (#3701) Medium 3-corner file or other fret crowning file Electric hand drill Screwdrivers: Phillips head #1 and #2 Drill bits: 1/16", 5/64", 3/32", 5/16", 1/4" Countersink bit Nut slotting files: 0.035", 0.042", and 0.046" width Optional:Clamps, 2 to 6 |
SUPPLIESSandpaper: 120, 220, 320, 400, 600-grits Blue permanent marker Tack cloth FINISHING SUPPLIESThere are many finishes and application methods to choose from. We rely on ColorTone Aerosol Guitar Lacquers because they’re easy to use and you'll get a beautiful nitrocellulose finish without investing in spray equipment. ColorTone Aerosol Guitar Lacquers: Sanding Sealer (1 can) Color Lacquer (1 can, optional) Clear Lacquer (2-3 cans) |
Getting started
The cigar box guitar is a fun way to incorporate new sounds and styles into your playing. Traditionally a rough-and-ready homemade electric instrument, now players from all genres have been adopting its one-of-a-kind look and sound. If you're looking to start playing slide, this is the perfect instrument for you!
And, this is a very simple and unique build! You don't need production tools for building the body or neck—we've taken care of all the tricky parts. The kit is made for the small shop builder with a modest tool budget. You probably already own most of what you'll need to build this guitar.
First Steps
We strongly recommend you read all of this book before you start building your kit. Understanding the later steps now will be helpful to you as you start to build. Here's an outline of the build process to familiarize yourself with before diving-in:
1. Prepping the neck
2. Building the body
3. Test fitting the hardware
4. Finishing
5. Final installation and setup
Dry Build
As you build you can apply finish at different stages depending on what construction method you choose. For this build we recommend "dry building" (or test-fitting) all of the parts before painting. This is a good practice to be sure all of the parts, hardware, and electronics fit correctly and are placed exactly where you want them. It's easier to make adjustments and fix any mistakes before the body is painted with no unwanted surprises when you're done.
Building Tips:
1. Woods can be very fragile, so be careful. Always drill pilot holes to avoid splitting the wood. Always hand-tighten any screws to avoid stripping them out. A little patience goes a long way.
2. Mark all of your holes precisely using a scribe or mechanical pencil.
3. Choose a drill bit that is smaller than the screw you are using to make sure the screw will hold securely in the wood.
4. Always use a depth-stop or piece of tape on the drill bit to mark how deep to drill your holes. It's easy to drill too far!
5. For very small screws, like tuner screws, wax the threads before installation to prevent breaking the heads off.
6. If using glue at any step, always apply it in a thin layer. Remove any glue squeeze-out as it appears with a damp cloth.
7. Use scrap wood cauls on both sides of the clamp jaws to prevent the clamps from denting the wood.
8. Always test on scrap! Finish and glue drying time can vary depending on temperature and humidity of where you are.
Humidity
While you're probably excited to get started, you need to take a little time to acclimate your kit. Wood can be extremely sensitive to changes in humidity and temperature. The ideal building environment is 70-80° Fahrenheit (21-26° Celsius), with a controlled relative humidity of 45-50%. The woods in your kit should be laid out and allowed to acclimate in your space for at least a few days before you start your build. Flip the wood daily to neutralize excessive warping.
Depending upon your location and the season, you may need to humidify or dehumidify your shop to maintain the desired relative humidity. We advise you to purchase a decent quality thermometer/hygrometer to monitor your shop's climate. Radical changes in humidity, especially during season changes, can cause warping, splitting, and other serious complications. If you're unable to control the relative humidity in your shop, we discourage building the guitar during the transition from dry to wet seasons, or vice versa.
You're going to put a lot of love into this build, and paying attention to the climate conditions while doing so is well worth it.
Safety
Always use eye protection, and wear gloves when working with glues and chemicals. Read the labels of the products your are using and do several dry runs to make sure you are comfortable with every step.
Check your parts
Unpack your kit and familiarize yourself with the parts by comparing them to the included list. Inspect for any defects or missing parts. Make note of the parts you are missing and let us know as soon as possible—we'll make it right.
Contact us
We wish you all the best on your build. If you get stuck or have any questions along the way, we're here to help! If you have any questions or concerns, contact: service@stewmac.com
Prepping the neck
The frets come installed but will need a little attention due to temperature and humidity change during manufacture and shipping. Seasonal changes can cause uneven frets and sharp fret ends. This is perfectly normal and very common on every guitar. These steps will help you get them ready for playing.
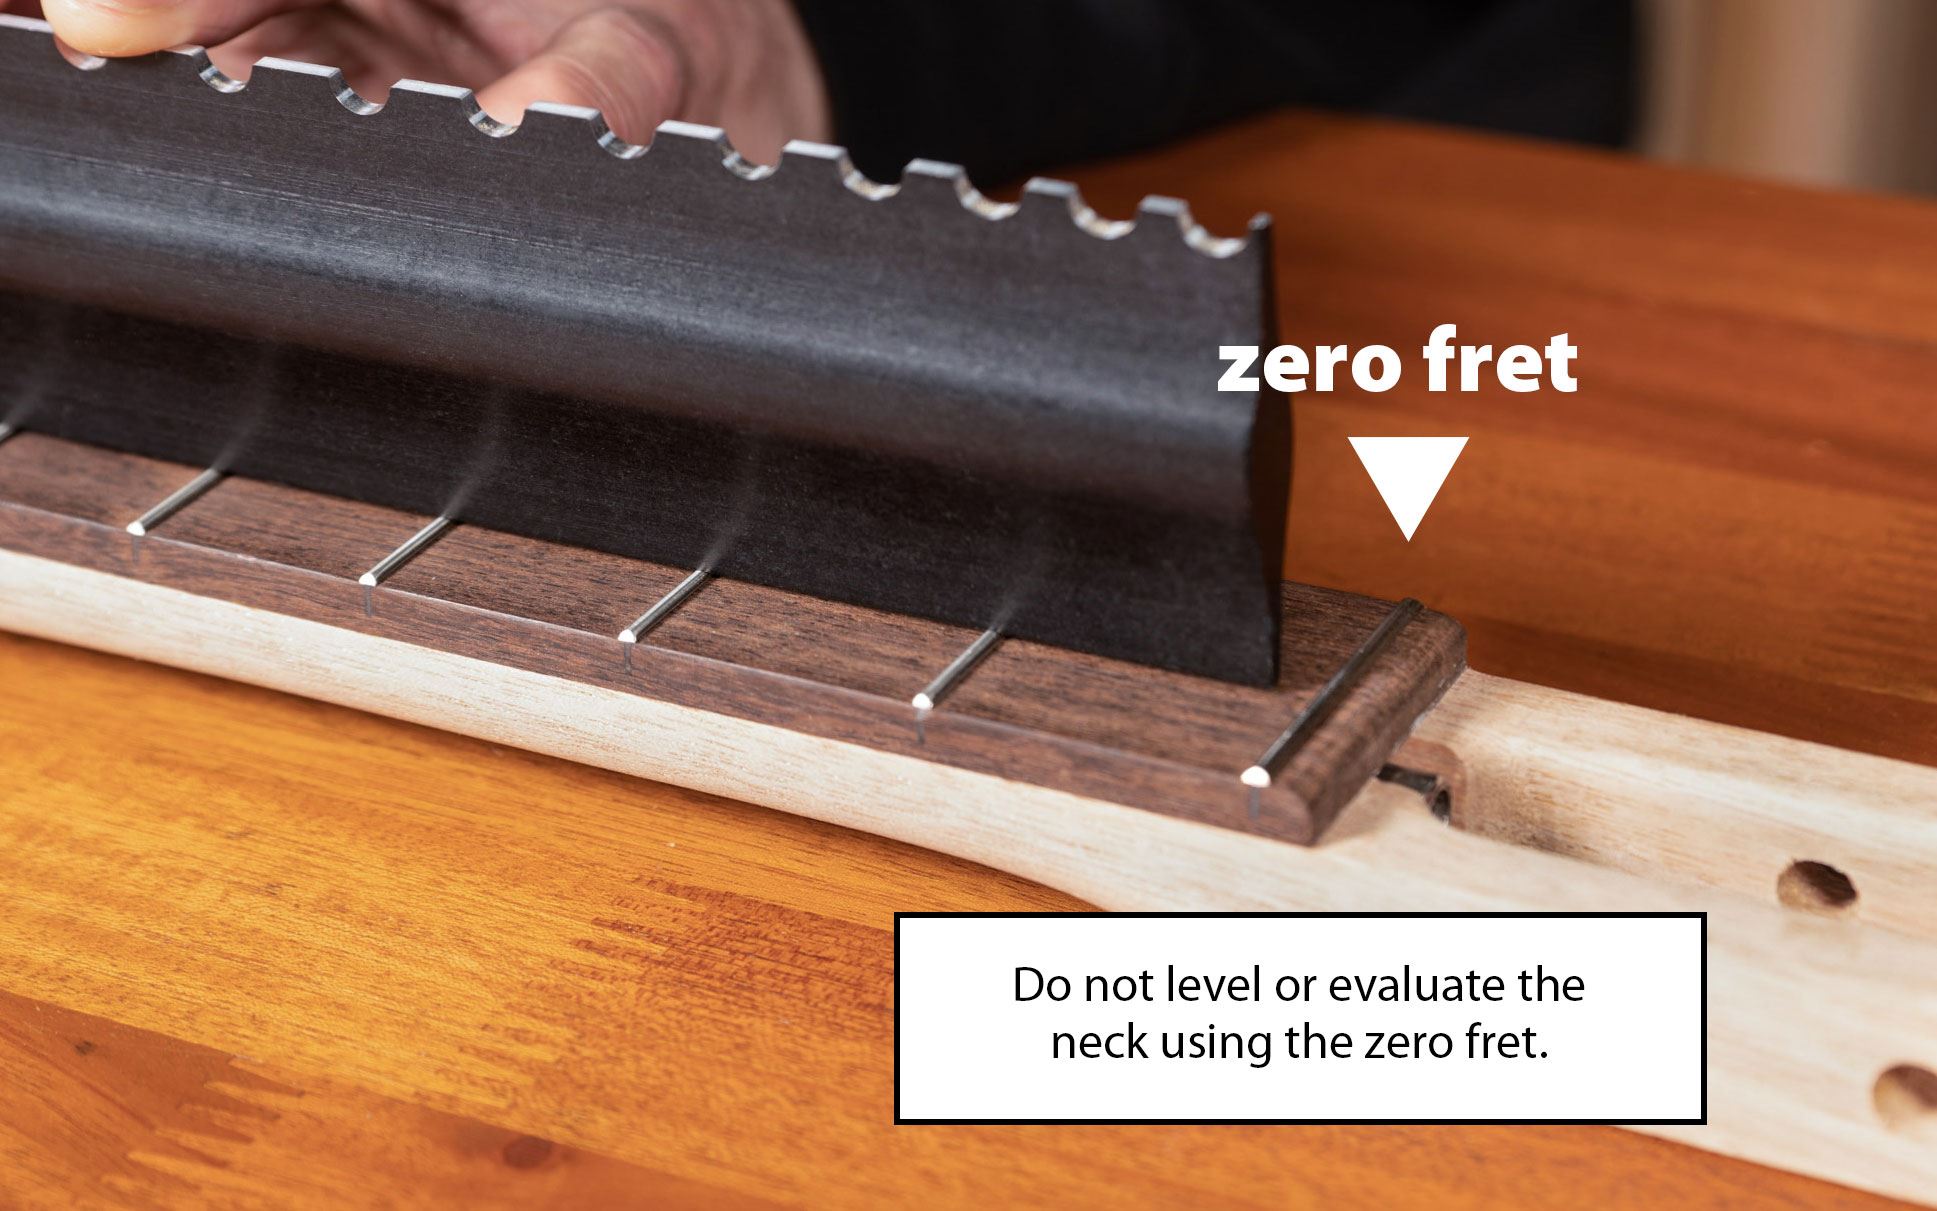
Understanding the zero fret
This cigar box guitar uses a zero fret, located nearest the nut and headstock. The zero fret sets the height of the strings, and the nut sets the string spacing. The zero fret is intentionally higher than all of the other frets, do not sand it when leveling or use it when measuring neck relief.
Seat the frets
Use a fretting hammer to make sure the frets are all seated properly. The more even your fret tops are, the less leveling work there is to do later. Seating the frets at this point will also help you more accurately straighten the neck when using a straightedge.
With the hammer handle running parallel to the frets, start at one end of a fret and work your way across it using light taps that are square to the face of the hammer. Use care not to use the edge of the hammer head as it can cause a bend in the fret, making it difficult to seat properly.
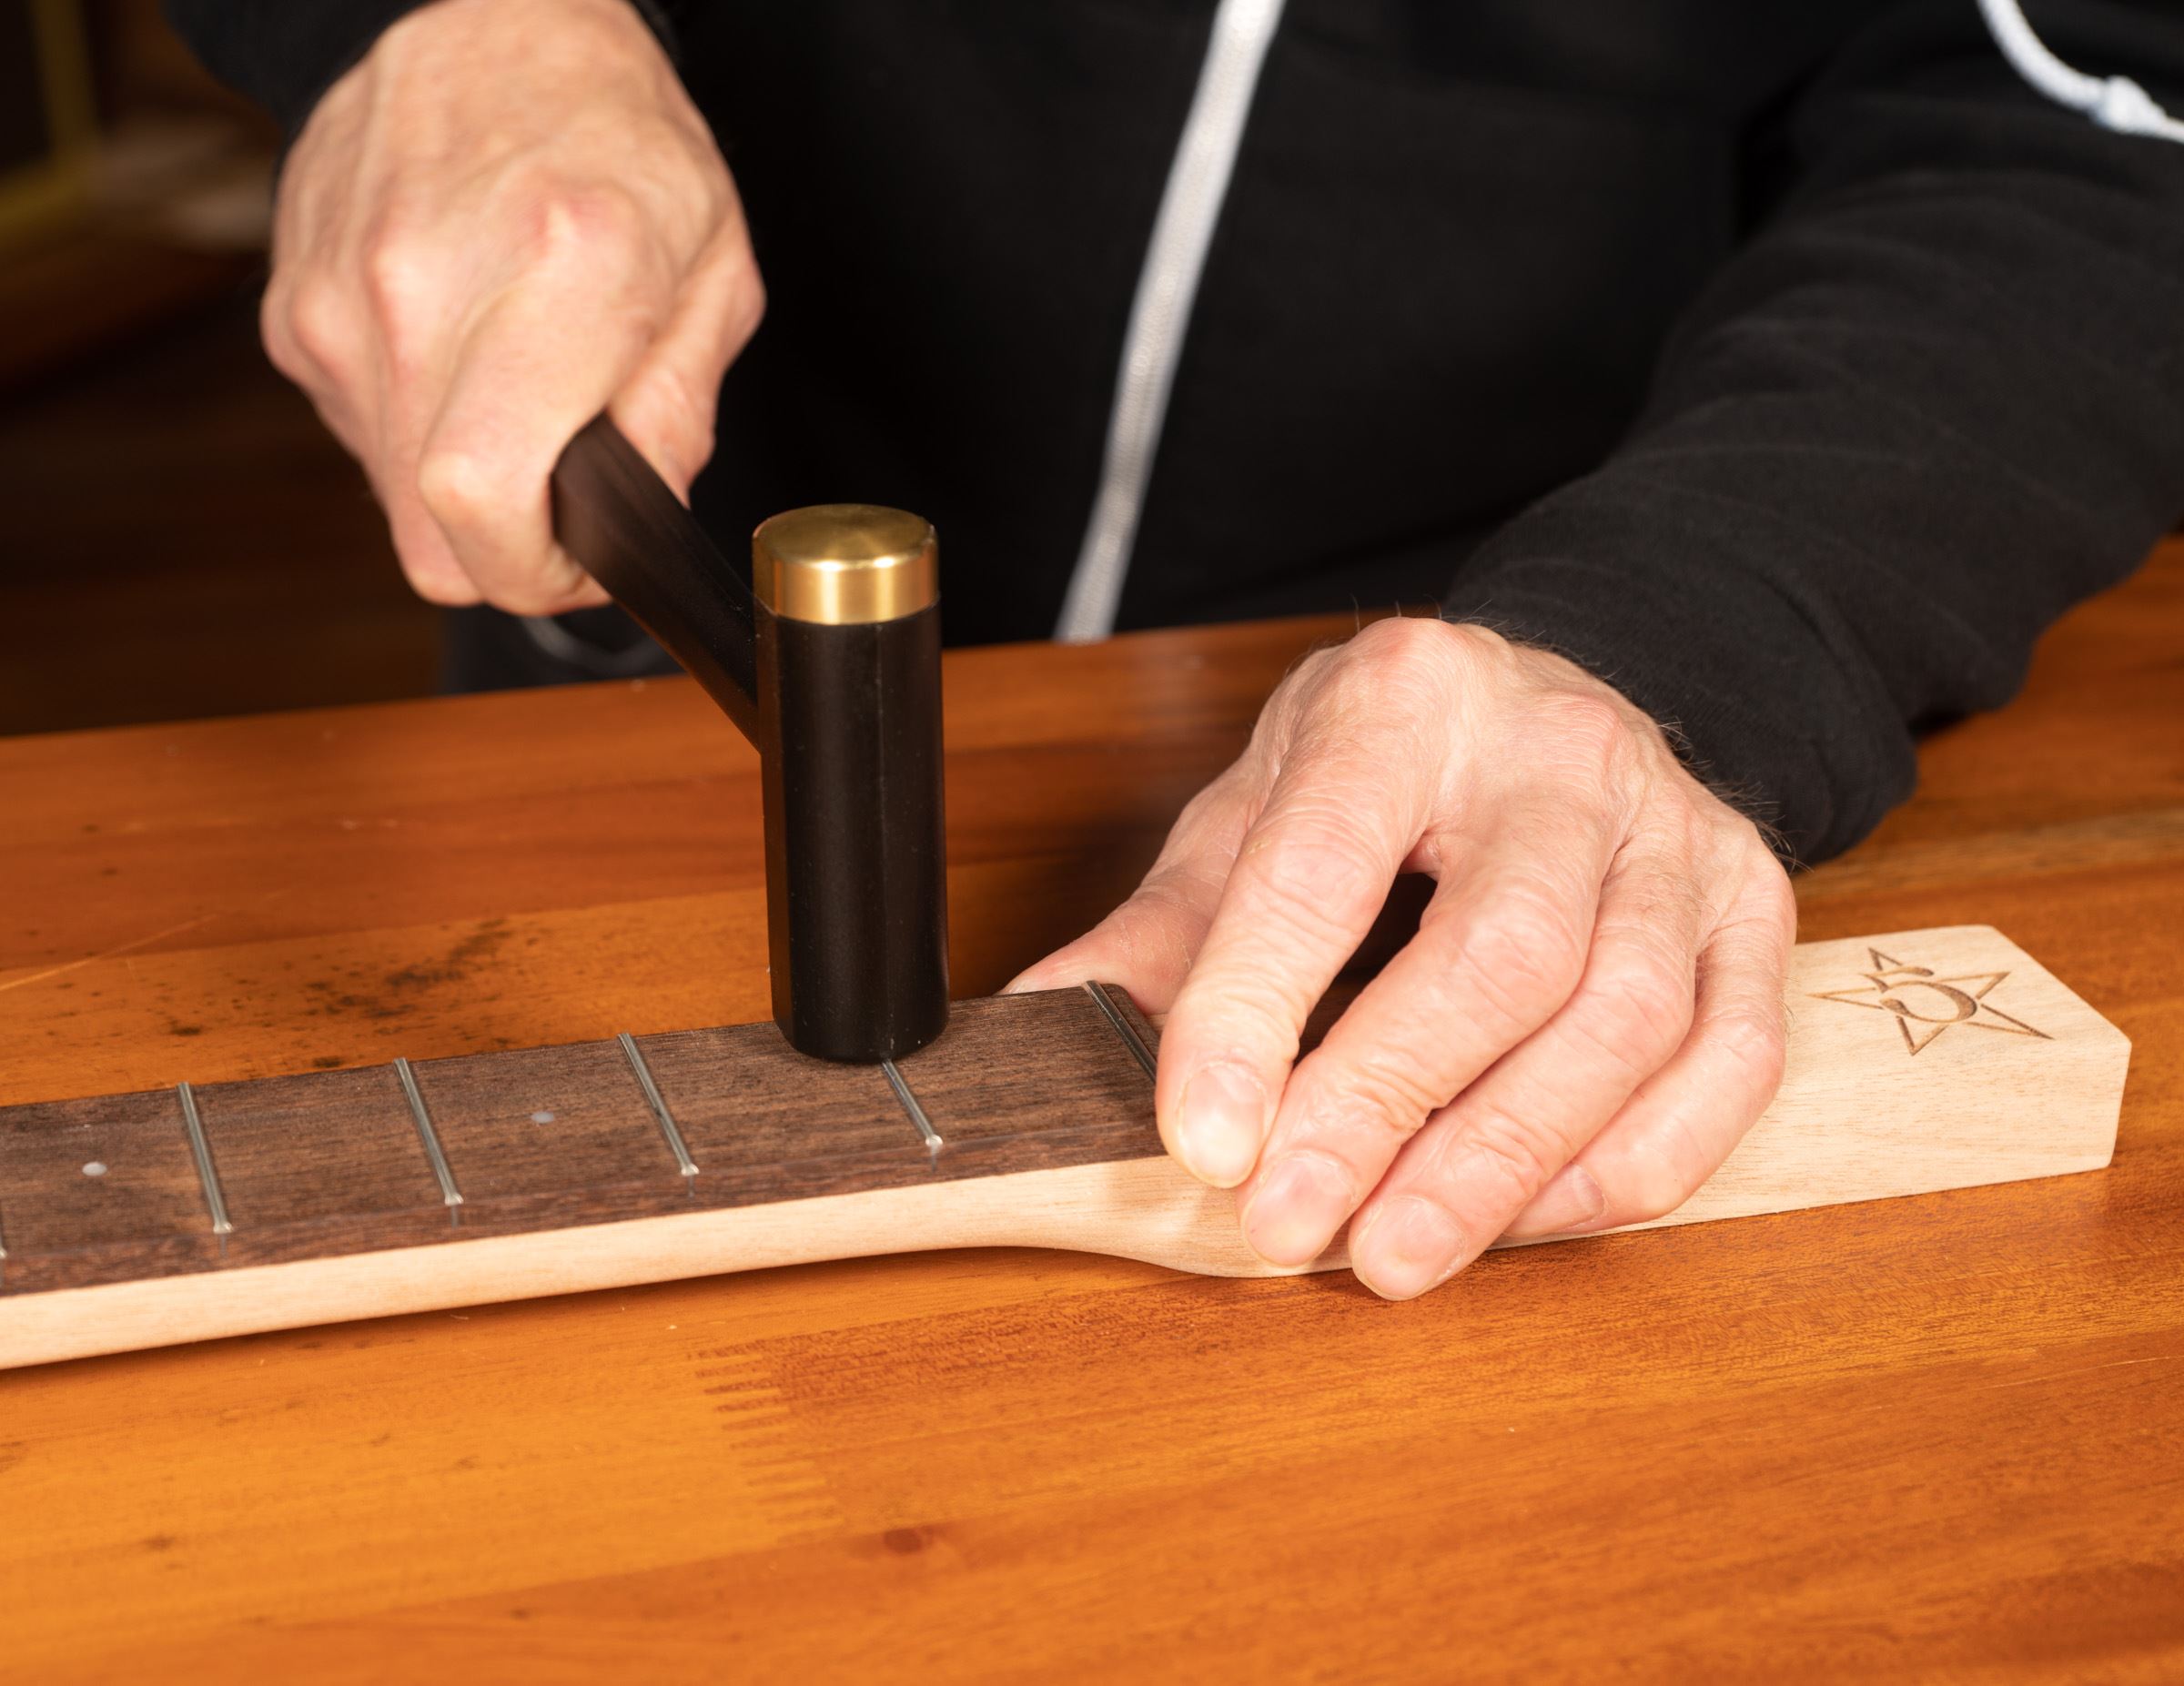
The idea is to use light taps, just enough to seat the frets flush to the fretboard. Hitting too hard can make a slight kink in the fret that can cause the ends to spring and be difficult to re-seat. Using a heavy hand can also damage the fretboard by driving the fret down into it.
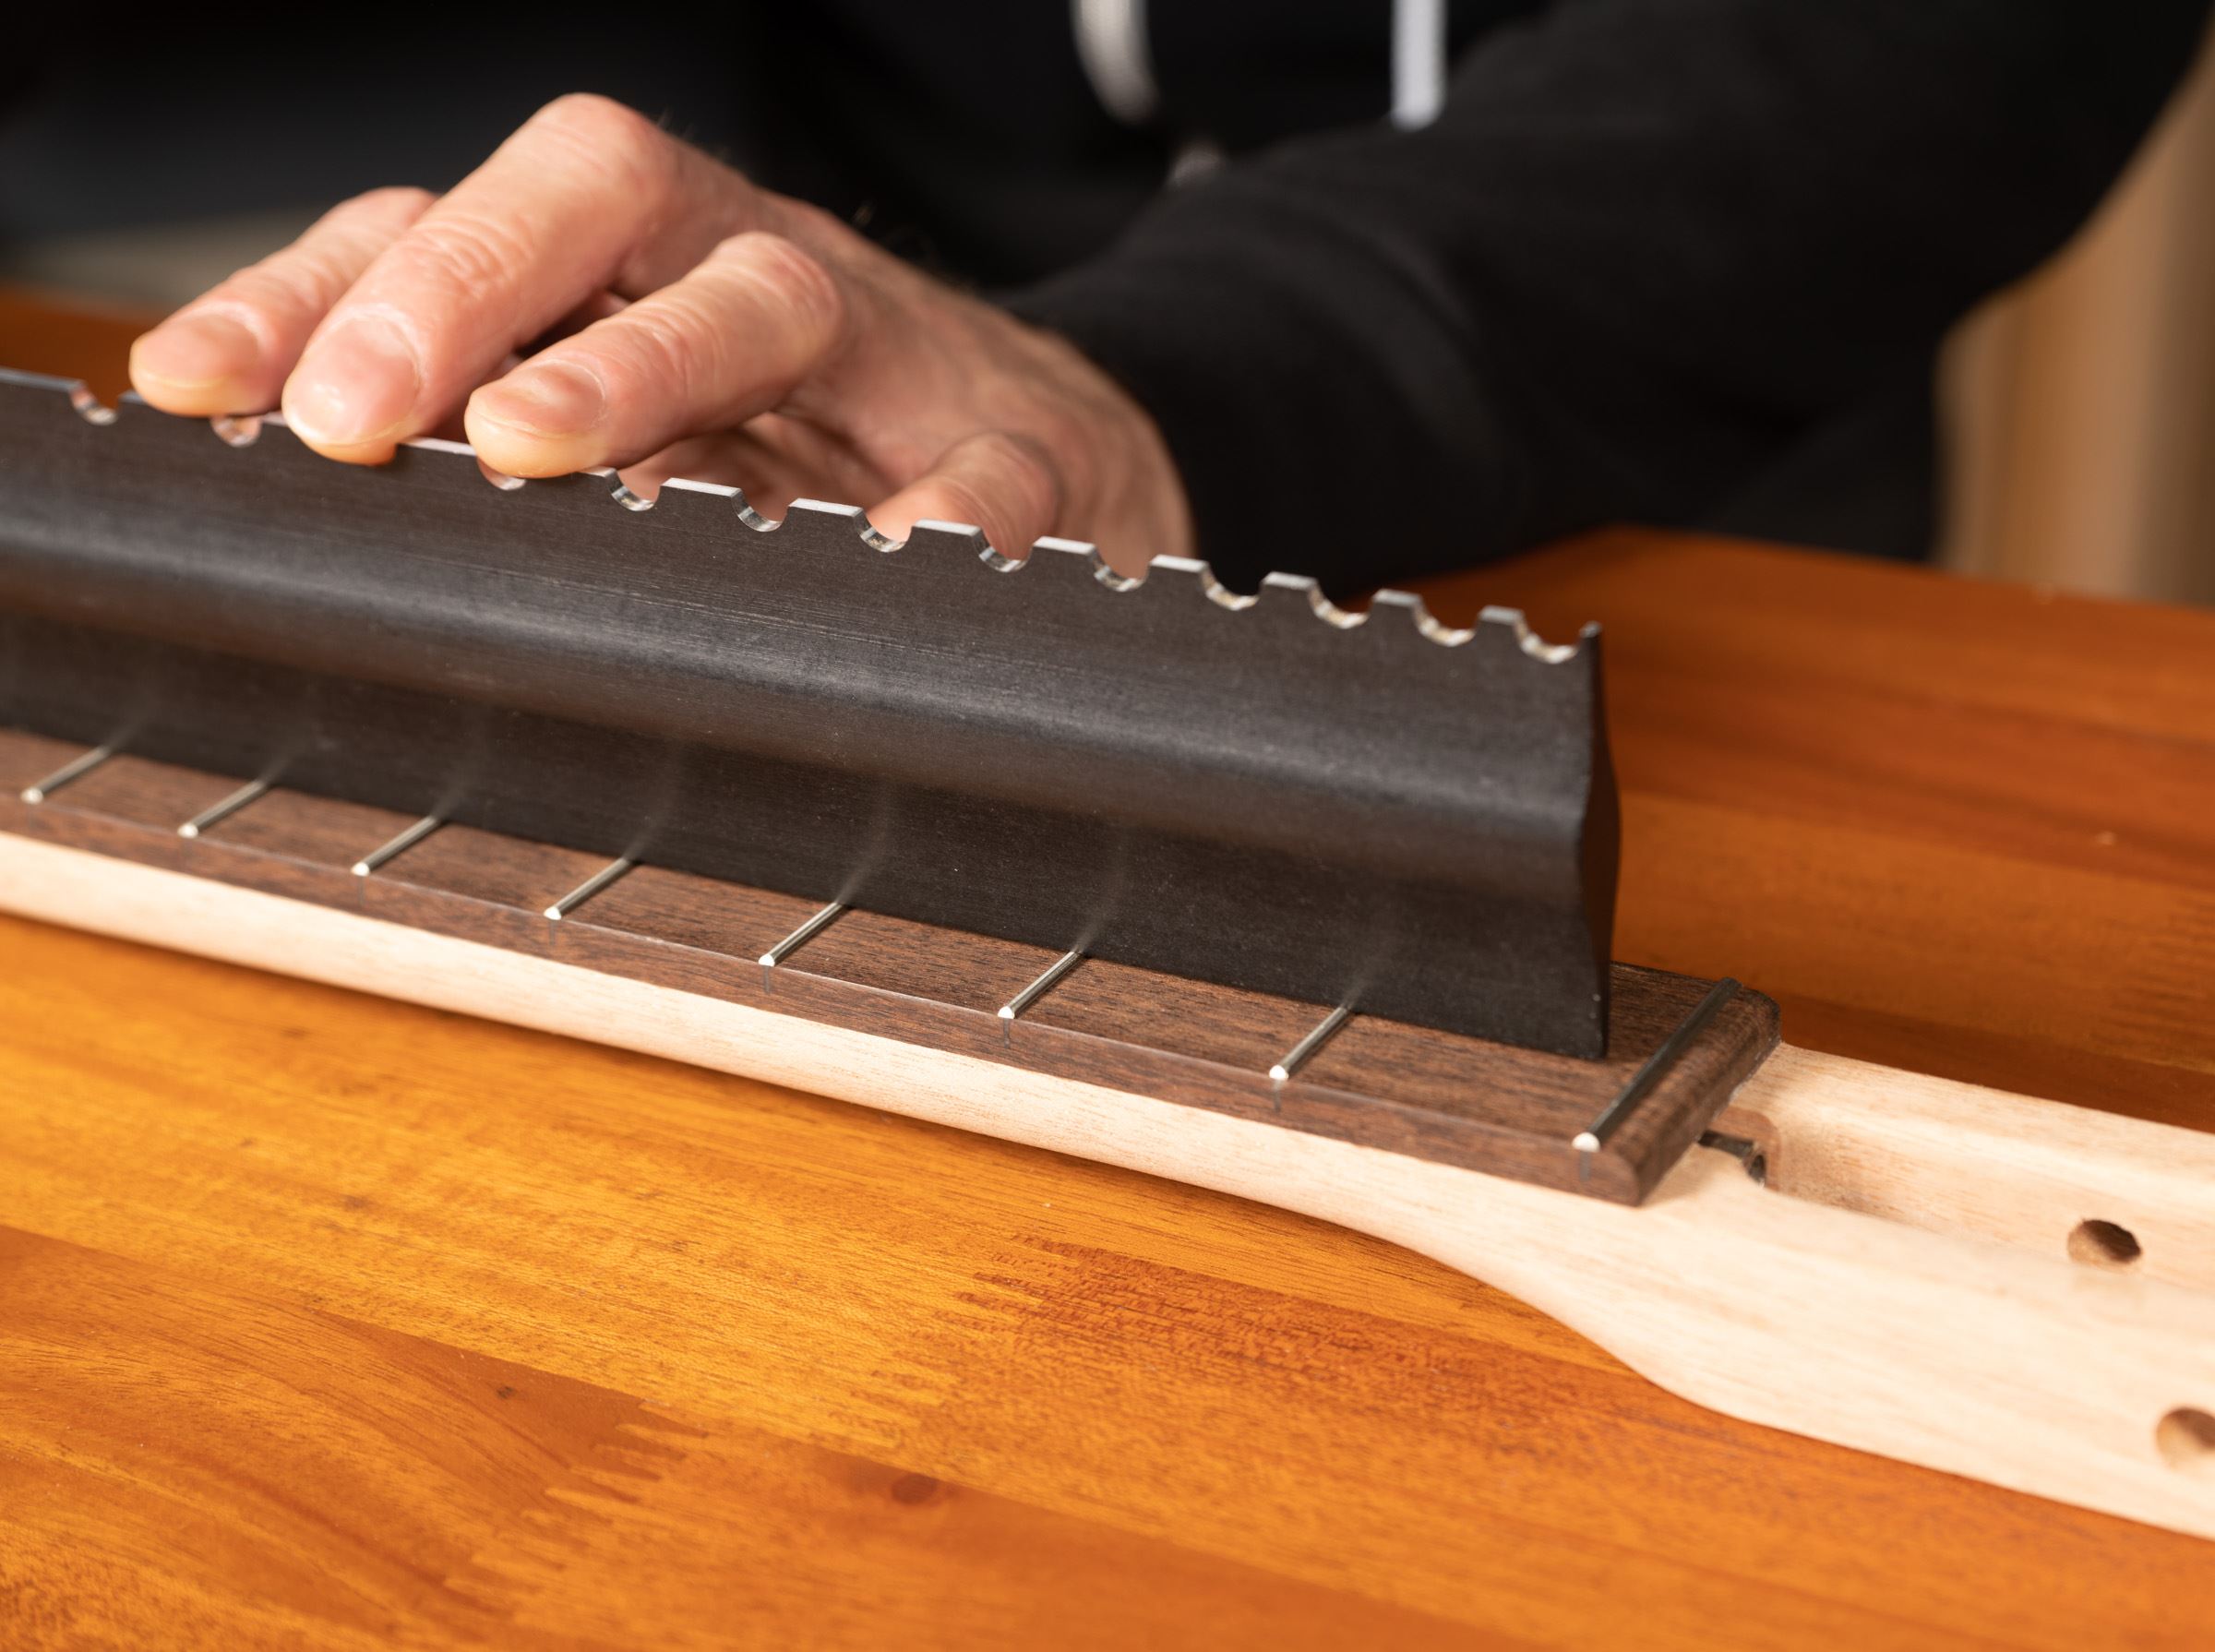
After seating the frets with the hammer, check for any high spots across the frets—a short straightedge or a Fret Rocker works well for this. Spanning three frets at a time, work down the neck. If the tool rocks, you have a high fret. Level any high frets you encounter with a file or Fret Kisser. Taking care of these high spots now will prevent your leveling tool from hanging up on them when sanding and will give you a more even overall leveling job.
Due to the natural expansion and contraction of unfinished wood, it's normal for the frets ends to be a little sharp. This is part of routine maintenance for fretted instruments. Run your fingers lightly along the edge of the fretboard and feel for sharp fret ends. If the fret ends feel sharp where they meet the edge of the fingerboard, gently sand them back with 320-grit sandpaper using long strokes down the length of the neck. Use care not to change the bevel of the frets in the process.
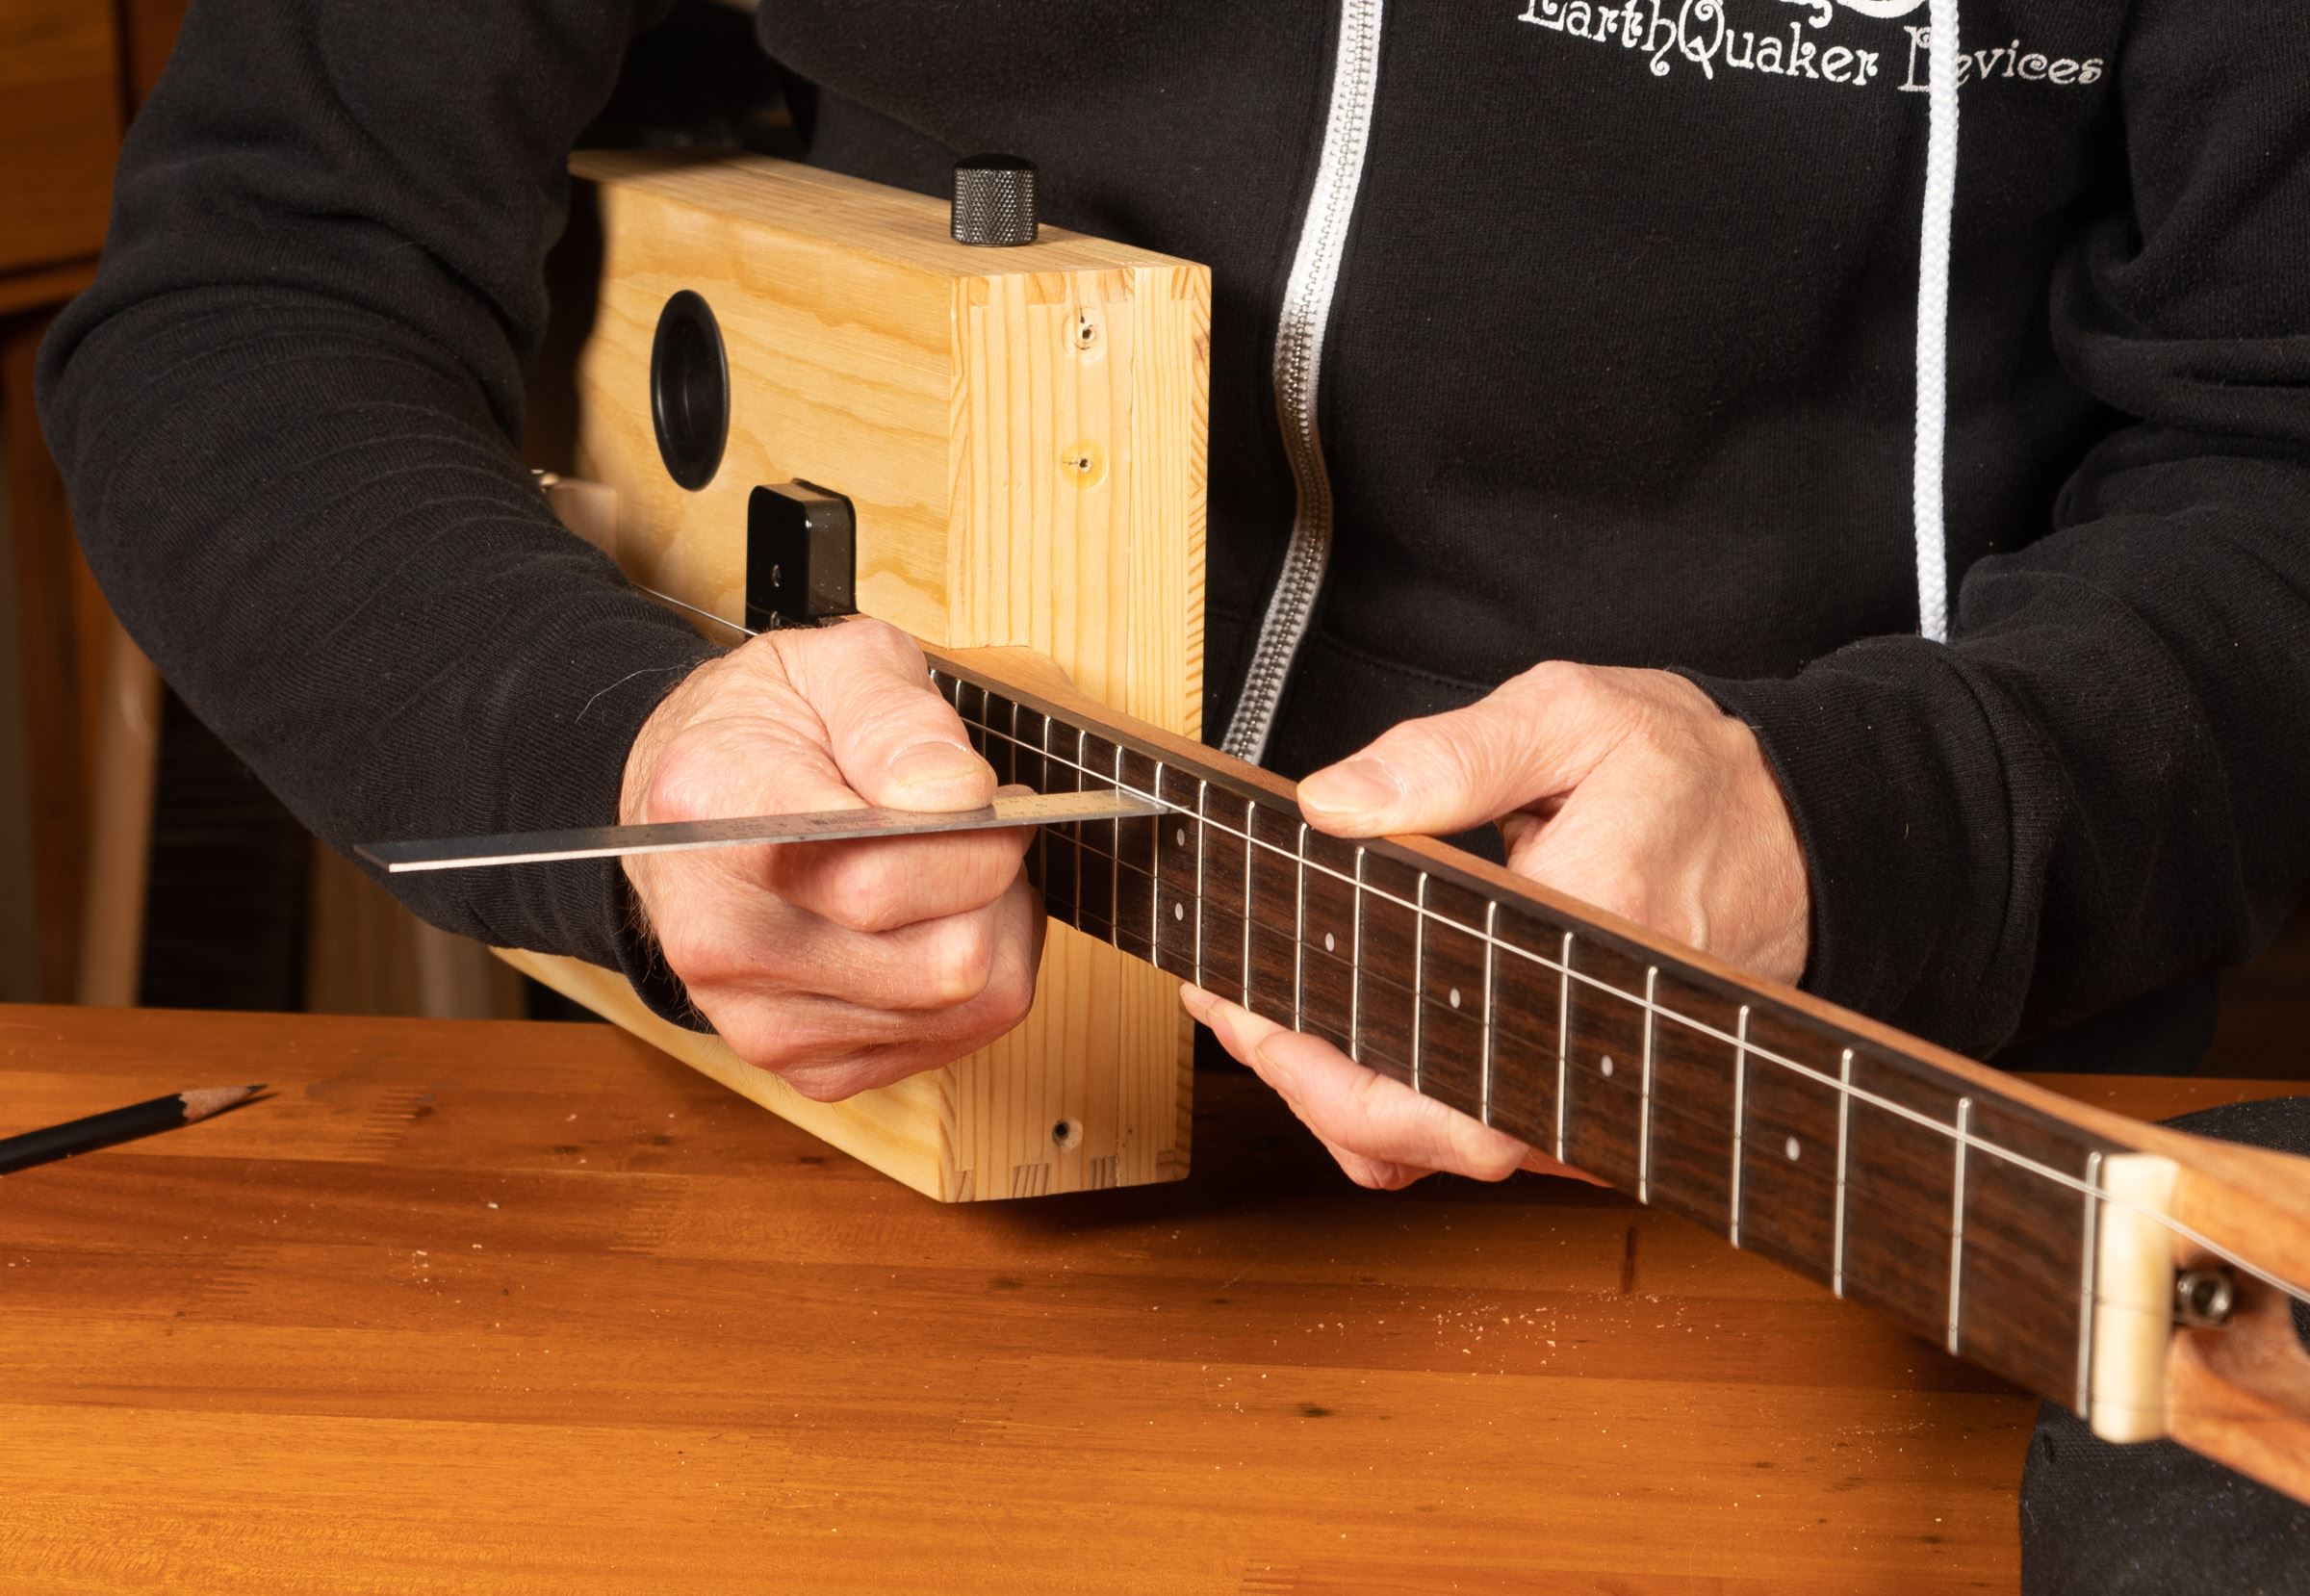
Straighten the neck
Use the included 4mm Allen wrench to adjust the truss rod. With a straightedge on the frets, adjust the truss rod until the straightedge touches all of the fret tops without rocking.
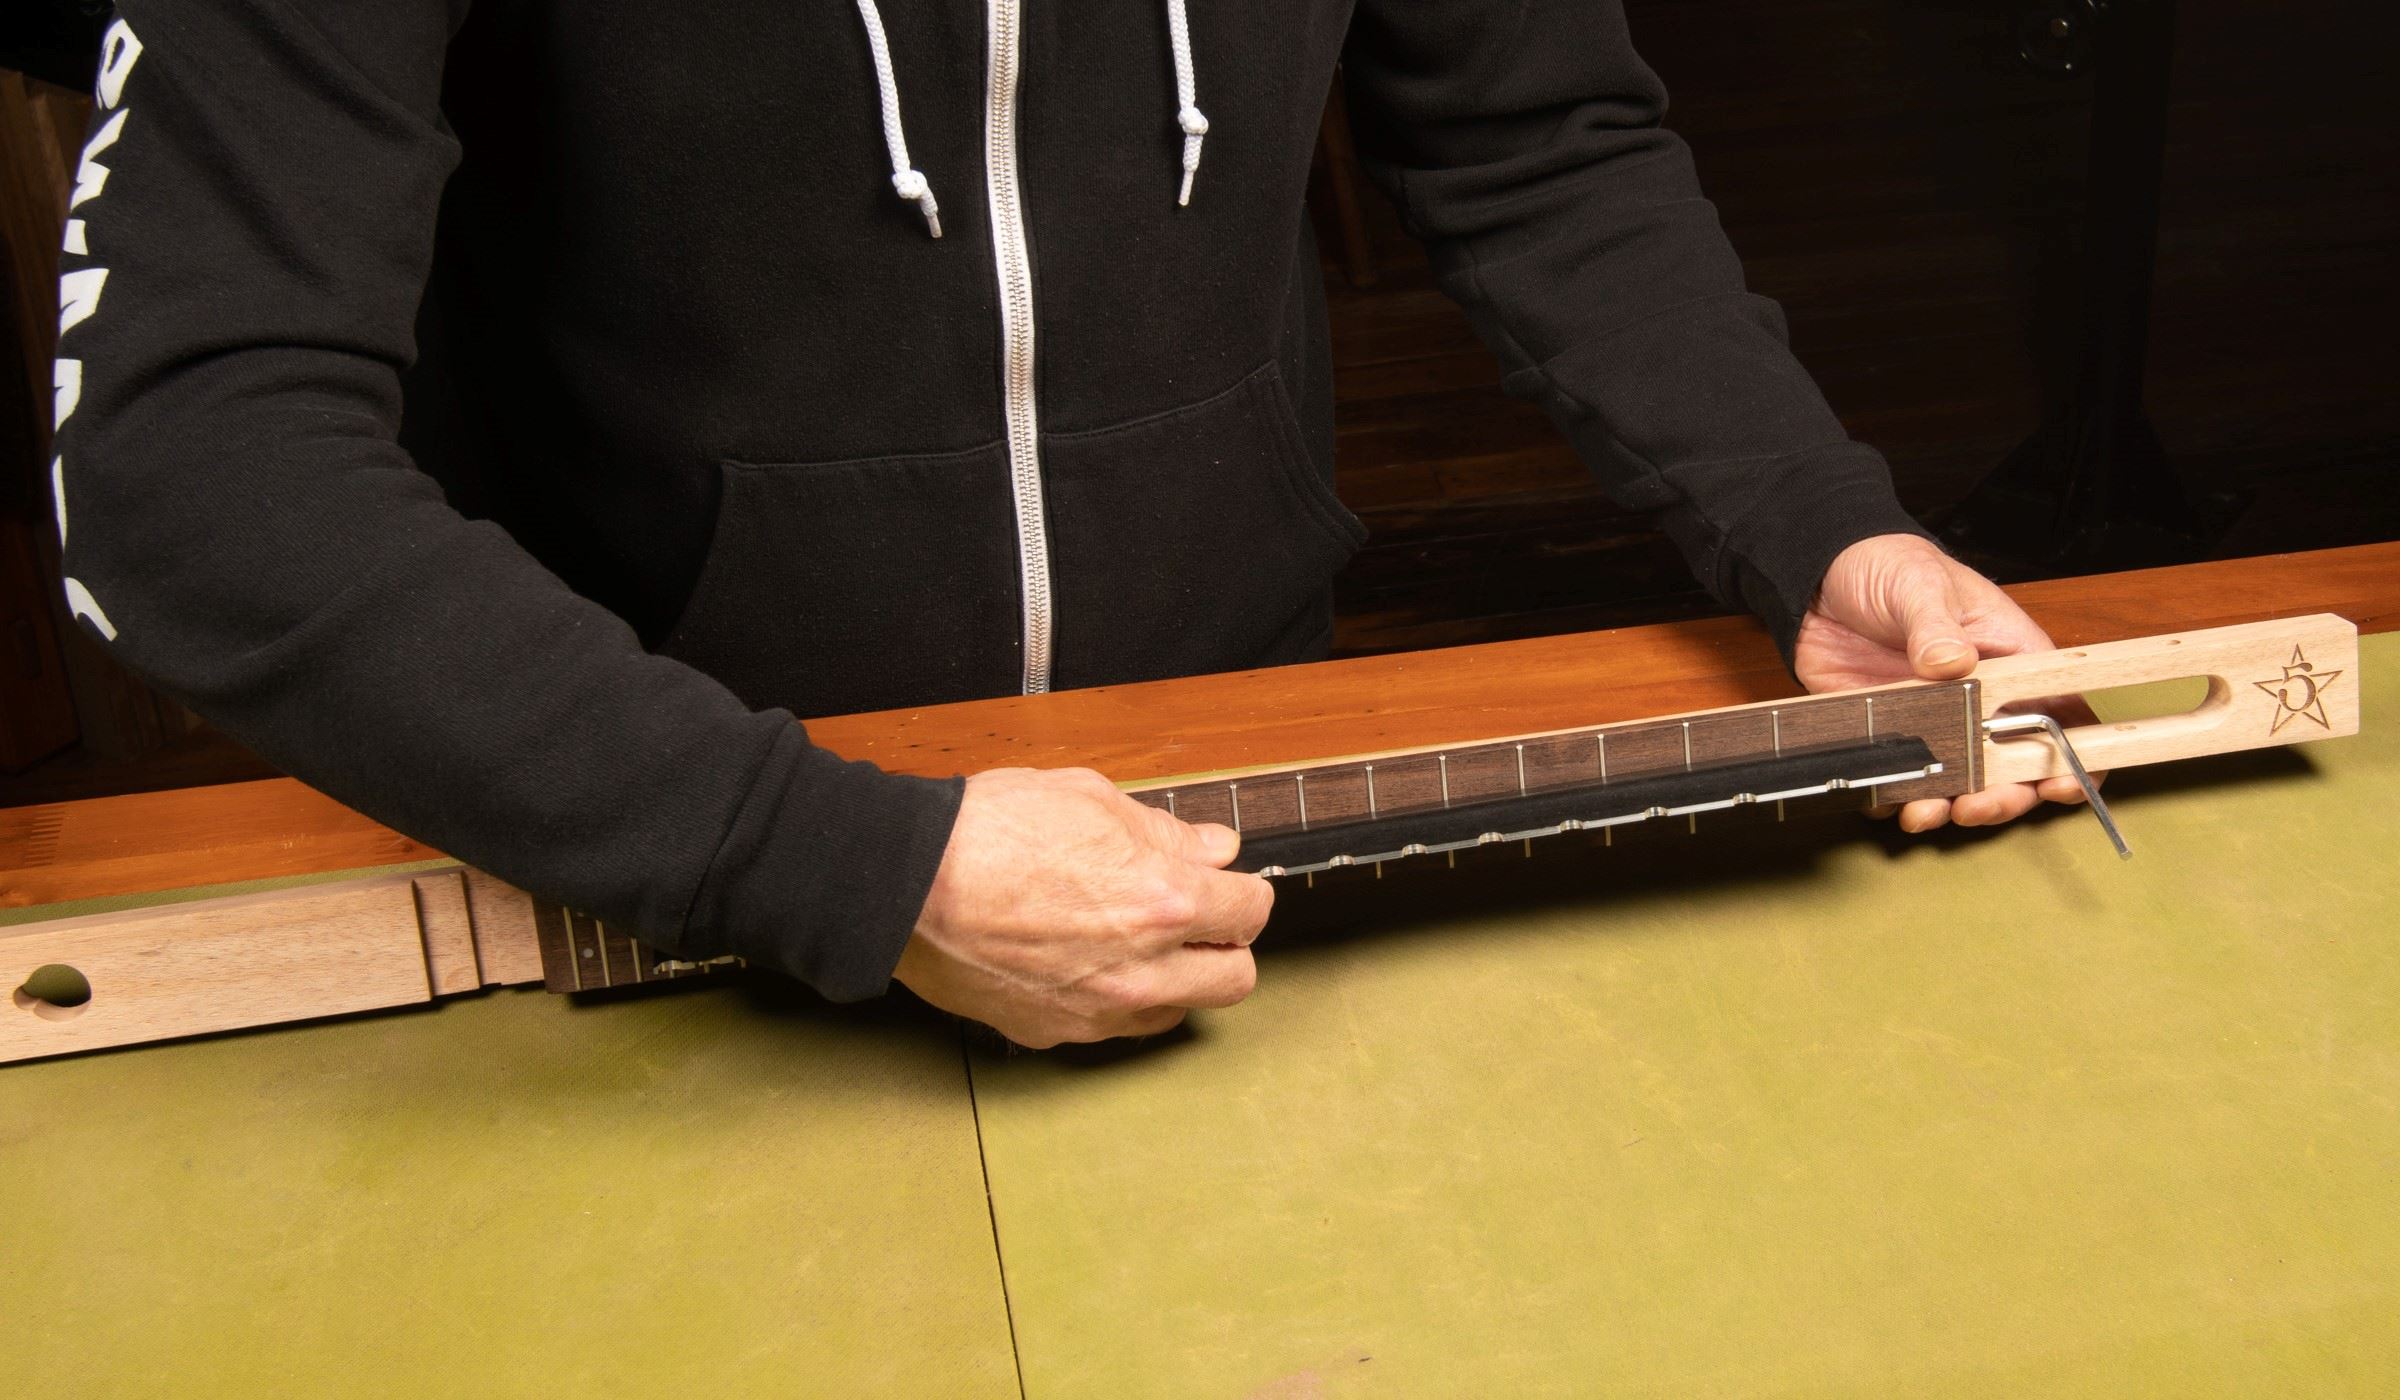
Turn the truss rod nut counterclockwise (viewed from the peghead end) to loosen the truss rod, allowing the neck to bow upward. Go a quarter turn at a time, and wait for the neck to react. Turning it right tightens the rod, pulling the neck back.

To learn more see our Trade Secrets article Understanding guitar truss rod adjustment.
Please again note that the zero fret is slightly taller than the rest. When checking the neck with a straightedge, sight the neck from the first fret on, staying off of the zero fret in order to get an accurate reading.
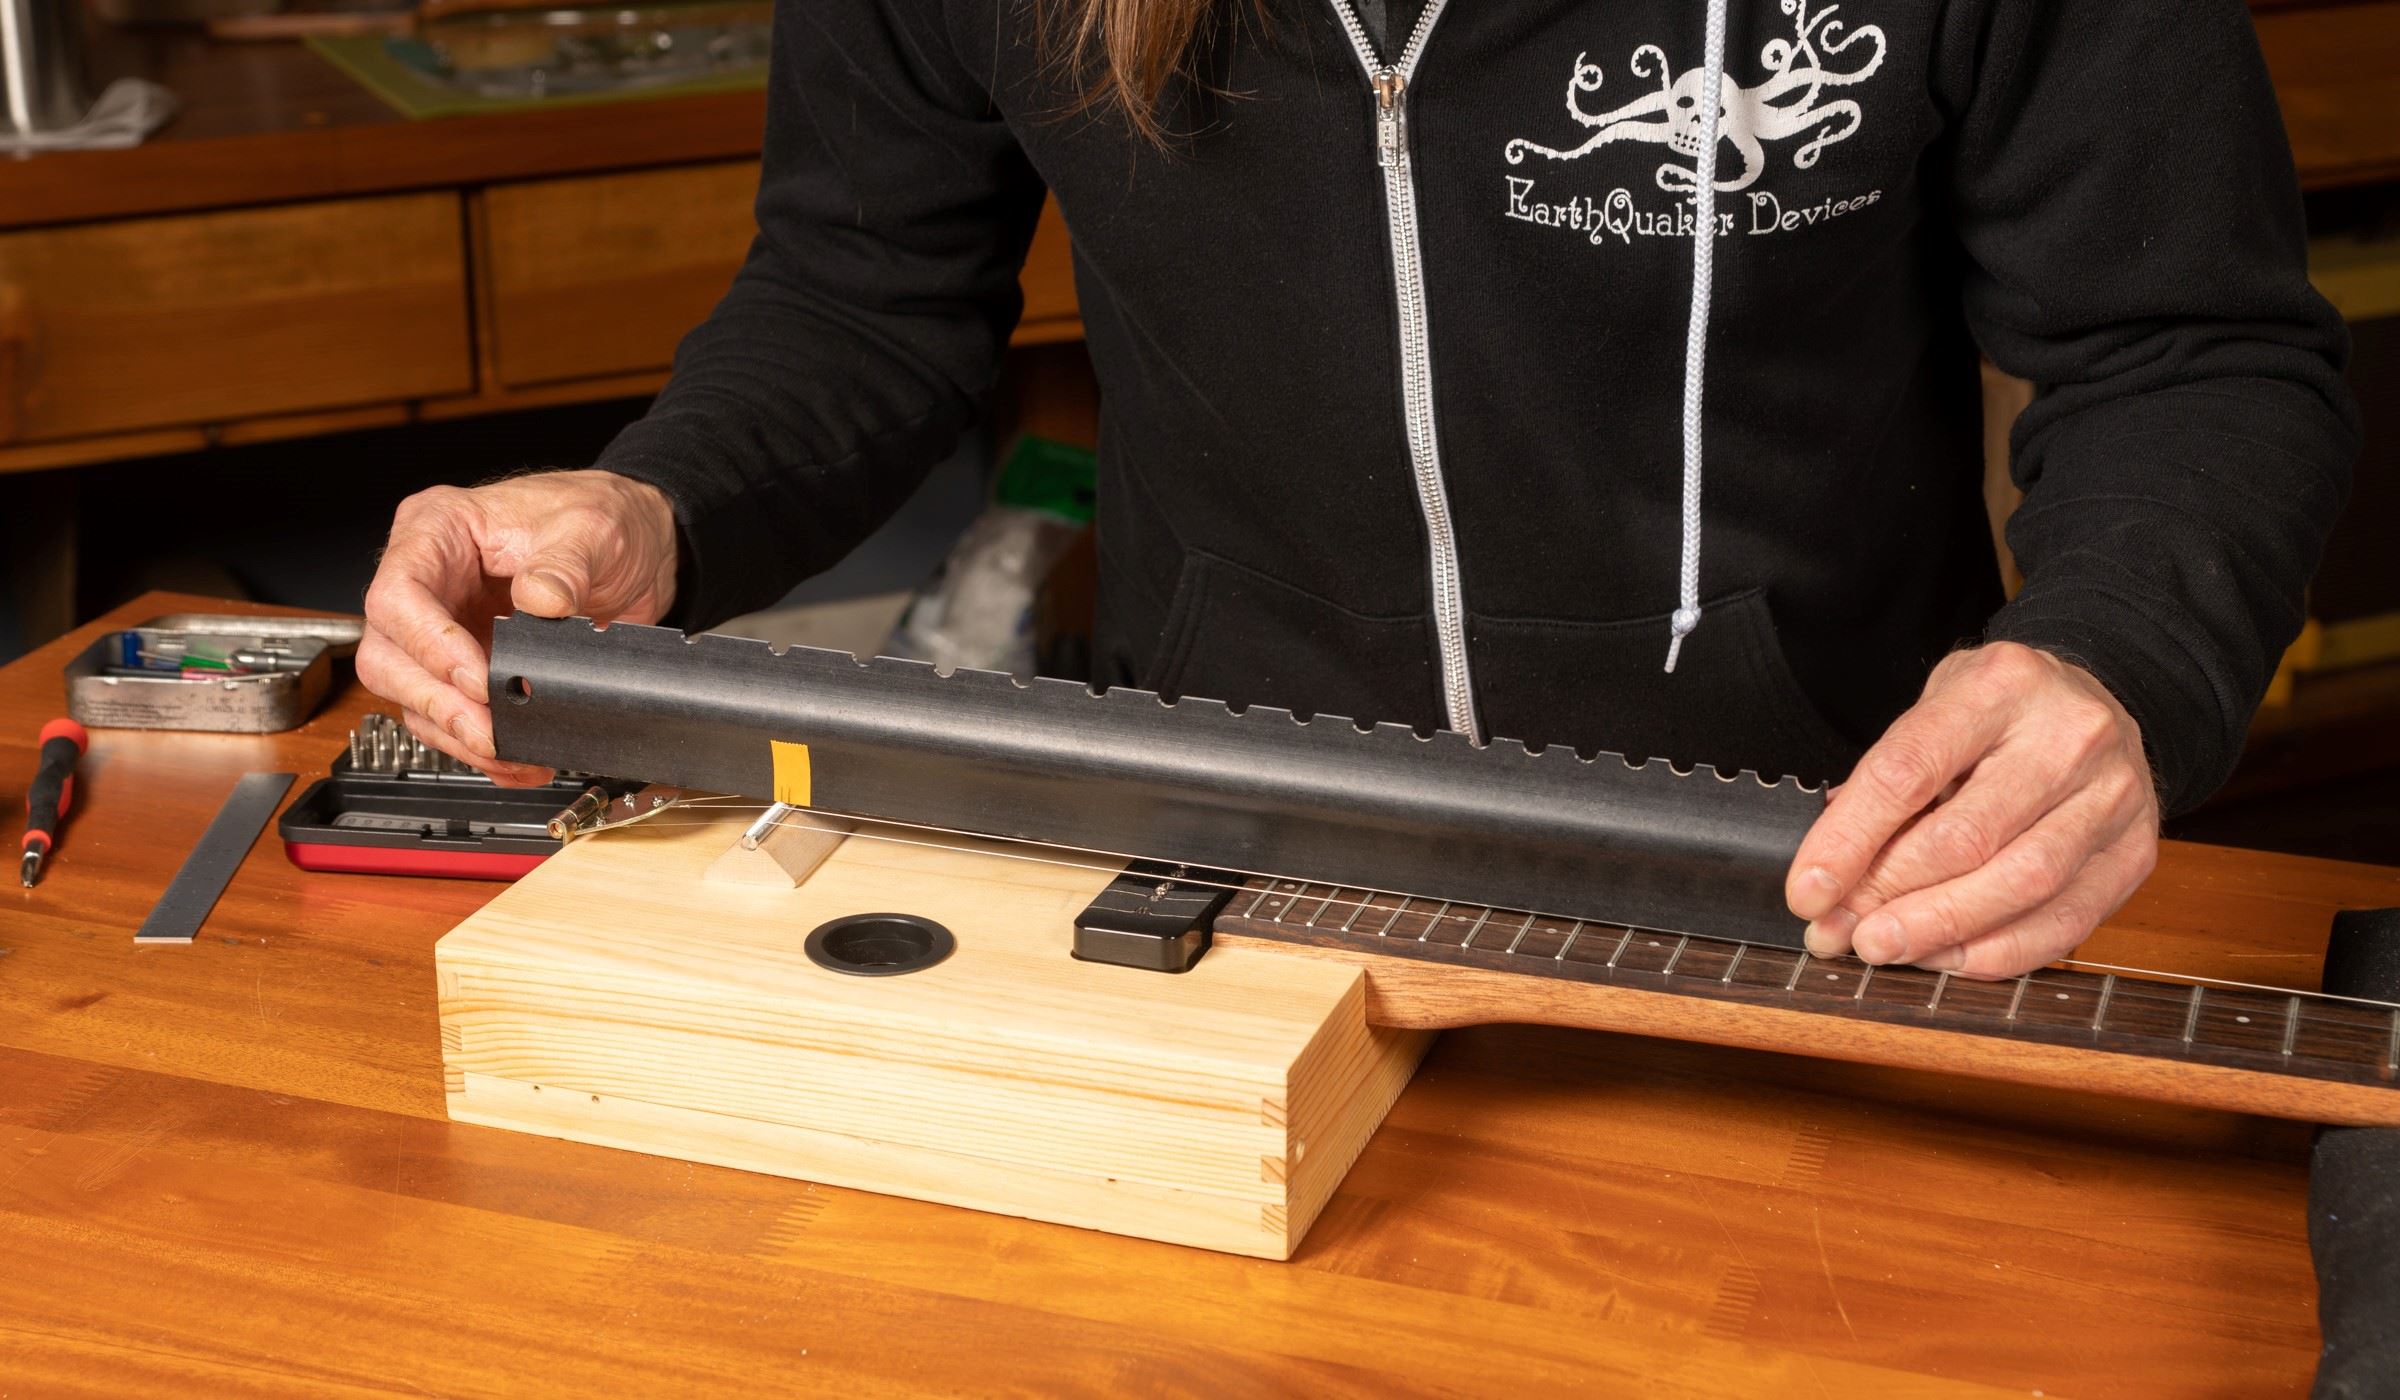
Level the frets
Cigar box guitars can be set up to play two ways: with high action to play with a slide, or with lower action to play with your fingers on the fretboard: it's your choice. This section will show you how to level the frets to play as a traditional guitar.
If you are planning to play your cigar box guitar with a slide only, you can skip the level and crowning steps and go straight to polishing.
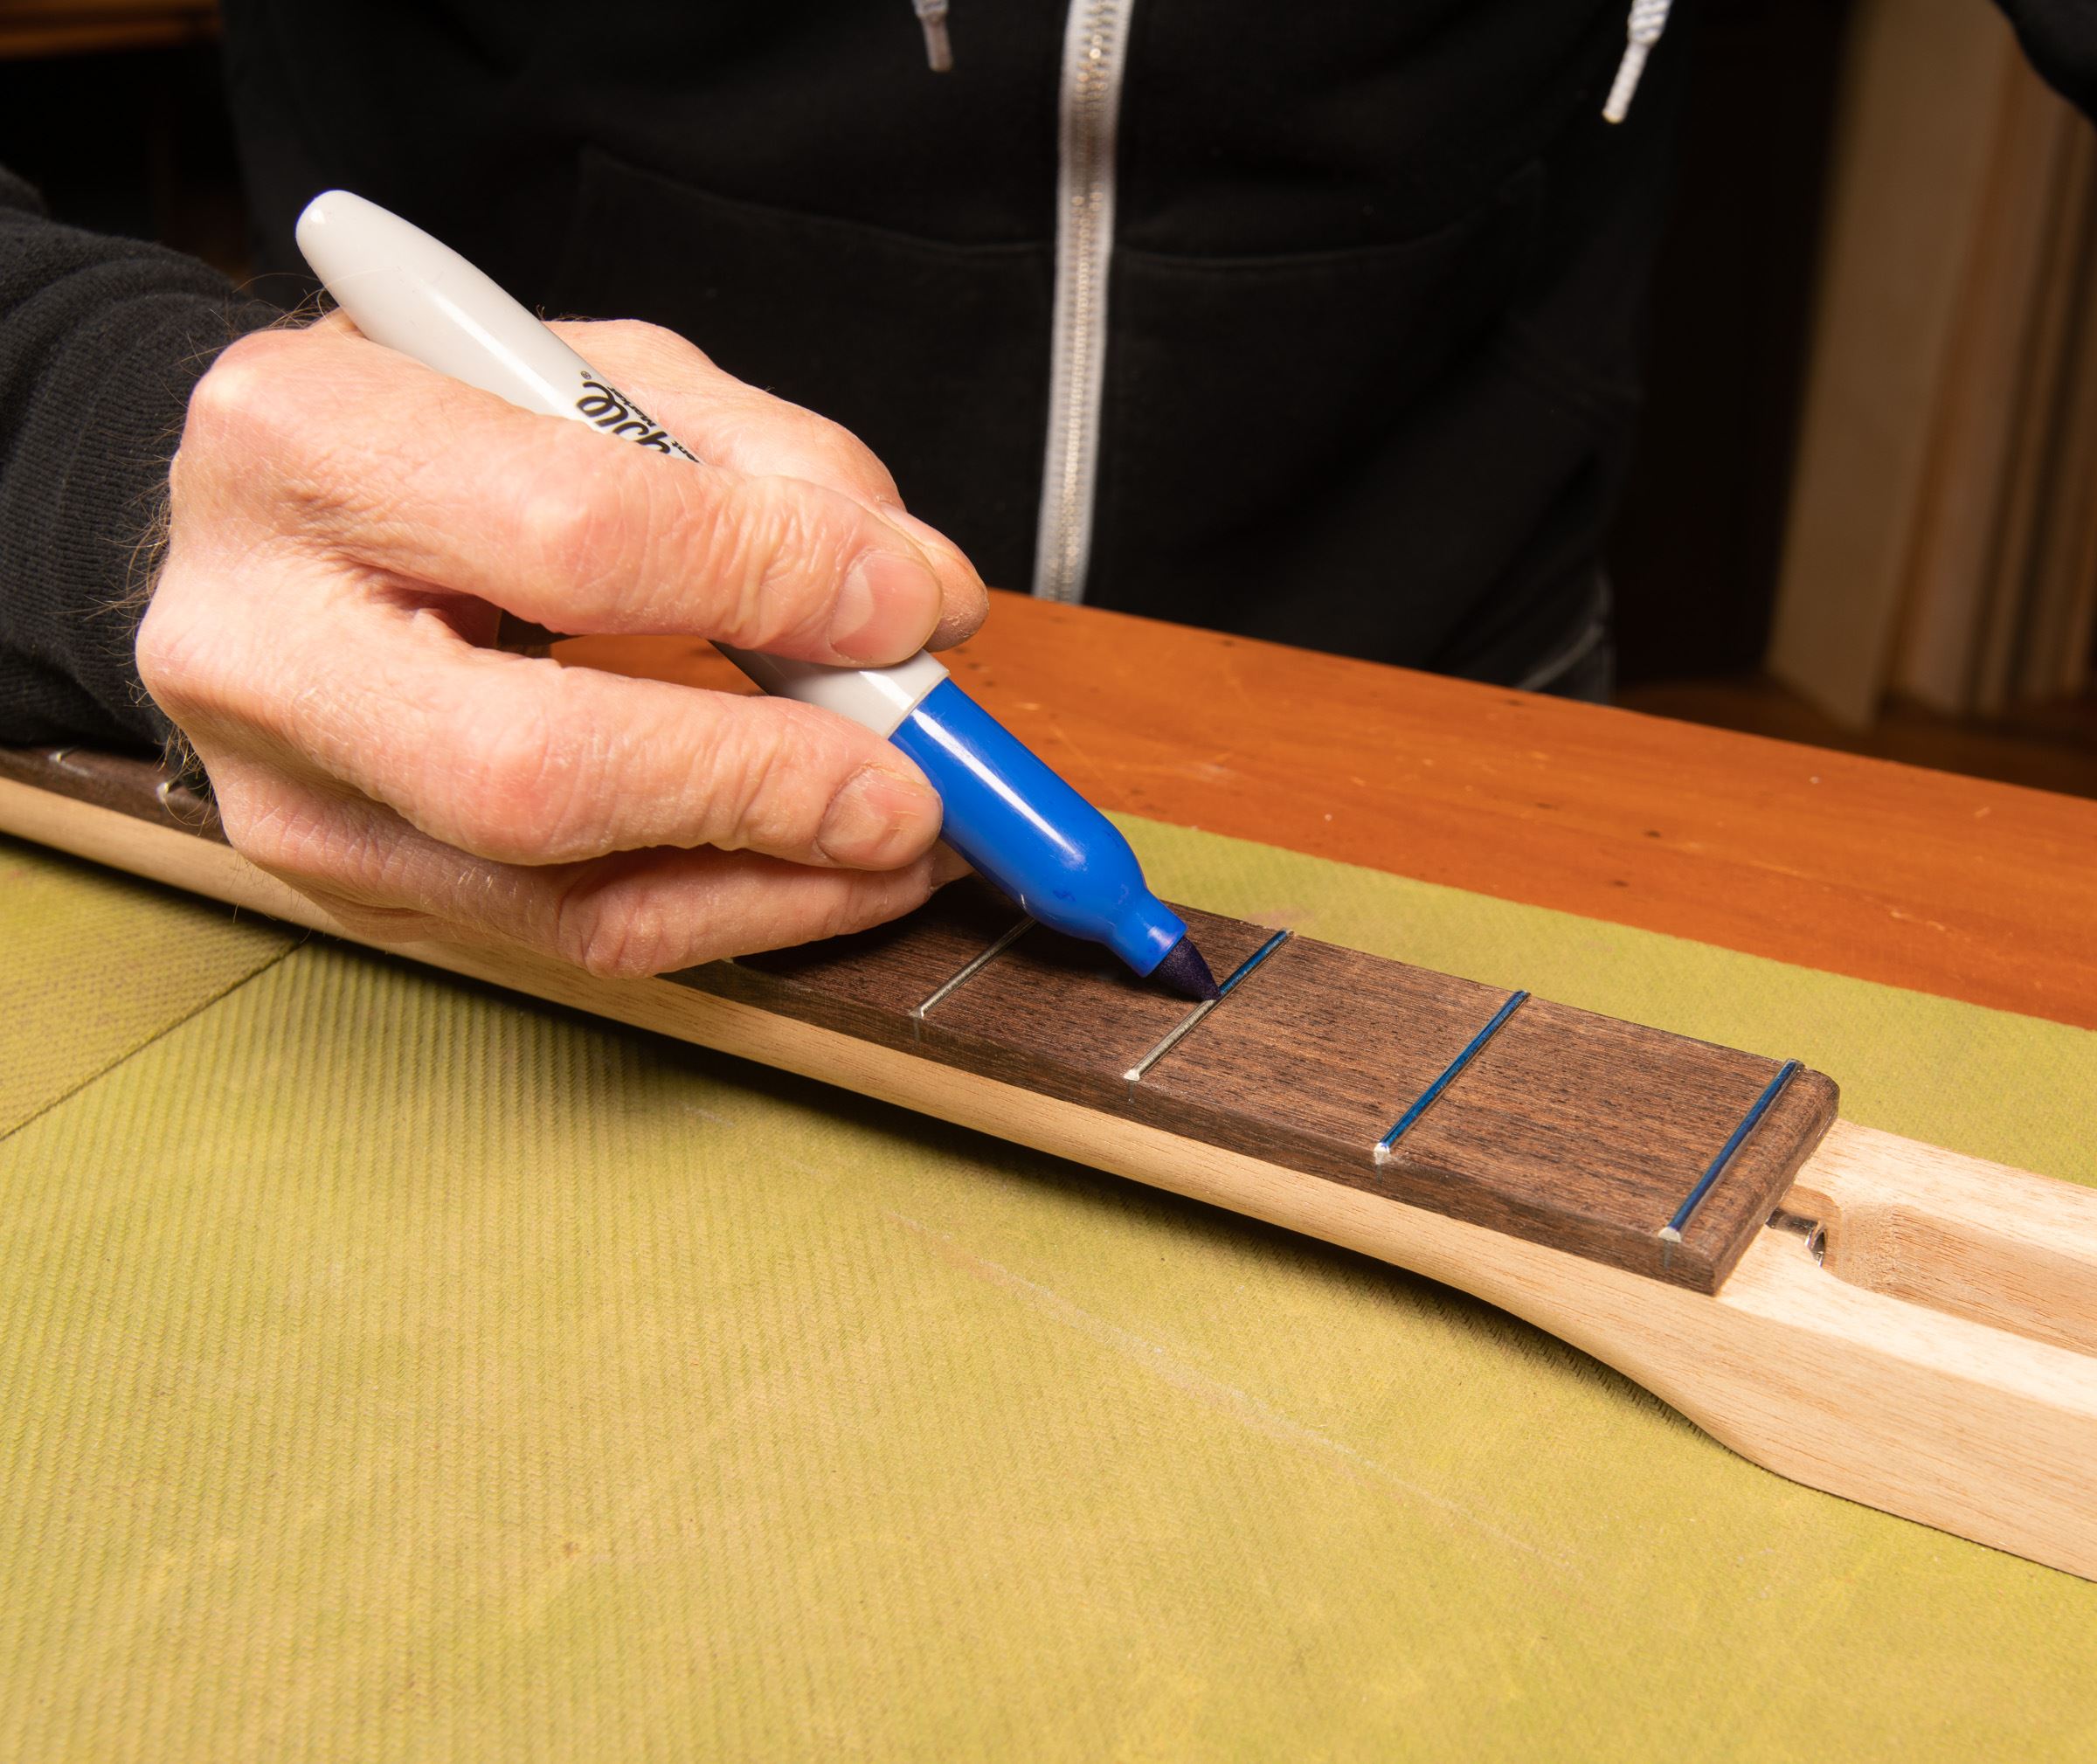
Color the length of the fret tops with a blue permanent marker to prepare them for leveling. The marker ink will show your progress: the frets are level when sanding has removed some of the blue across all of the fret tops.
The simplest way to level the frets is using a firm, flat block wrapped in 320-grit sandpaper. There are a variety of leveling tools you can use, such as files and beams. Choose which is most comfortable for you.
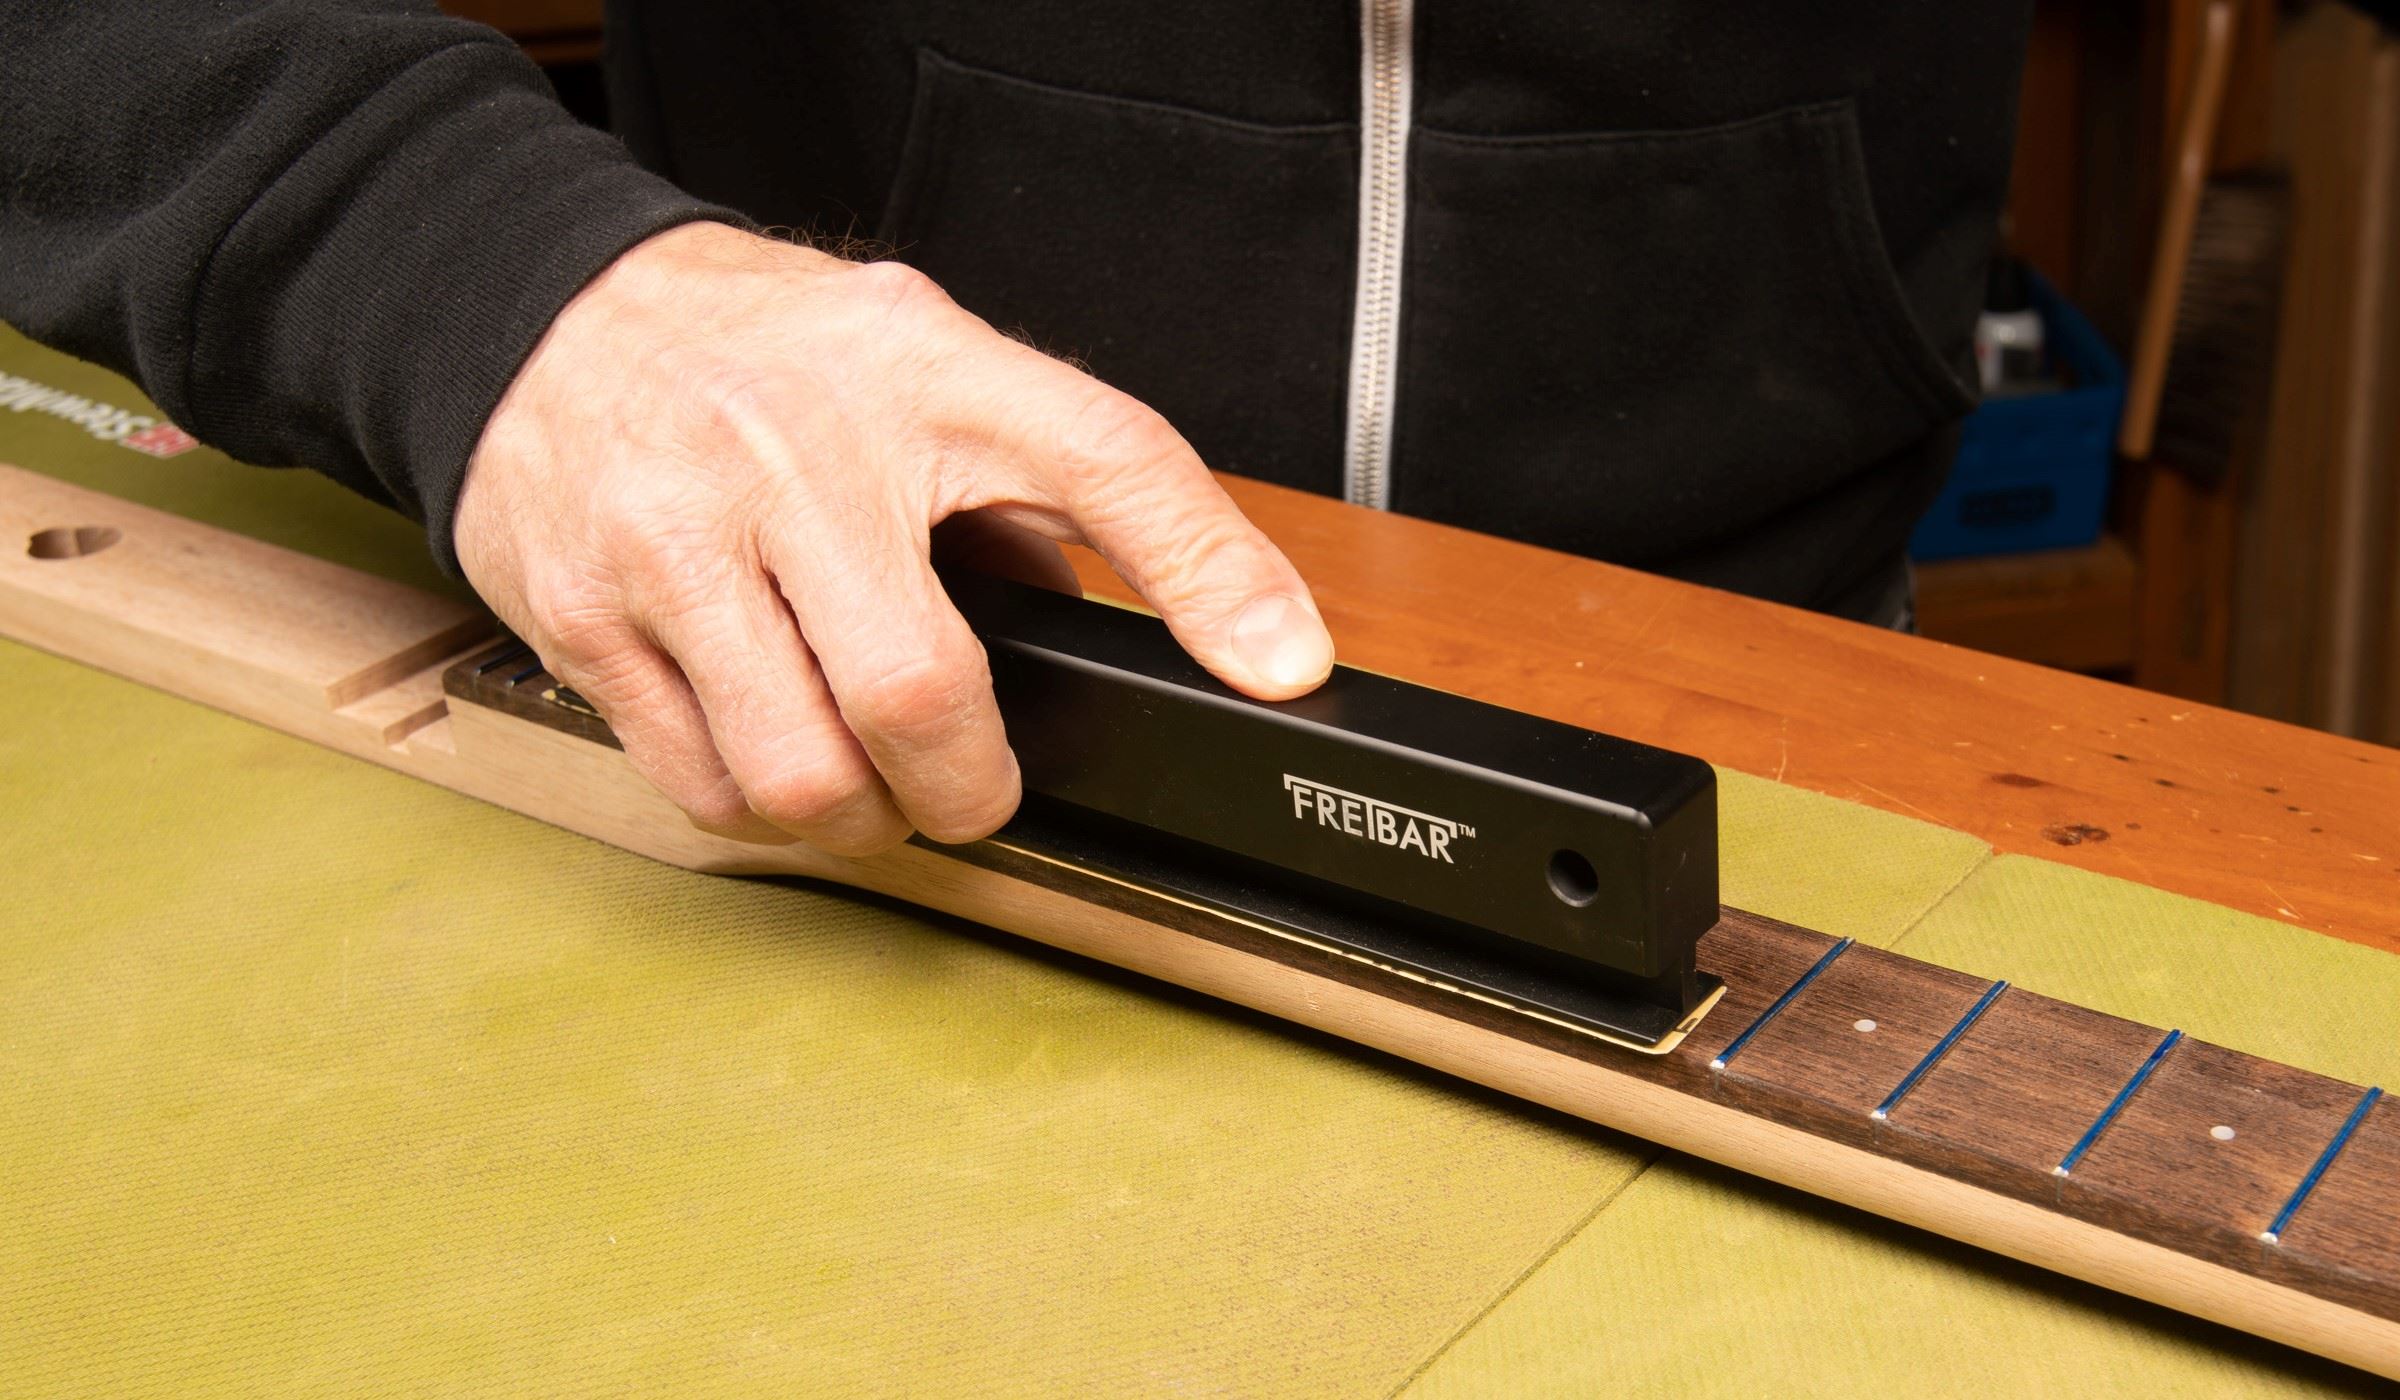
Do not level the zero fret. The fretboard is flat, there is no radius to worry about then leveling. Level the frets by using full-length strokes down the fretboard, working from one end to the other. Work slowly and check every few strokes to monitor your progress. The frets are level when the blue ink is removed from the fret tops. The goal is to remove as little material as possible while still achieving a completely level fretboard.
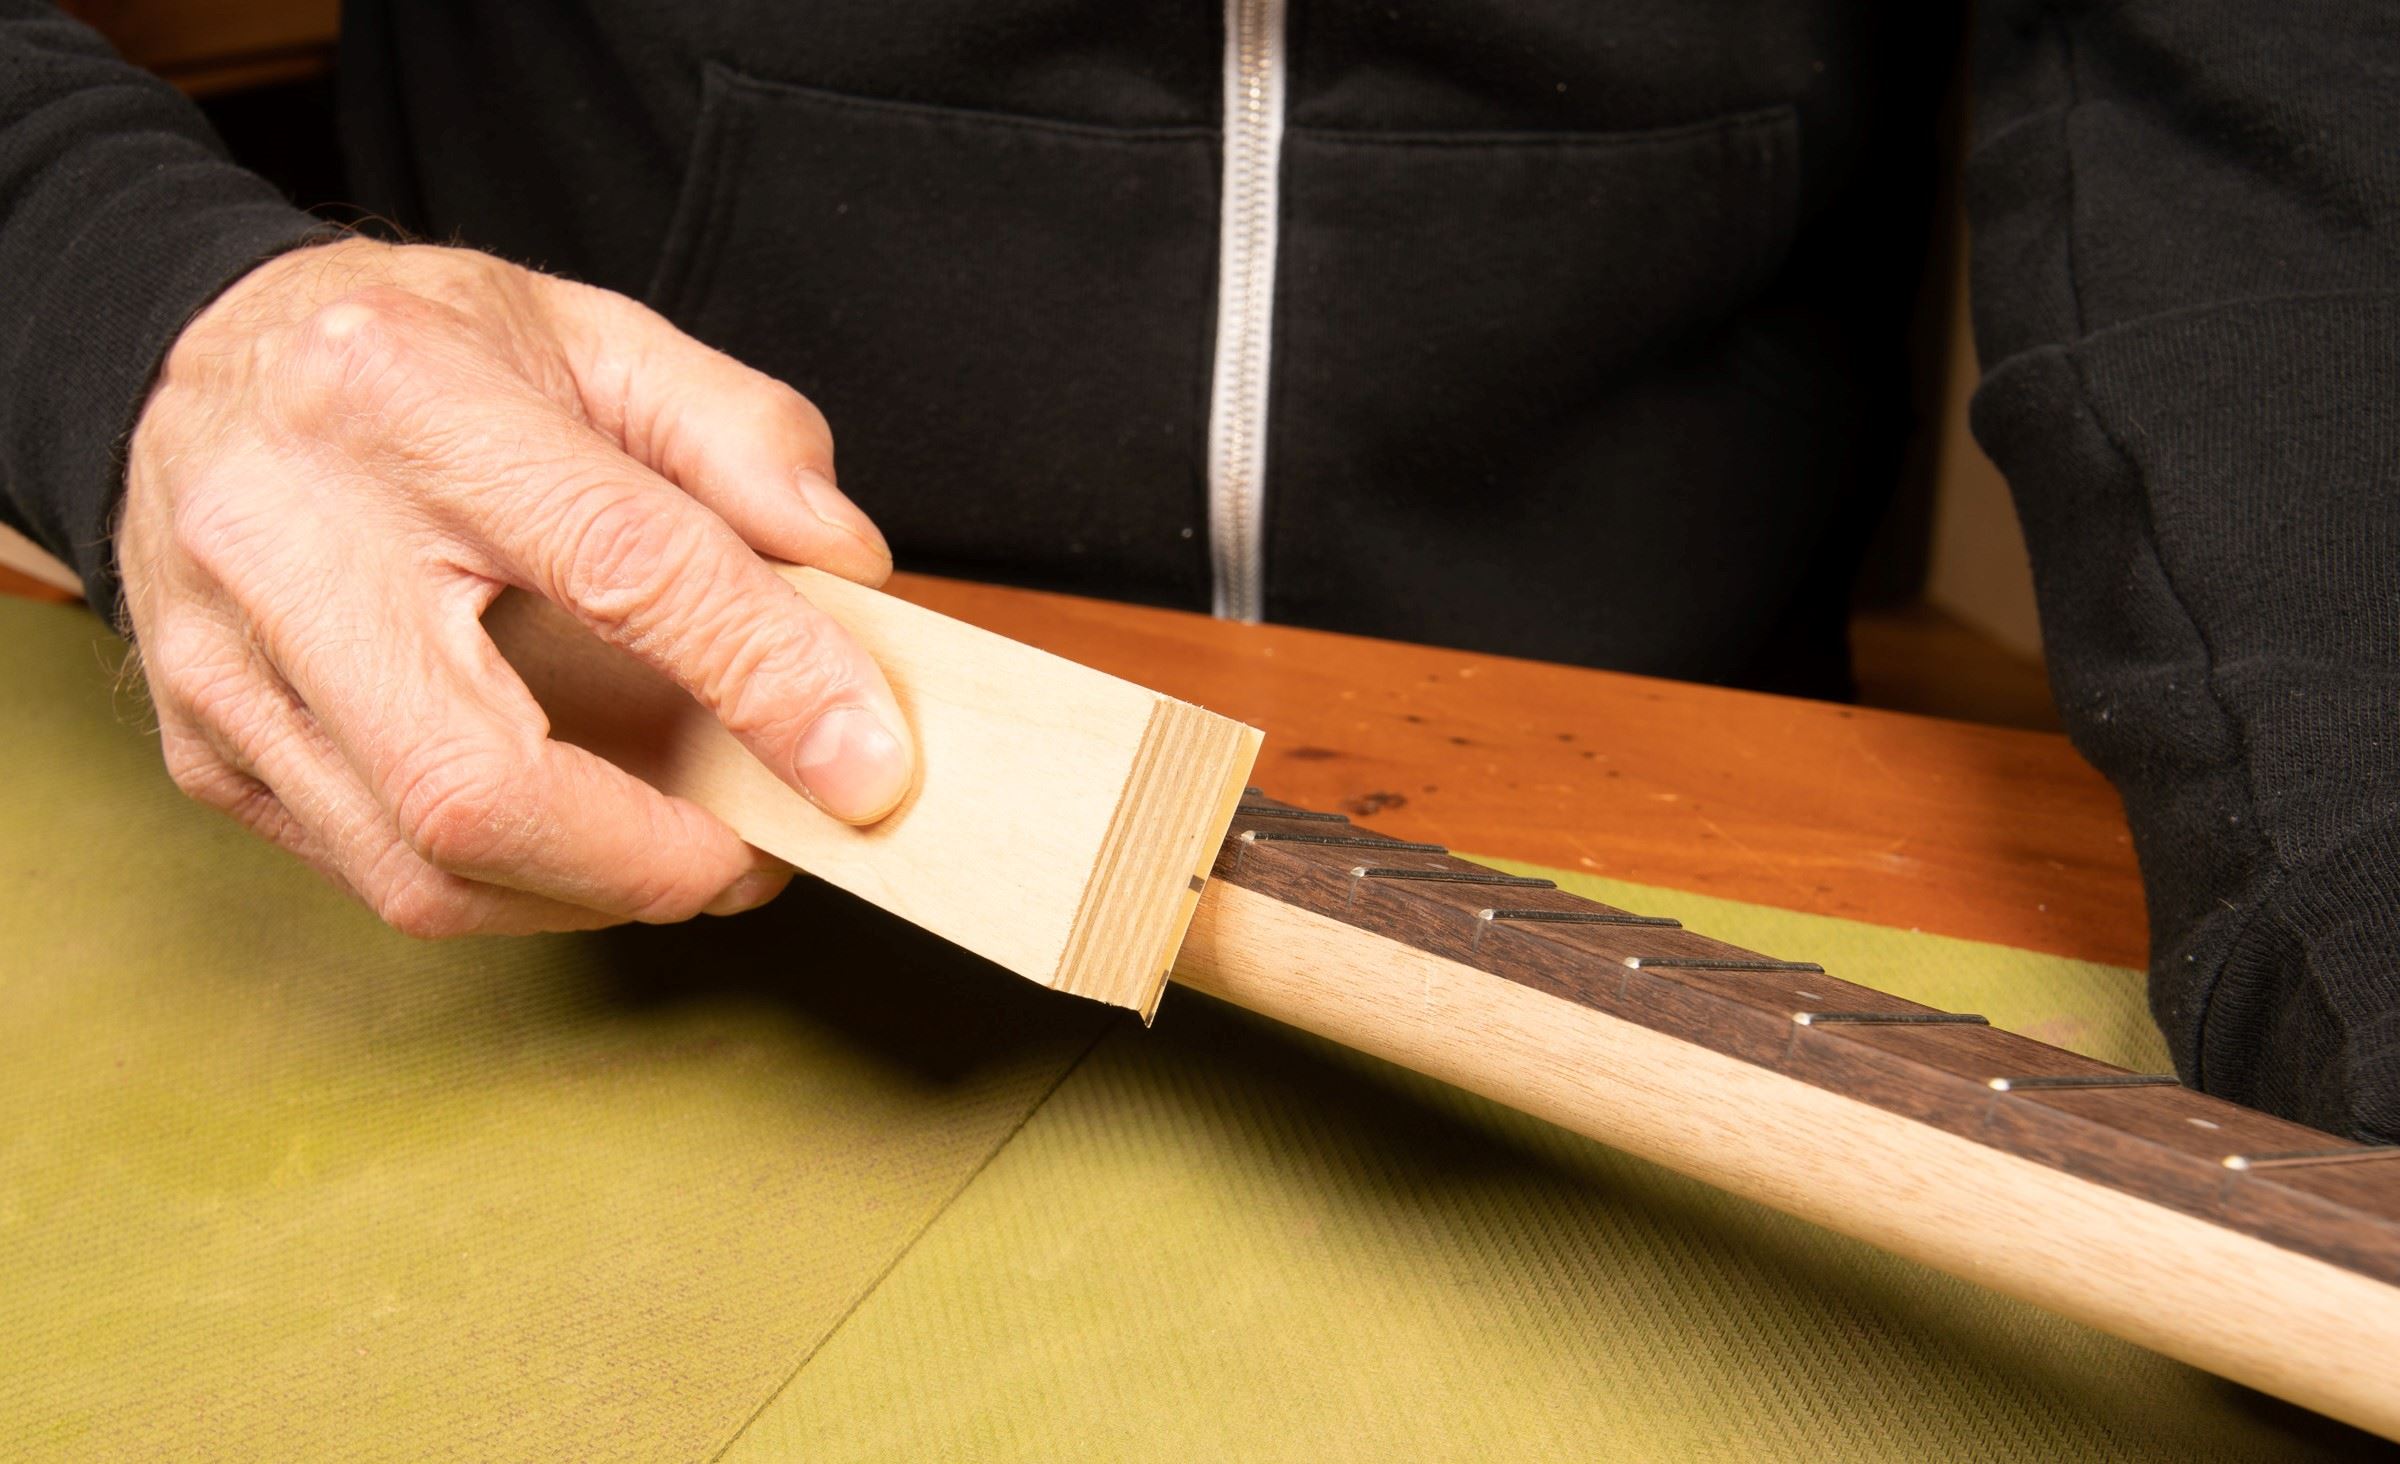
Crowning the frets
Leveling will leave flat tops on the frets which you will now round over or "crown." Protect your fretboard from the file with tape. Leave only the frets exposed and reapply blue marker to the length of the fret tops.
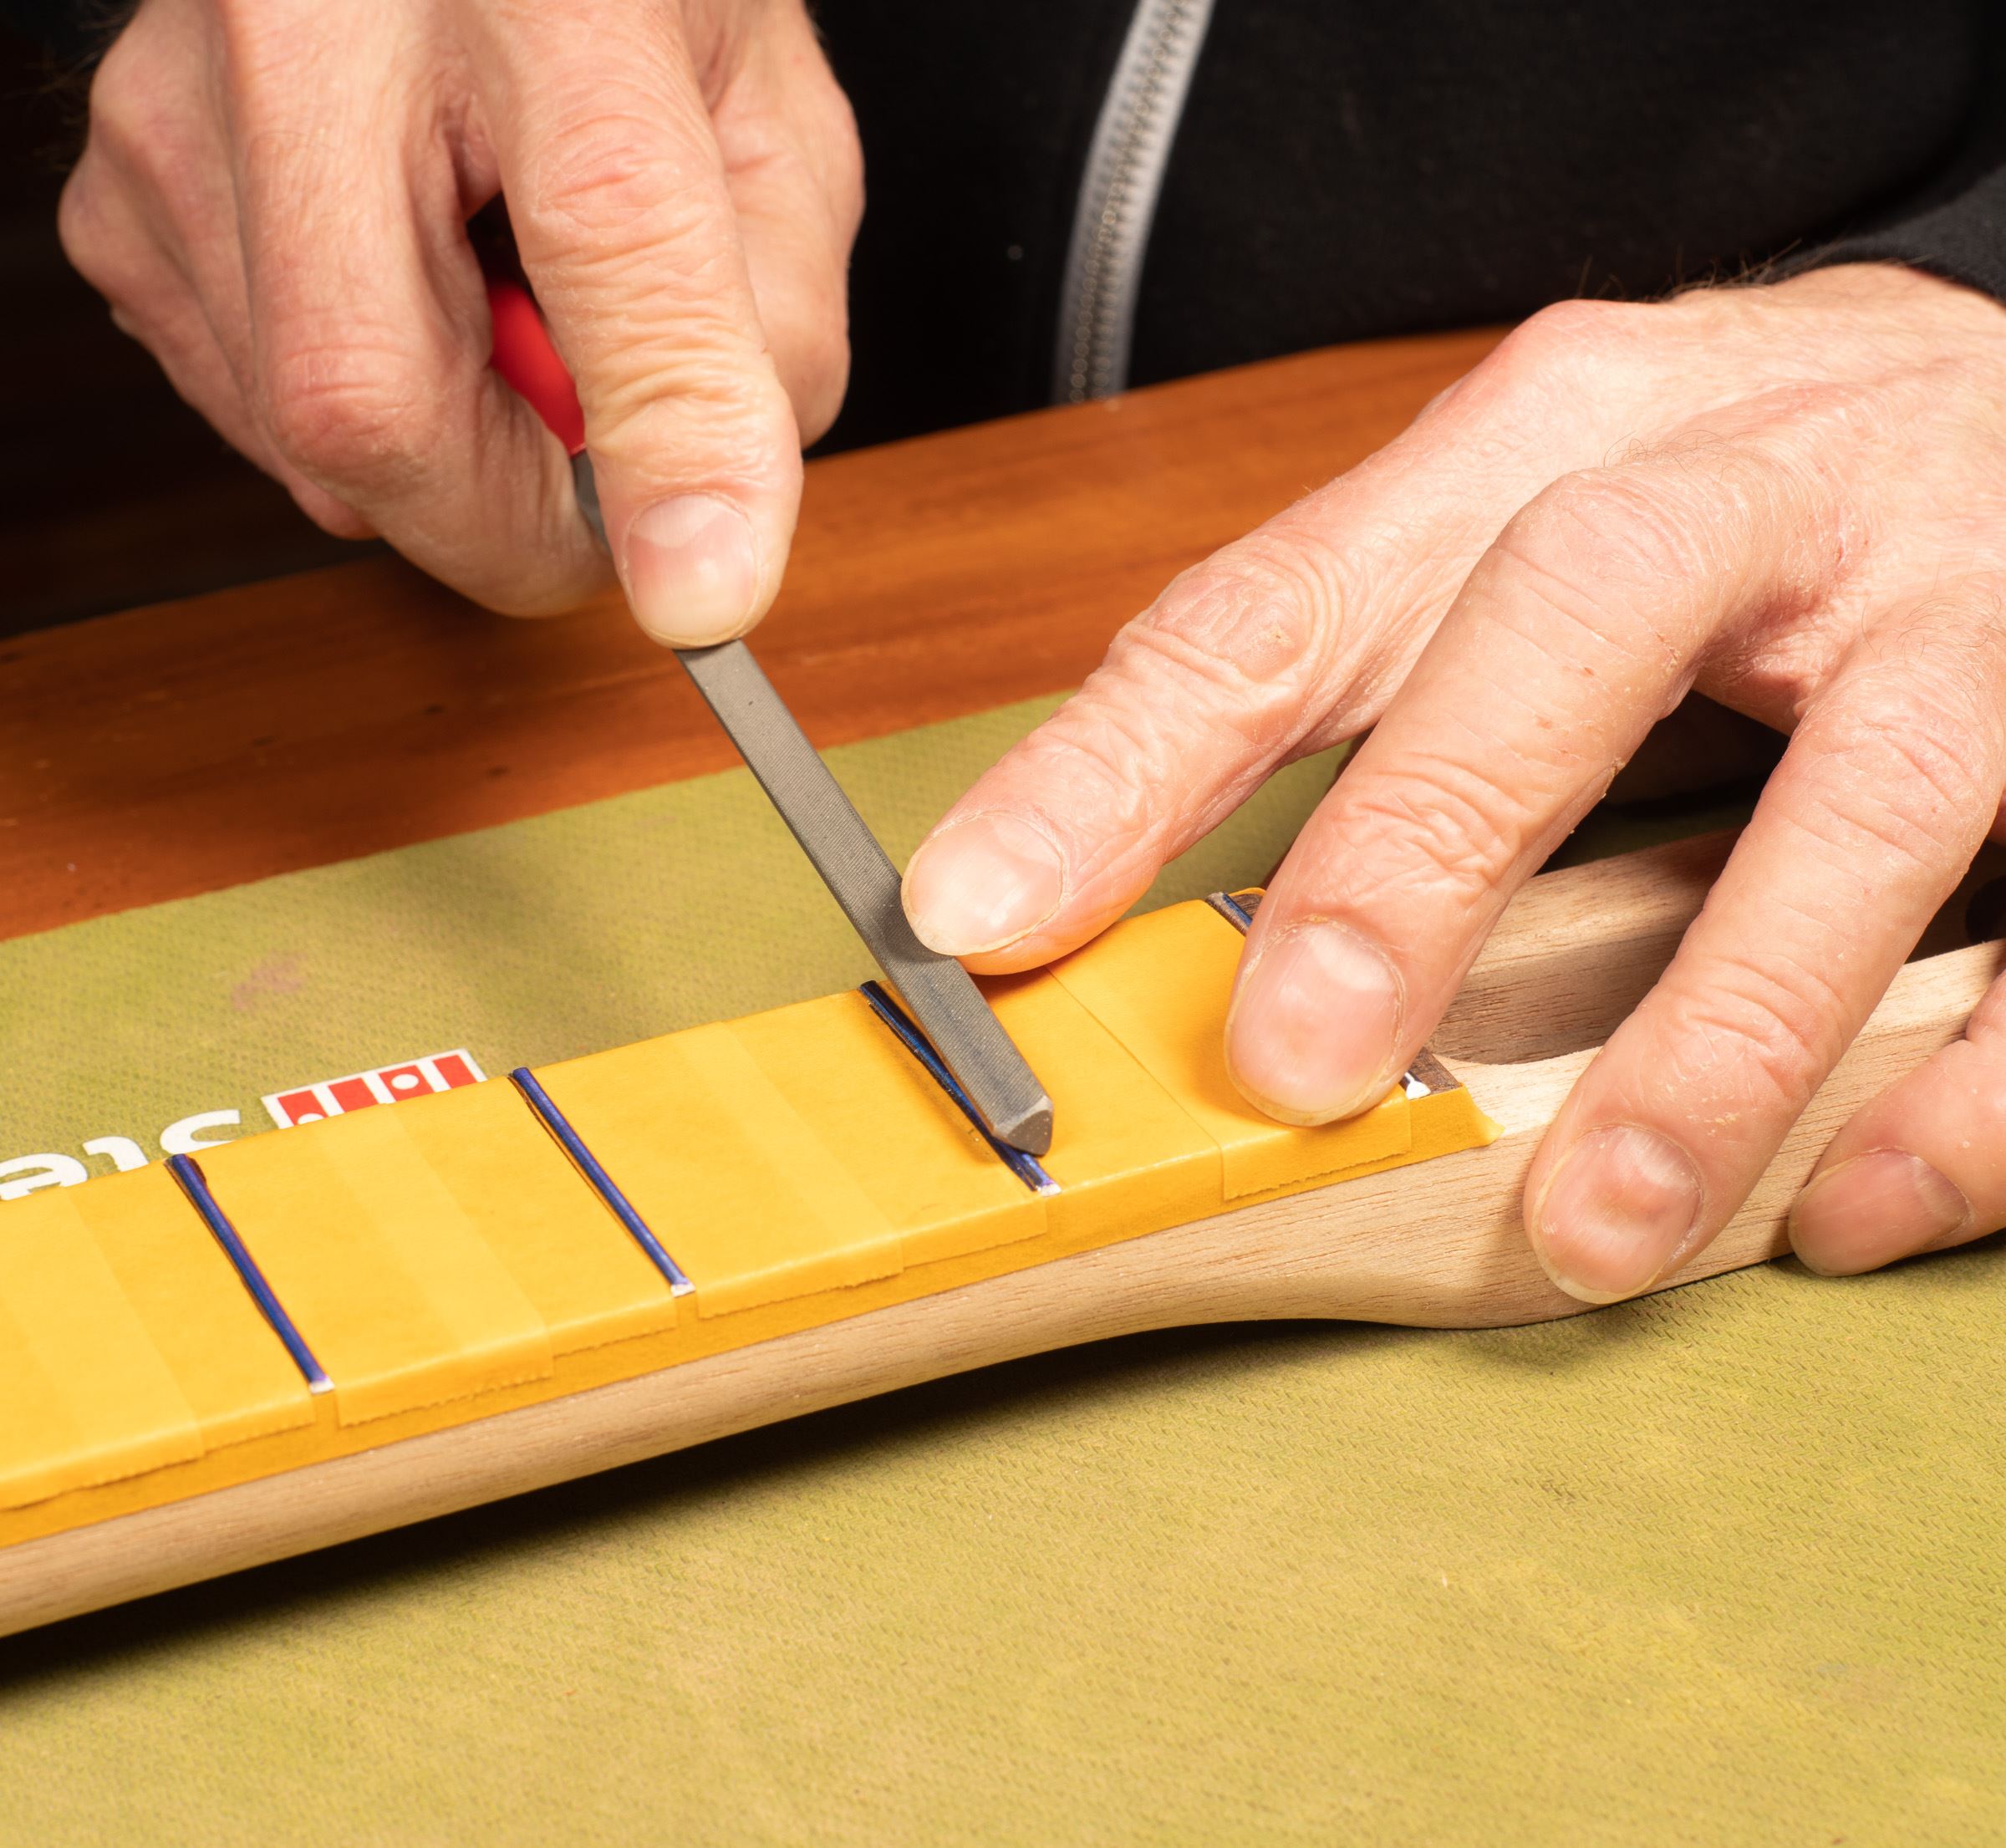
Use a fret crowning file to remove the hard edges created by leveling and restore their rounded shape. File the sides of the frets with a rounding motion until all that remains of the top is a very thin flat line along the center of the fret. Don't remove this line entirely, as filing the fret tops would undo your leveling. This line will buff out when polishing.
To learn more see our Trade Secrets video How to choose the perfect fret crowning file.
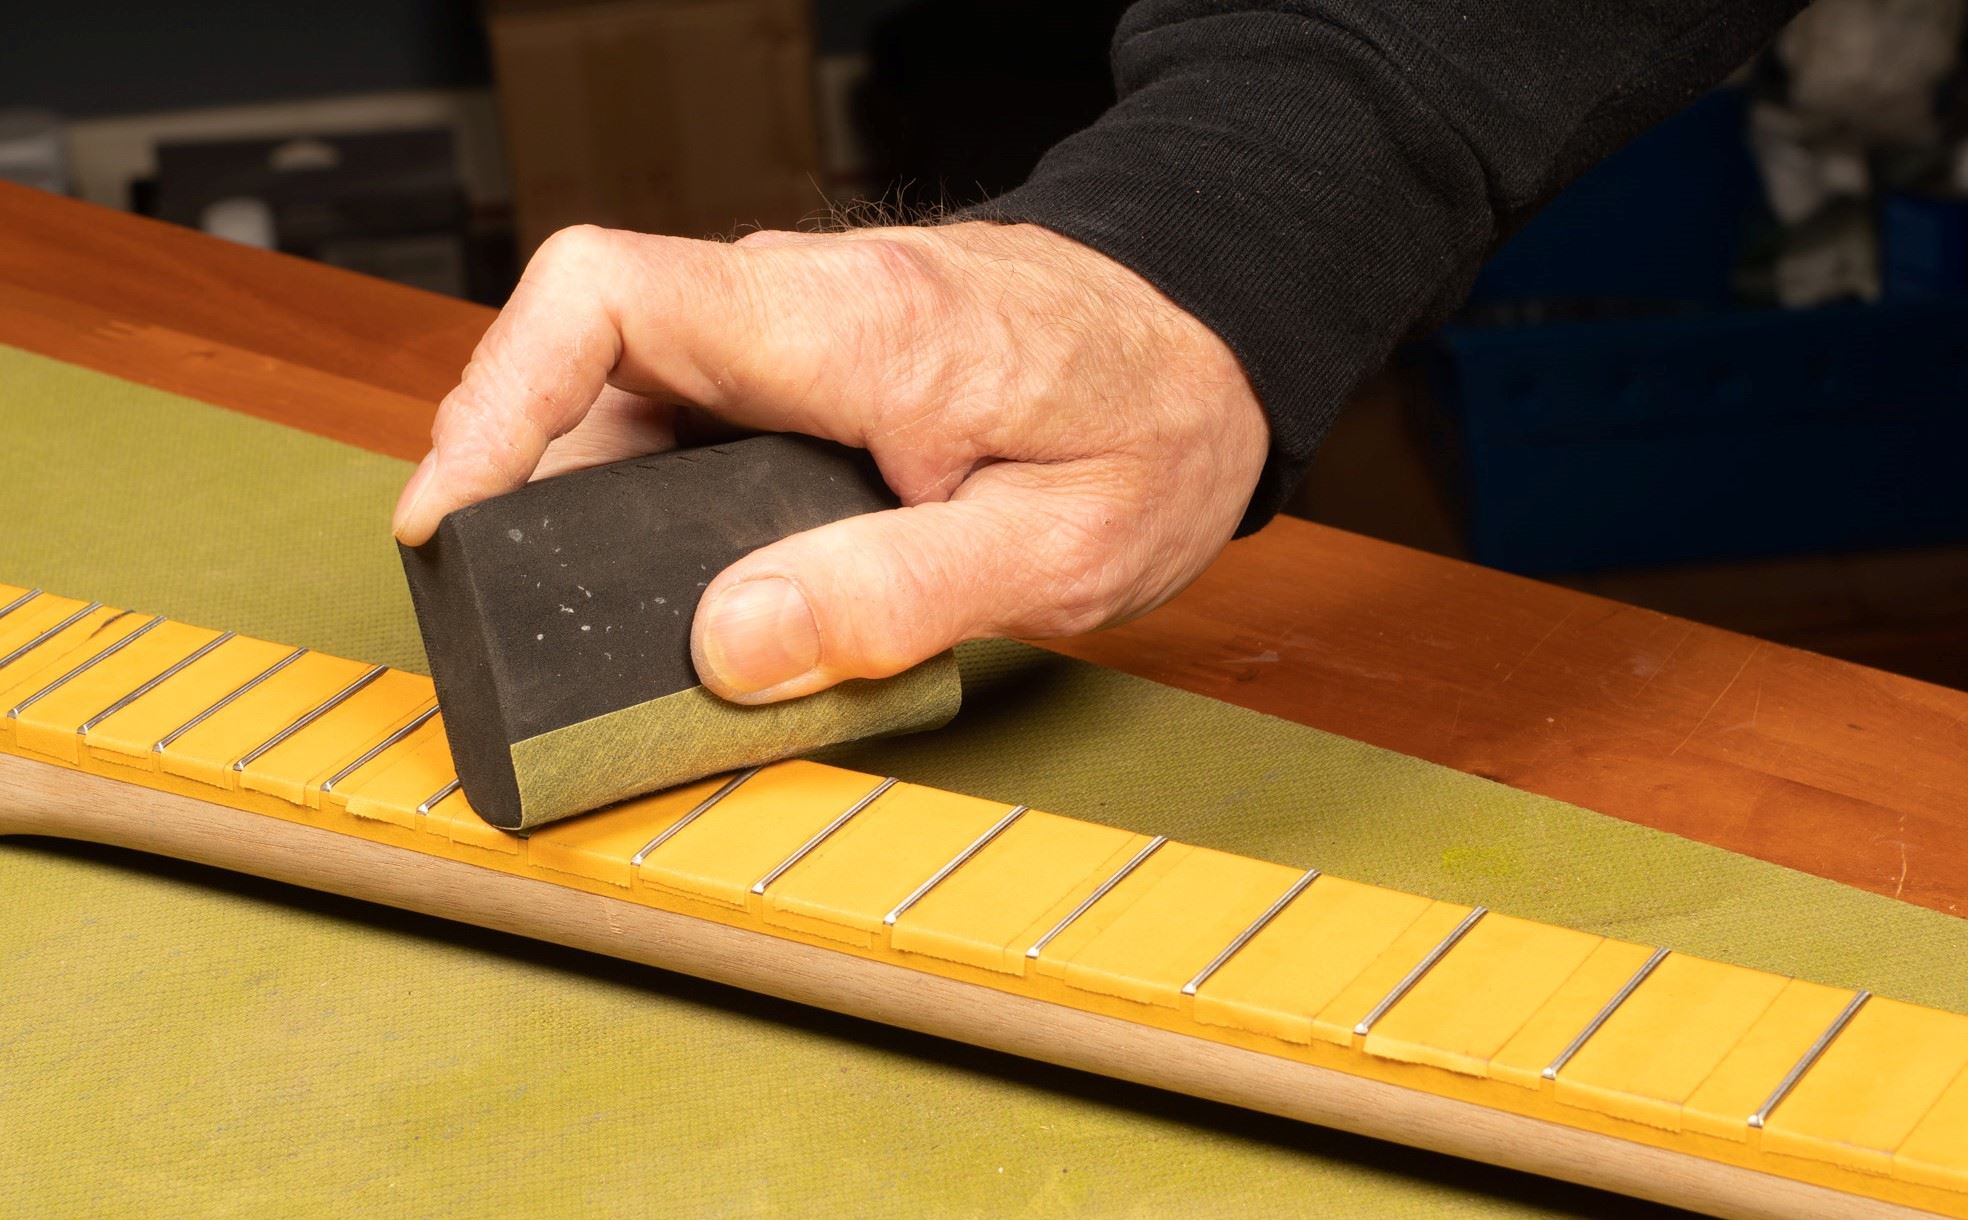
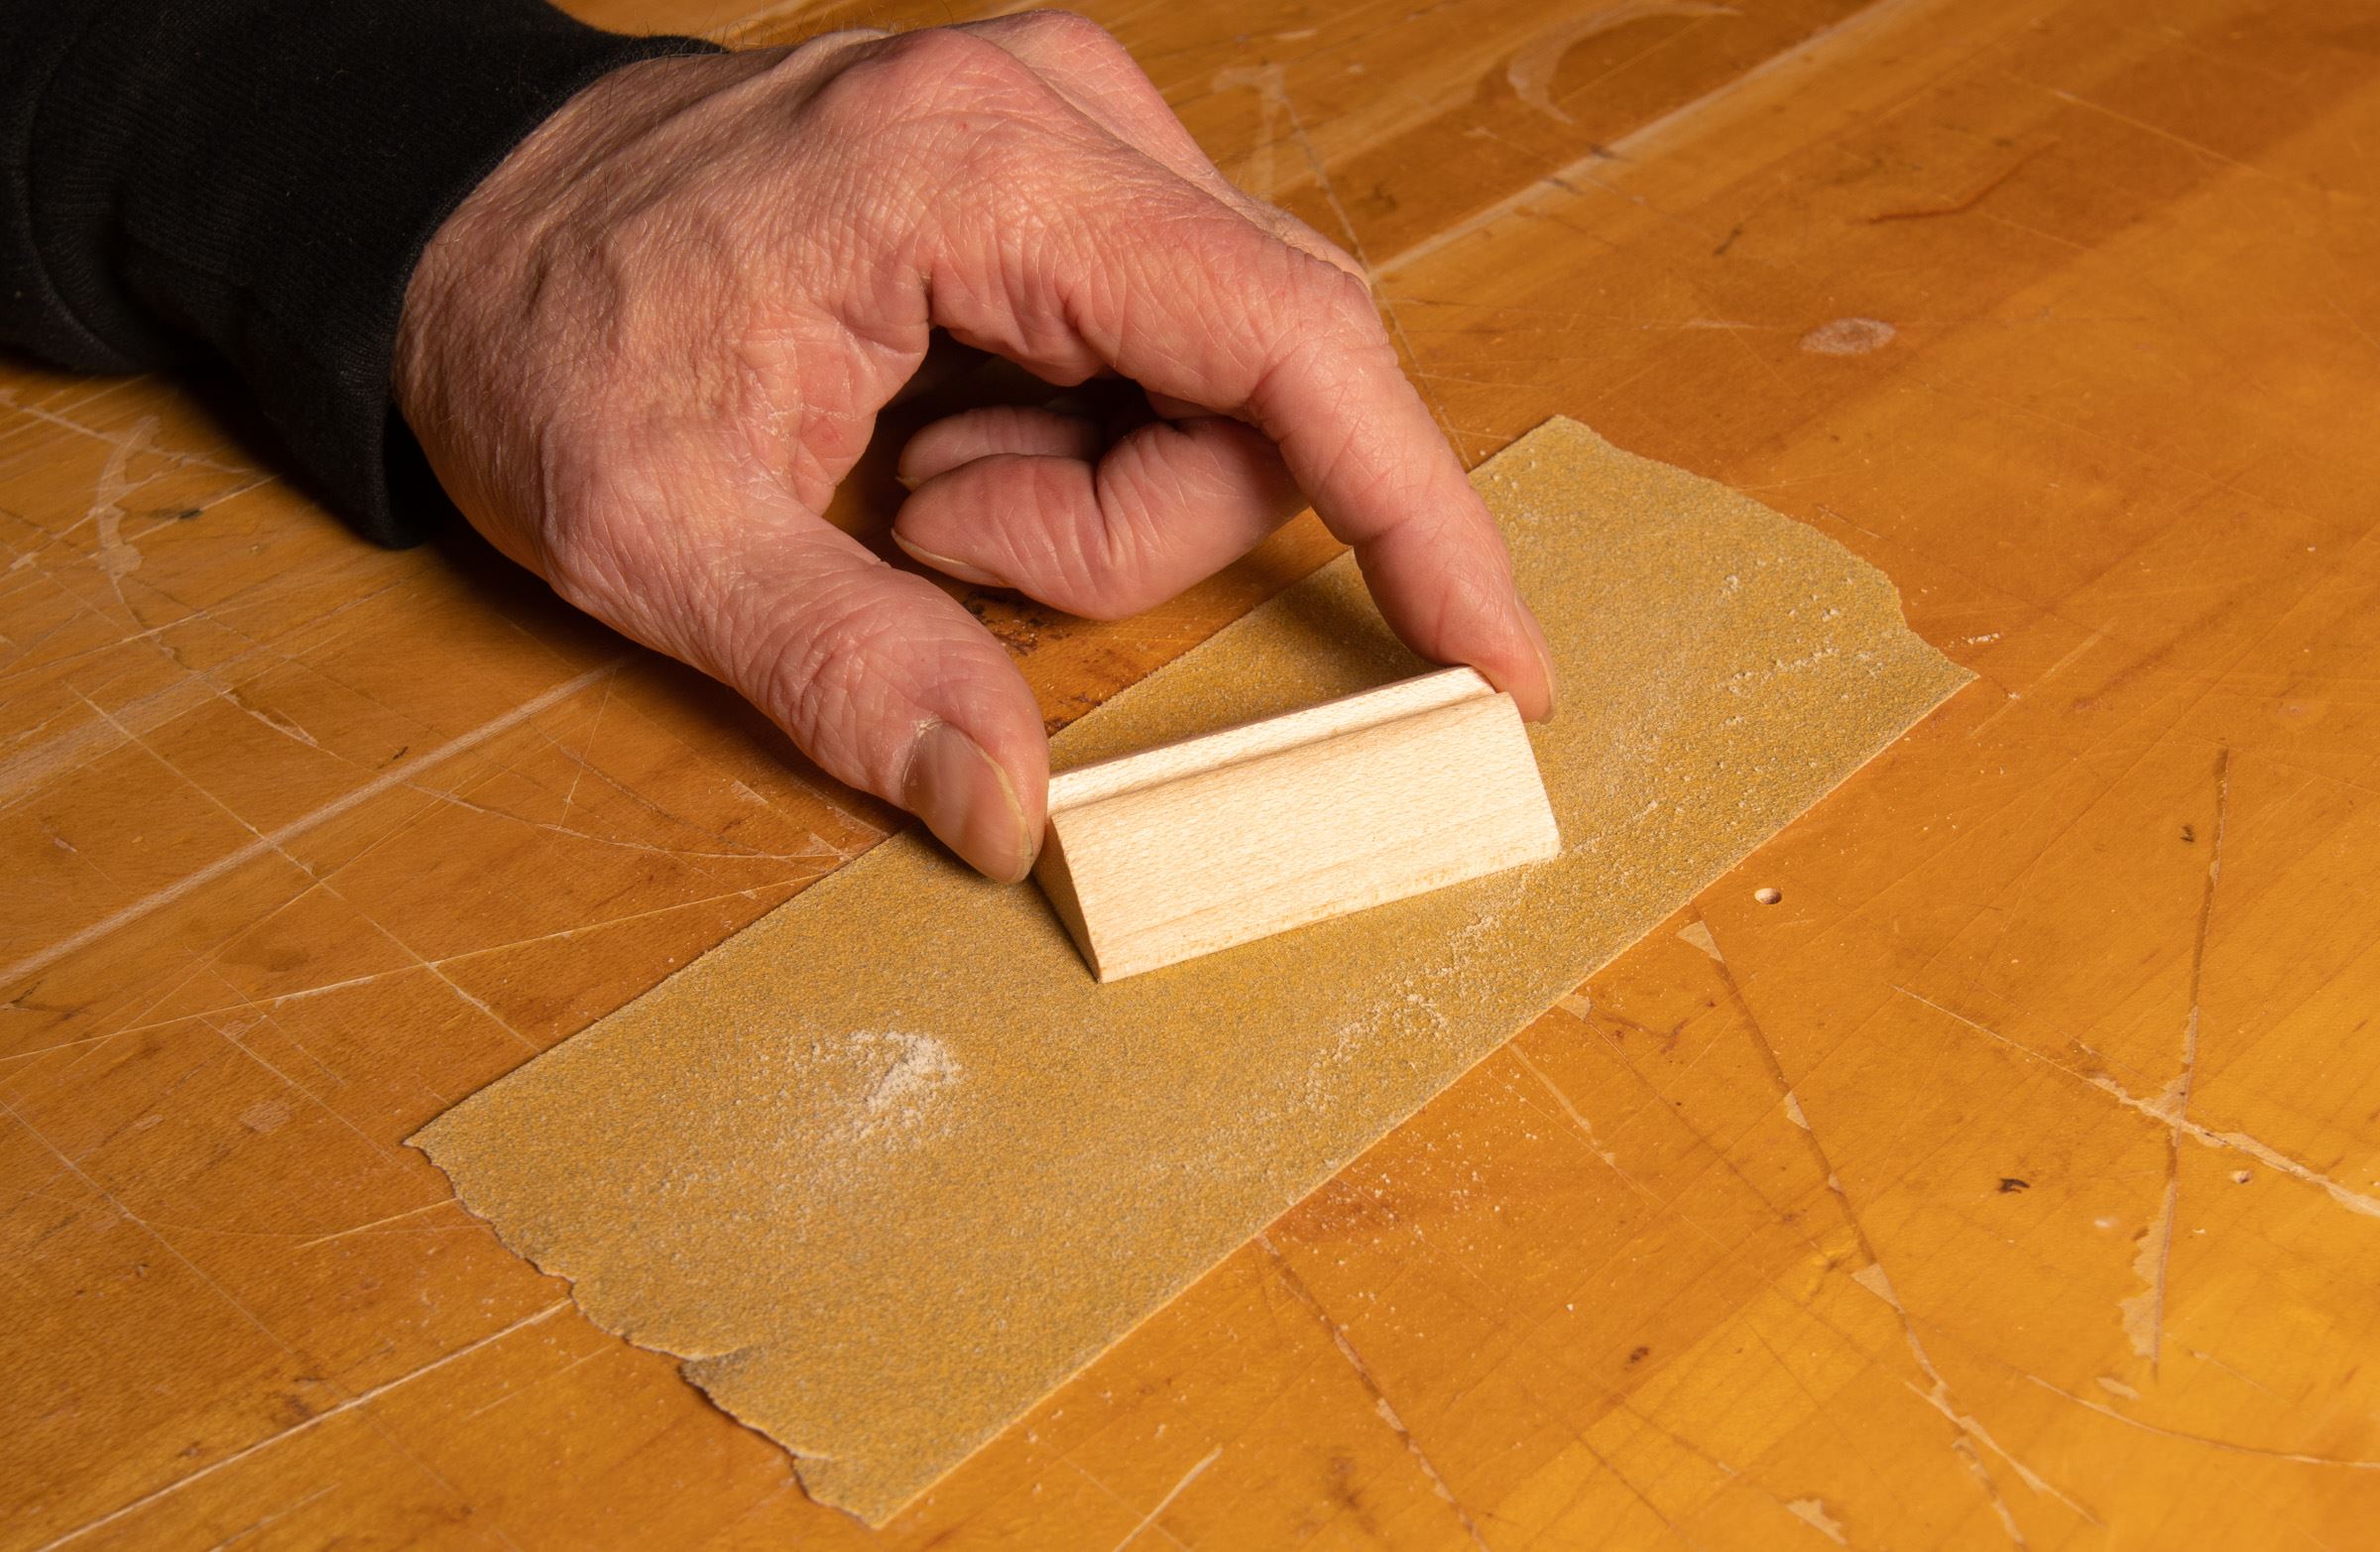
Polish the frets
To remove the file marks, polish the frets using 400-grit sandpaper wrapped around a foam block and run up and down the entire length of the fretboard. Repeat with 600-grit sandpaper. Rounding the edge of the block will make polishing easier. For a higher gloss there are a number of different options such as Scotch-Brite, 3M Polishing Papers or Micro-Mesh pads. When finished, remove the tape.
Building the body
You will be doing a "dry build" where you will drill all the pilot holes and fit all the hardware before finishing. Refer to the "Building Tips" section for helpful information on drilling pilot holes.
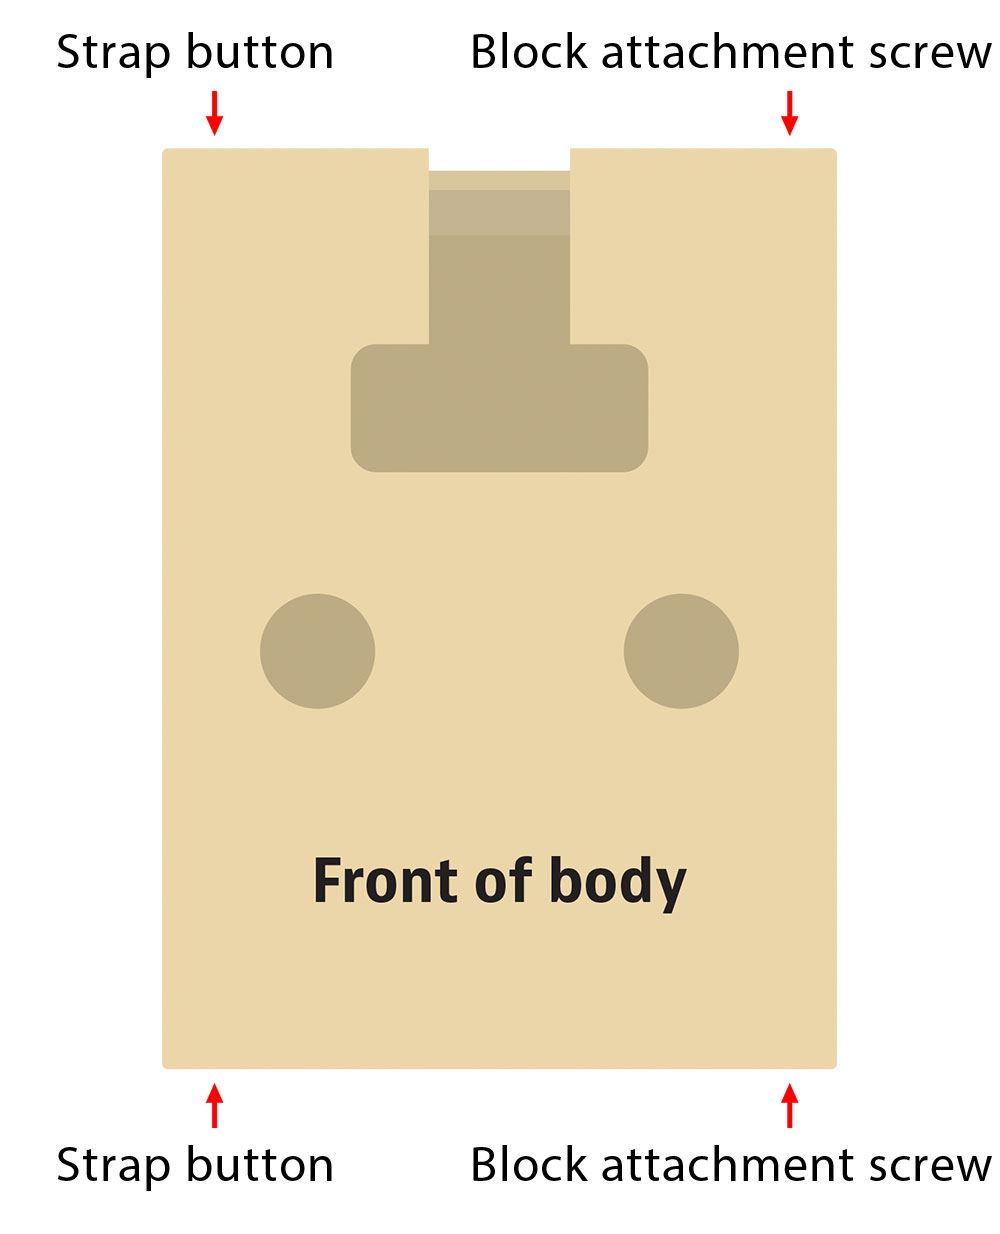
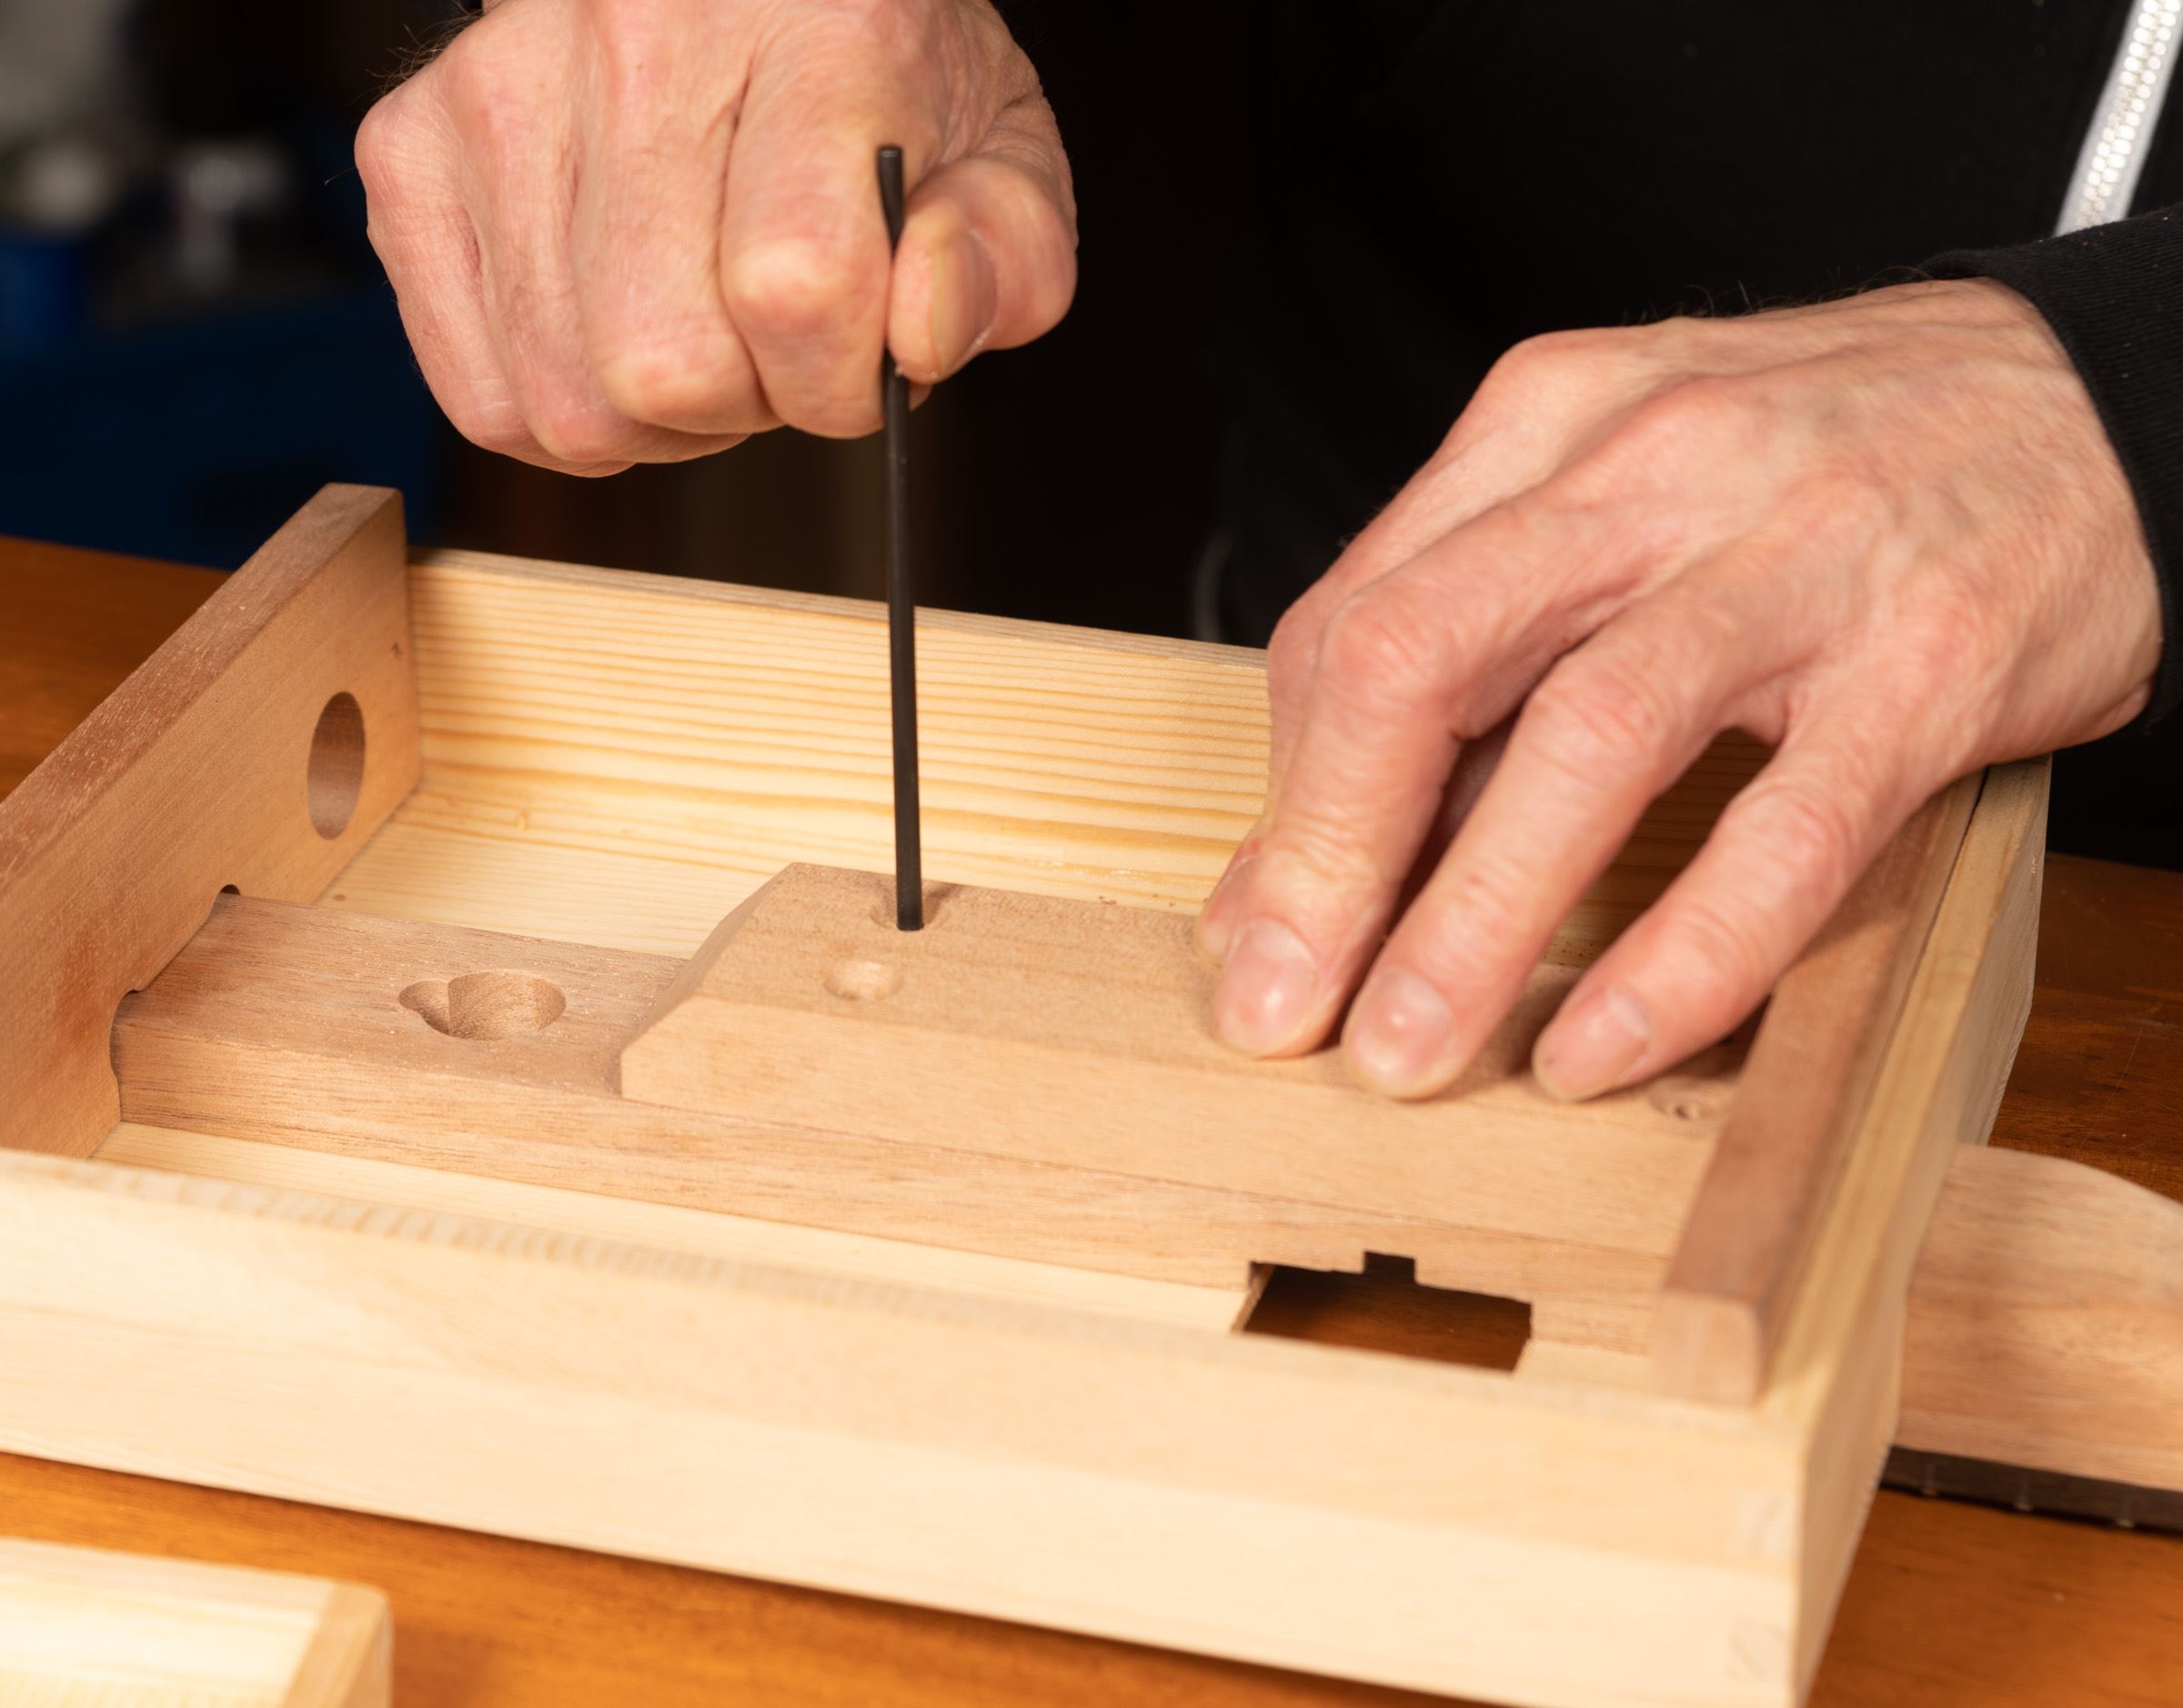
Mark out the block attachment screws
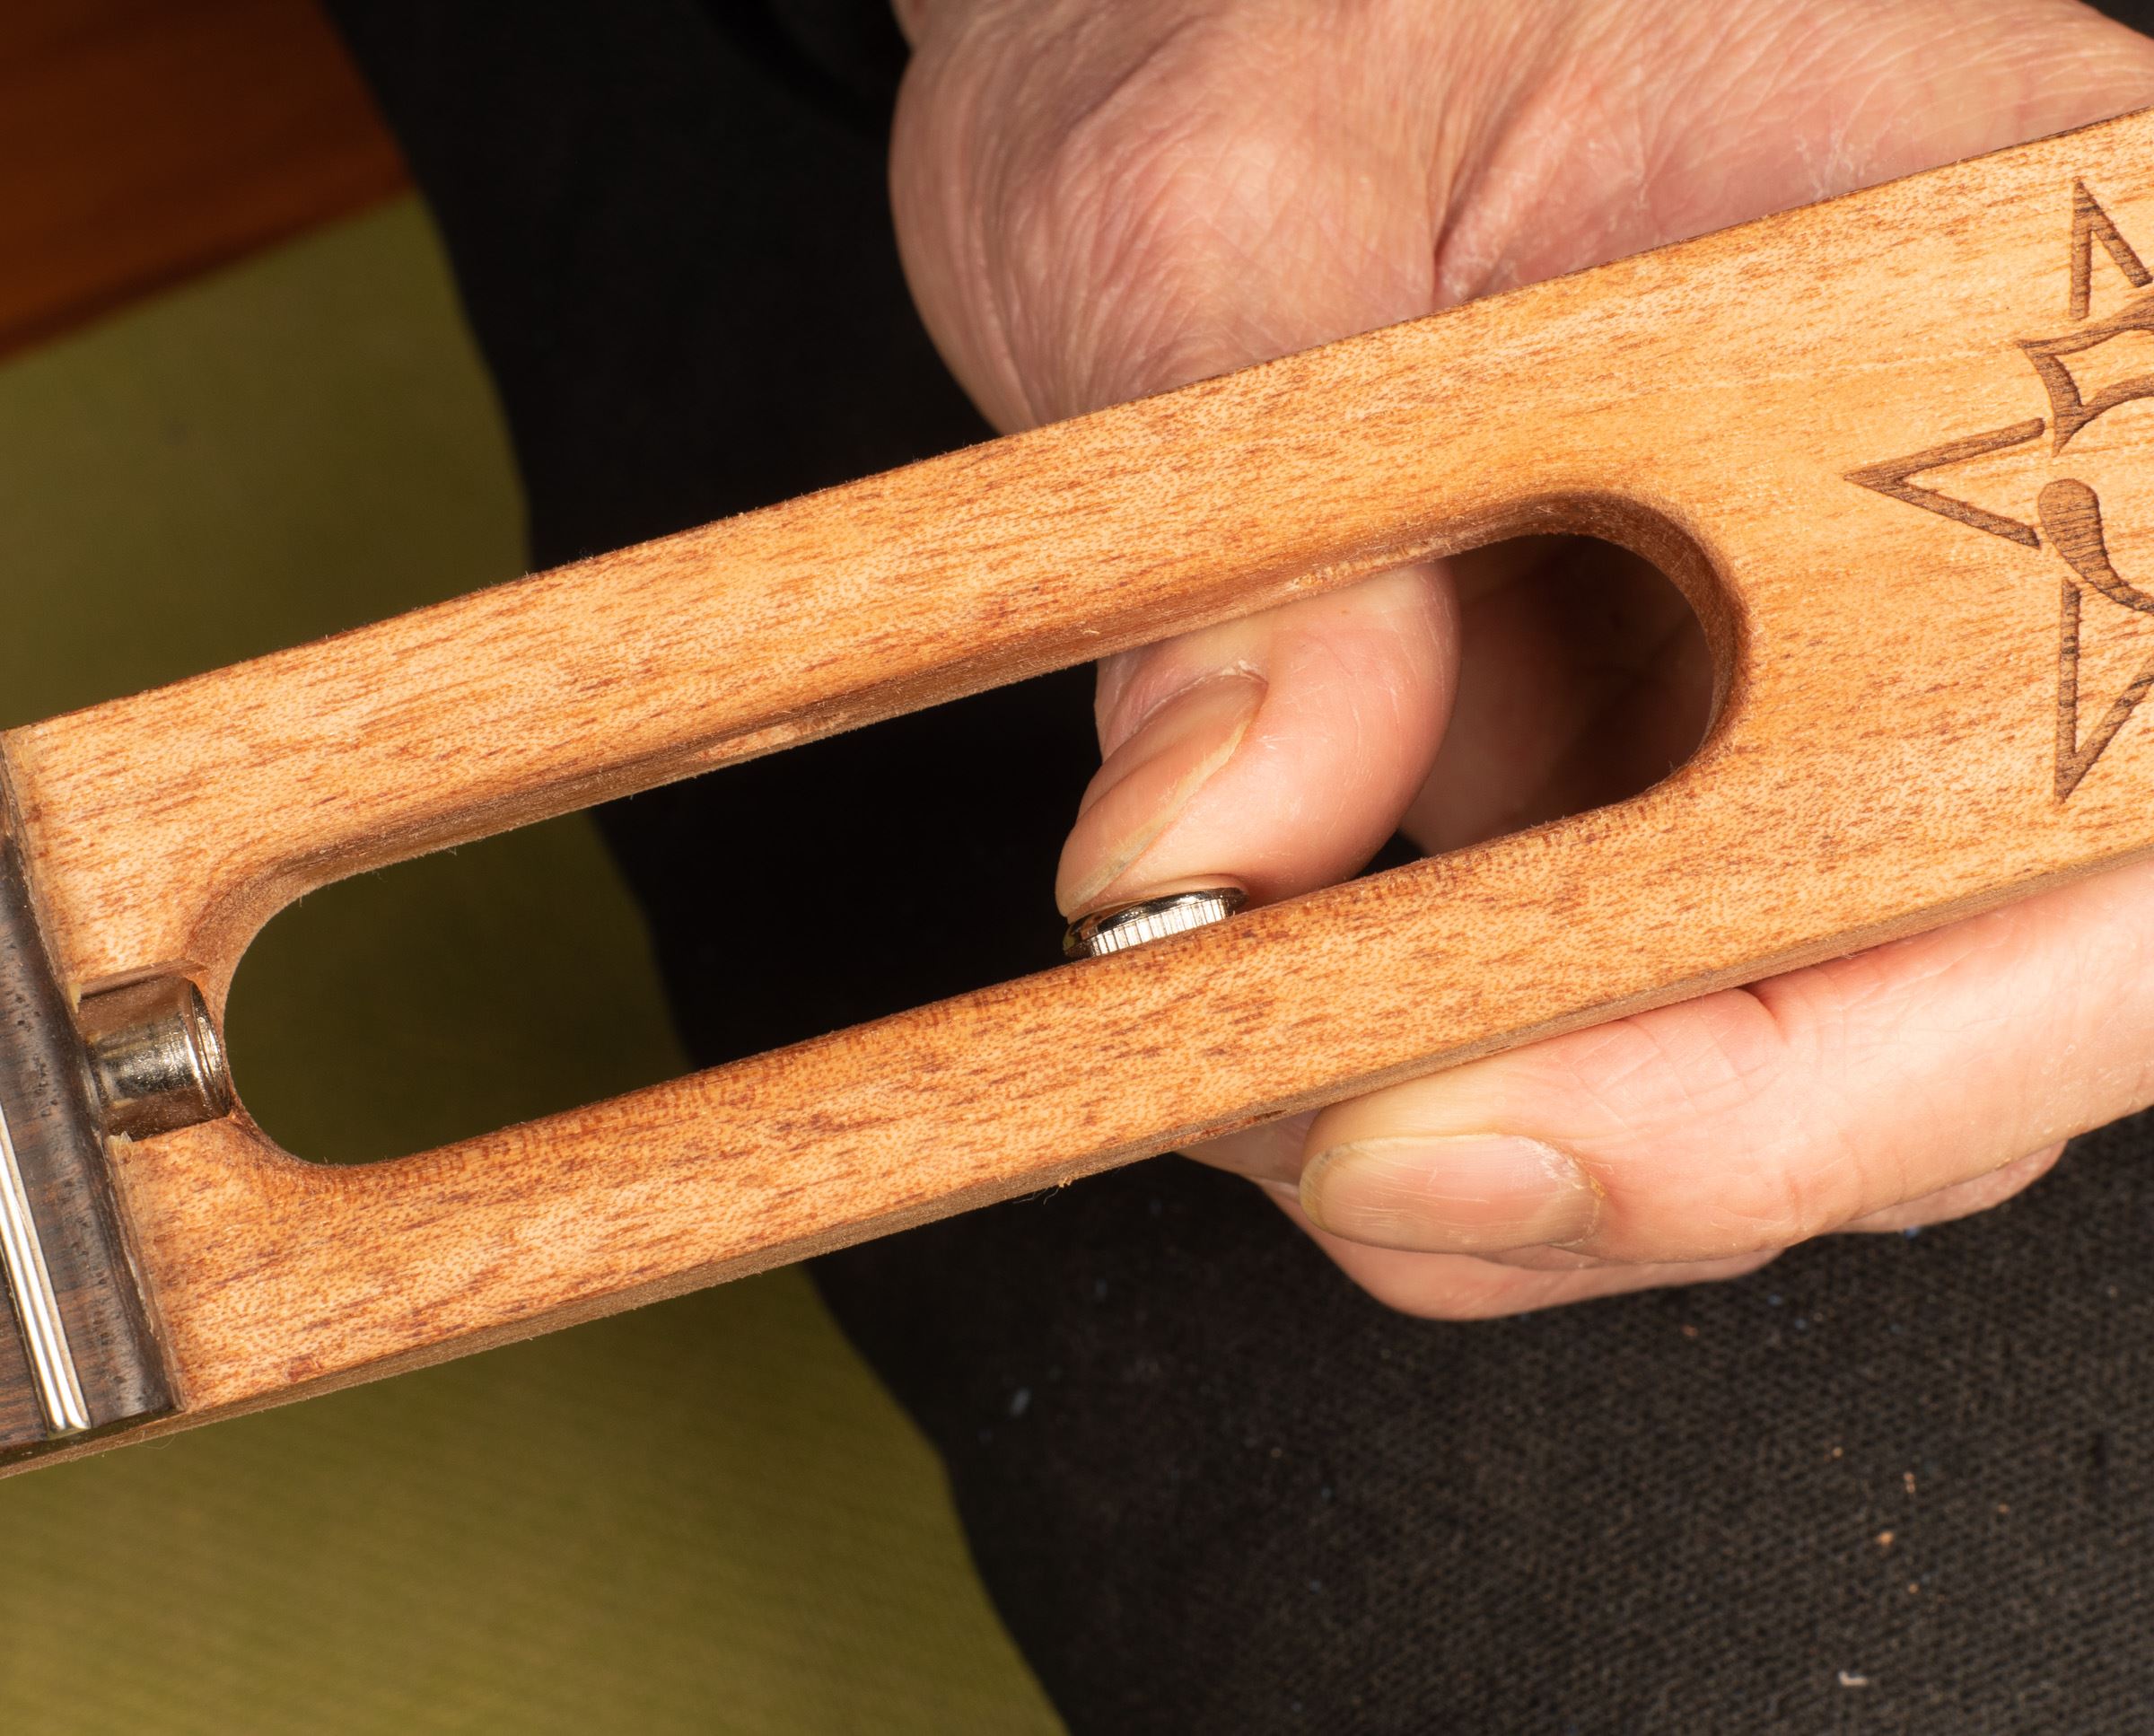
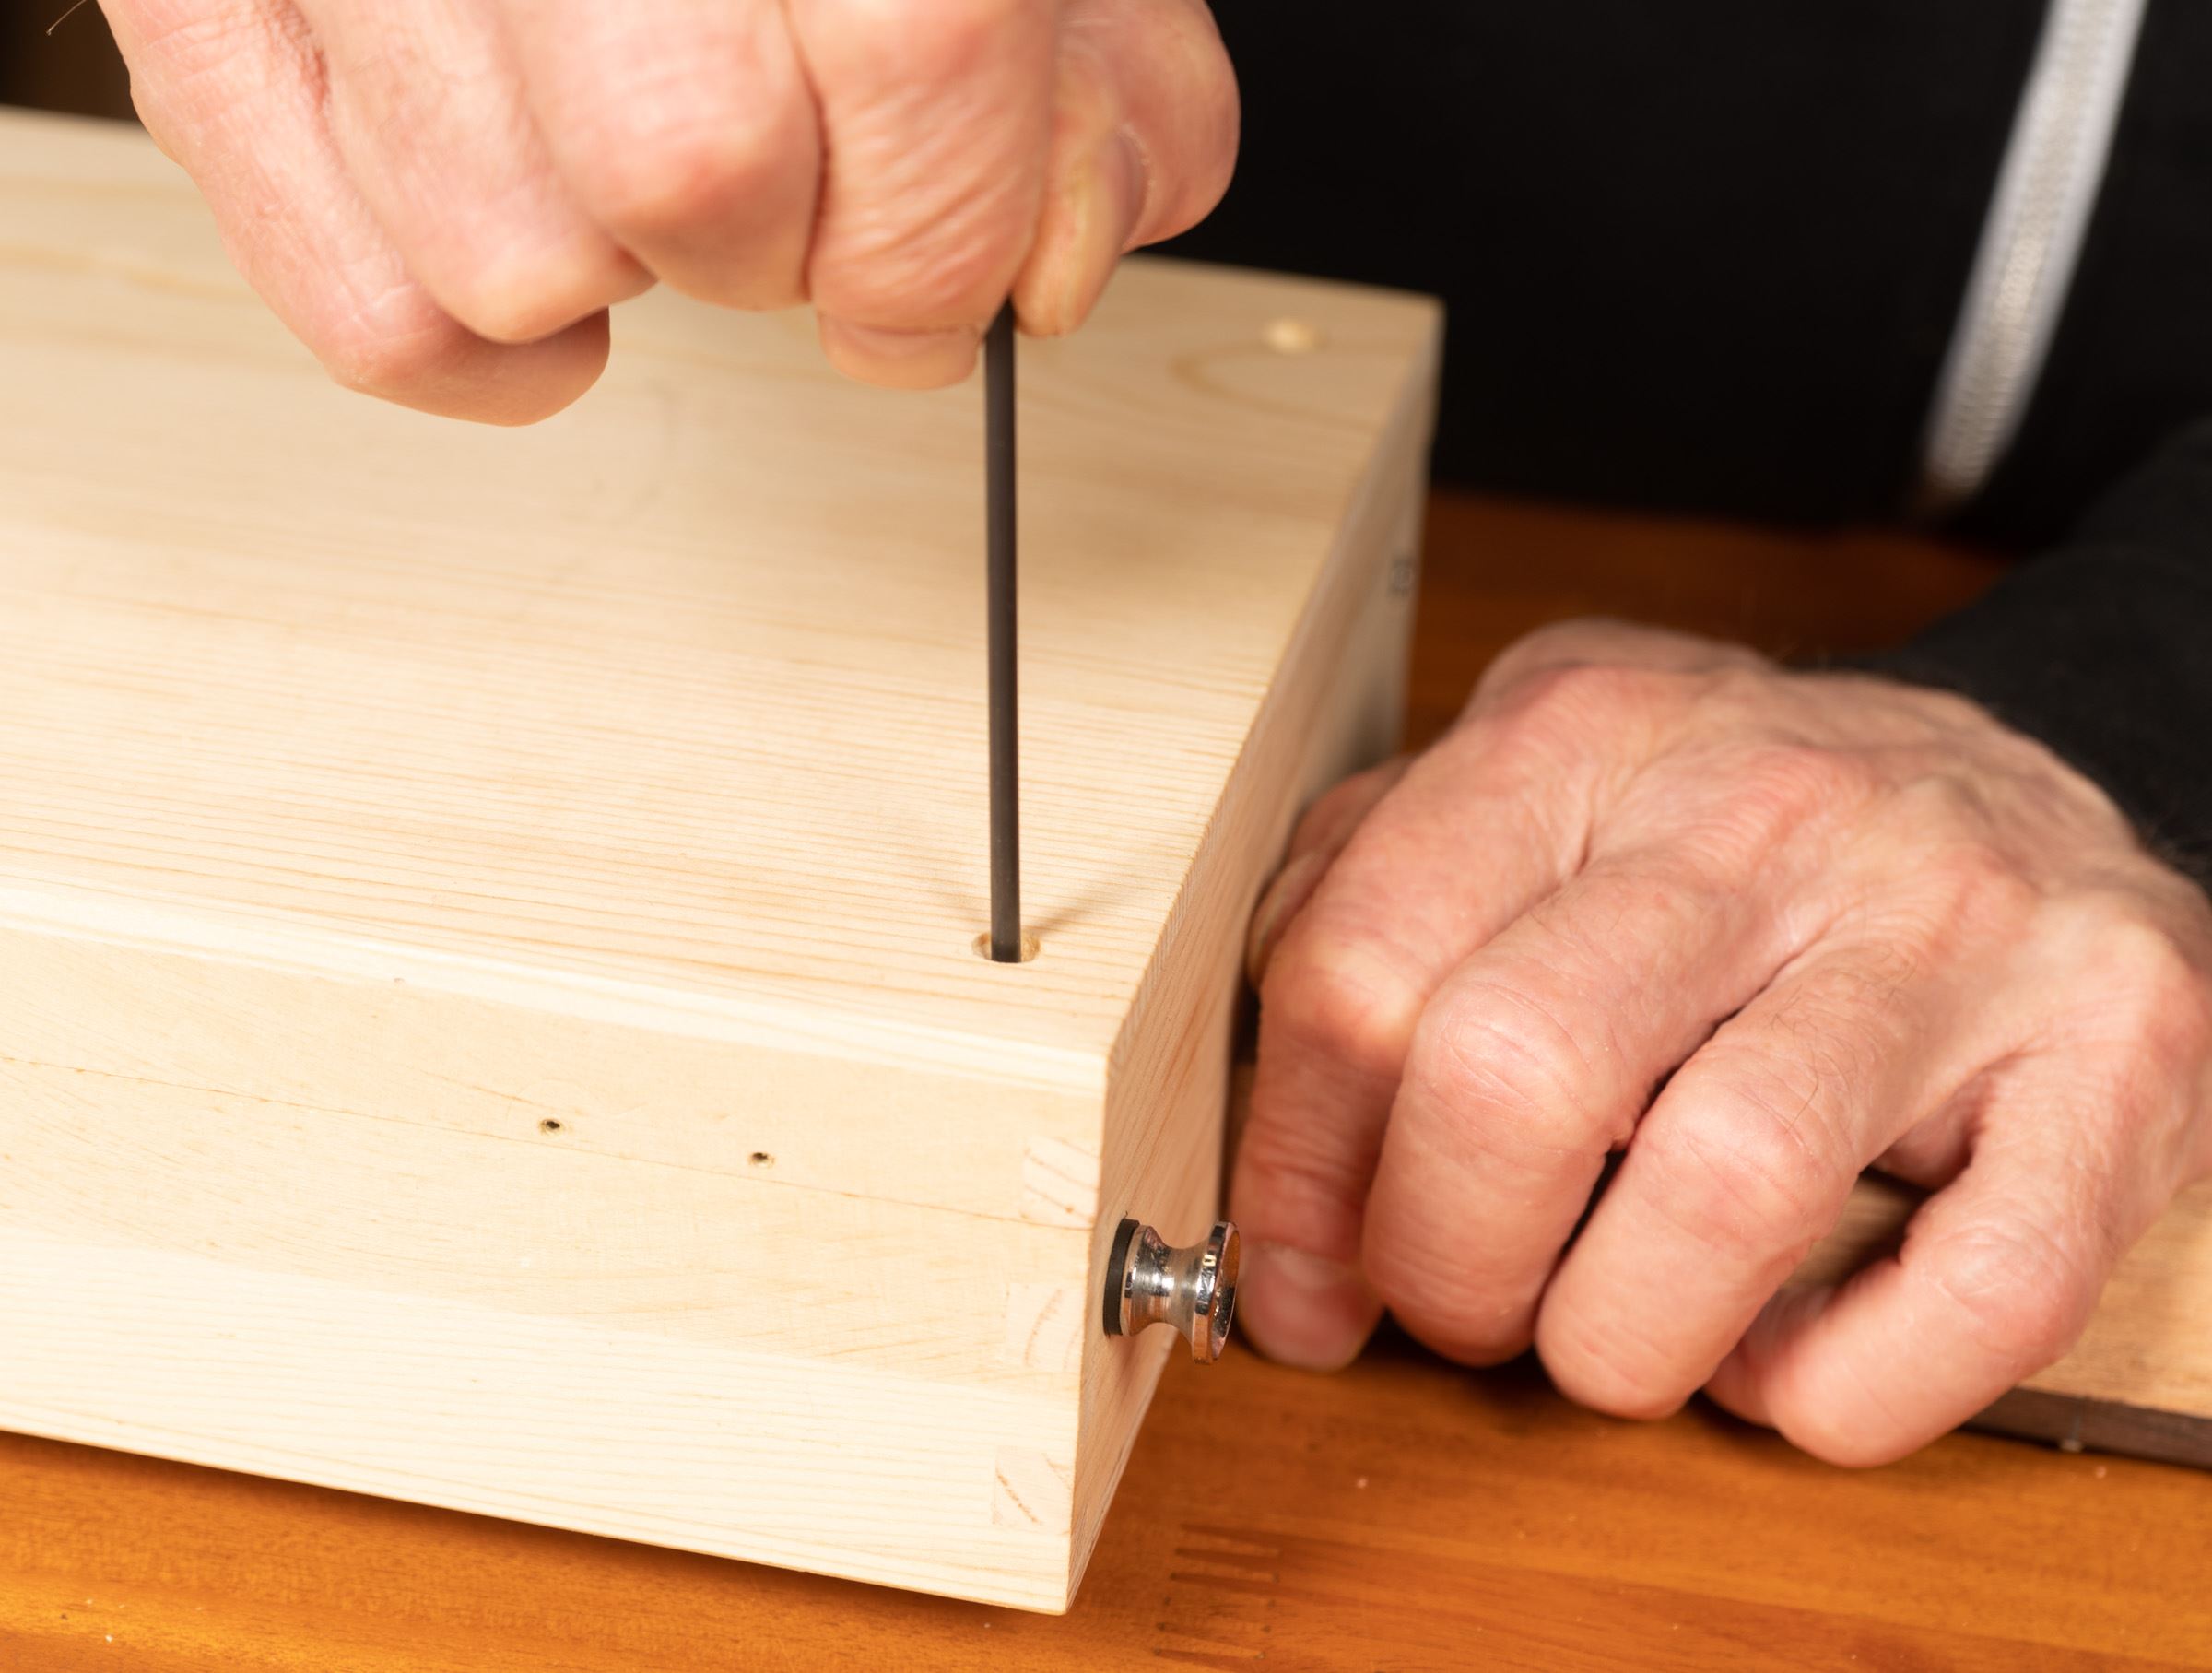
The neck and tail block will be secured to the body with two screws each. Two of these screws will also function as the strap buttons, two are #6 x 1" block attachment screws.
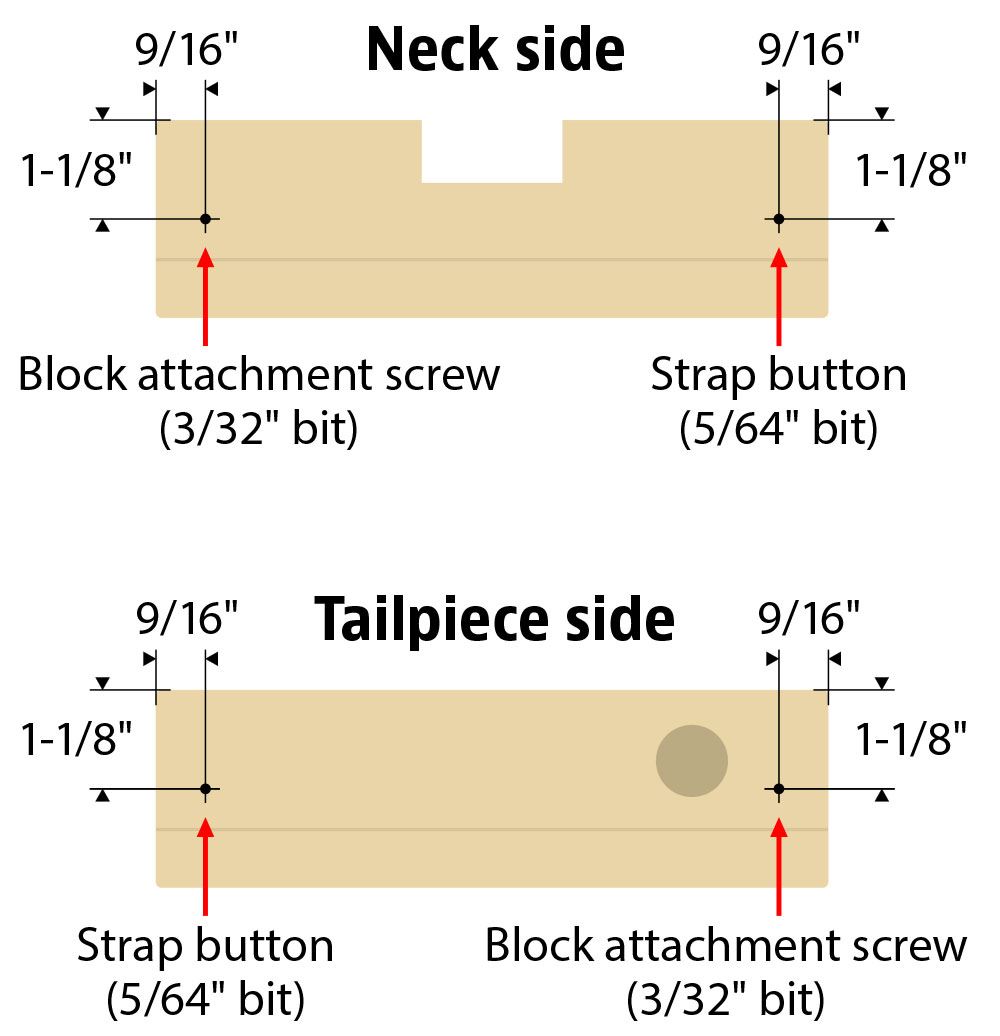
With the back temporarily placed on the body, determine your hole locations, centered approximately 1-1/8" front to back and place them approximately 9/16" from the edge of the body as noted in the diagram.
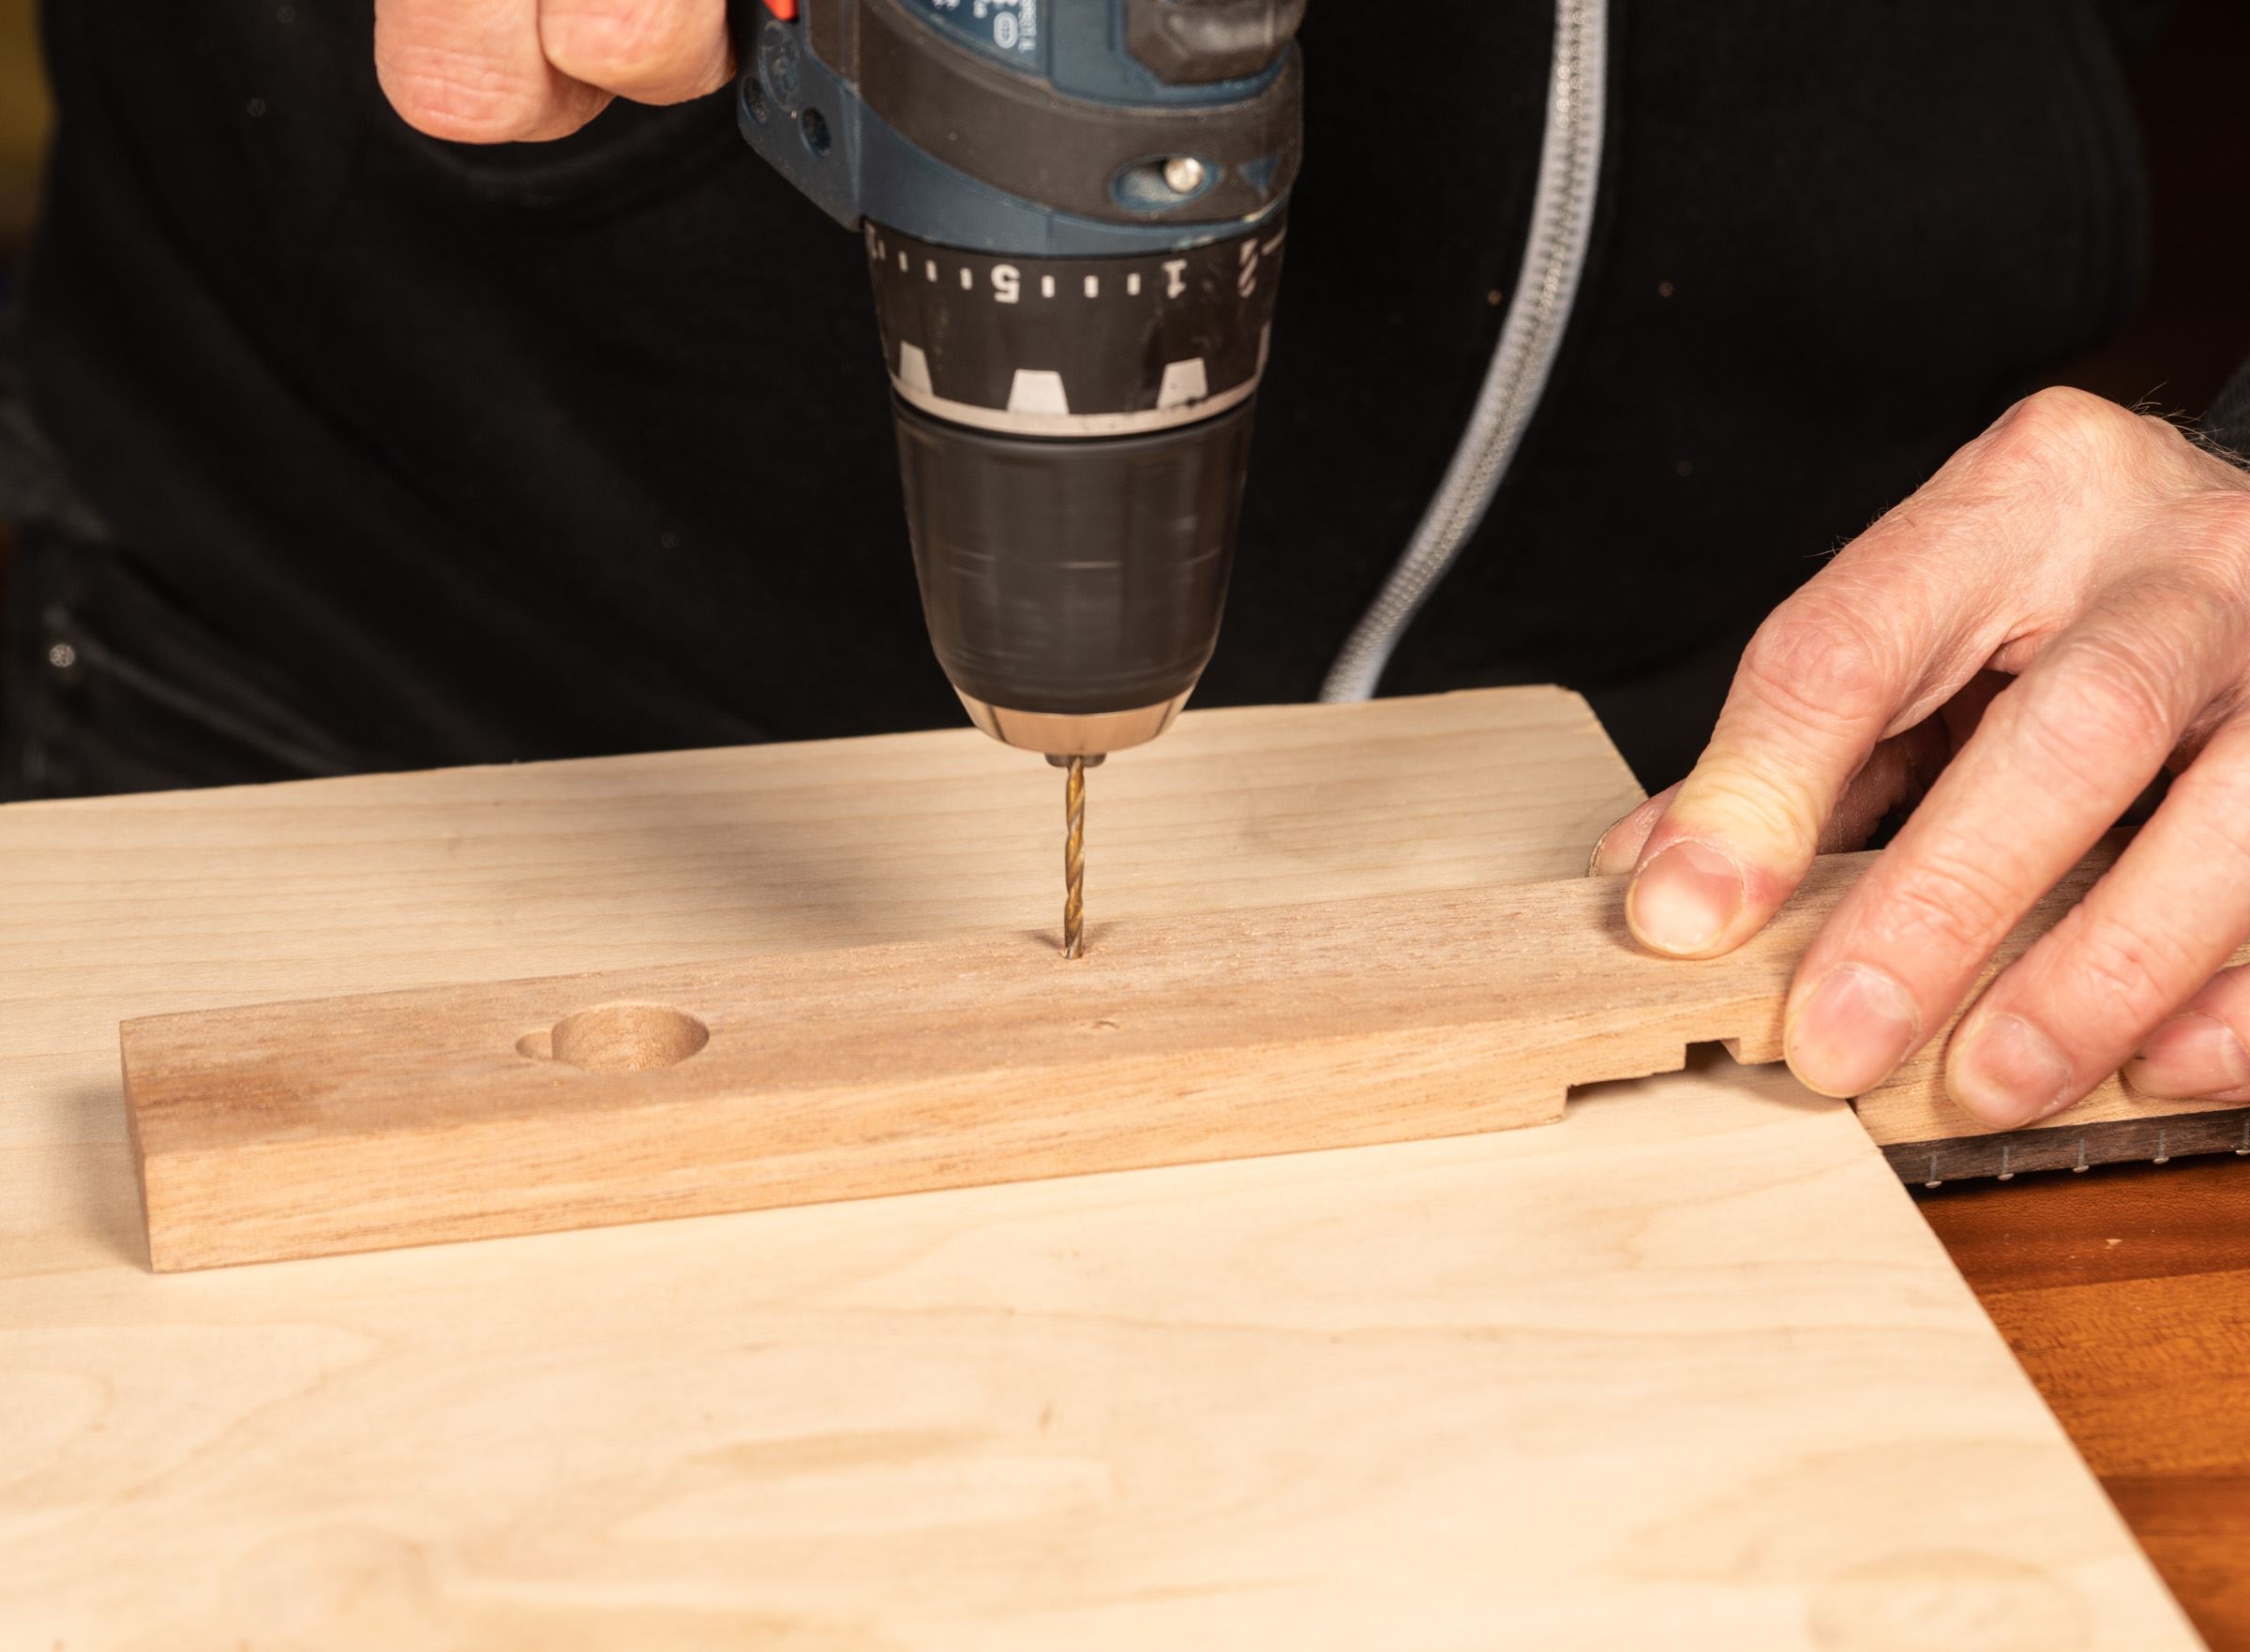
Install the tail and neck block
Align the neck and tail blocks inside the body. The tail block already has the jack hole drilled in it. Make sure to align that hole to the hole in the body. Also make sure to align the neck pocket in the body with the neck pocket in the neck block. If the neck block is out of alignment it will make installing the neck difficult. Use tape to secure the blocks in place while drilling.
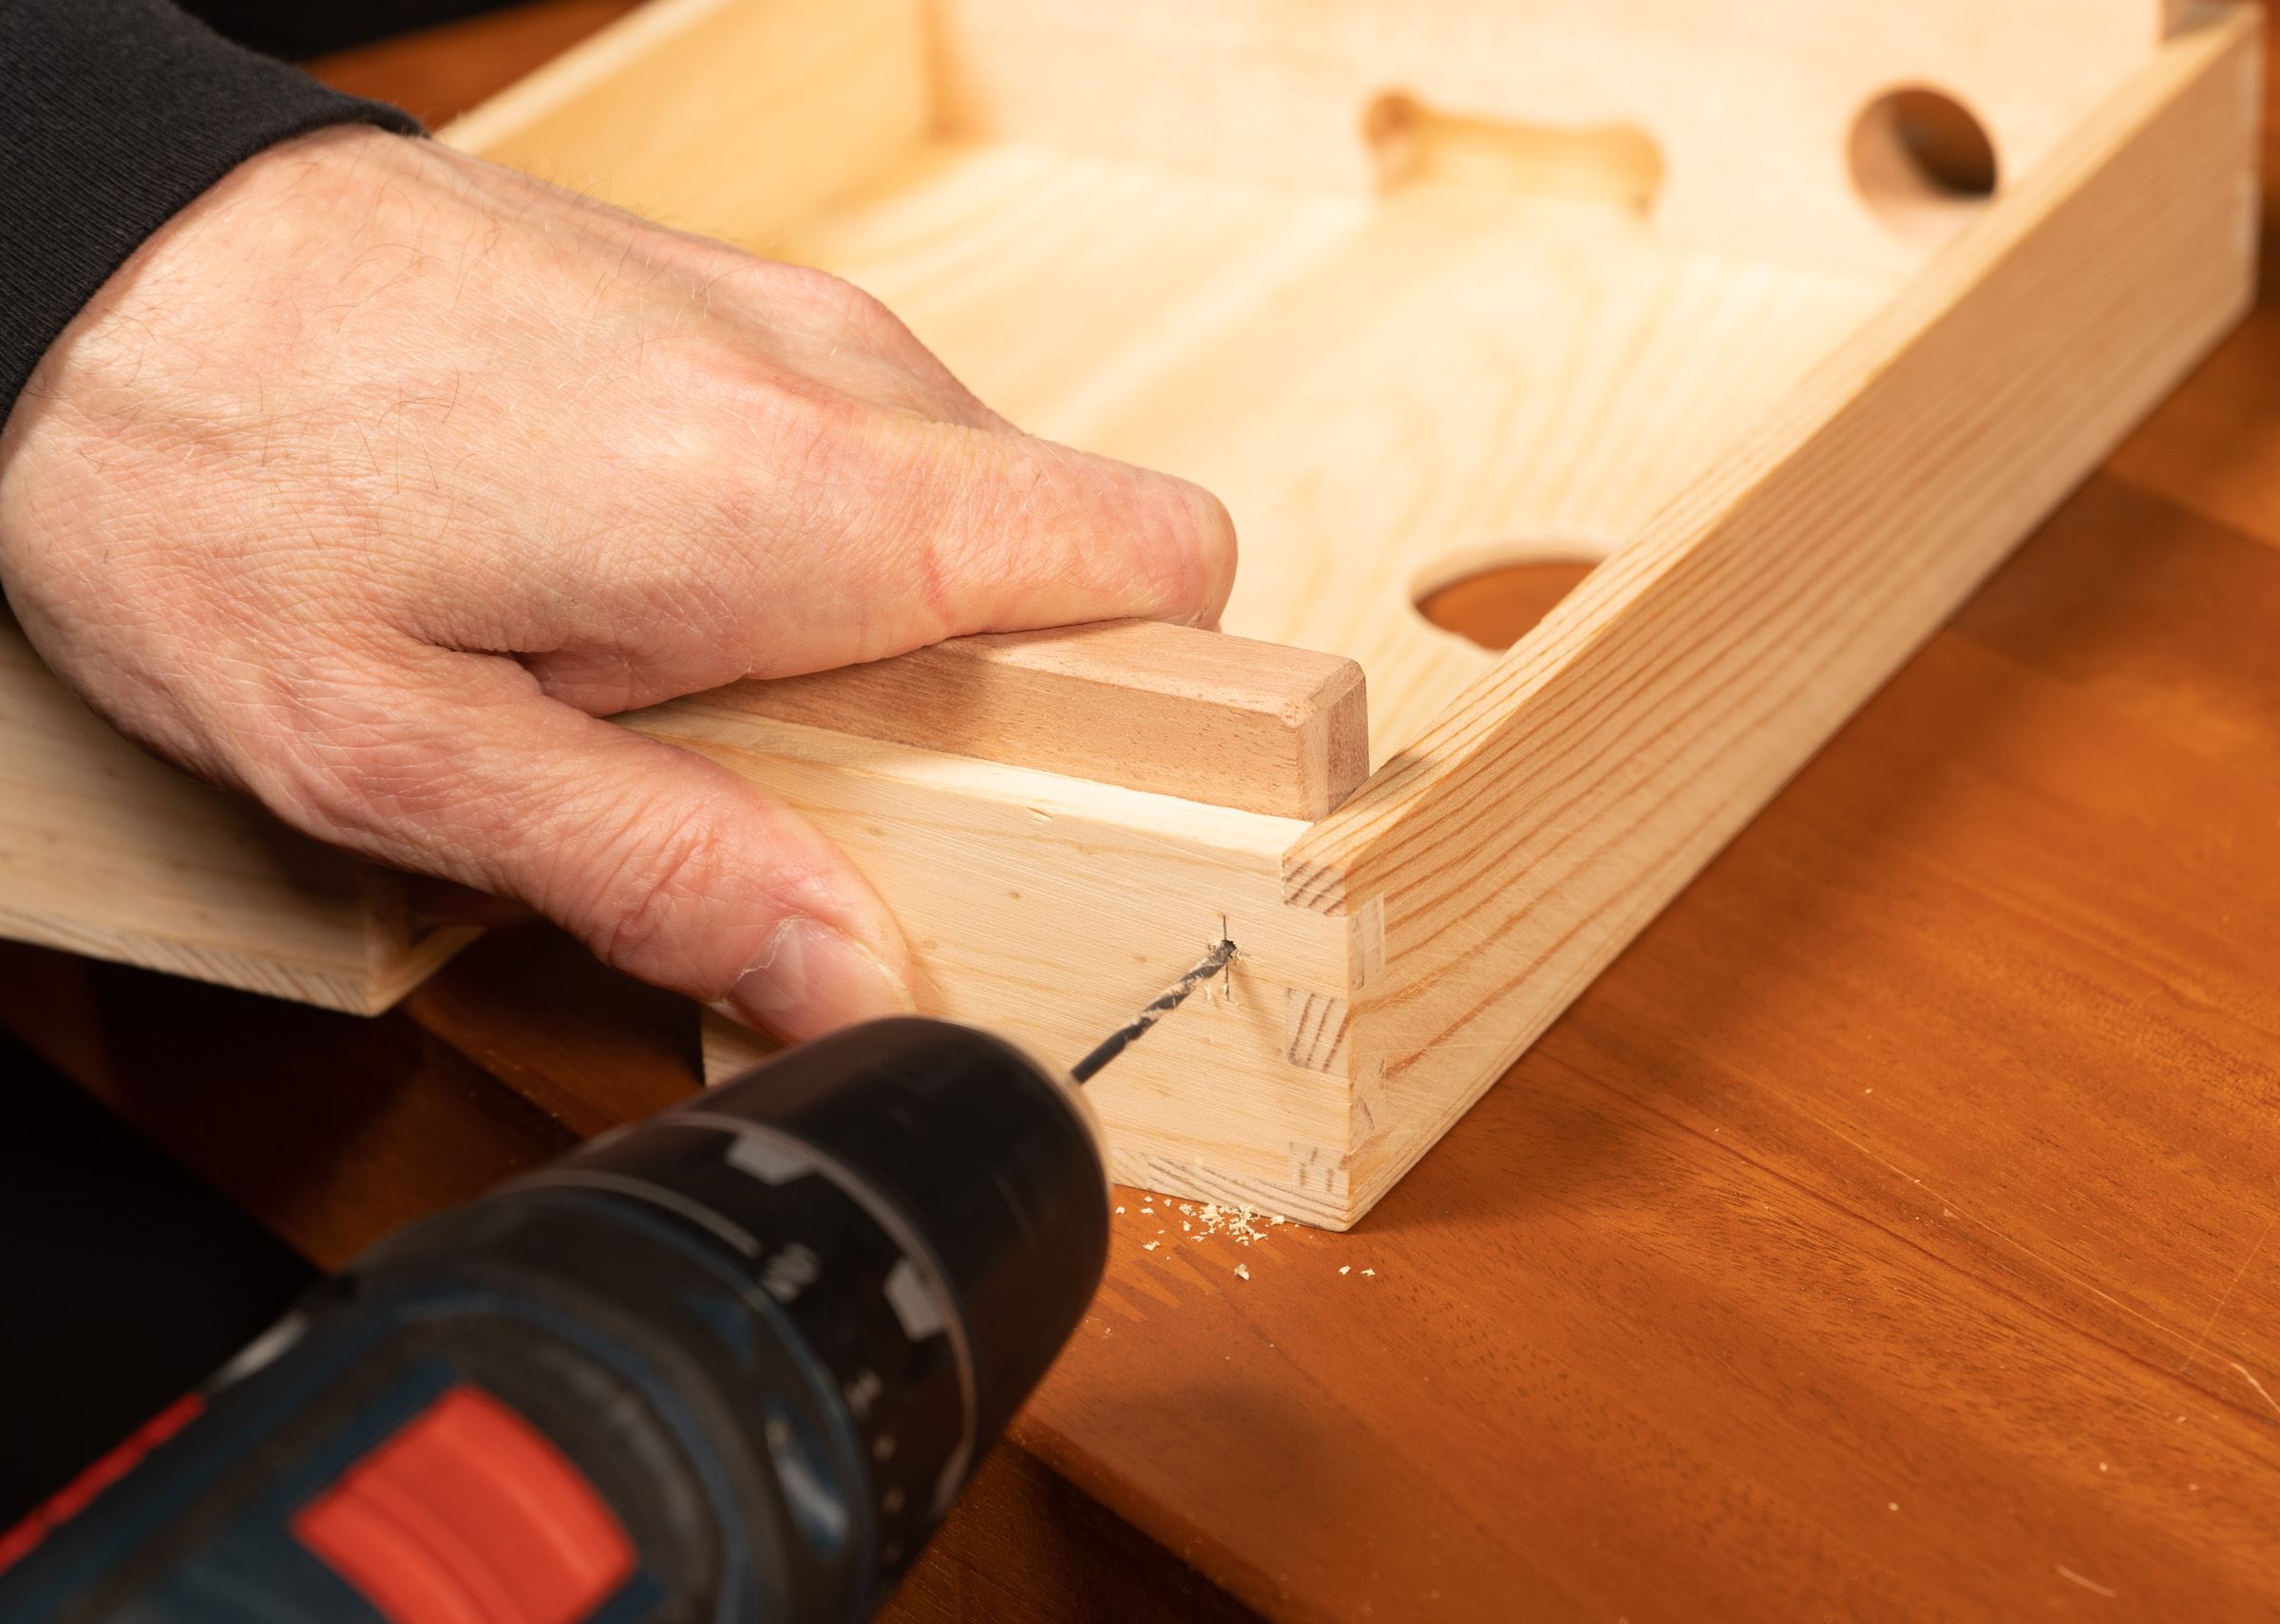
Drill all four marked-out pilot-hole locations through the body and neck and tail block. For the strap button holes use a 5/64" drill bit, for the block attachment screws use a 3/32" drill bit.
|
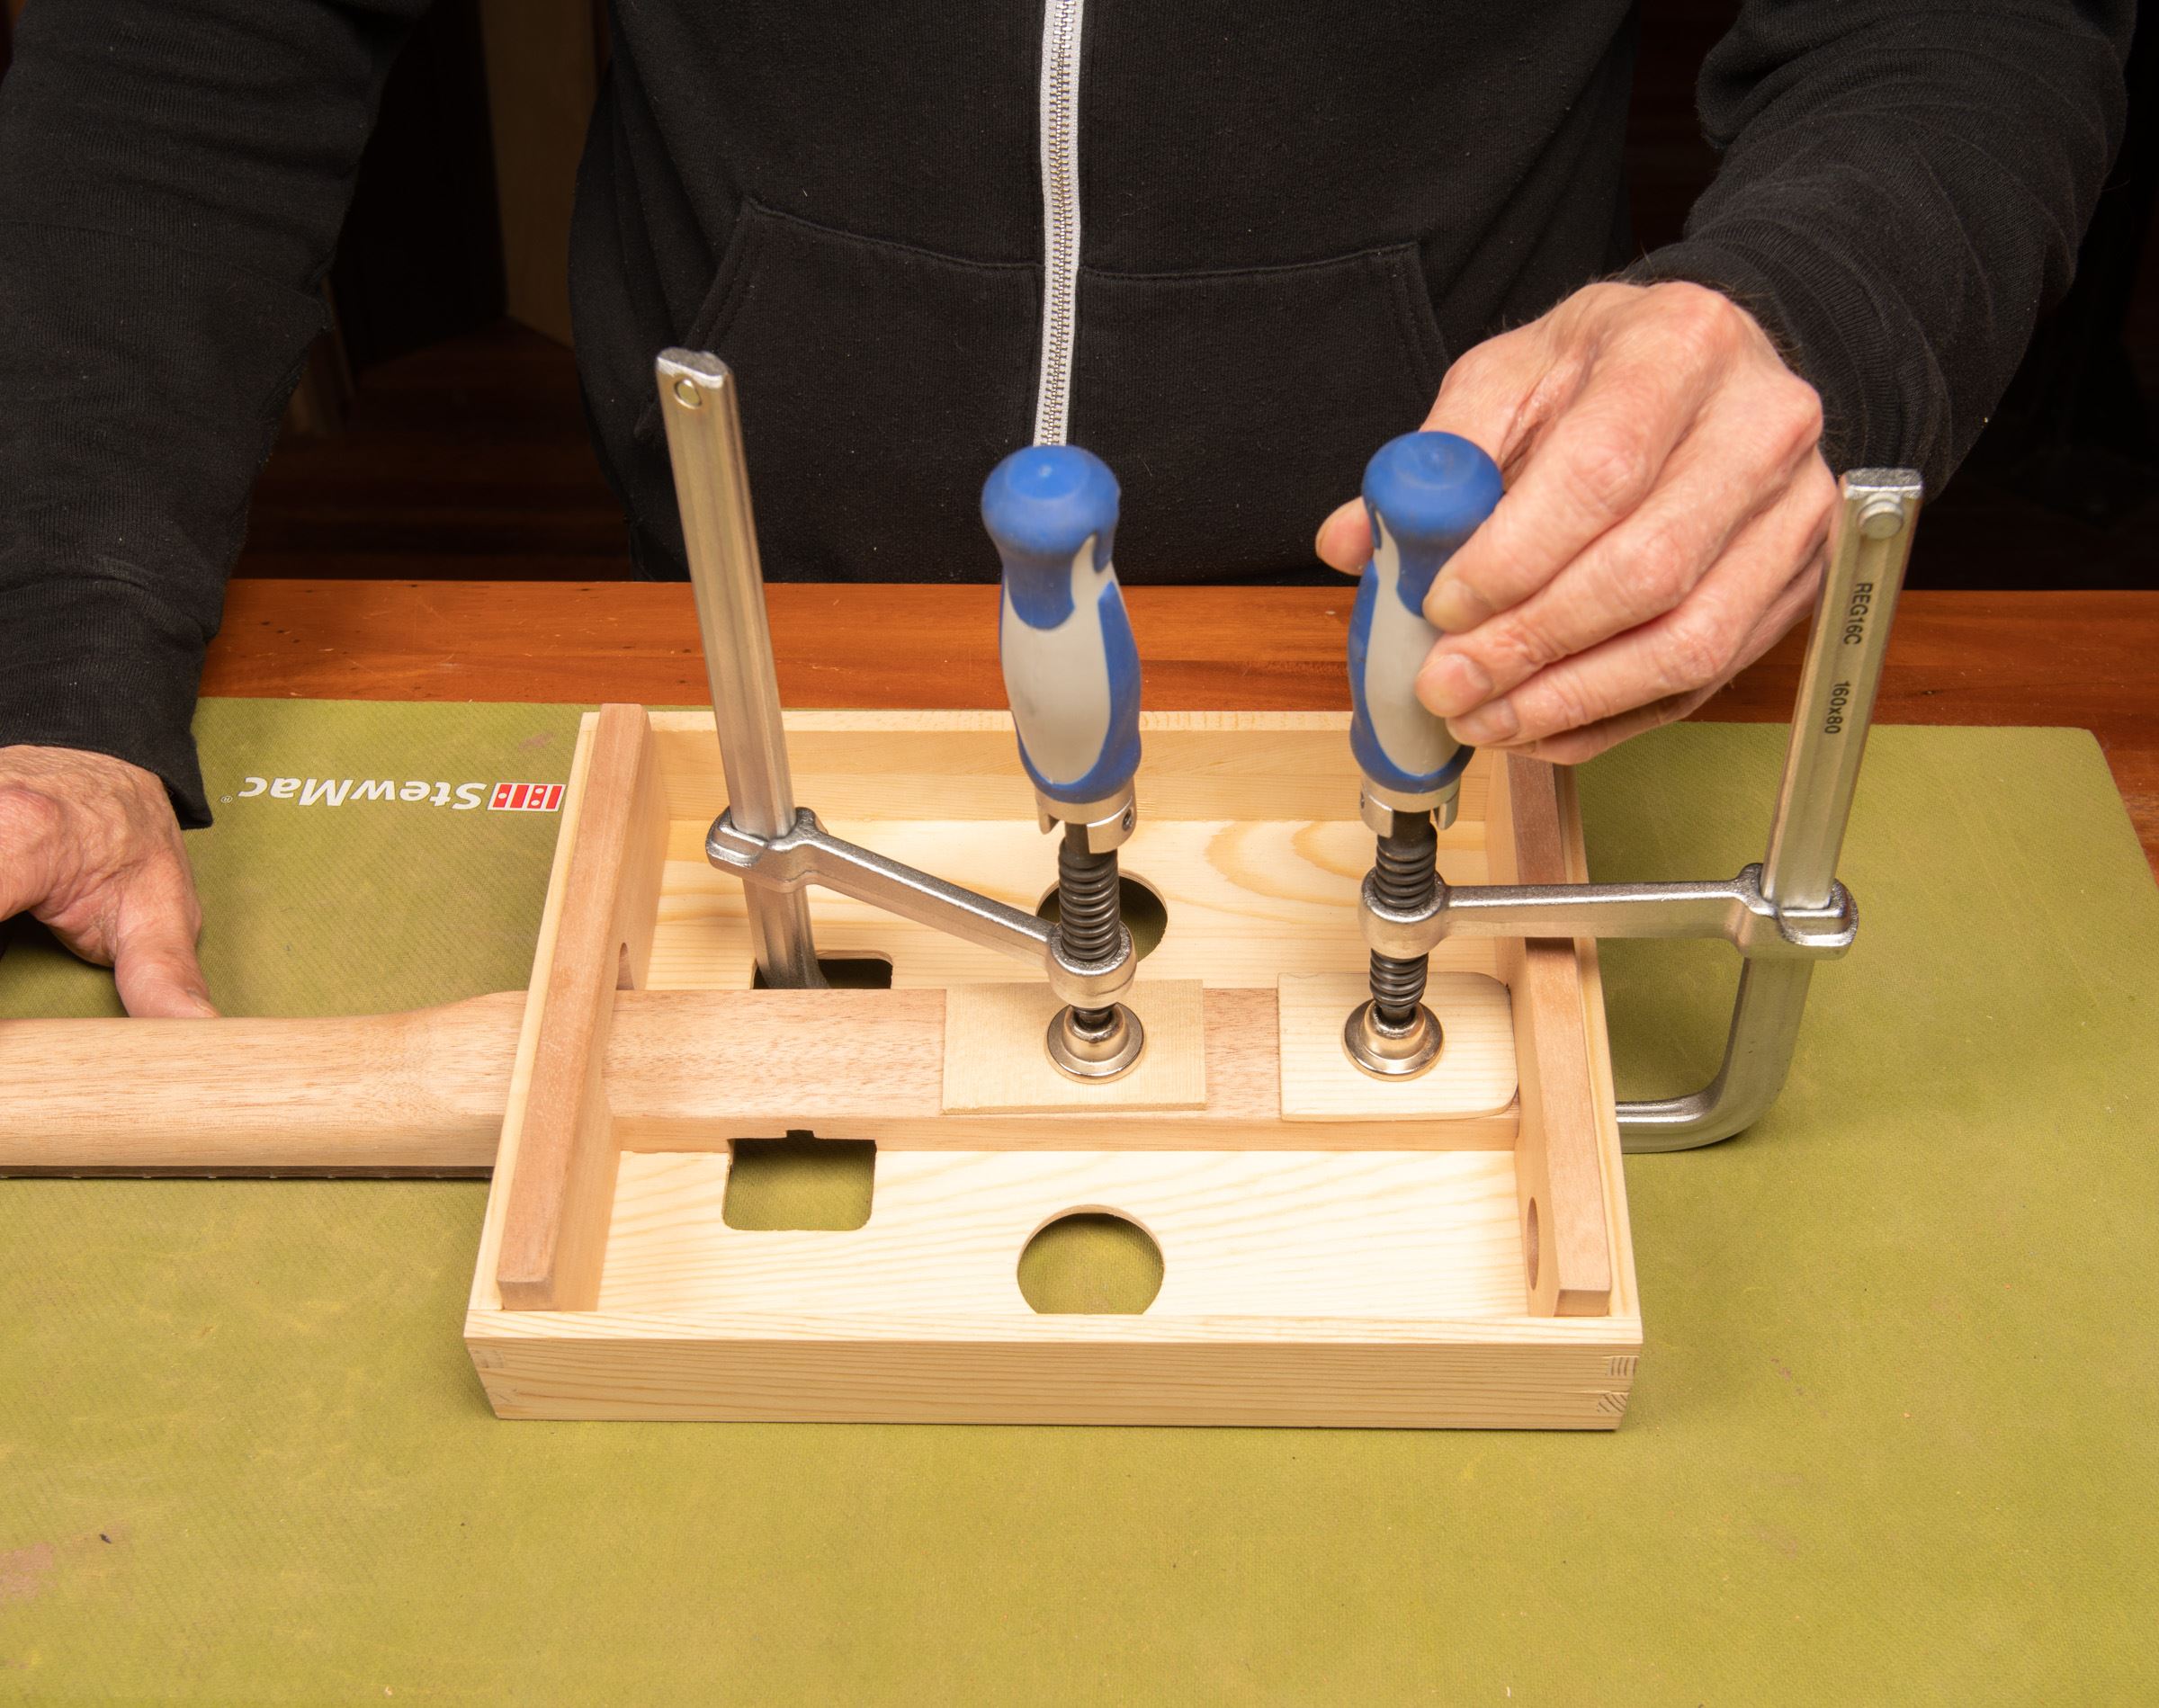
Option: You can also glue in the blocks and neck to the body like a set neck or acoustic guitar. Gluing will make a more solid connection, but will require more tools and time. If you will be using glue, you must paint the body and neck before building the body, they can't be disassembled after gluing. To glue the blocks in, add a thin layer of glue to each block, and clamp them in the body in the locations described above. Use a padded clamp or scrap wood cauls on both sides of the clamp jaws to prevent them from denting the wood.
|

After drilling the pilot holes, first install the strap buttons, washers, and included screws using a #2 screwdriver.
Then, for the remaining two block attachment screws, use a 1/4" countersink bit and countersink the remaining two hole locations. Countersinking allows the head of screw clearance when tightened down without splitting the wood. Install the screws using a #2 screwdriver.
Fit the neck
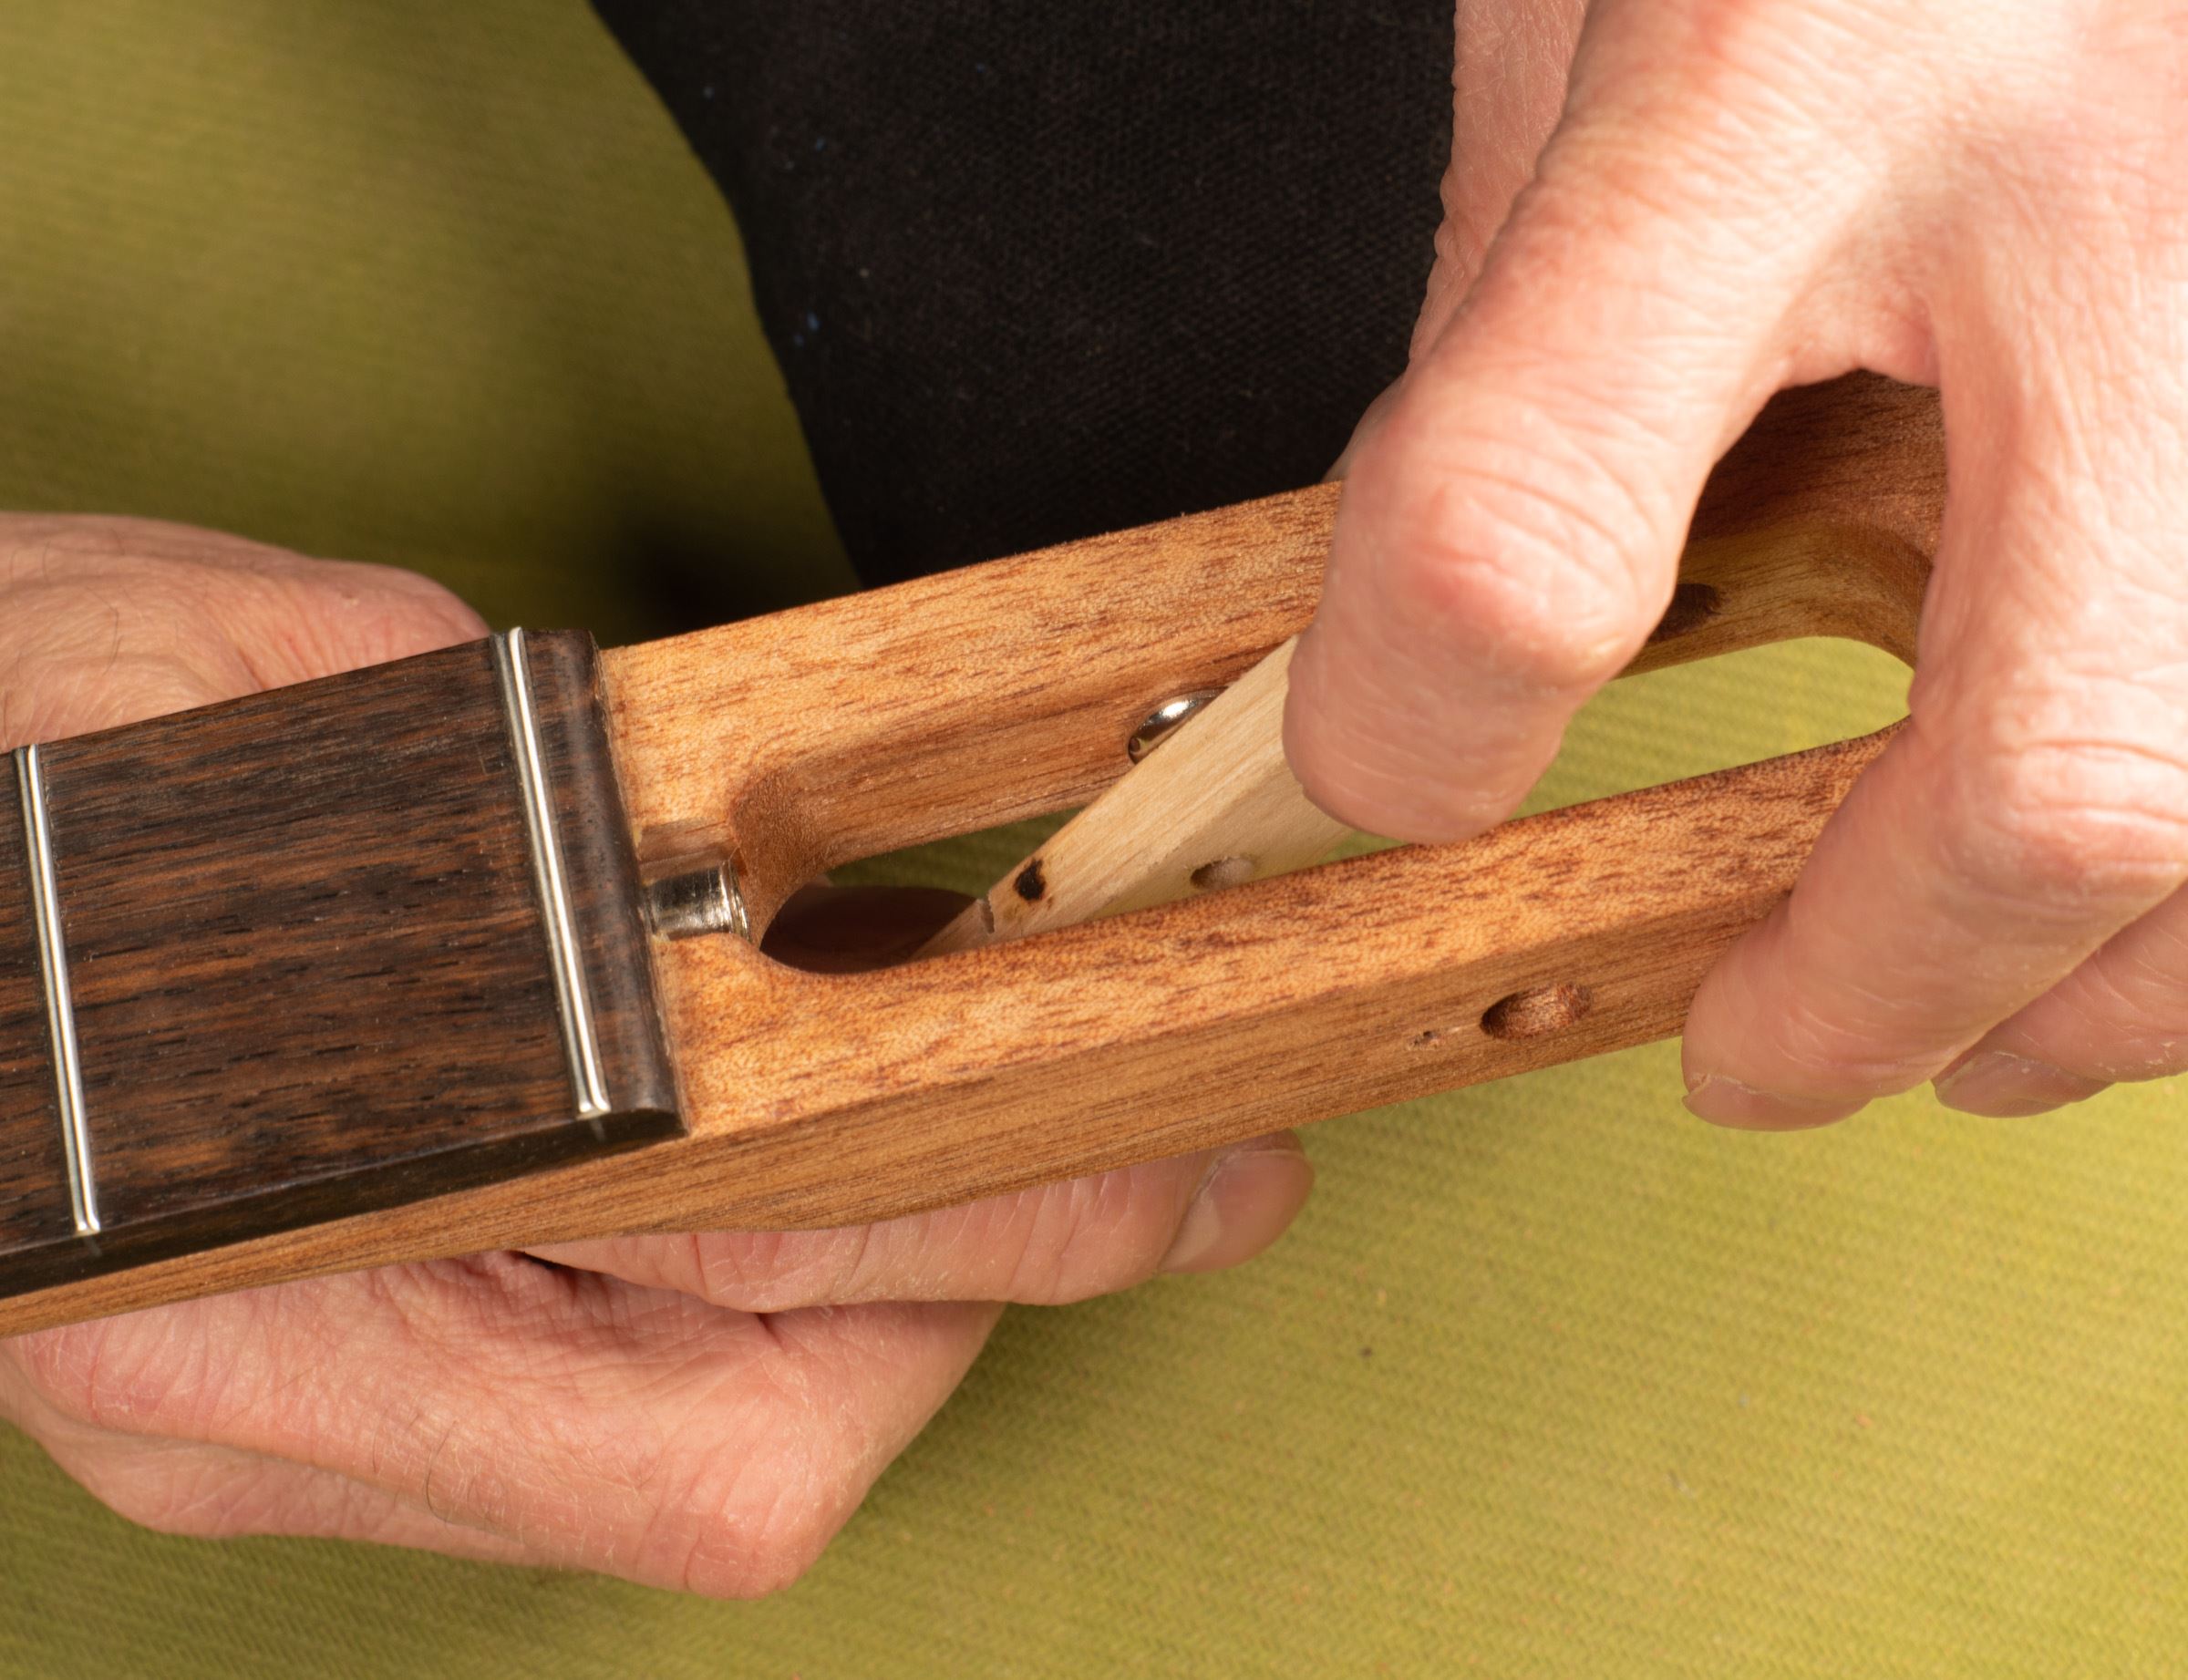
Insert the neck into the body, face down. Seat it flat against the underside of the top and through neck pocket all the way to the pocket in the tail block.
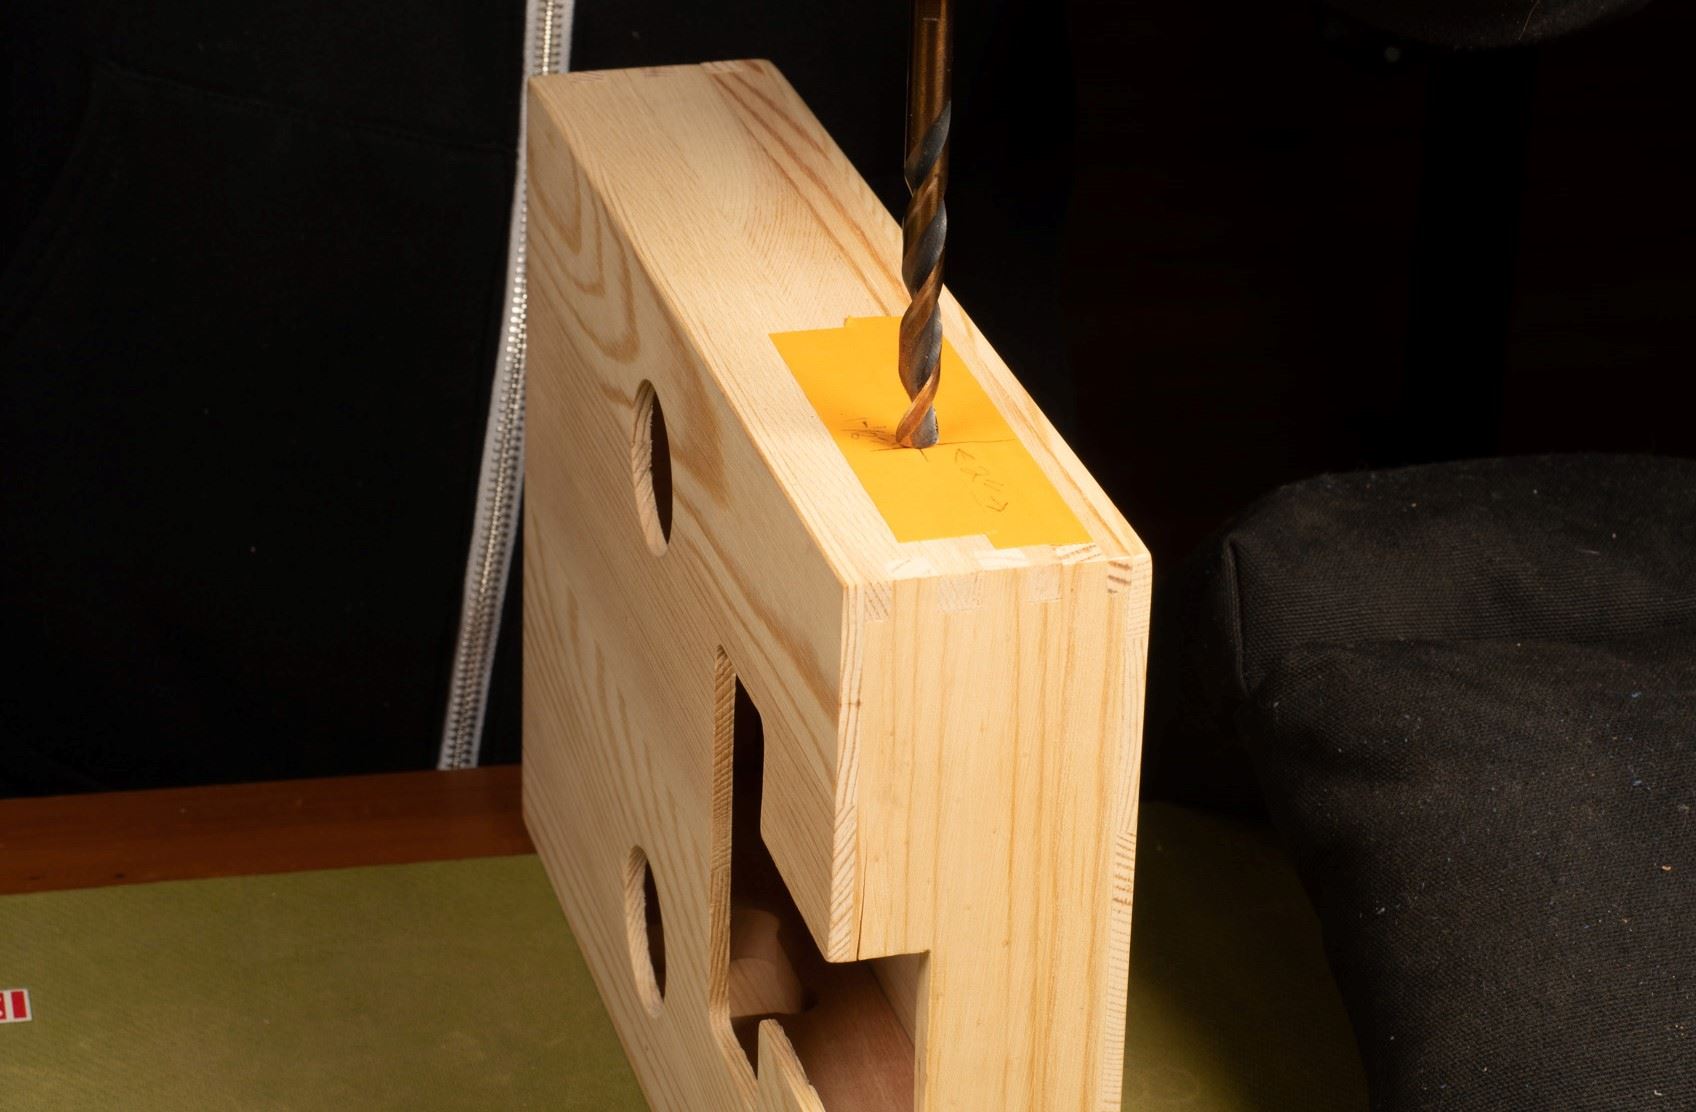
With the neck pressed firmly to the bottom of the body (through the tail block), and the neck reinforcement block butted firmly to the top of the body (through the neck block), mark the locations of the 4 pre-drilled holes to the back of the neck.
Remove the neck and drill the holes with a 5/64" drill bit running 3/8" deep. A 1/2" block of scrap wood placed under the neck will help keep the neck level while drilling.
Re-install the neck and add the neck reinforcement block. Secure the screws using a #2 screwdriver. Go slowly and make sure the holes are aligned.
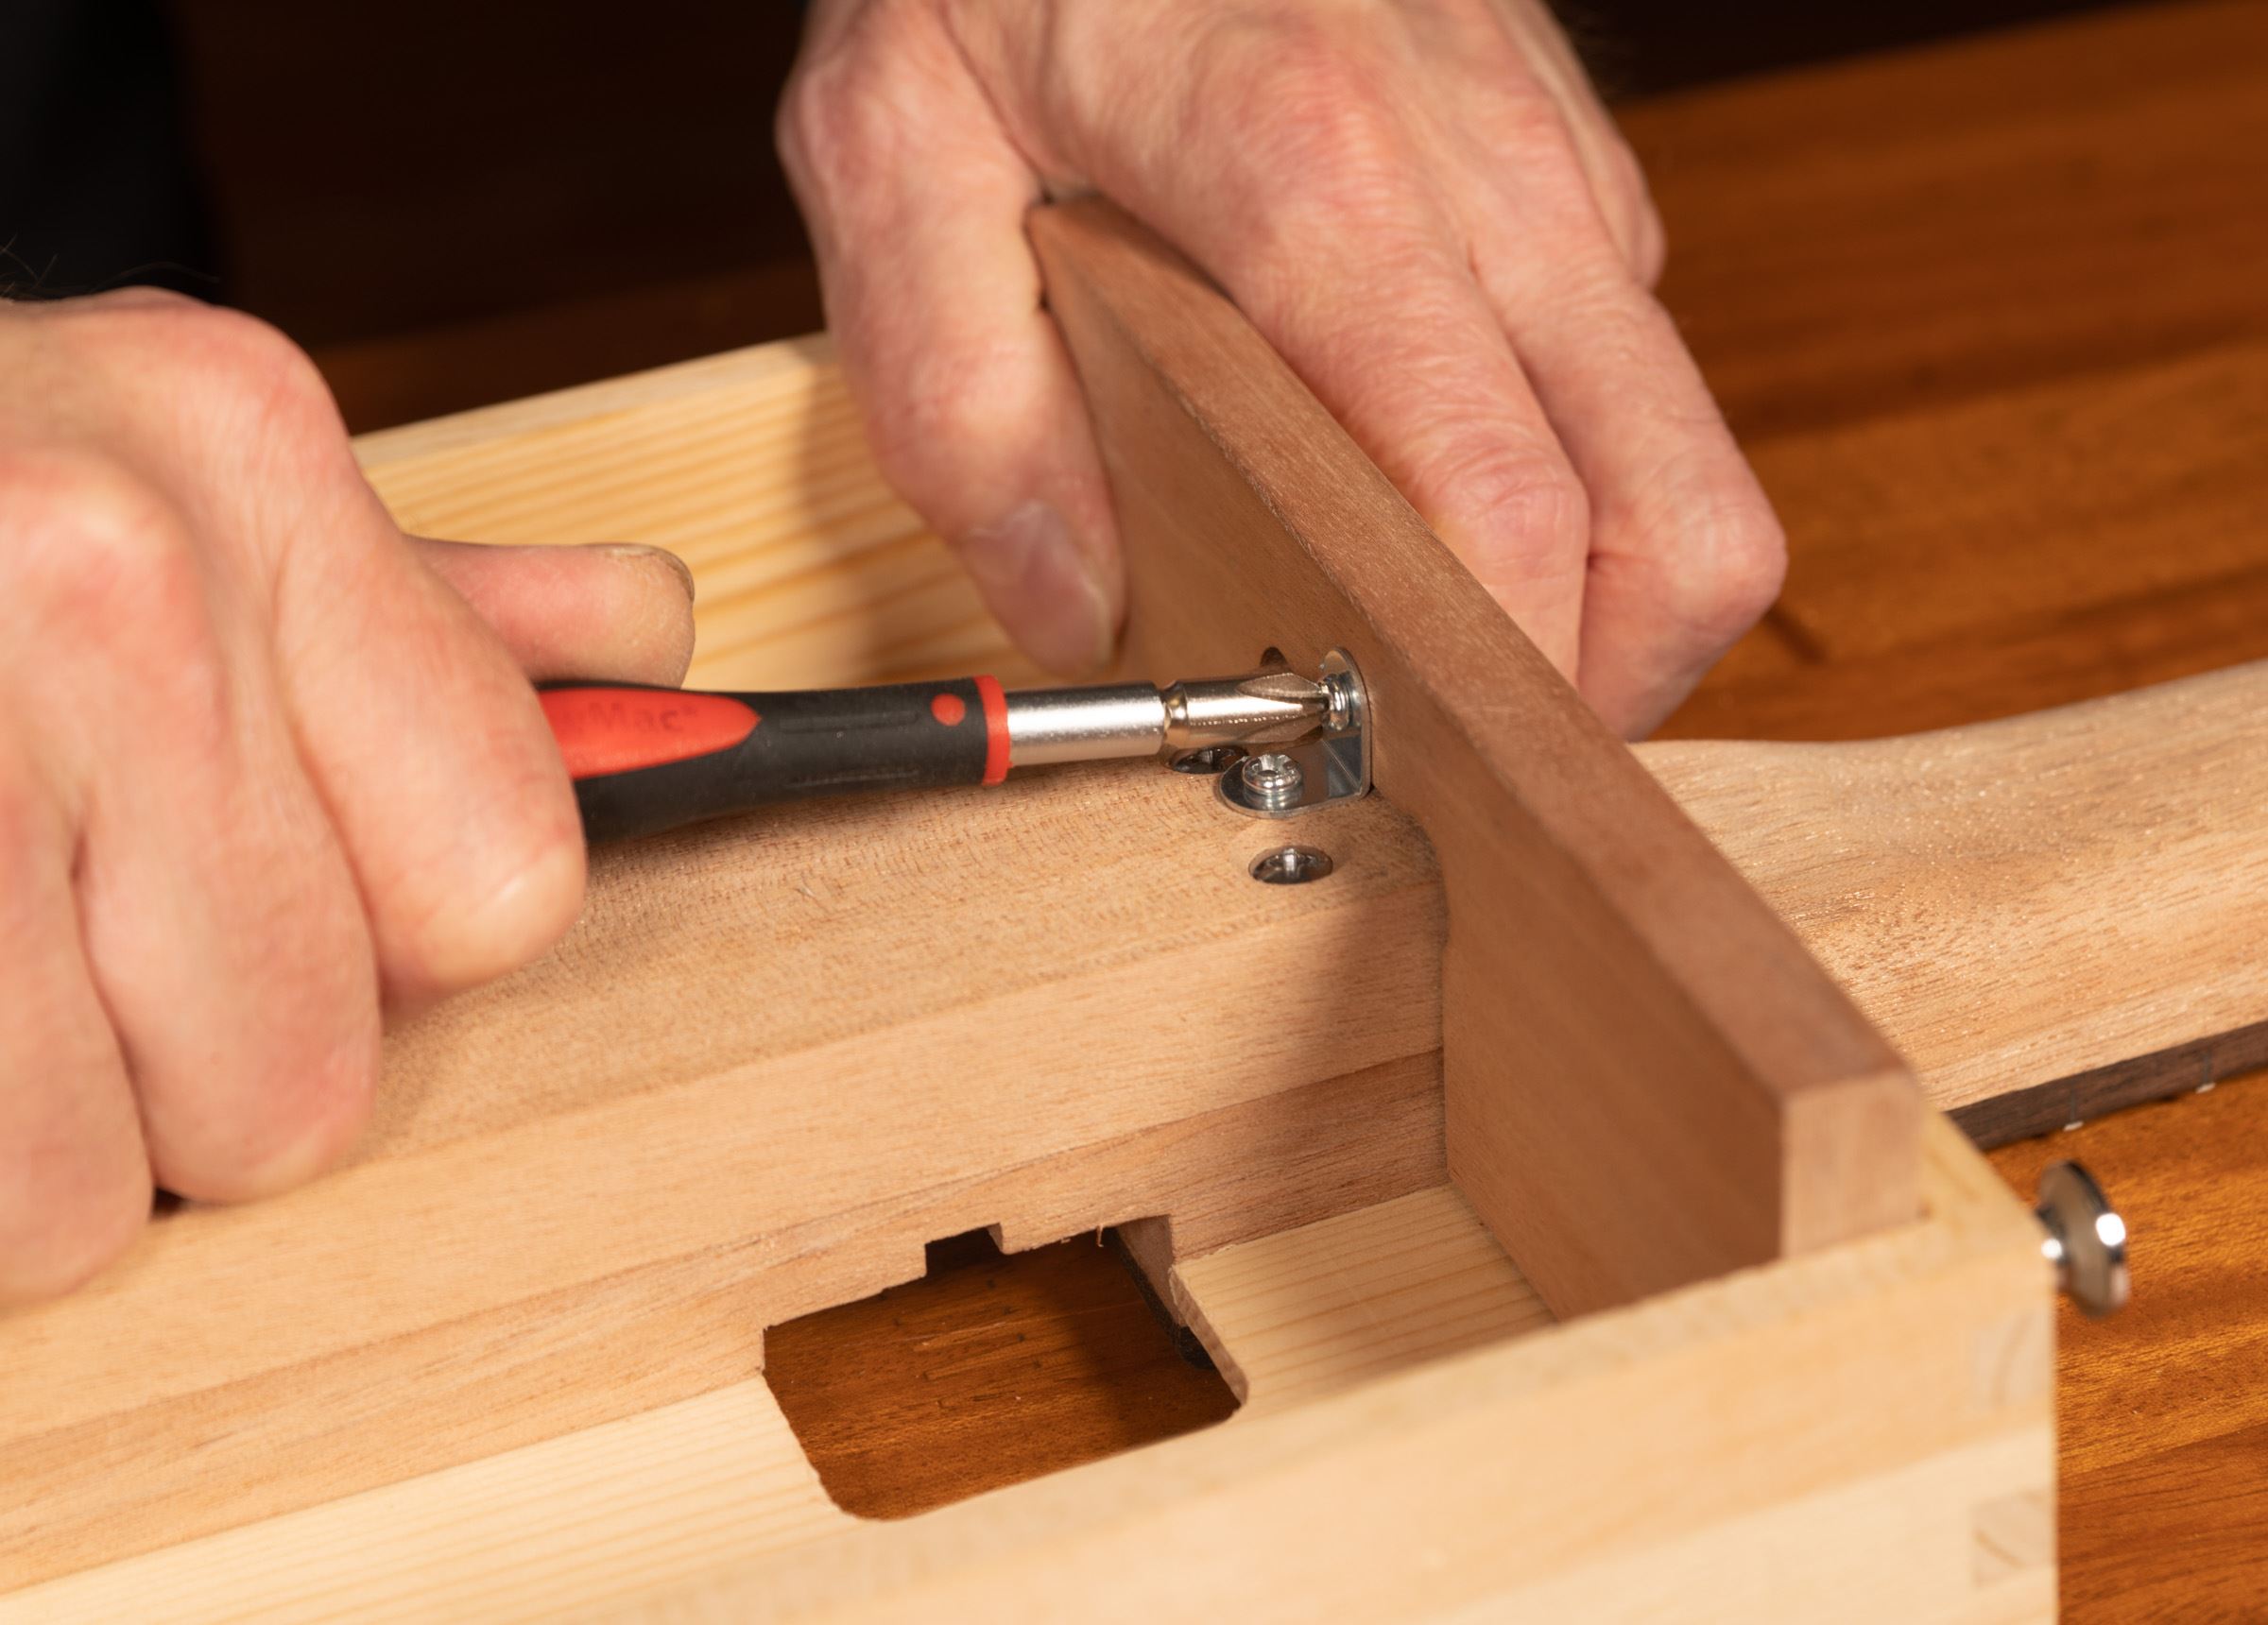
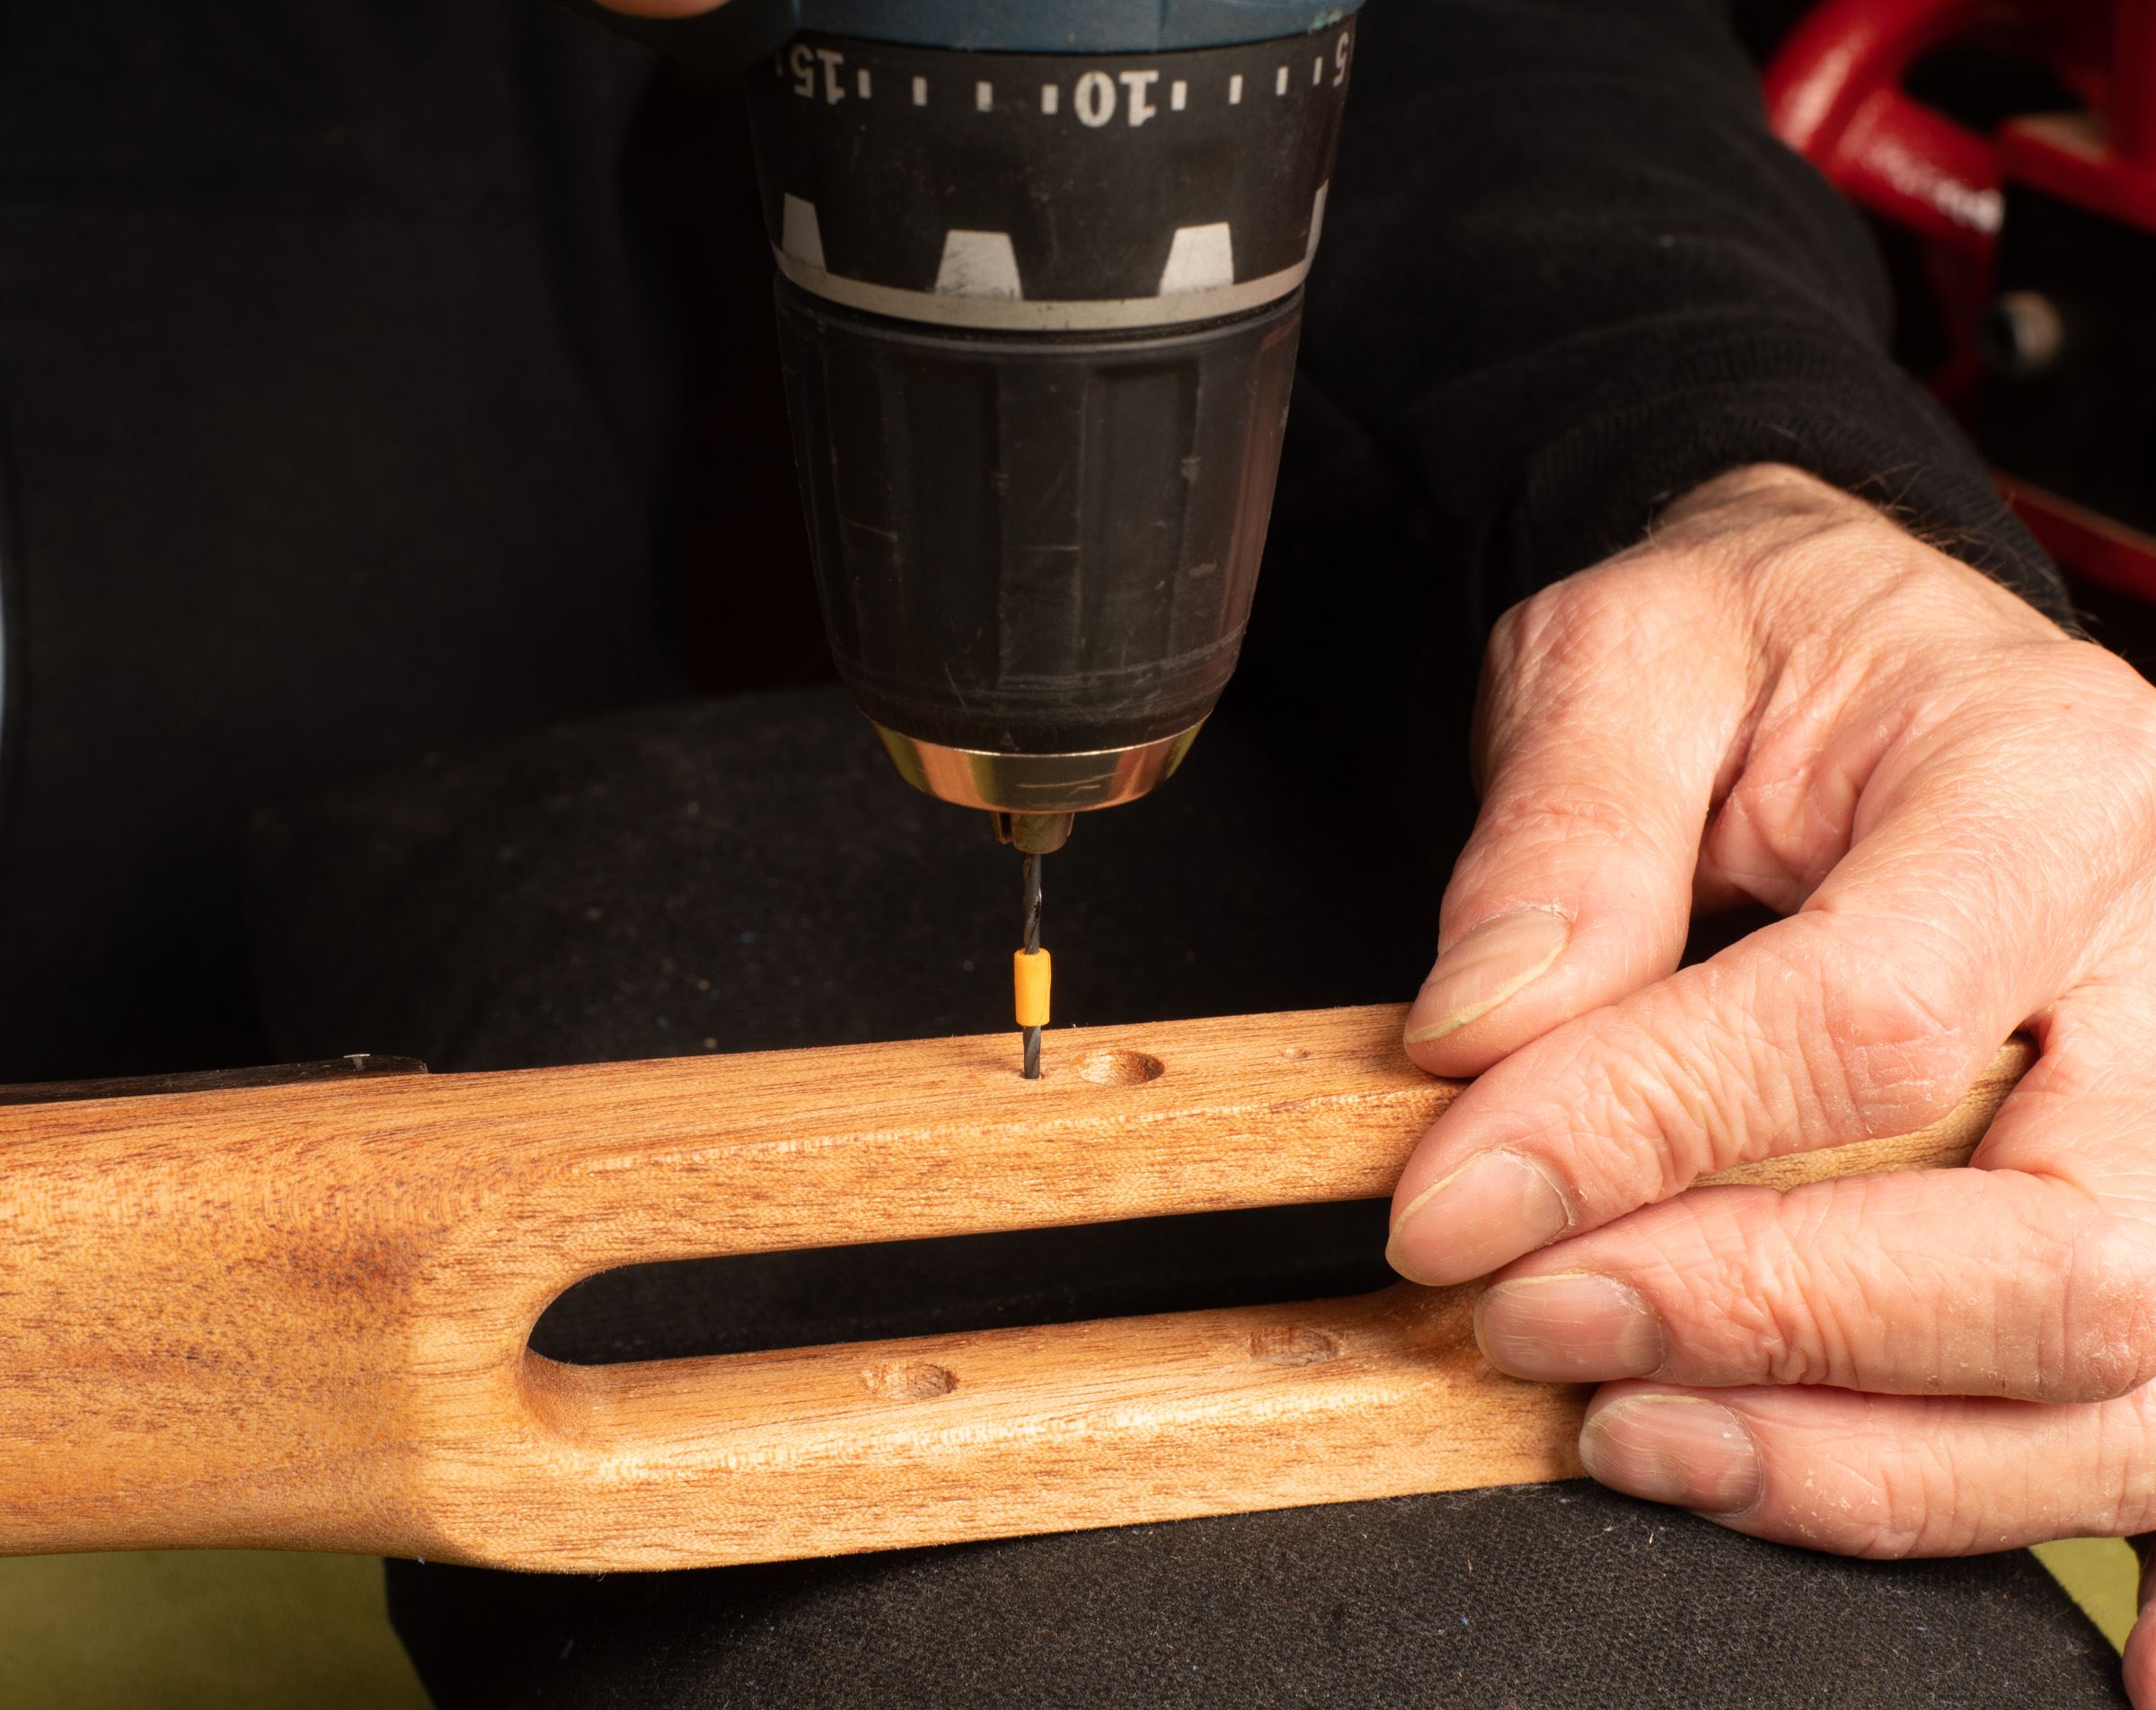
Install the L-bracket
Using the L-bracket as a guide, mark out the screw locations on the neck reinforcement block and the neck block. Drill the two pilot holes 1/4" deep with a 5/64" bit using a piece of tape or depth-stop. Install the L-bracket joining the back of the neck and the side of the body.
|
Option: If gluing the neck in, spread a thin layer of glue on the neck below the pickup rout, fit the neck into the body and clamp it in place. Use a padded clamp or cauls. Your clamp will go through the pickup rout so it will contact the back of the neck and the top. When dry, apply a thin layer of glue and attach the reinforcement block to the neck using the 4 included screws. Apply additional clamps if needed—the screws are usually enough to hold it in place. Wipe up any glue squeeze-out.
|
Fitting the hardware and electronics
In this section you will be temporarily installing all of the parts and hardware to ensure a good placement and fit. Use a padded work surface to minimize any handling damage.
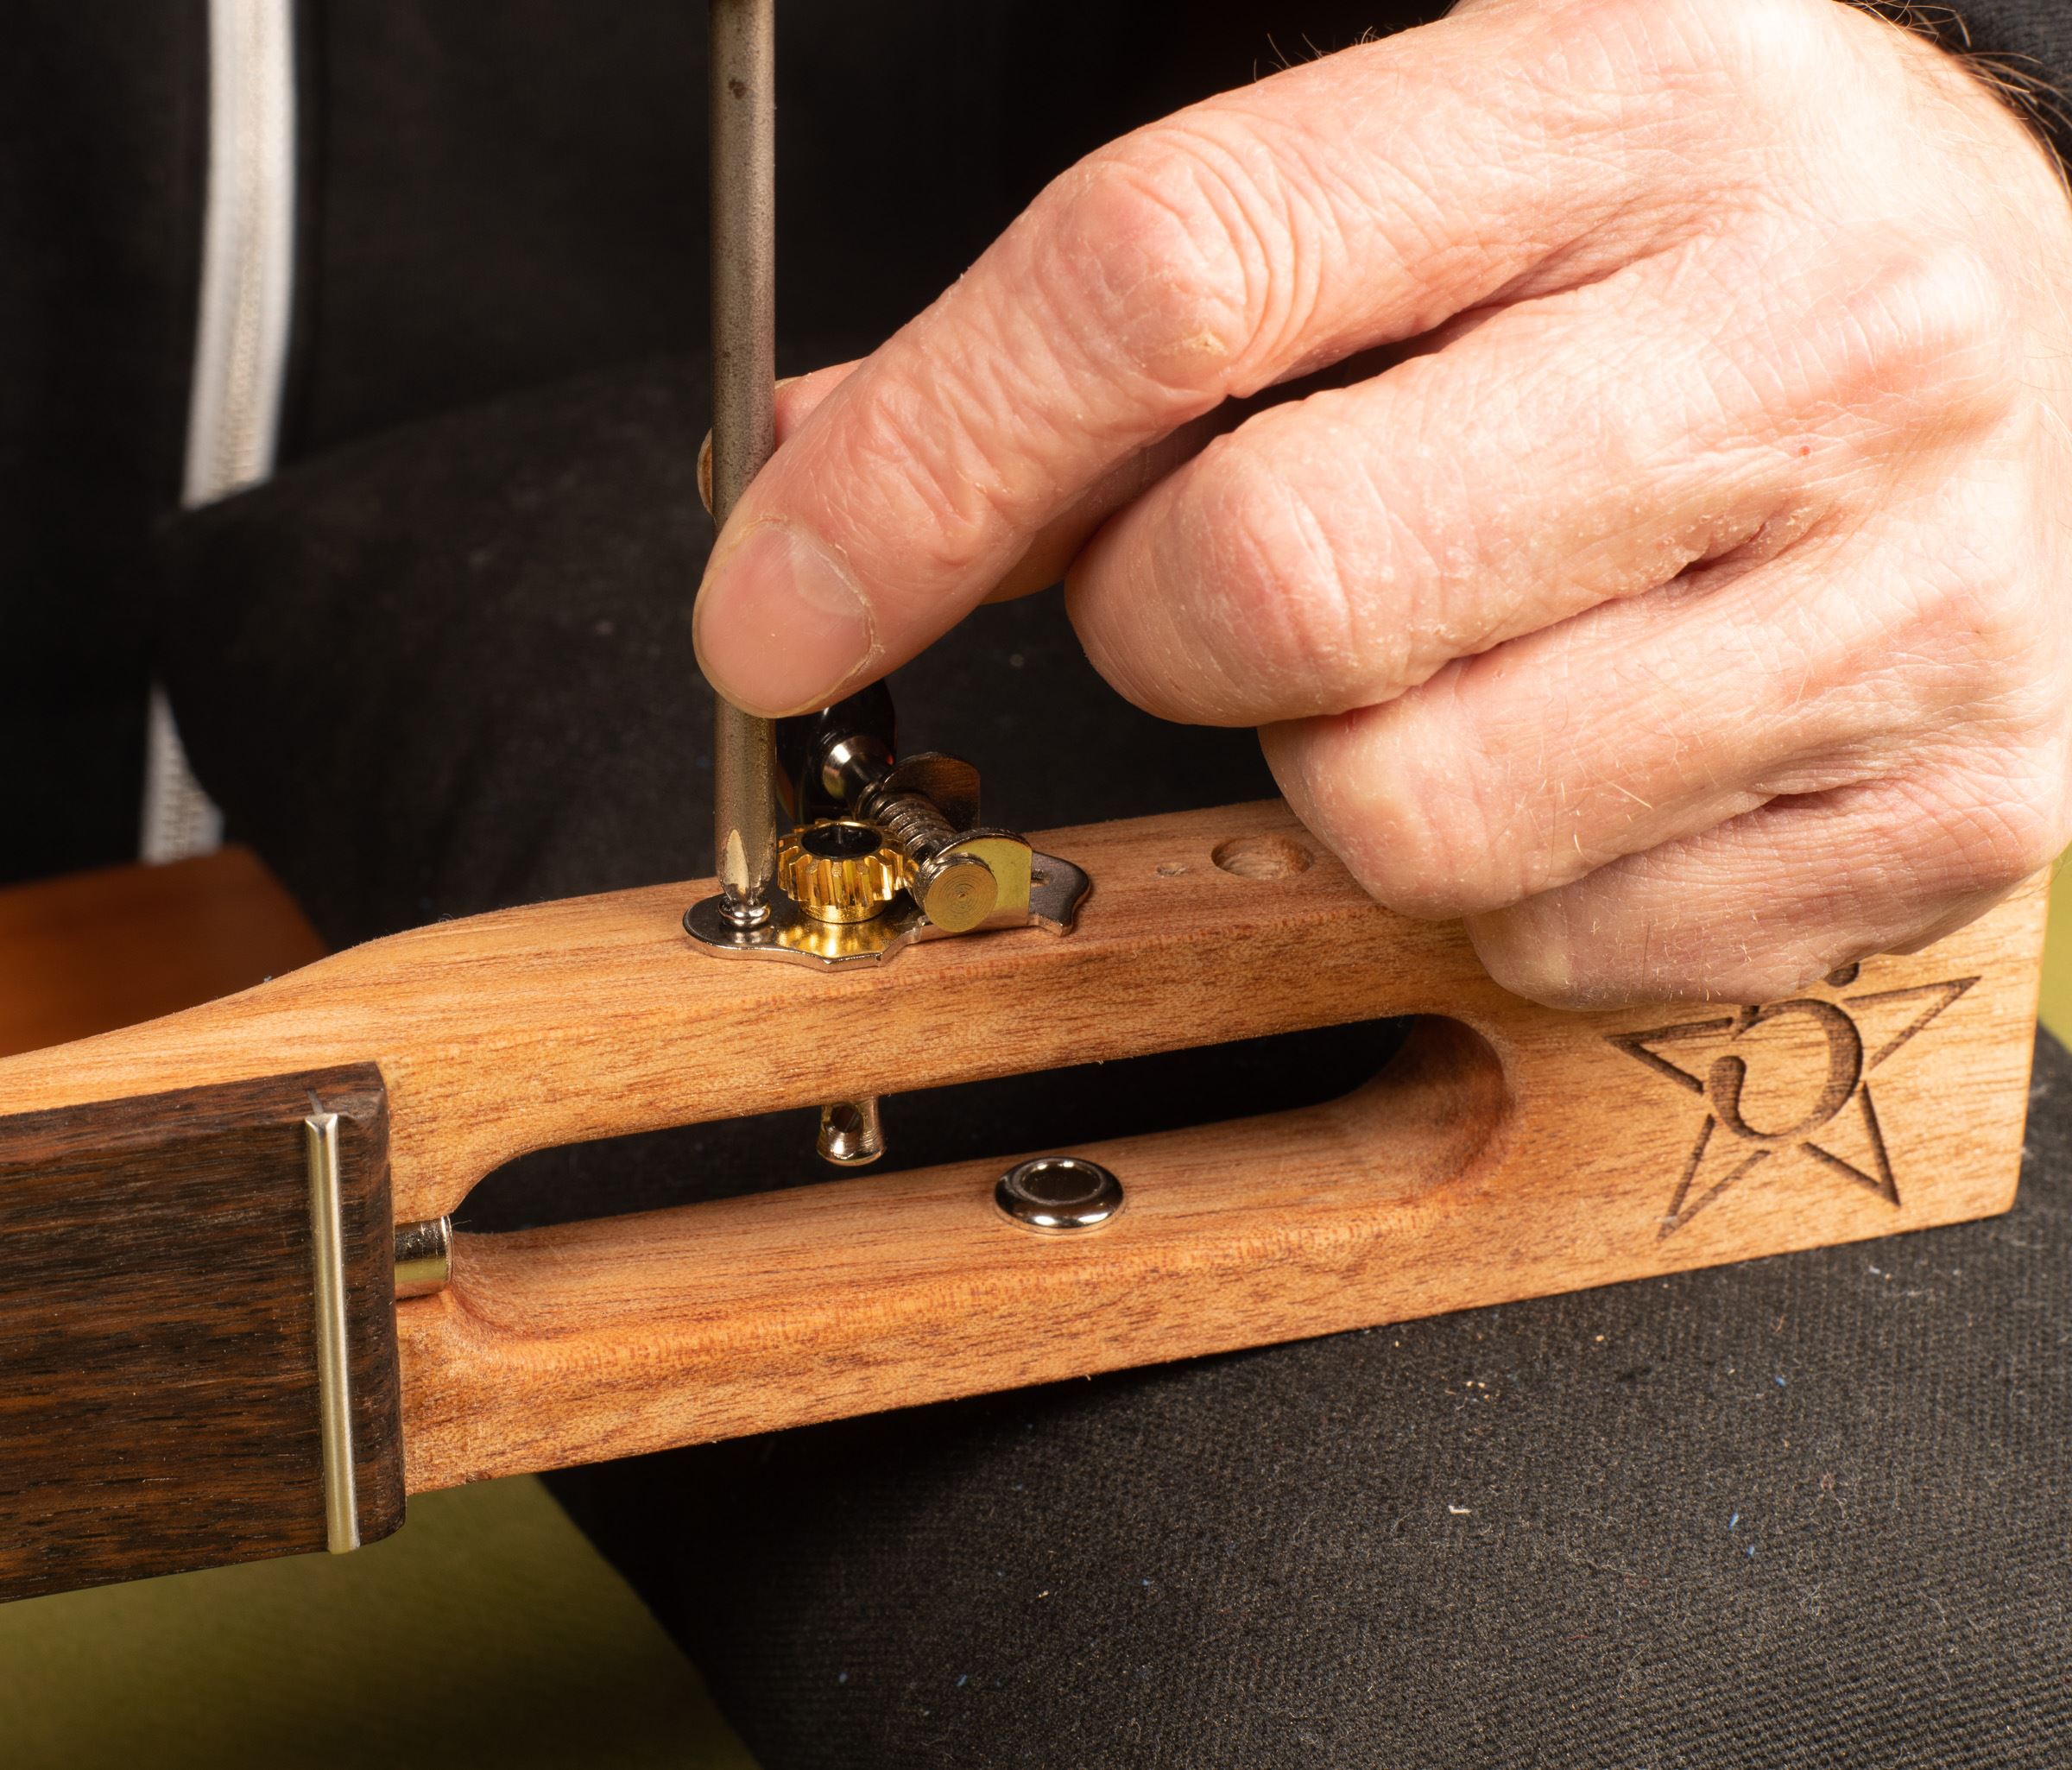
Install the tuners
The bushings are installed from the inside of the peghead. Using finger pressure, fit the press-fit tuner bushings into the holes leaving a fingernail's depth before they are flush with the peghead. You will be removing them later before finishing.
If they are not going in with finger pressure, use a small piece of scrap wood as a caul for extra pressure to work them in. Go slowly and don't force it: too much pressure can split the peghead.
Insert the tuners from the outside of the peghead, lining them up squarely with the edge of the peghead. The knobs face the back of the guitar with the worm gear facing up. Mark out the locations of the screws and remove the tuners.
Drill the pilot holes using a 1/16" bit, drilling 5/64" deep. Be careful and mark your depth on the bit with a piece of masking tape or depth-stop to prevent drilling all the way through the peghead wall.
Important: Tuner mounting screws are very delicate and the mahogany is hard. Lubricate the screw threads by dragging them across soap or wax for smooth installation.
With the tuners back in place, install the screws in the pilot holes with a #1 Phillips screwdriver.
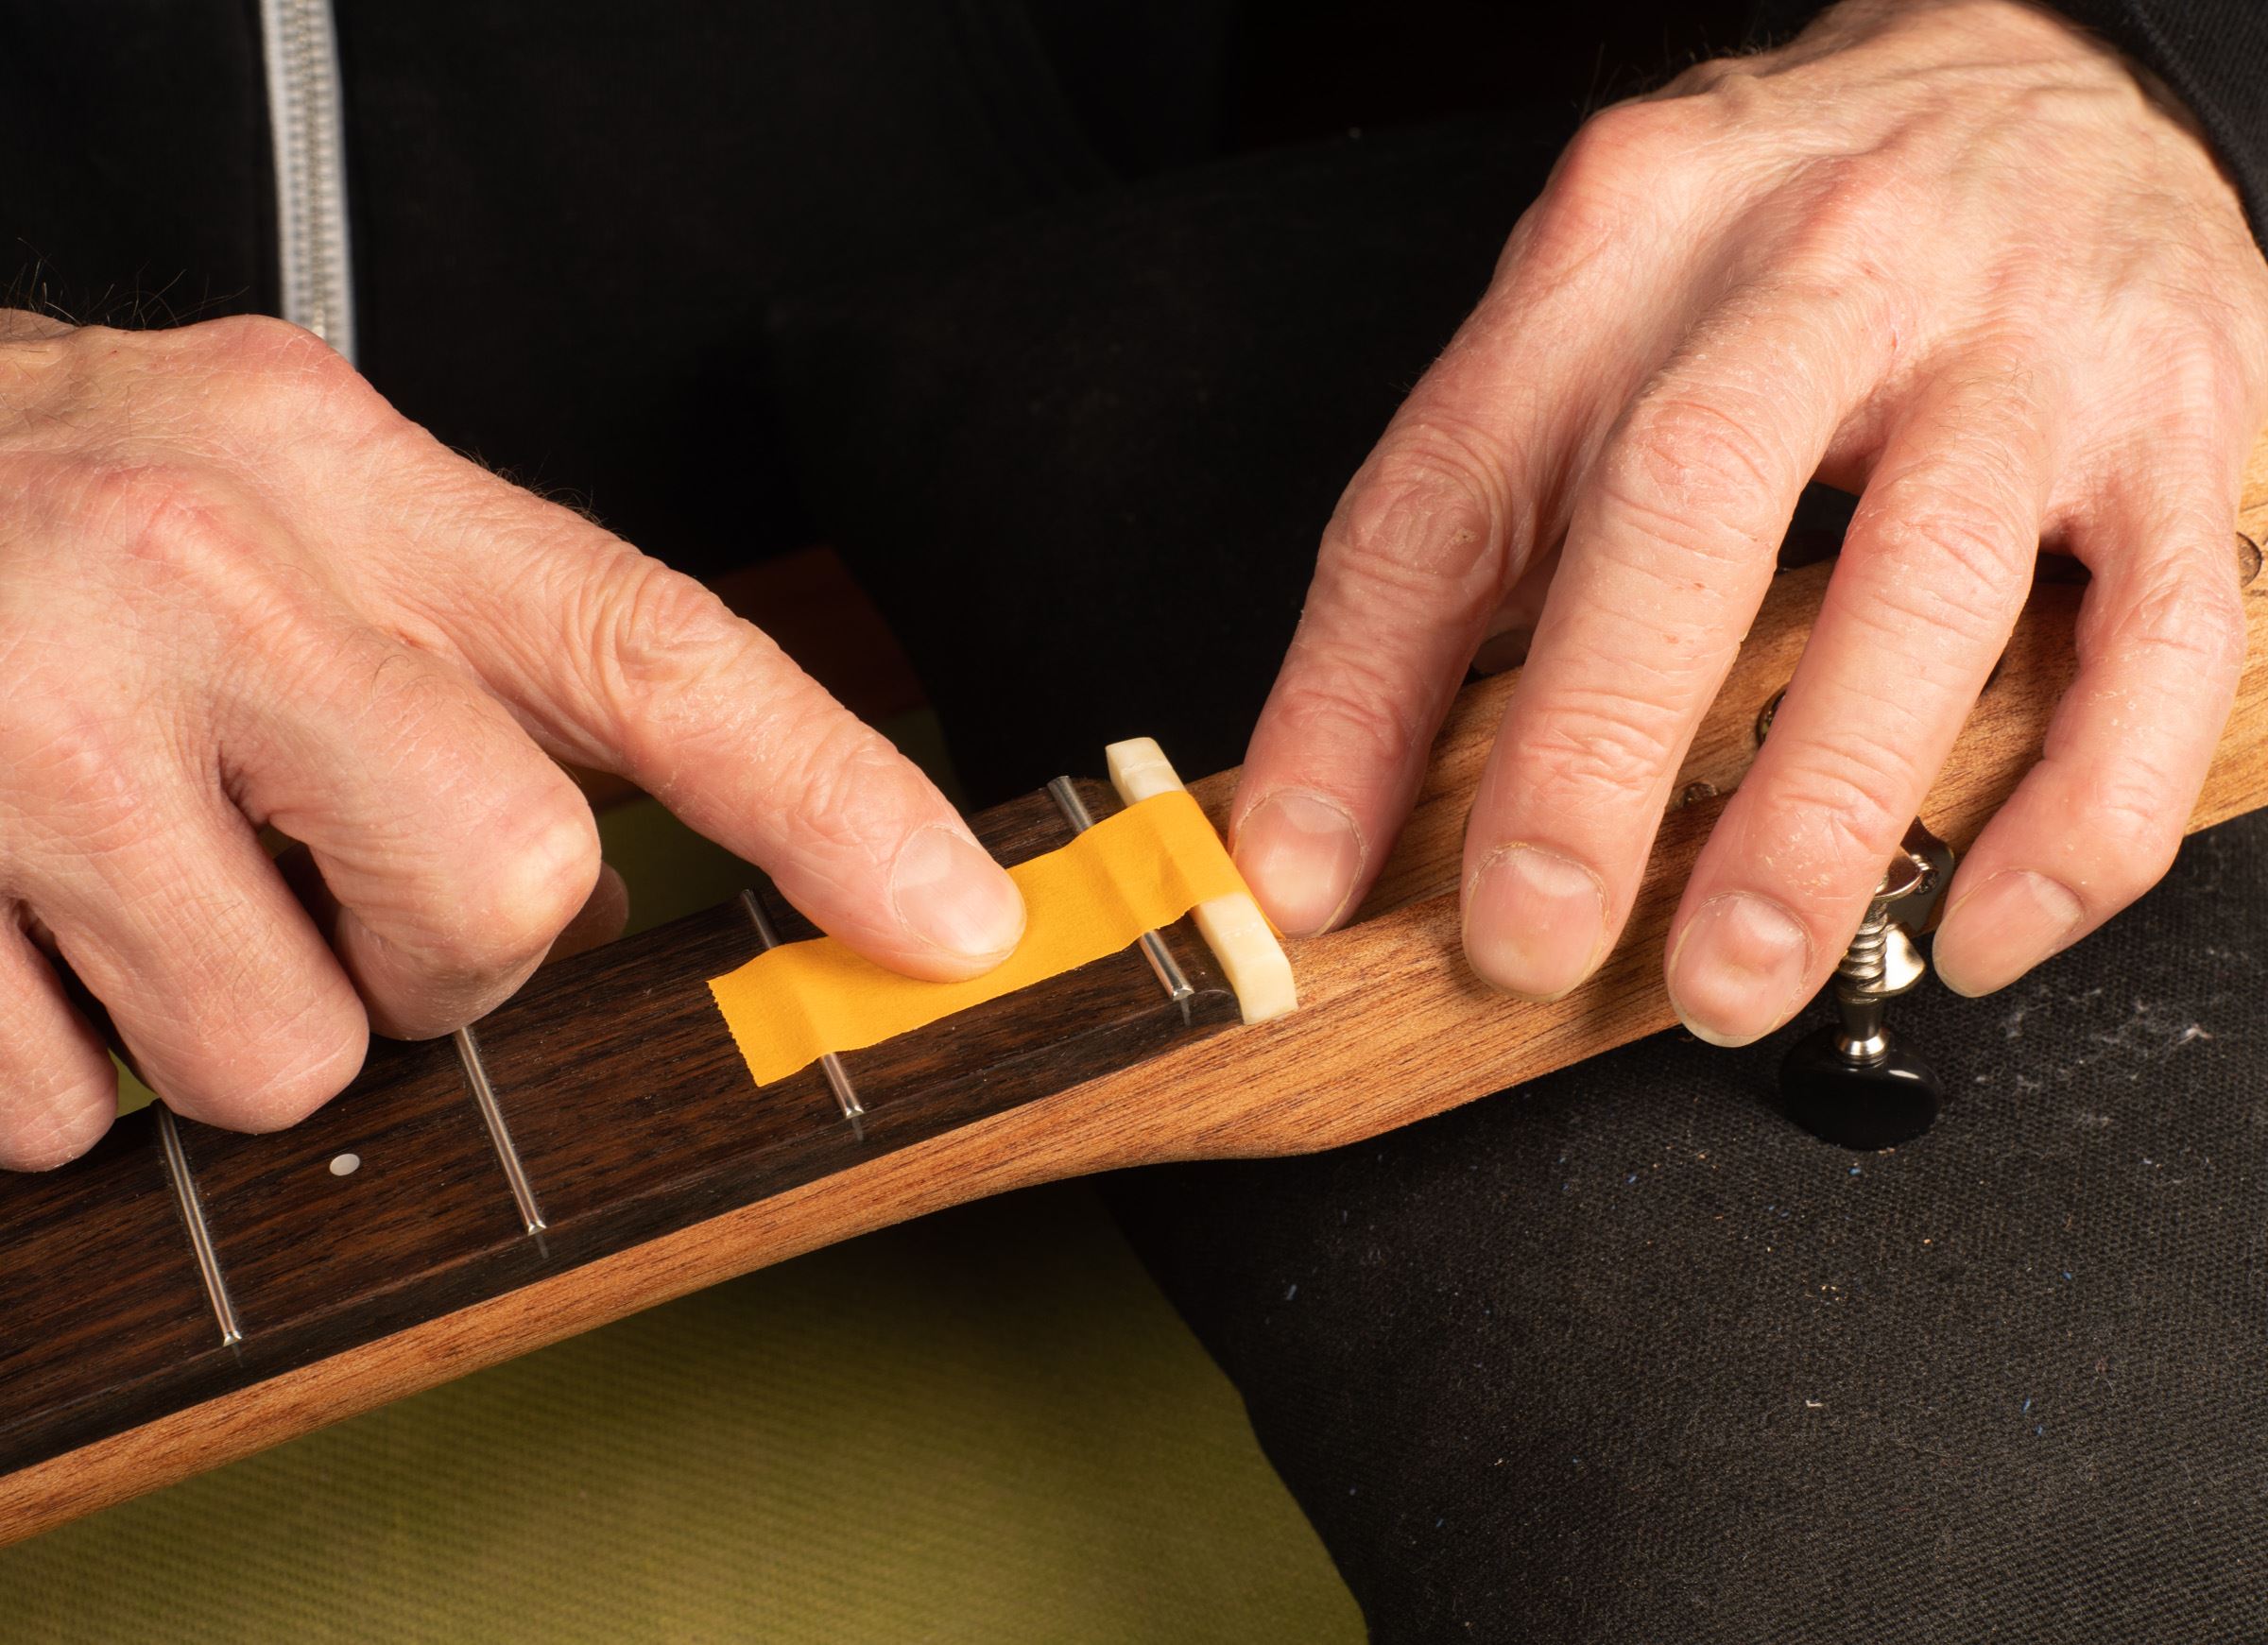
Install the nut
Align the nut on the neck. Mark out any nut material overhanging the sides of the neck with a pencil and remove it with 320-grit sandpaper, bringing it in flush with the edges of the neck. Install the nut with wood glue and tape in place while the glue dries. Make sure to leave space in the middle of the nut free of glue as to not interfere with the truss rod. All you need is just a tiny film of glue on the bottom of the nut. Wipe up any squeeze-out with a damp cloth before it dries.
Drill for the volume control pot
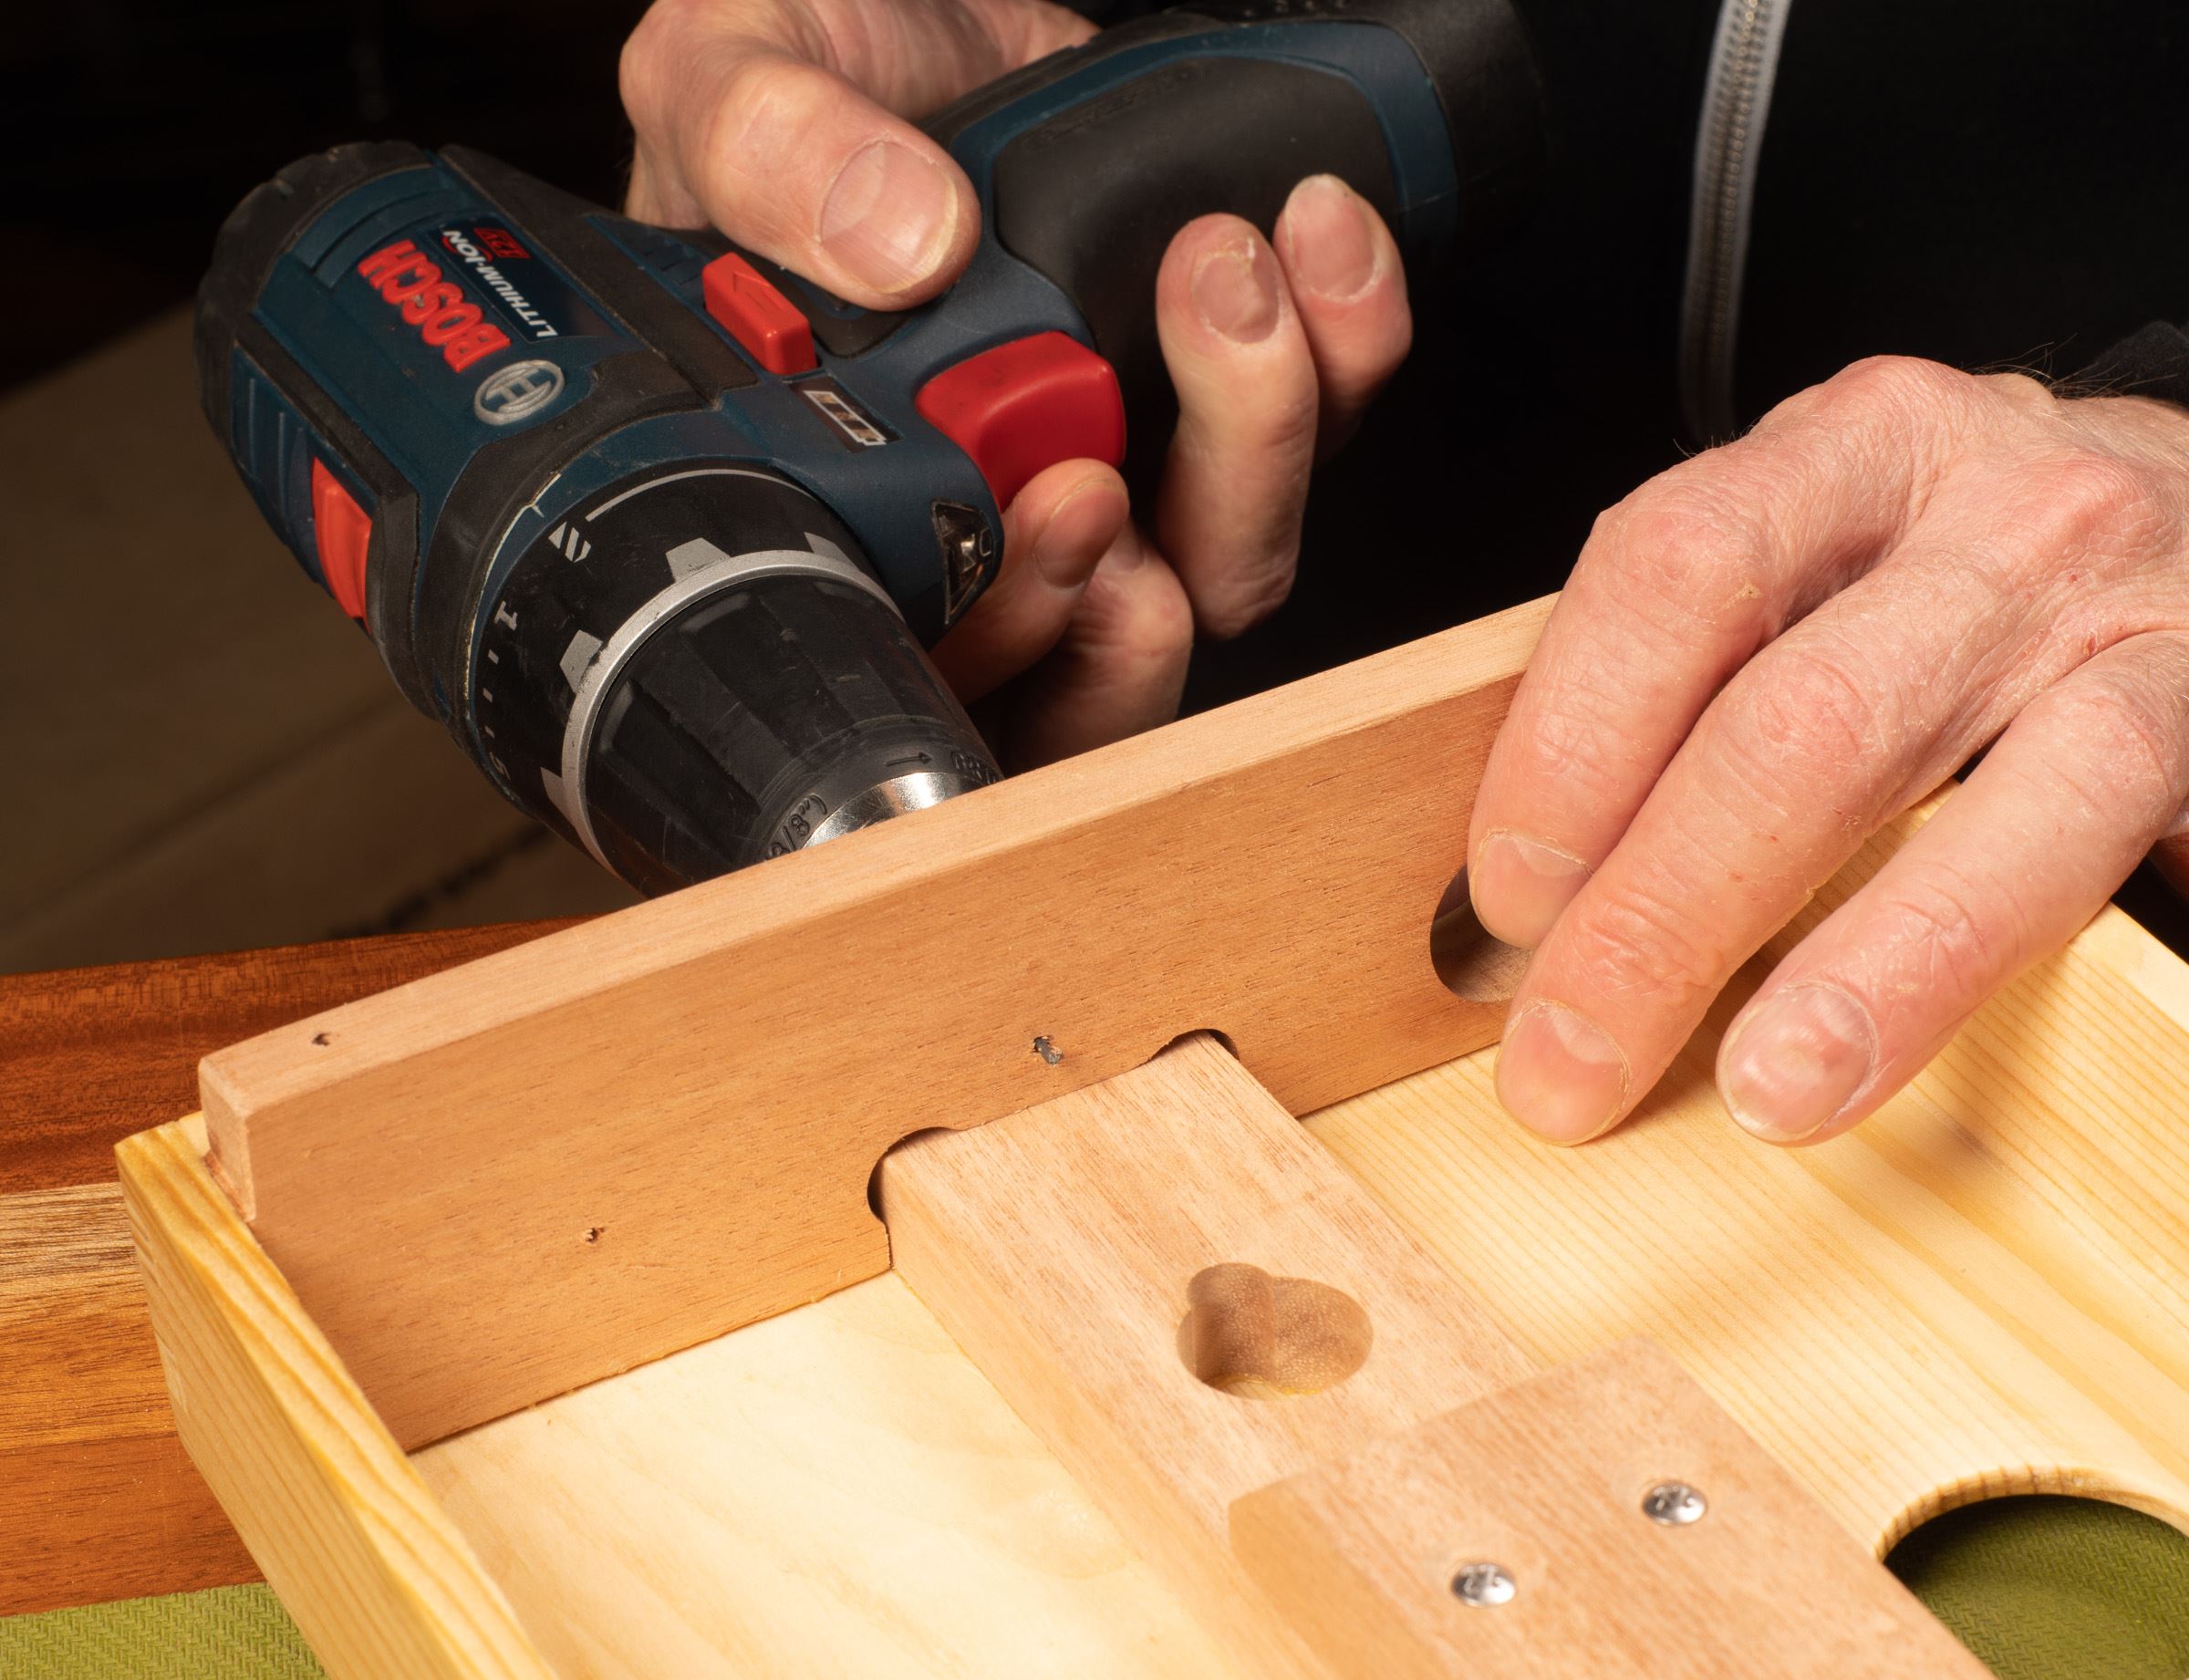
You will be fitting all of the electronics at this point to ensure a good fit; do not make the connections yet. That will be done during final assembly after the body and neck are painted and fully dry.
The control pot can be positioned anywhere on the body thin enough for it to fit. We suggest using the upper bout through the side, as the threaded collar that holds the pot is not long enough to install the pot through the neck or tail blocks. Drill a 5/16" hole in the location you choose. Adding tape over the drilling location will minimize chipping out the wood. Mark your depth so you won't go too far. The side wood is very thin. Go slowly to avoid cracking the wood.
When drilling be mindful not to drill into the neck or other parts you can't see inside the body. Place the pot through the hole, and hand tighten the nut. Install the knob.
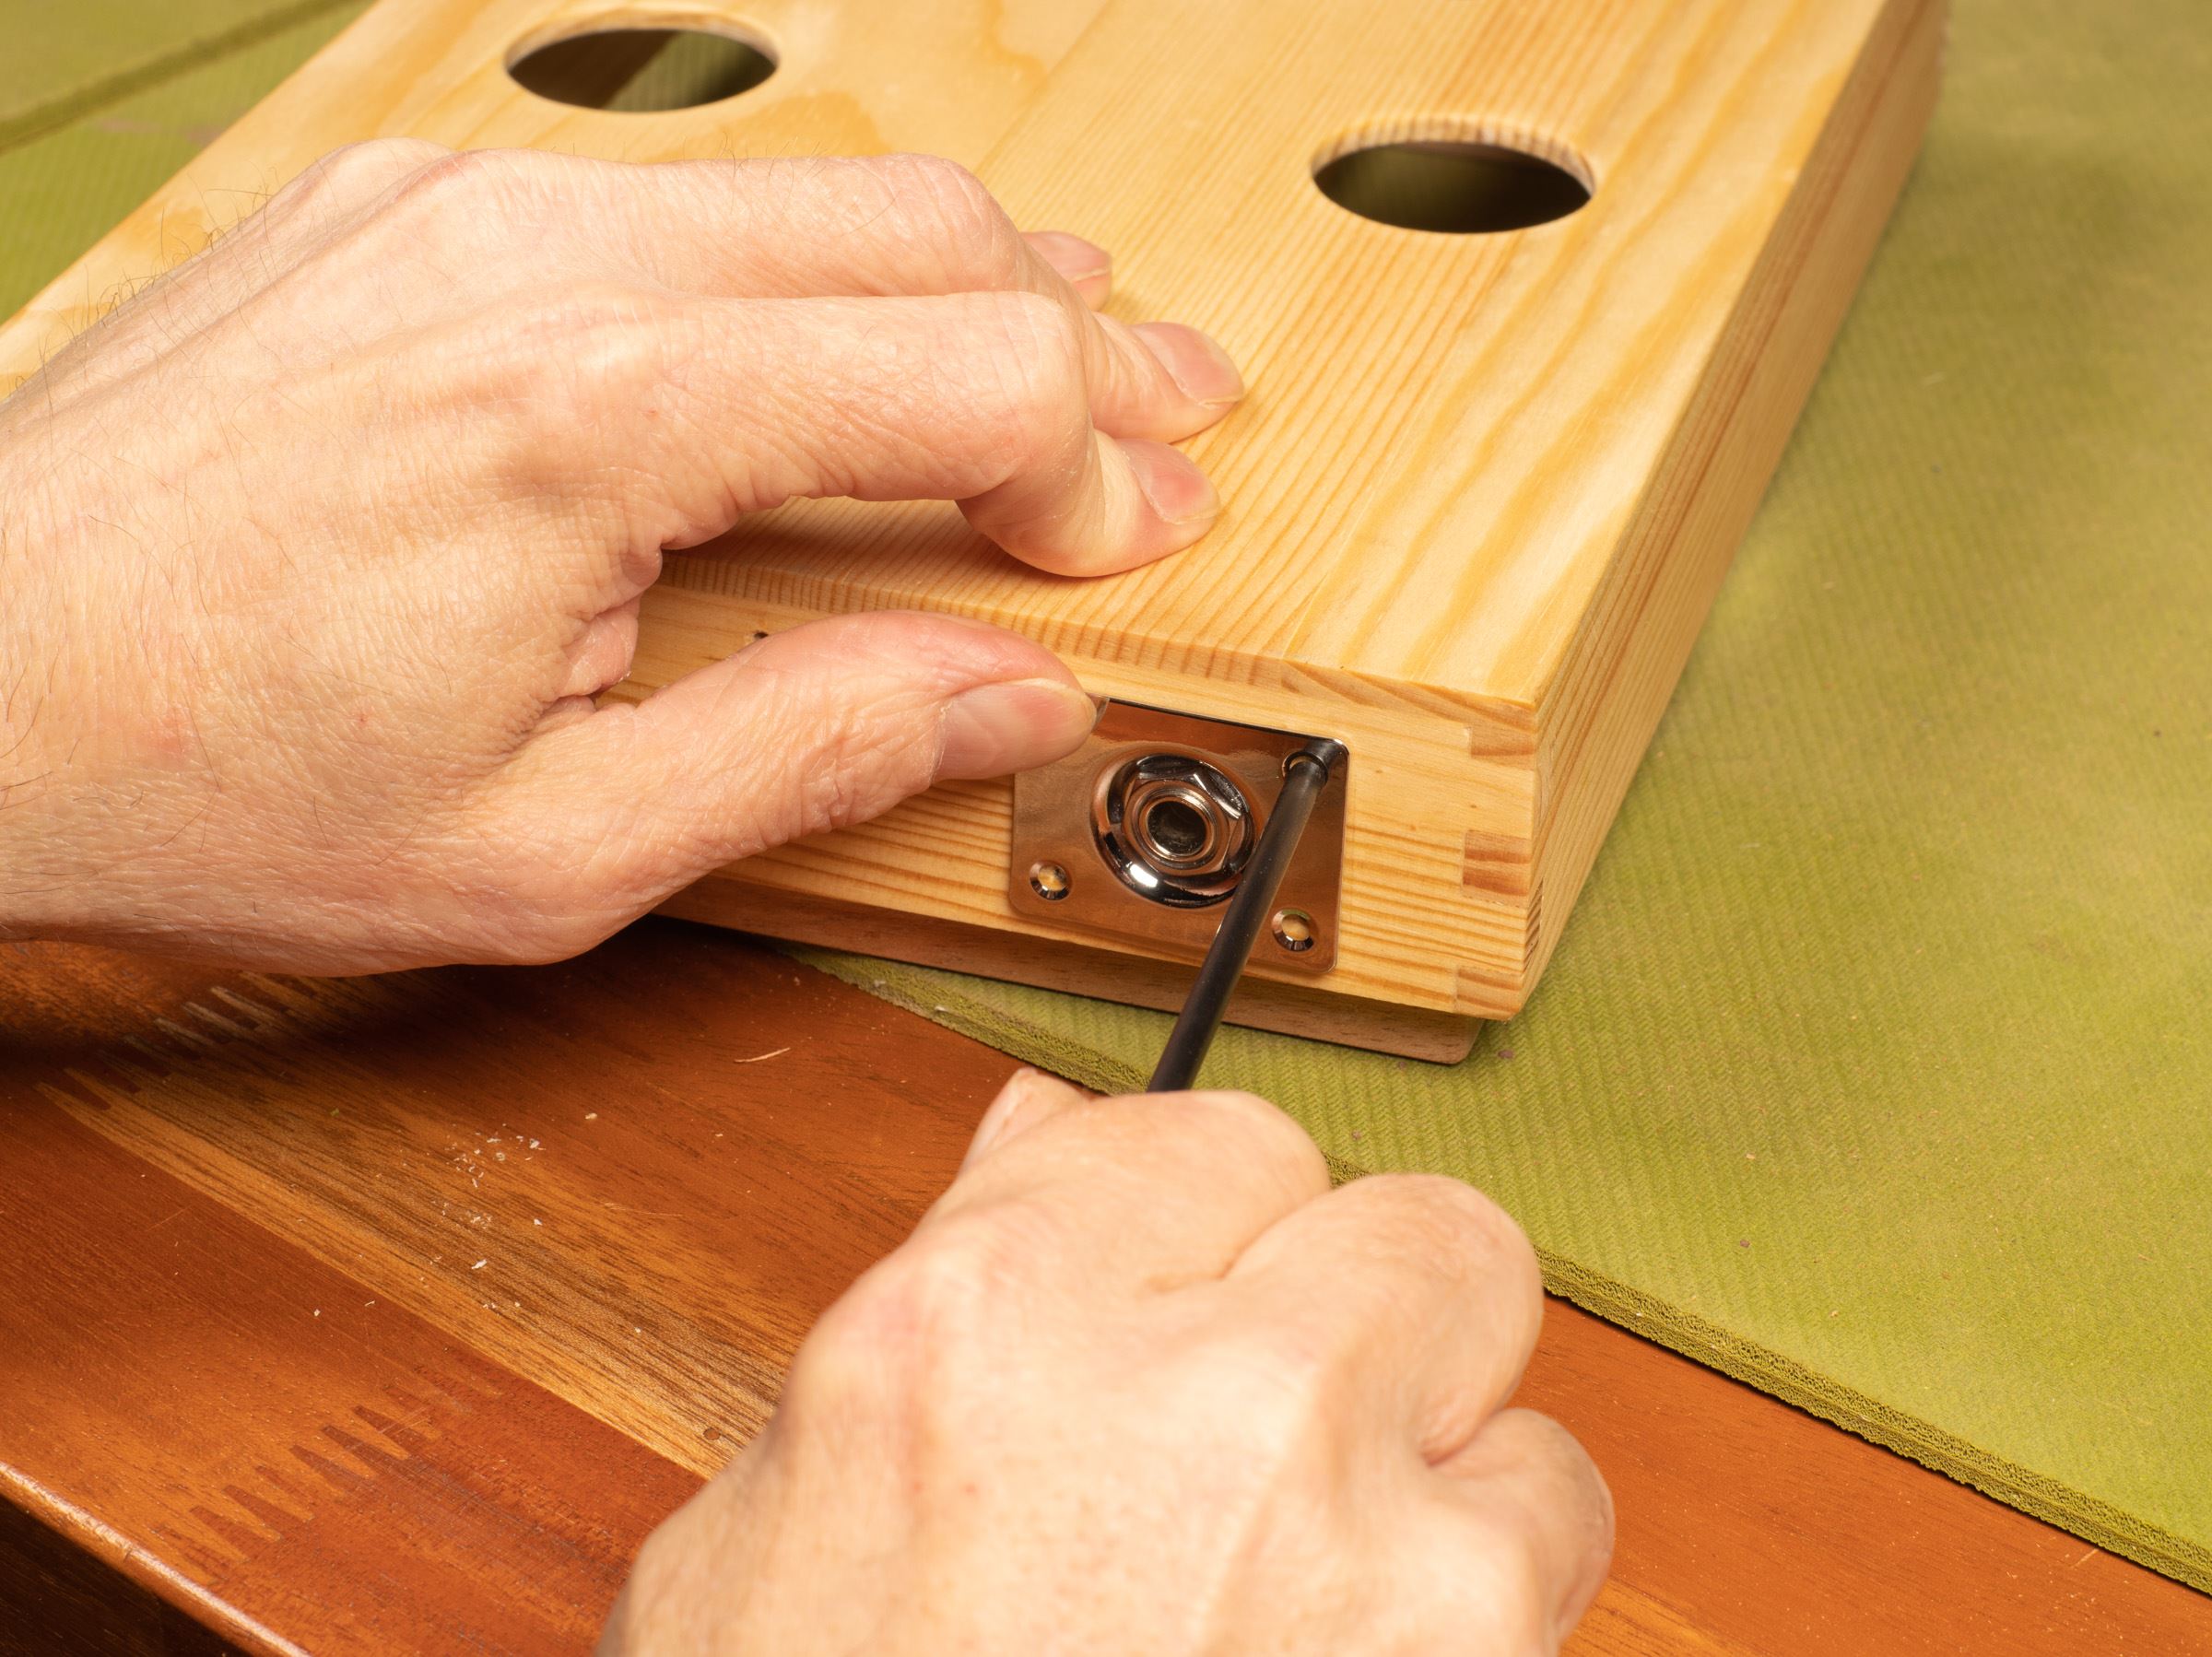
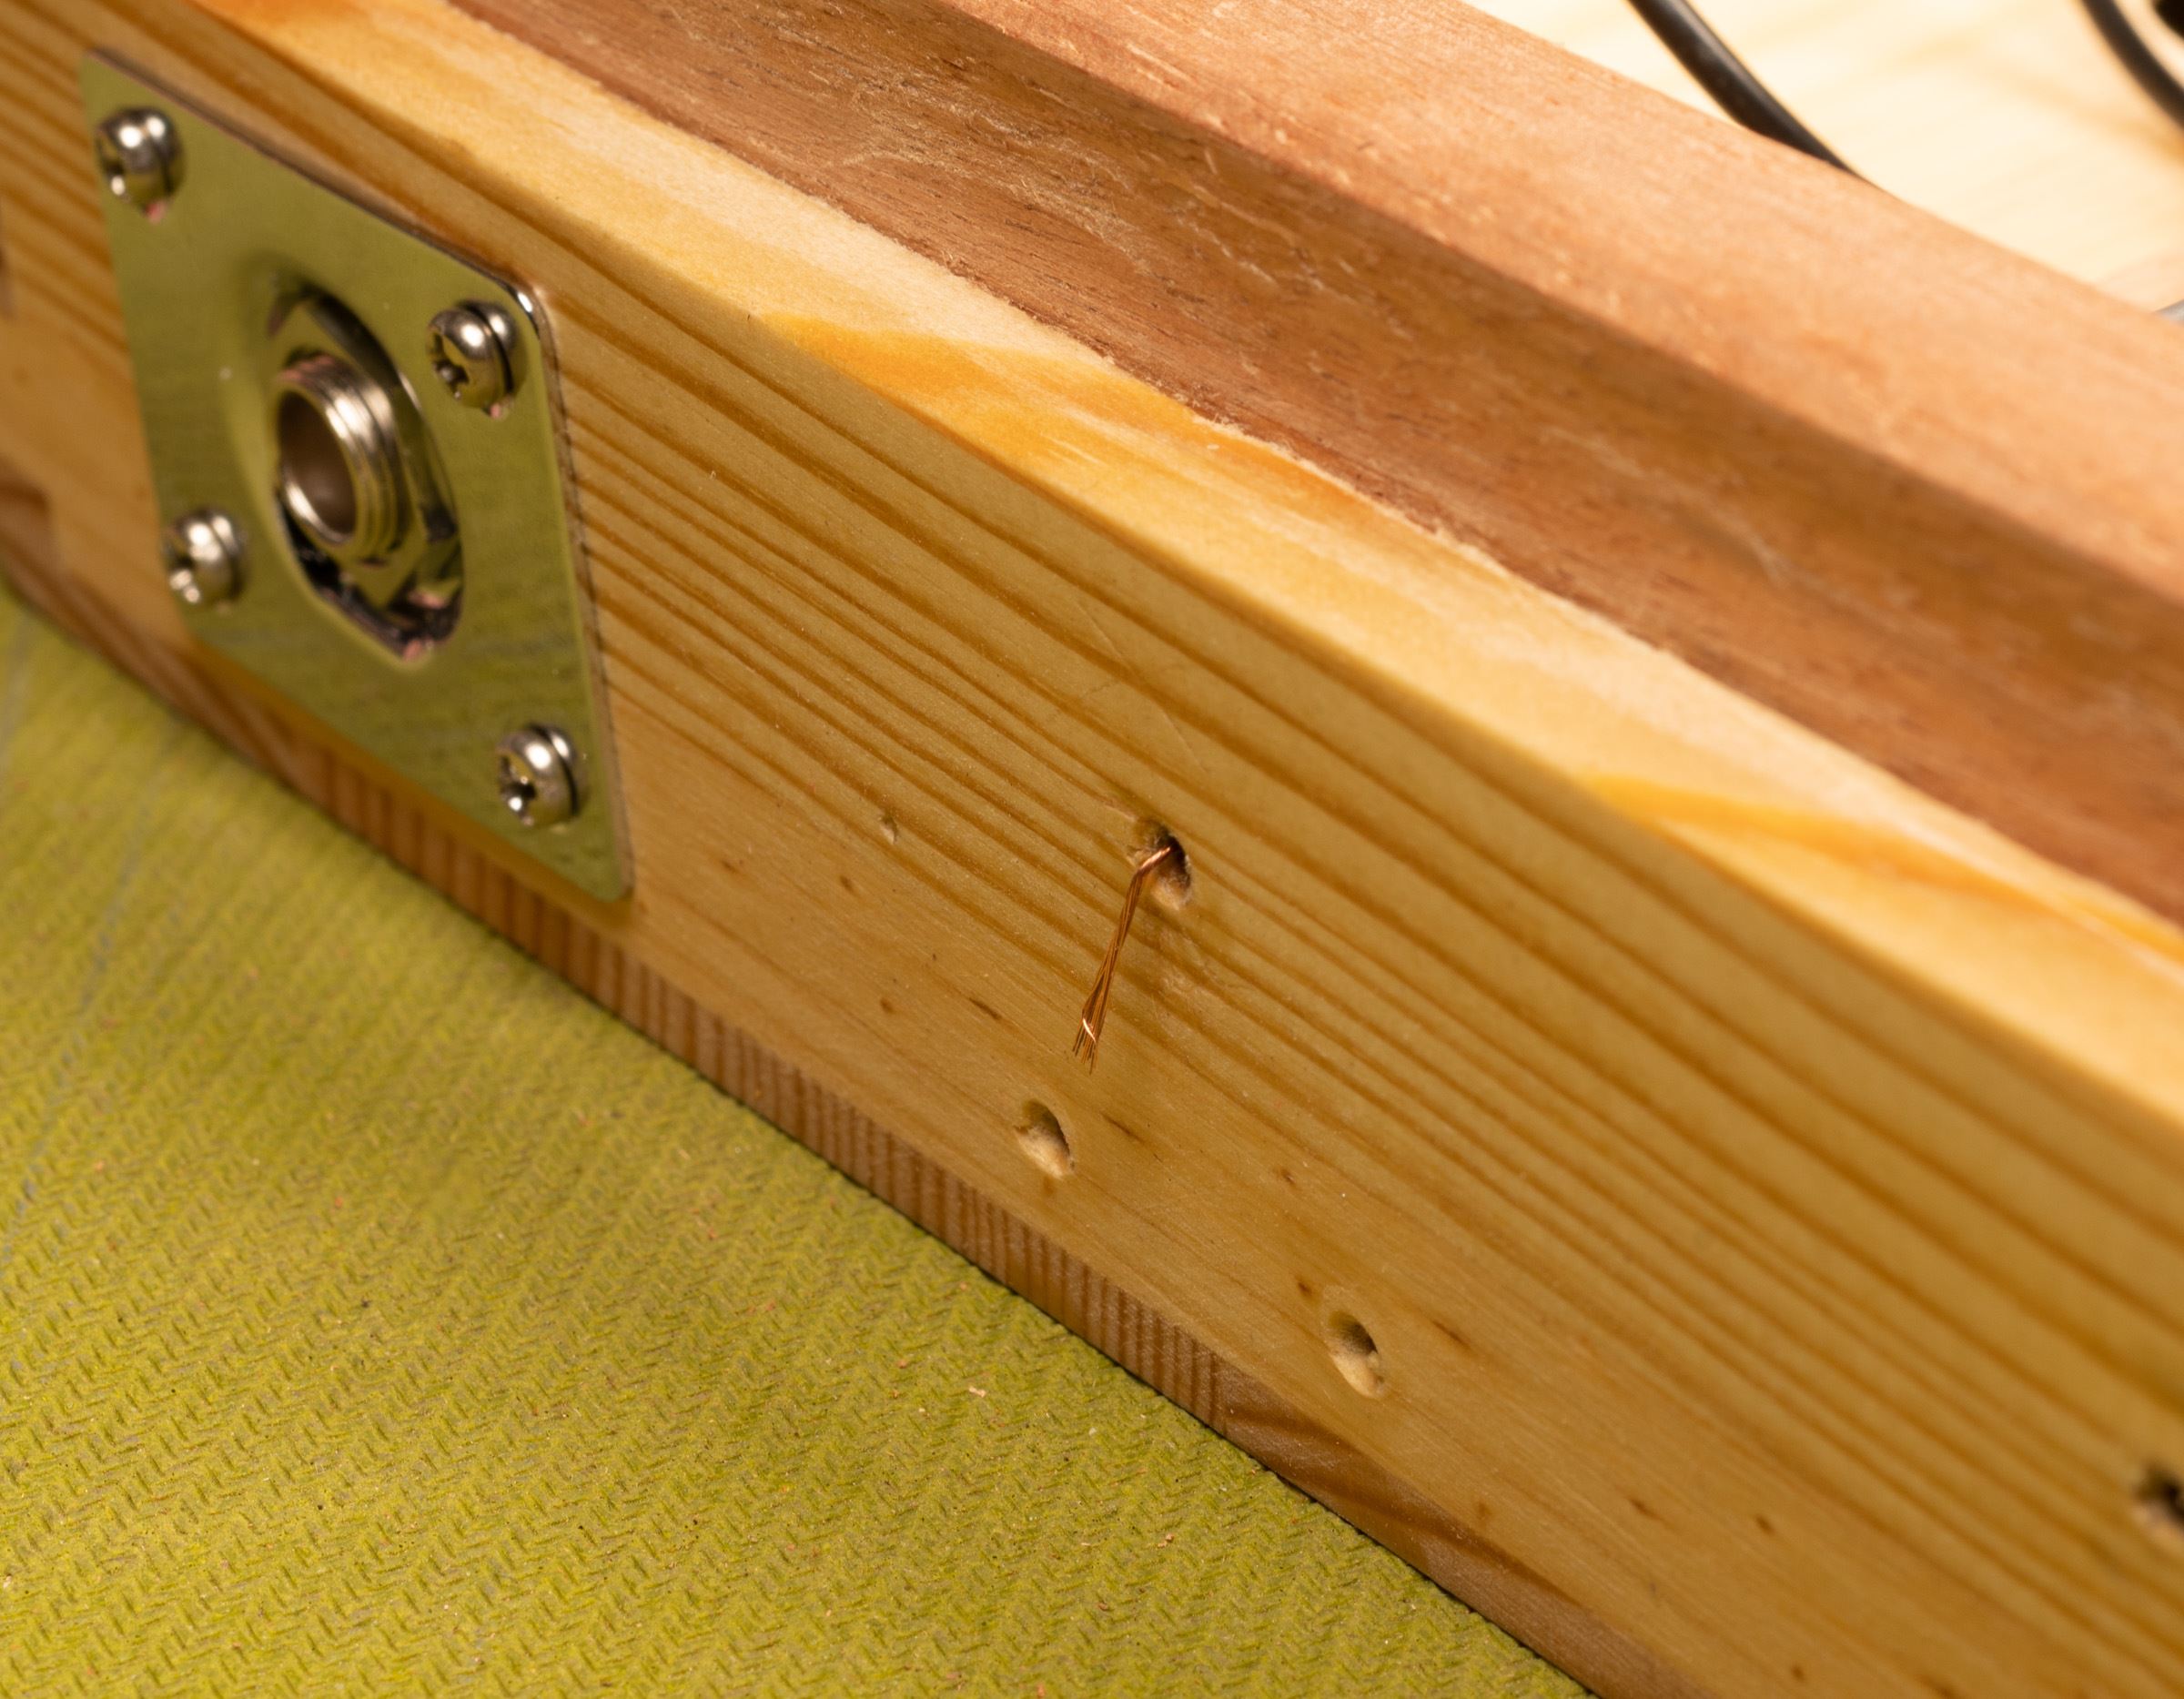
Drill for the output jack screws
Mark out the output jack screws location using the edge of the body and jack plate to align it and to keep it square. Drill 5/16" deep holes using a 1/16" bit. Install the jack plate.
Fit the pickup
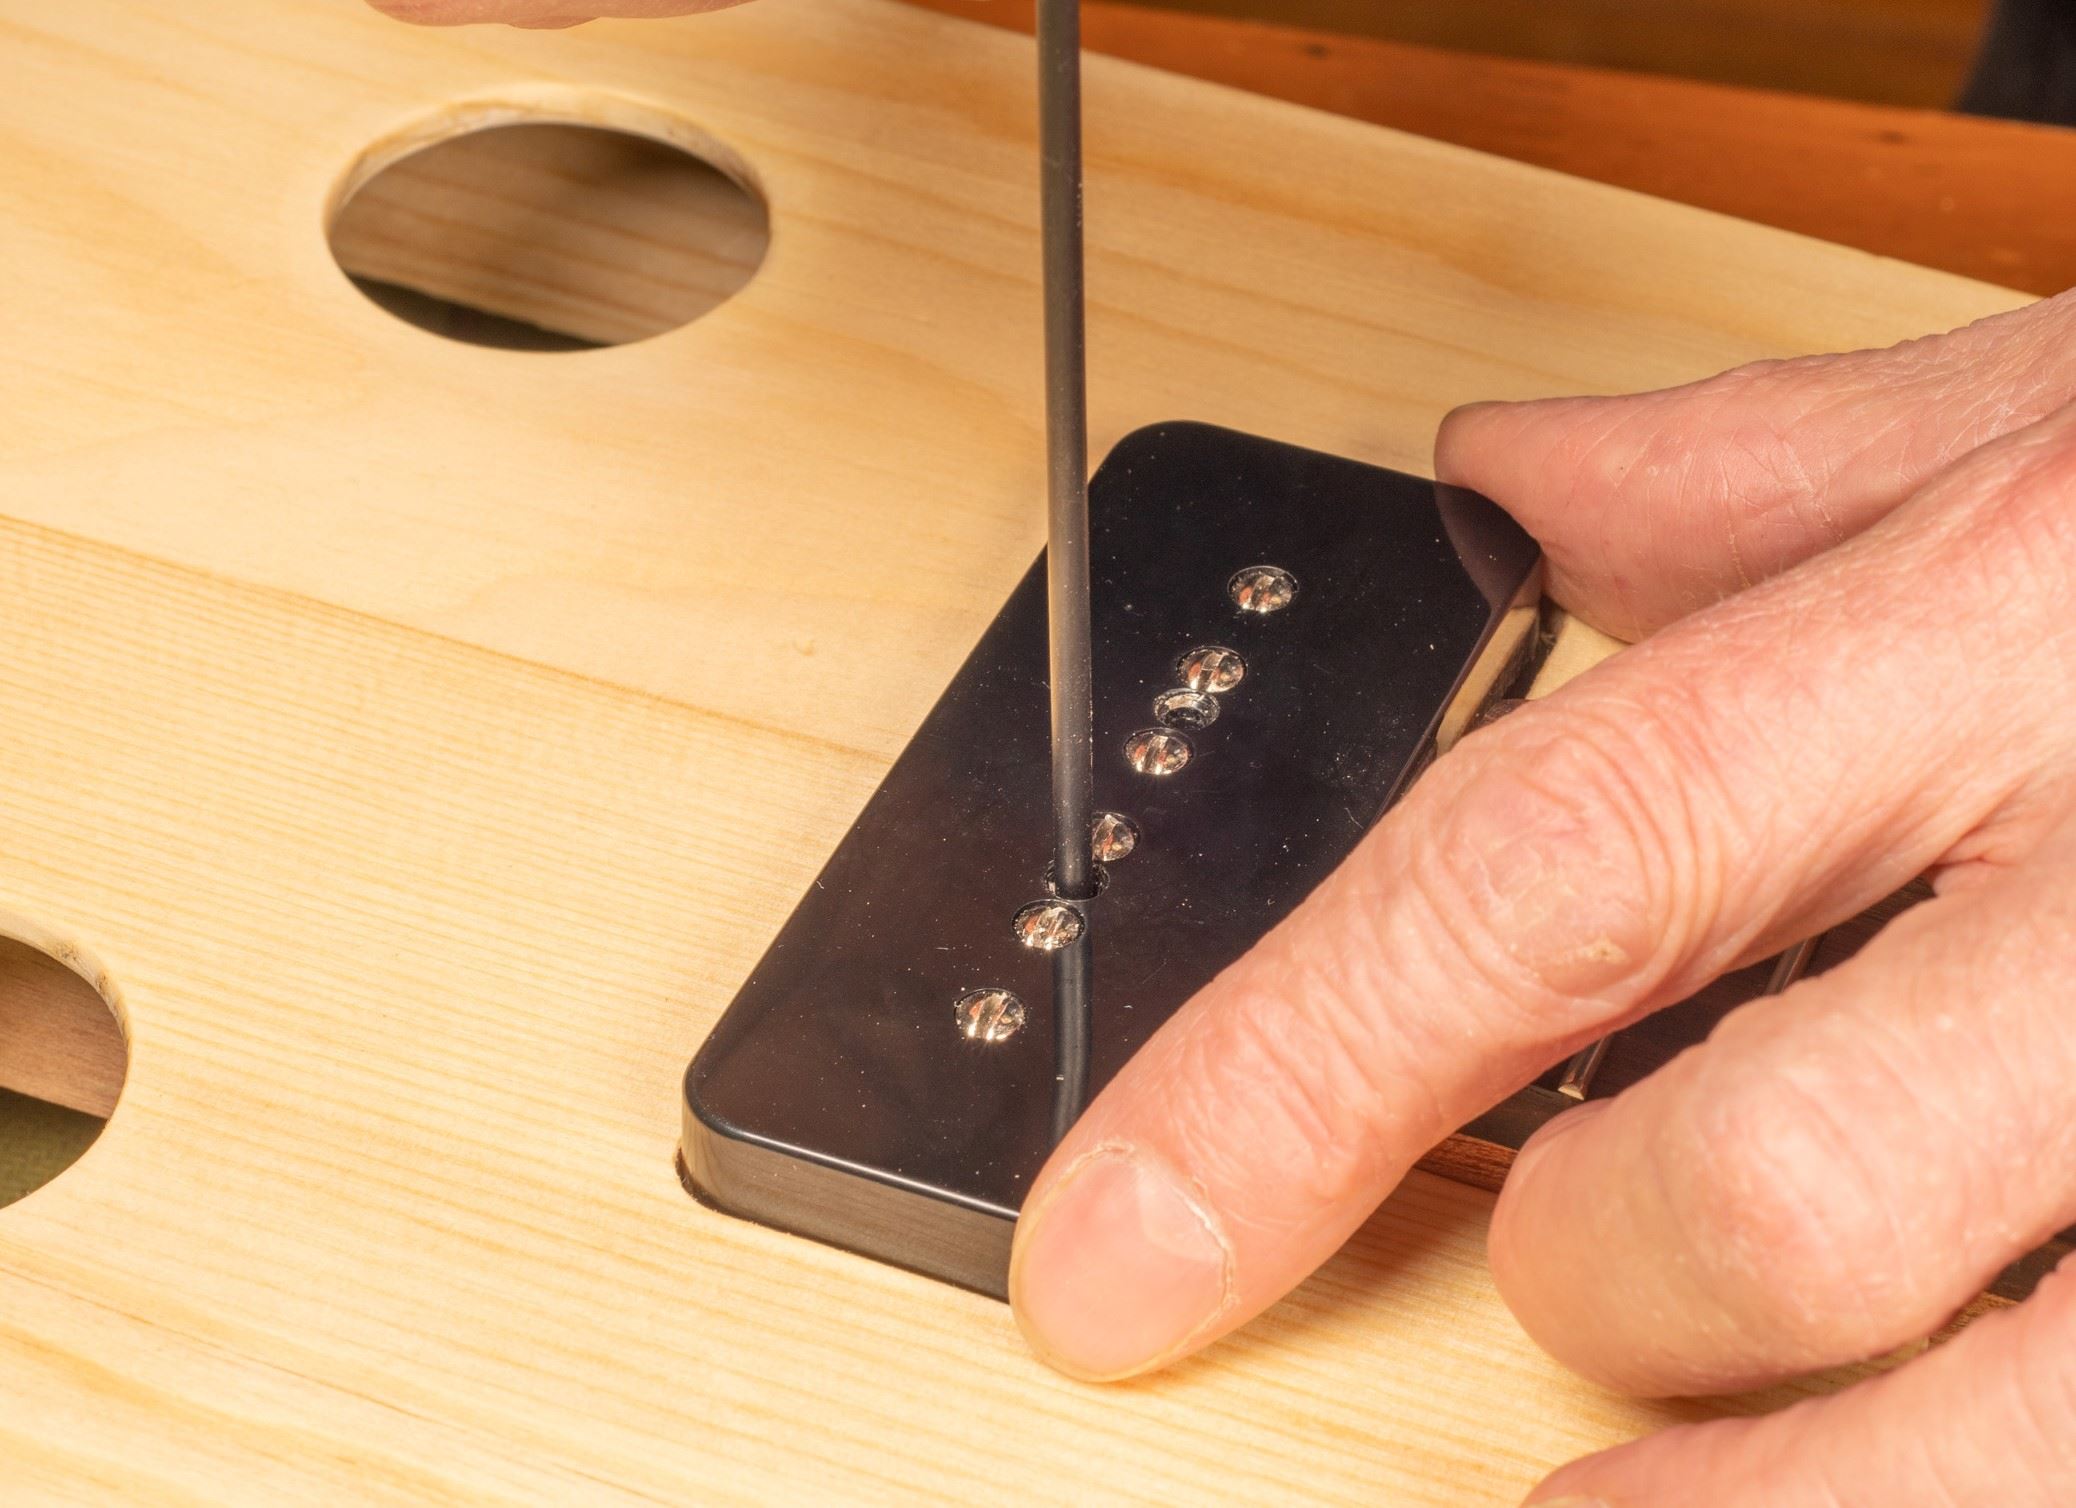
Orientation of this P-90 is not critical, but for easier wiring, install it so the side with the wires is closer to the volume pot. Using the pickup cover as your guide, mark out the pickup mounting screw holes. There may be wax in the holes you can poke out with a 3/32" drill bit held with your fingers.
Remove the pickup, and drill 1/2" deep pilot holes using a 1/16" bit. Now insert the mounting screws through the holes in the pickup, and then thread the springs through the screws under the pickup. Lower the pickup into the cavity, aligning the screws with the drilled holes in the neck. Screw the pickup down so it is just lower than the end of the fingerboard, you will adjust the height later.
Install the tailpiece
Locate the center of the body at the tail end (a centering rule is ideal for this), noting the centerline with a piece of low-tack tape. Using the centerline, line up and mark out the tailpiece mounting screw locations with a pencil or a transfer punch. Do not drill on the top of the body. The hinge of the tailpiece faces up. You will be installing only three screws at the base of the tailpiece. The three holes at the top are for installing the strings.
Drill the top two holes 1/4" deep using a 5/64" bit. The tailpiece will also house the ground wire. The bottom hole will be drilled all the way through. Later when installing the electronics, this hole and tailpiece will secure the ground wire from inside the guitar.

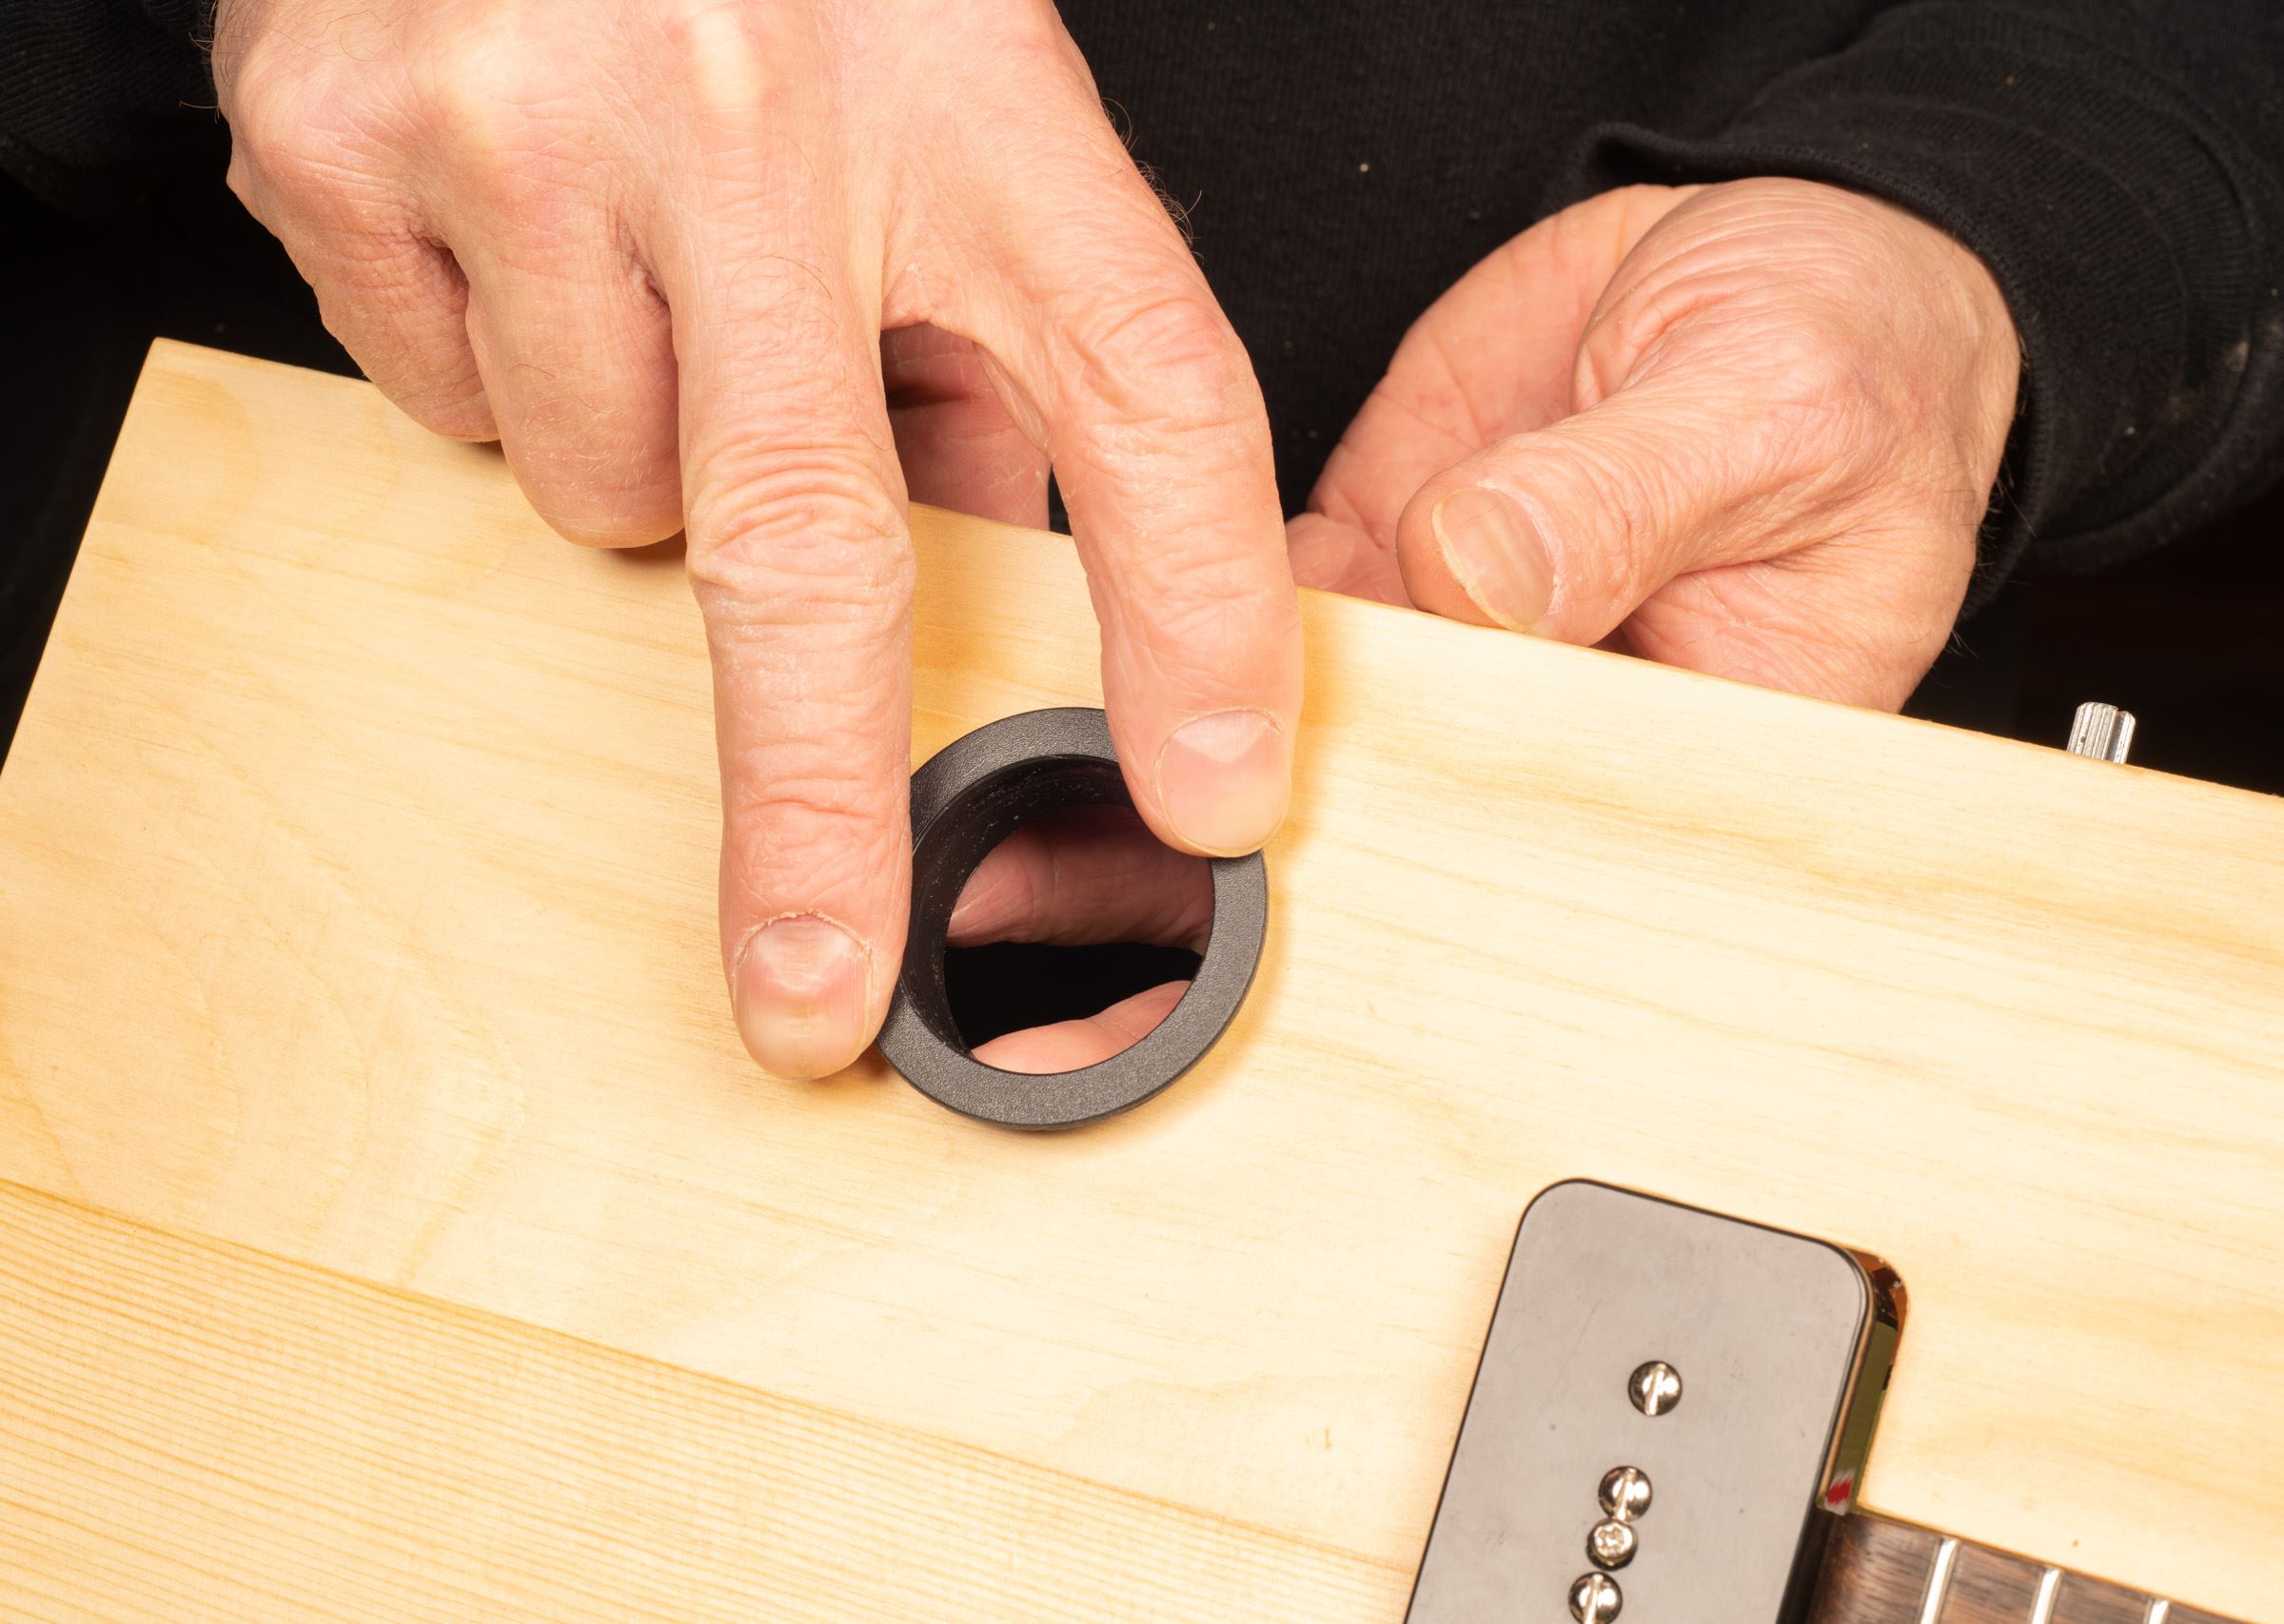
Fit the sound port rings
You will need to enlarge the sound port holes for the rings to fit. They should slide in with minimal pressure so as to not crack the top. The rings will be glued in after finishing. Gently sand the inside of the sound port holes with 220-grit sandpaper until the ring is just held in place by the surrounding wood. Make sure to keep them round by sanding around the hole evenly and checking the fit frequently.
While supporting the back of the top with your fingers, carefully press the rings into place. Go slowly! You can crack the top if you press too hard too fast. When the ring slides in and out with minimal pressure, leave the ring installed.
Install the back
Using the pre-drilled holes on the back of the body as a guide, mark out the attachment screw hole locations on the neck and tail blocks with a punch or pencil. Drill the pilot holes 1/2" deep with a 1/16" bit.
After drilling, countersink the holes on the back of the body with a 1/4" countersink bit to allow the head of screw clearance without splitting the wood when tightened down. Attach the back using a #2 screwdriver.
Now that all of the parts are temporarily installed, you will install the remaining hardware for a final fit check before finishing.
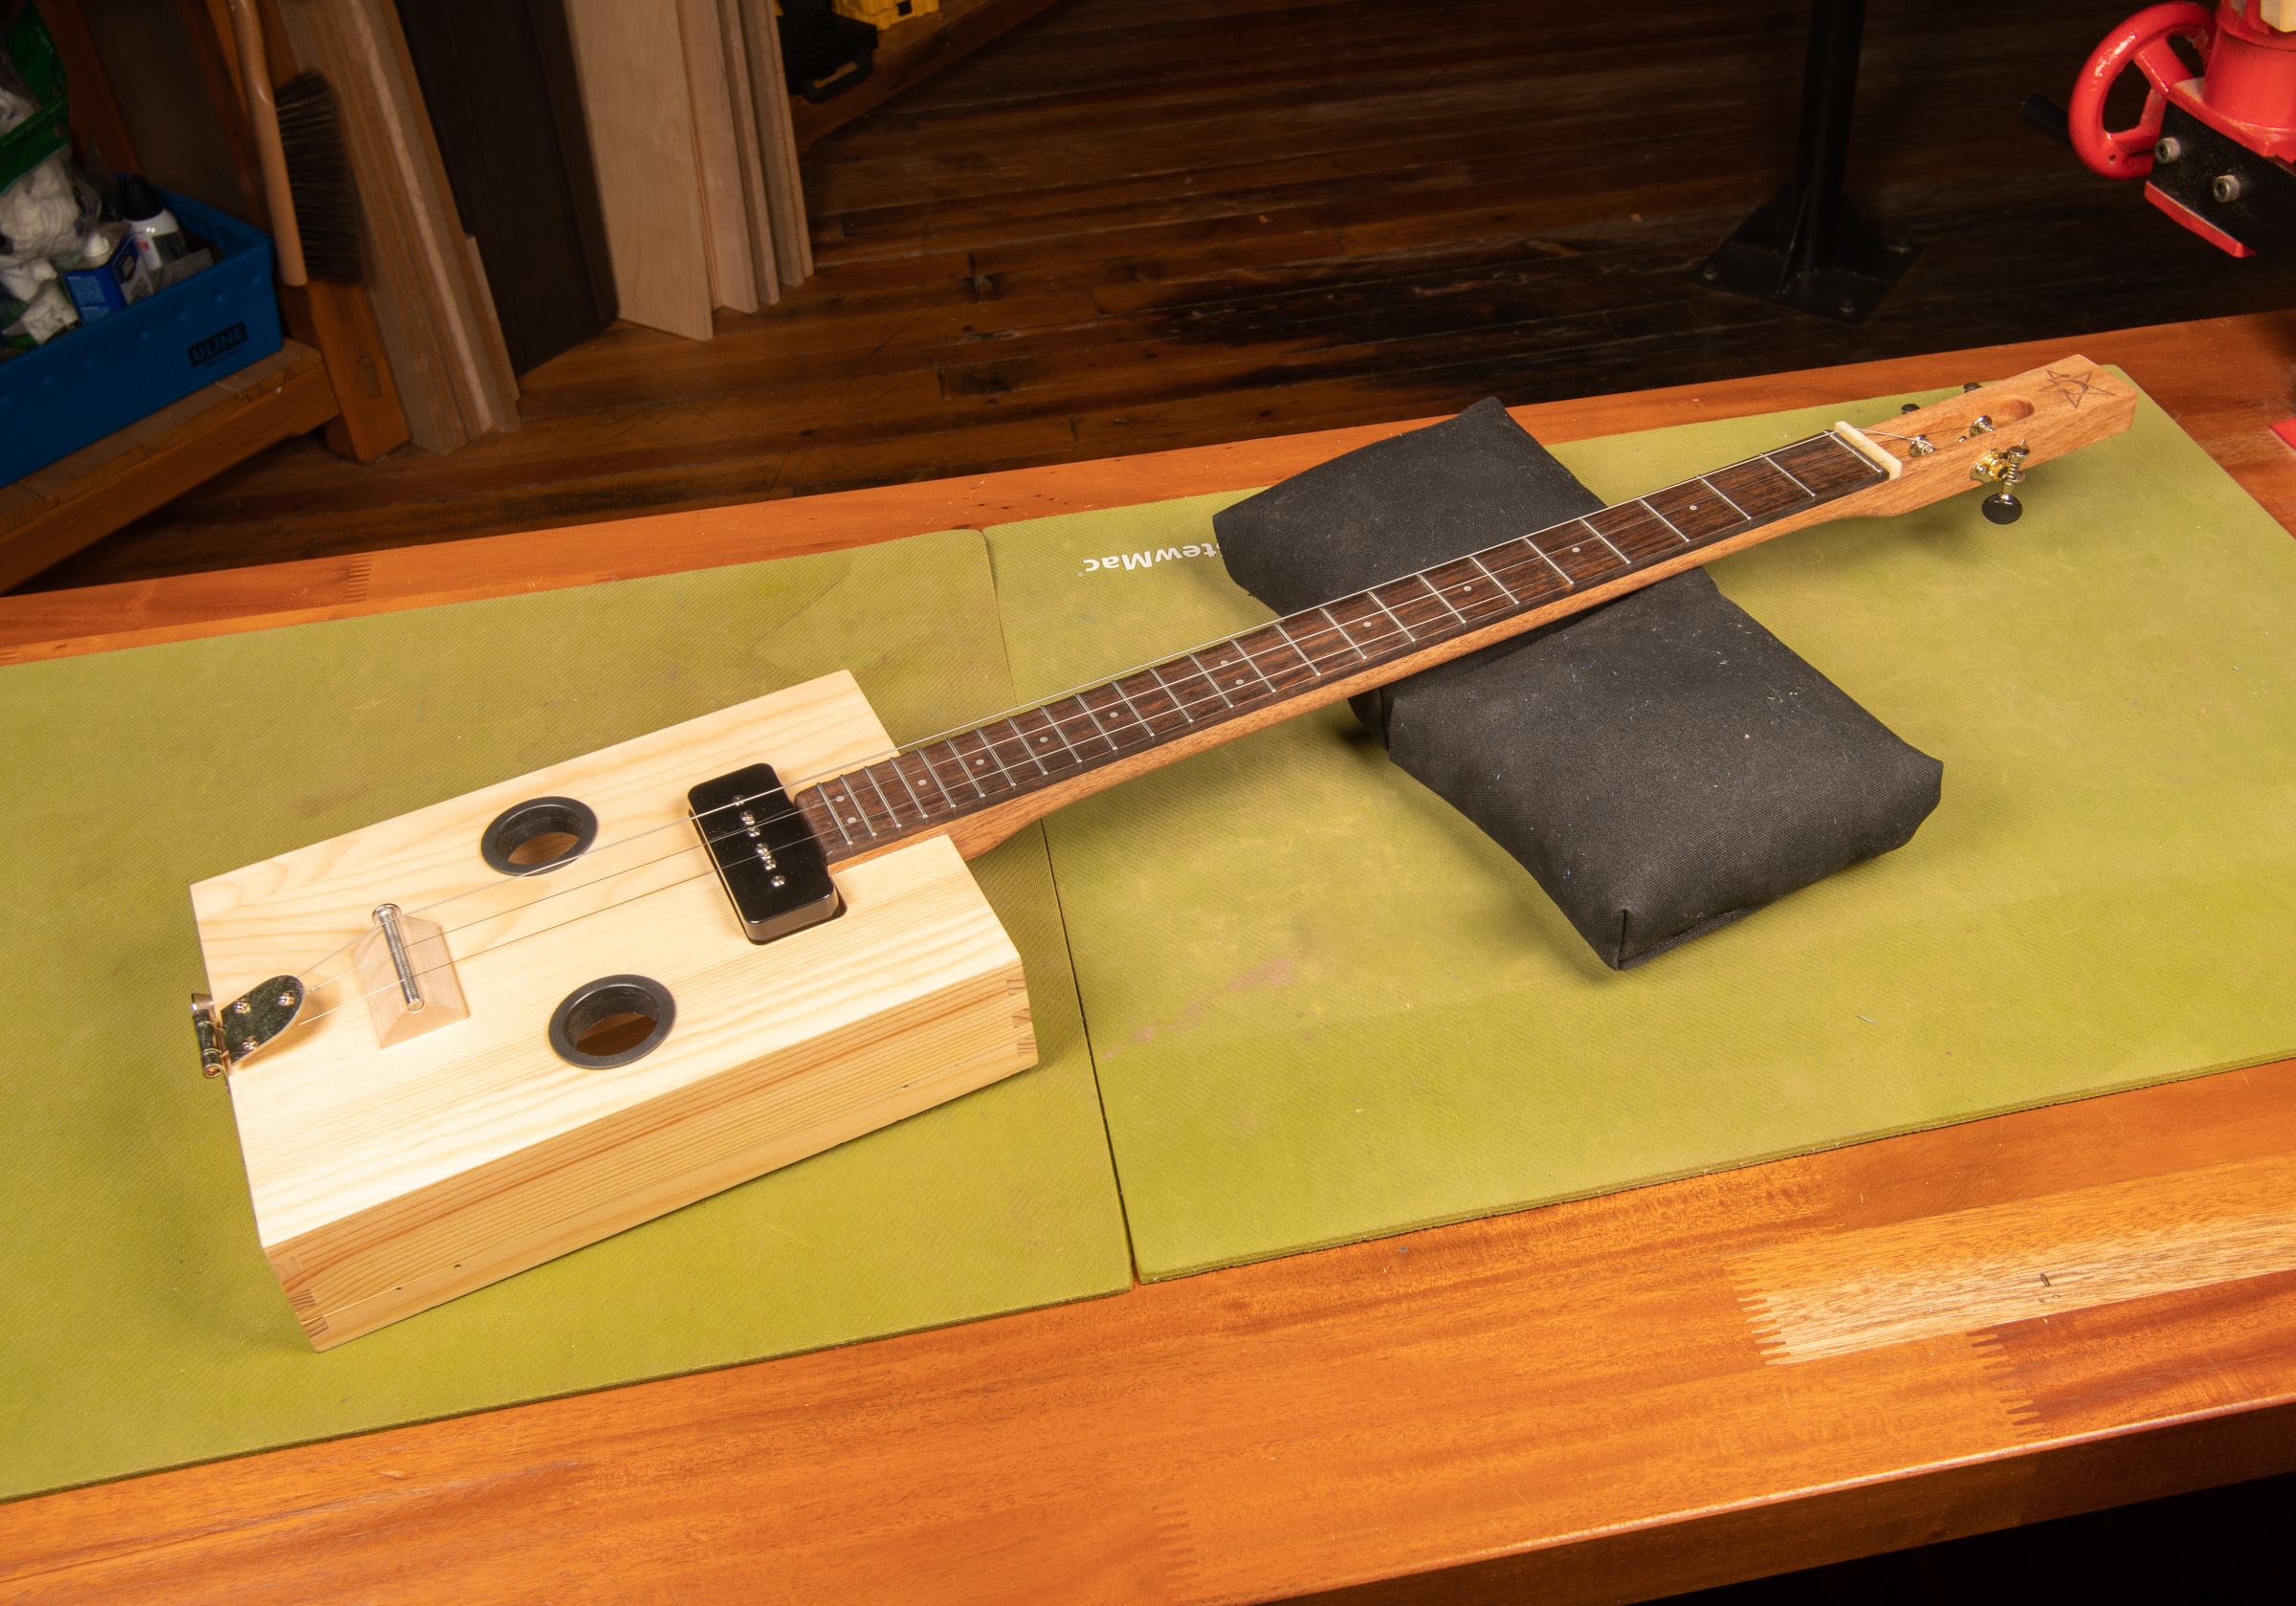
Initial setup
Install the strings
Like a traditional guitar, the strings are installed from thickest to thinnest, with thickest string on the top, toward the ceiling, and the thinnest on the bottom, towards the floor.
Pull the strings through the bottom side of the tailpiece until the ball end catches on the hole. Then run the string up the neck and attach it to the tuner. An easy method is to wrap the string around the tuner post twice, pull the excess through the hole in the post and tune up until tight. Leave the excess string length so you can reuse the strings for final setup.
Don't tune them to final pitch. You want just enough tension for them to not be floppy.
Position the bridge and saddle
This guitar has a floating (not attached) bridge that you will position in the next step. The saddle is a threaded rod bolt that is secured to the bridge with string tension.
Starting with the end of a straightedge at the center of the zero fret, and locate the center of the 12th fret. Put a piece of tape on the straightedge and mark the location of the center of the 12th fret. This is half of the scale length.
Make a second mark 1/8" past the 12th fret location you marked towards the tailpiece.
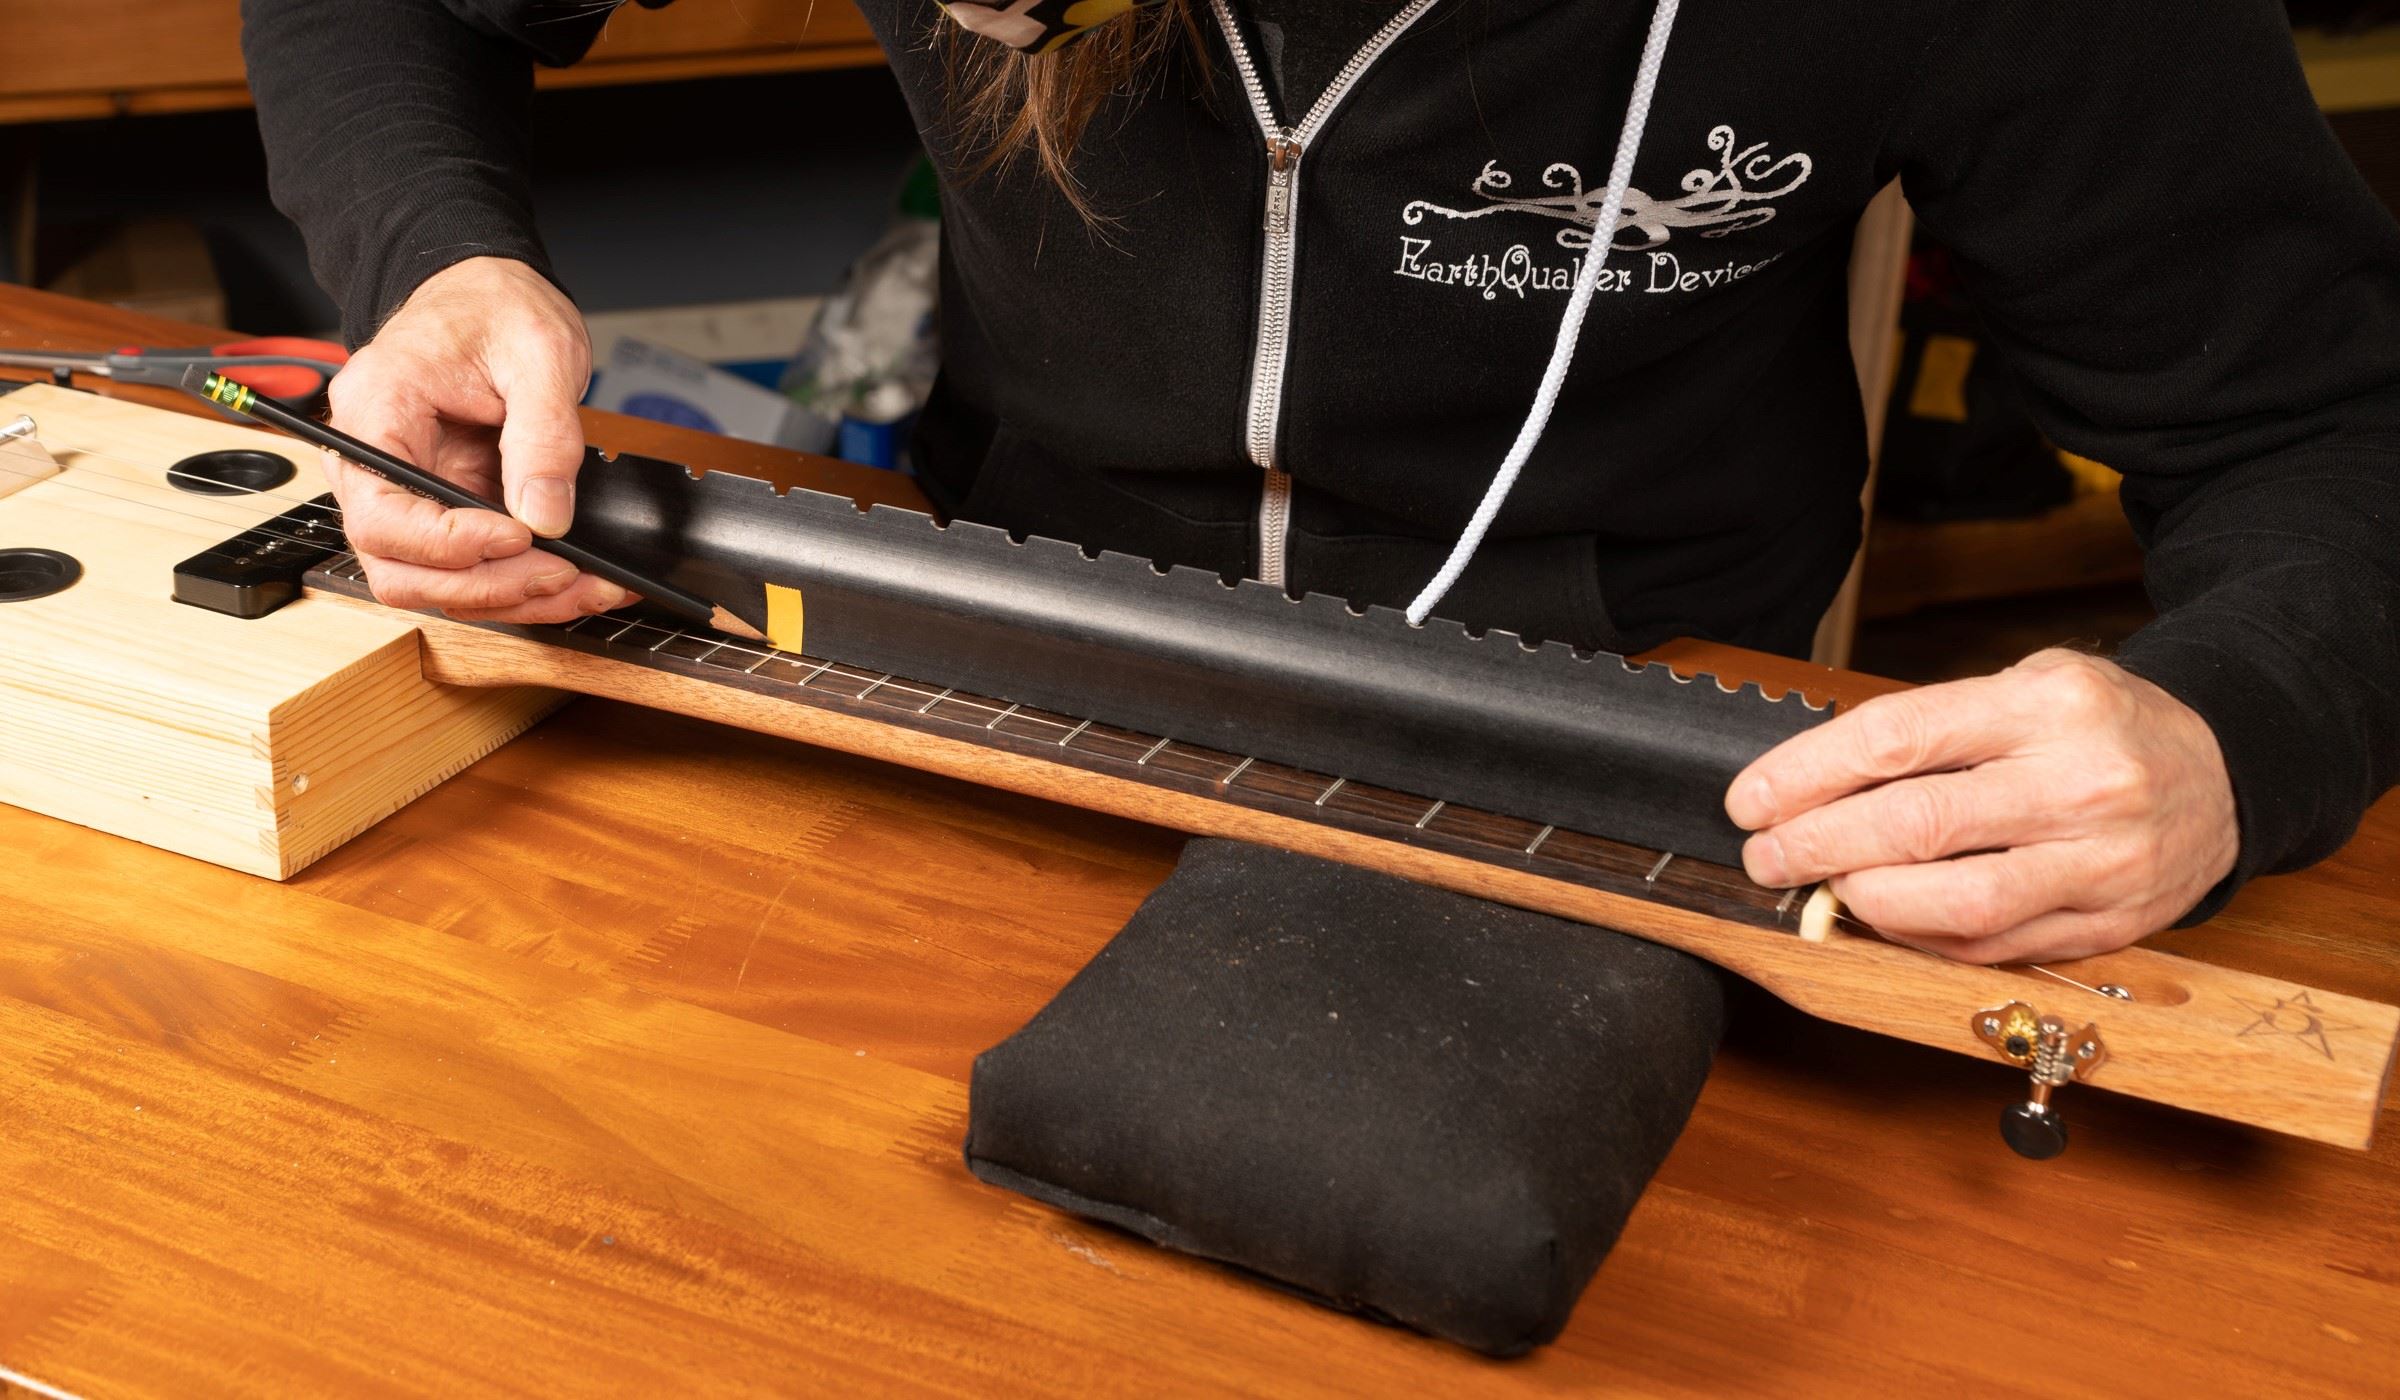
Now move the straightedge down the fretboard so the end is now at the center of the 12th fret. Position the bridge and bolt/saddle under the tape so that the second mark you made is in the center of the bolt/saddle. The bridge is symmetrical; either side will work when placing the bridge. The bridge will be very close to the tailpiece. This is normal.
Adjust the neck
With the bridge in place, tune the strings to pitch. Standard cigar box tuning is low to high E-B-E, but we encourage you to experiment with others tunings to see what best suits your style.
Using the provided hex wrench, adjust the neck relief with the truss rod as described in the "Straighten the neck" section. Neck relief refers to adjusting a neck so that it has a very slight upbow, rather than being perfectly straight. This relief allows a little more room for string vibration, reducing the chance of hitting the lower frets and causing fret buzz.
Depending on your playing style, and how perfectly level your fret tops are, a neck should be anywhere from perfectly straight to having 0.012" of relief. This measurement refers to additional string height over the 12th fret, compared to a perfectly straight neck. A straight neck tends to play and sound better, but very few guitars end up with no relief at all, and several thousandths of an inch or more is perfectly normal.
You can use a straightedge or the low E string to get you in the ballpark. Using your index finger, hold down the low E string at the first fret. With the other hand, hold down the string at the fret where the neck meets the body with your thumb and use your index finger to check for relief. The smaller the gap between the bottom of the string and the top of the frets, the straighter the neck. For less relief, tighten the truss rod, for more relief, loosen it.
Evaluate and disassemble
Now that the guitar is temporarily together, inspect your work. Inspect that all of the holes you drilled are located where you want, the tailpiece is centered, and the pickup moves freely. It will be much easier (and look better) to make any adjustments now before finish is applied.
While the guitar is roughly setup, take some time to play it. Strum some chords and fret all of the notes on the fretboard. After finishing, you will be dialing in the setup further. Put a strap on it and play it in your normal playing position. Once you are happy with your work, carefully reverse the steps and disassemble the guitar. You can leave the nut installed.
Finishing
There are many options for finishing. A simple option that can be done indoors is a satin Wipe-on Poly or a rubbed-on oil finish. These dry quickly and will seal and protect the wood. If using a rubbed-on finish, follow the directions on the package.
If you have the space and proper ventilation, we recommend having some fun with ColorTone Aerosols. They are a fast and easy way to get a beautiful nitrocellulose finish without investing in spray equipment.
Important finishing notes:
For any type of finish, keep these precautions in mind. Don't apply finish to any surface you'll glue, such as the inside of the body and base of the neck. Mask off the fretboard and truss rod cavity to protect them from finish.
Don't mix finish types (such as oil and nitro). These finishes are not compatible and mixing will result in a poor final result.
Always test on scrap! Get your comfortable finishing technique before working on your guitar. Your drying time and final color can depend on the wood, temperature, and humidity where you are.
Inspect the body and neck and repair any defects that you note, or not! Sometimes little bumps and bruises add character to this style of instrument. Small dents can be steamed out by placing a damp cloth over the dent and applying heat with a soldering iron.
To learn more, see our Trade Secrets video Fixing a guitar dent by steaming it out.
No matter what finish you choose, preparing the neck and body for finish is just as important as applying the finish. The key to a great looking finish is patience and lots of it.
Prep work for any finish
There's no need to sand the inside of the body as it can be used as a gluing surface. Do not sand on the fret ends or tops, and do not change the bevel at the fret ends. No matter what finish you choose, follow these next steps for the best results.
Sand the body and neck
Sand the body and neck using 320-grit sandpaper on a sanding block. Sand only in the direction of the grain. After a complete sanding, wipe the body and neck with a damp cloth to raise the grain, to reveal fibers that need more sanding. Let the dampness dry, then sand the raised grain with 320-grit sandpaper.
Breaking the edges
While sanding, slightly break any sharp edges on the body, fingerboard, and peghead. Softening hard edges promotes even finish coverage. Use a tack cloth to remove any remaining dust or debris.
Degrease with naphtha
When you've finished sanding, wipe the body and neck with a naphtha-dampened lint-free rag to remove any oils or grease. From this point on, wear clean gloves when handling so you won't contaminate the wood.
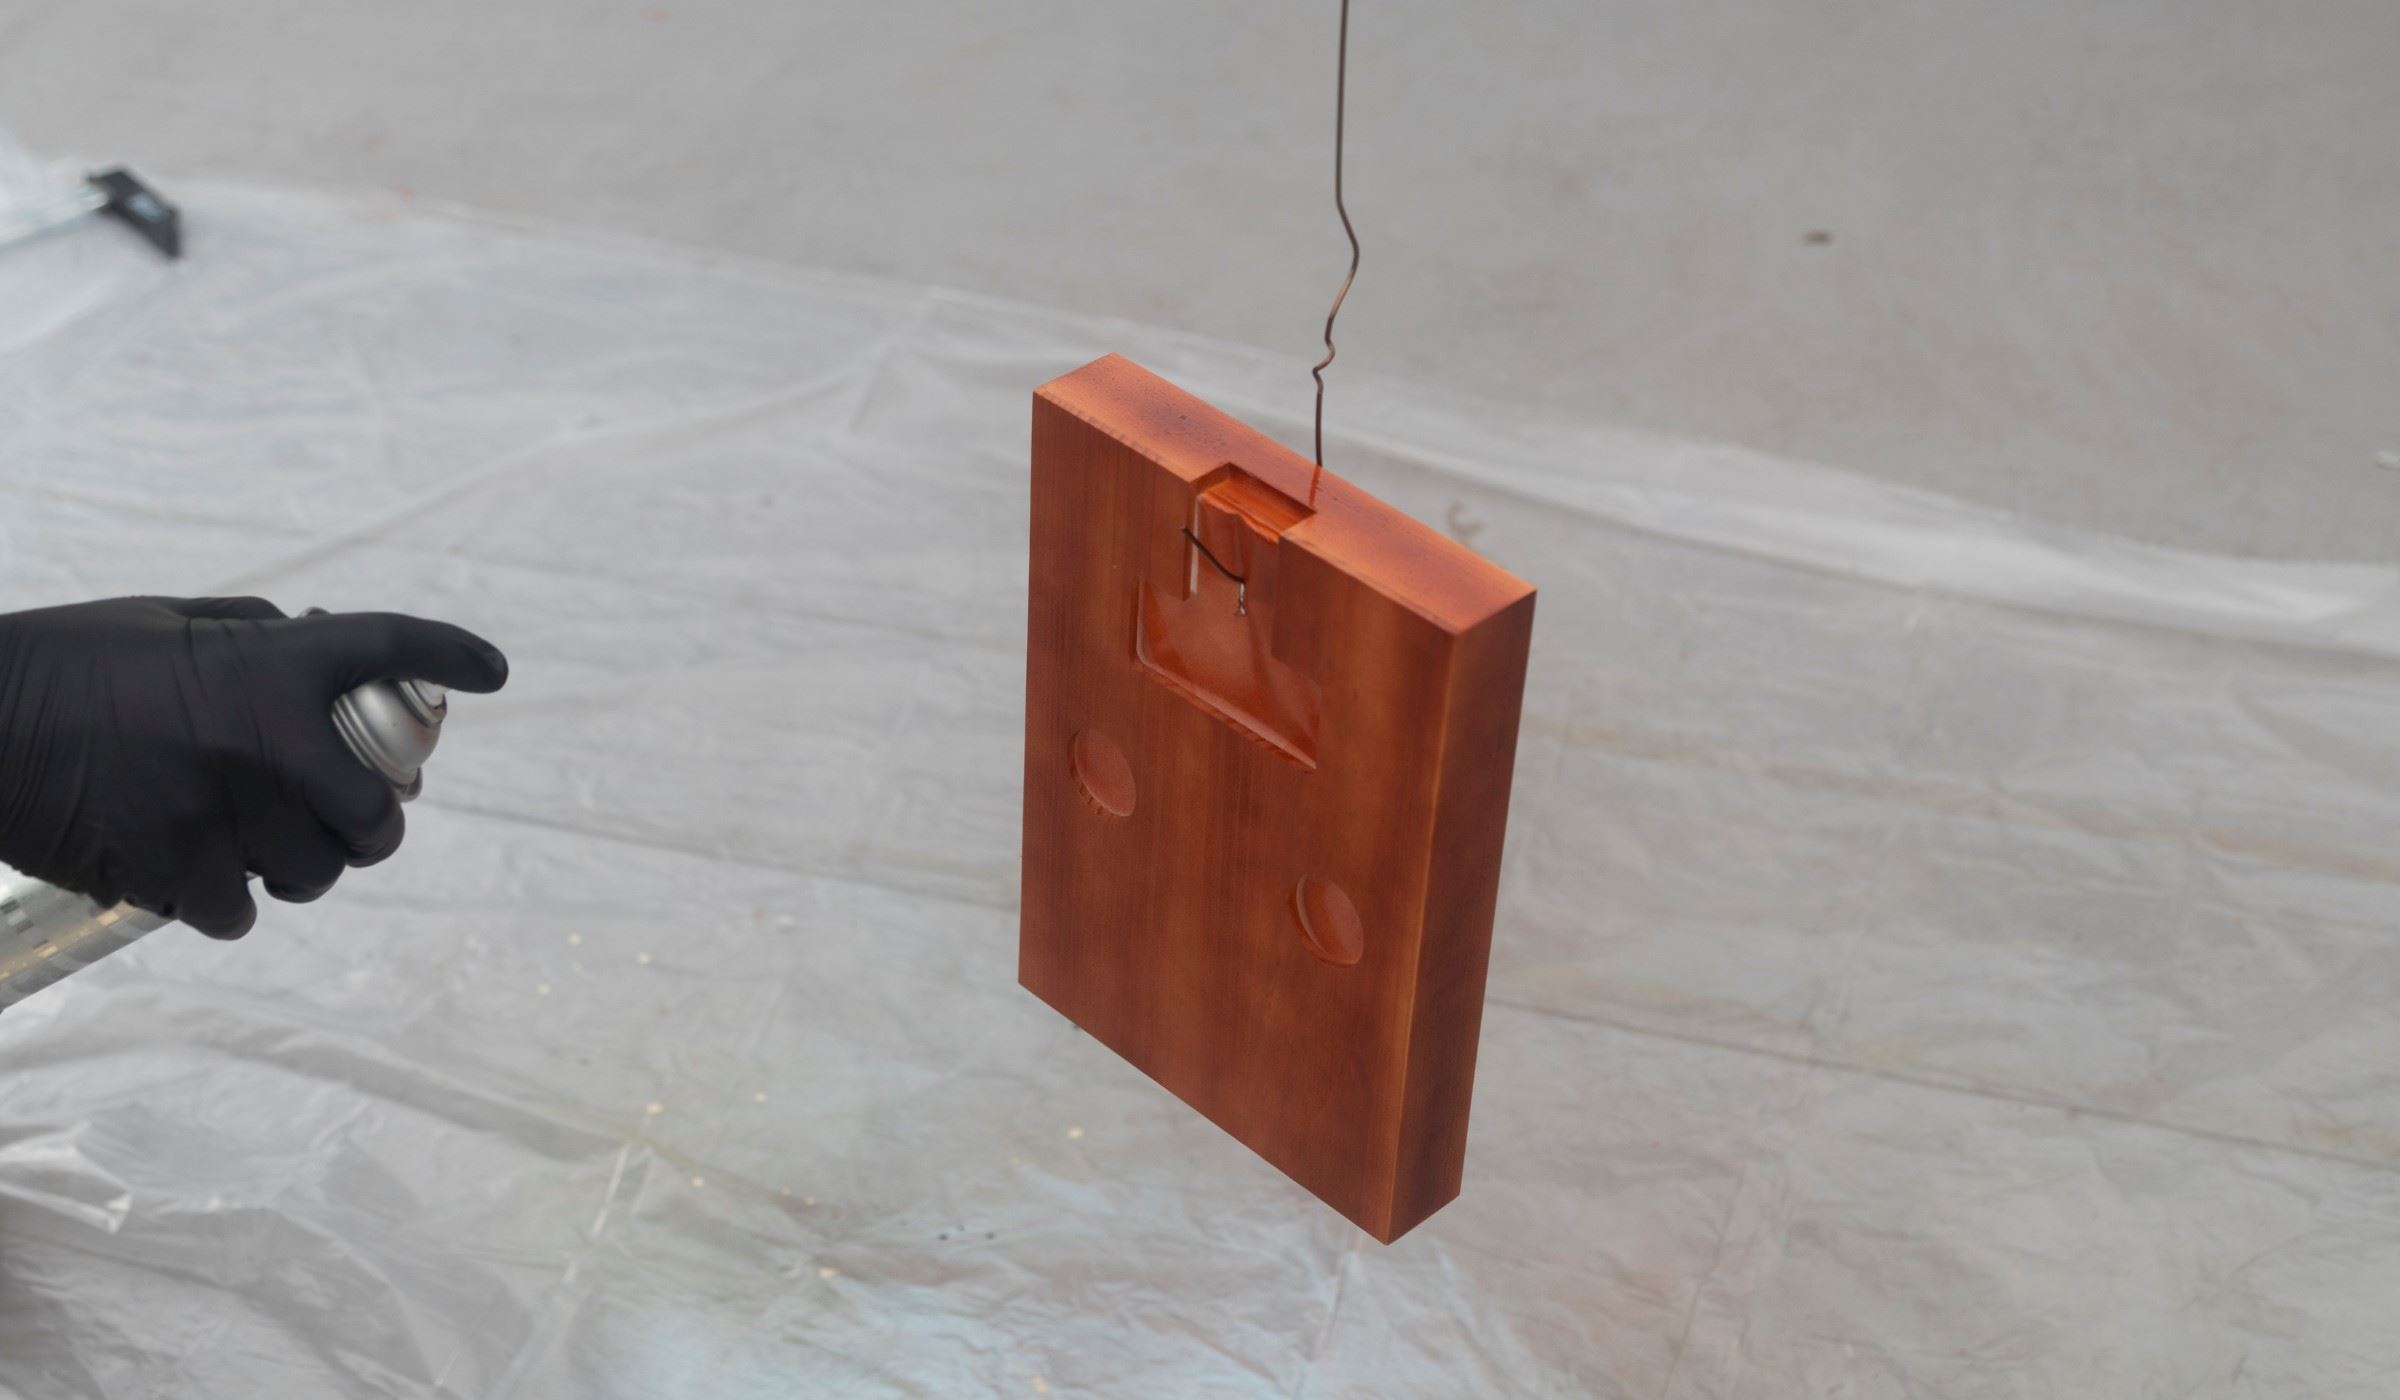
Set up your finishing space
Lay down drop cloths or mask anything you do not want to get finish on. Make sure you have proper ventilation. Read the labels of the products you are using and make sure you have applicable safety gear like gloves, goggles, and a respirator mask.
For spraying and drying, you can use a wire hanger through the hole in the bottom of the neck and through neck pocket or other-drilled holes in the body. Hanging the parts to dry will reduce the change of smudging the color coats and finish as they dry.
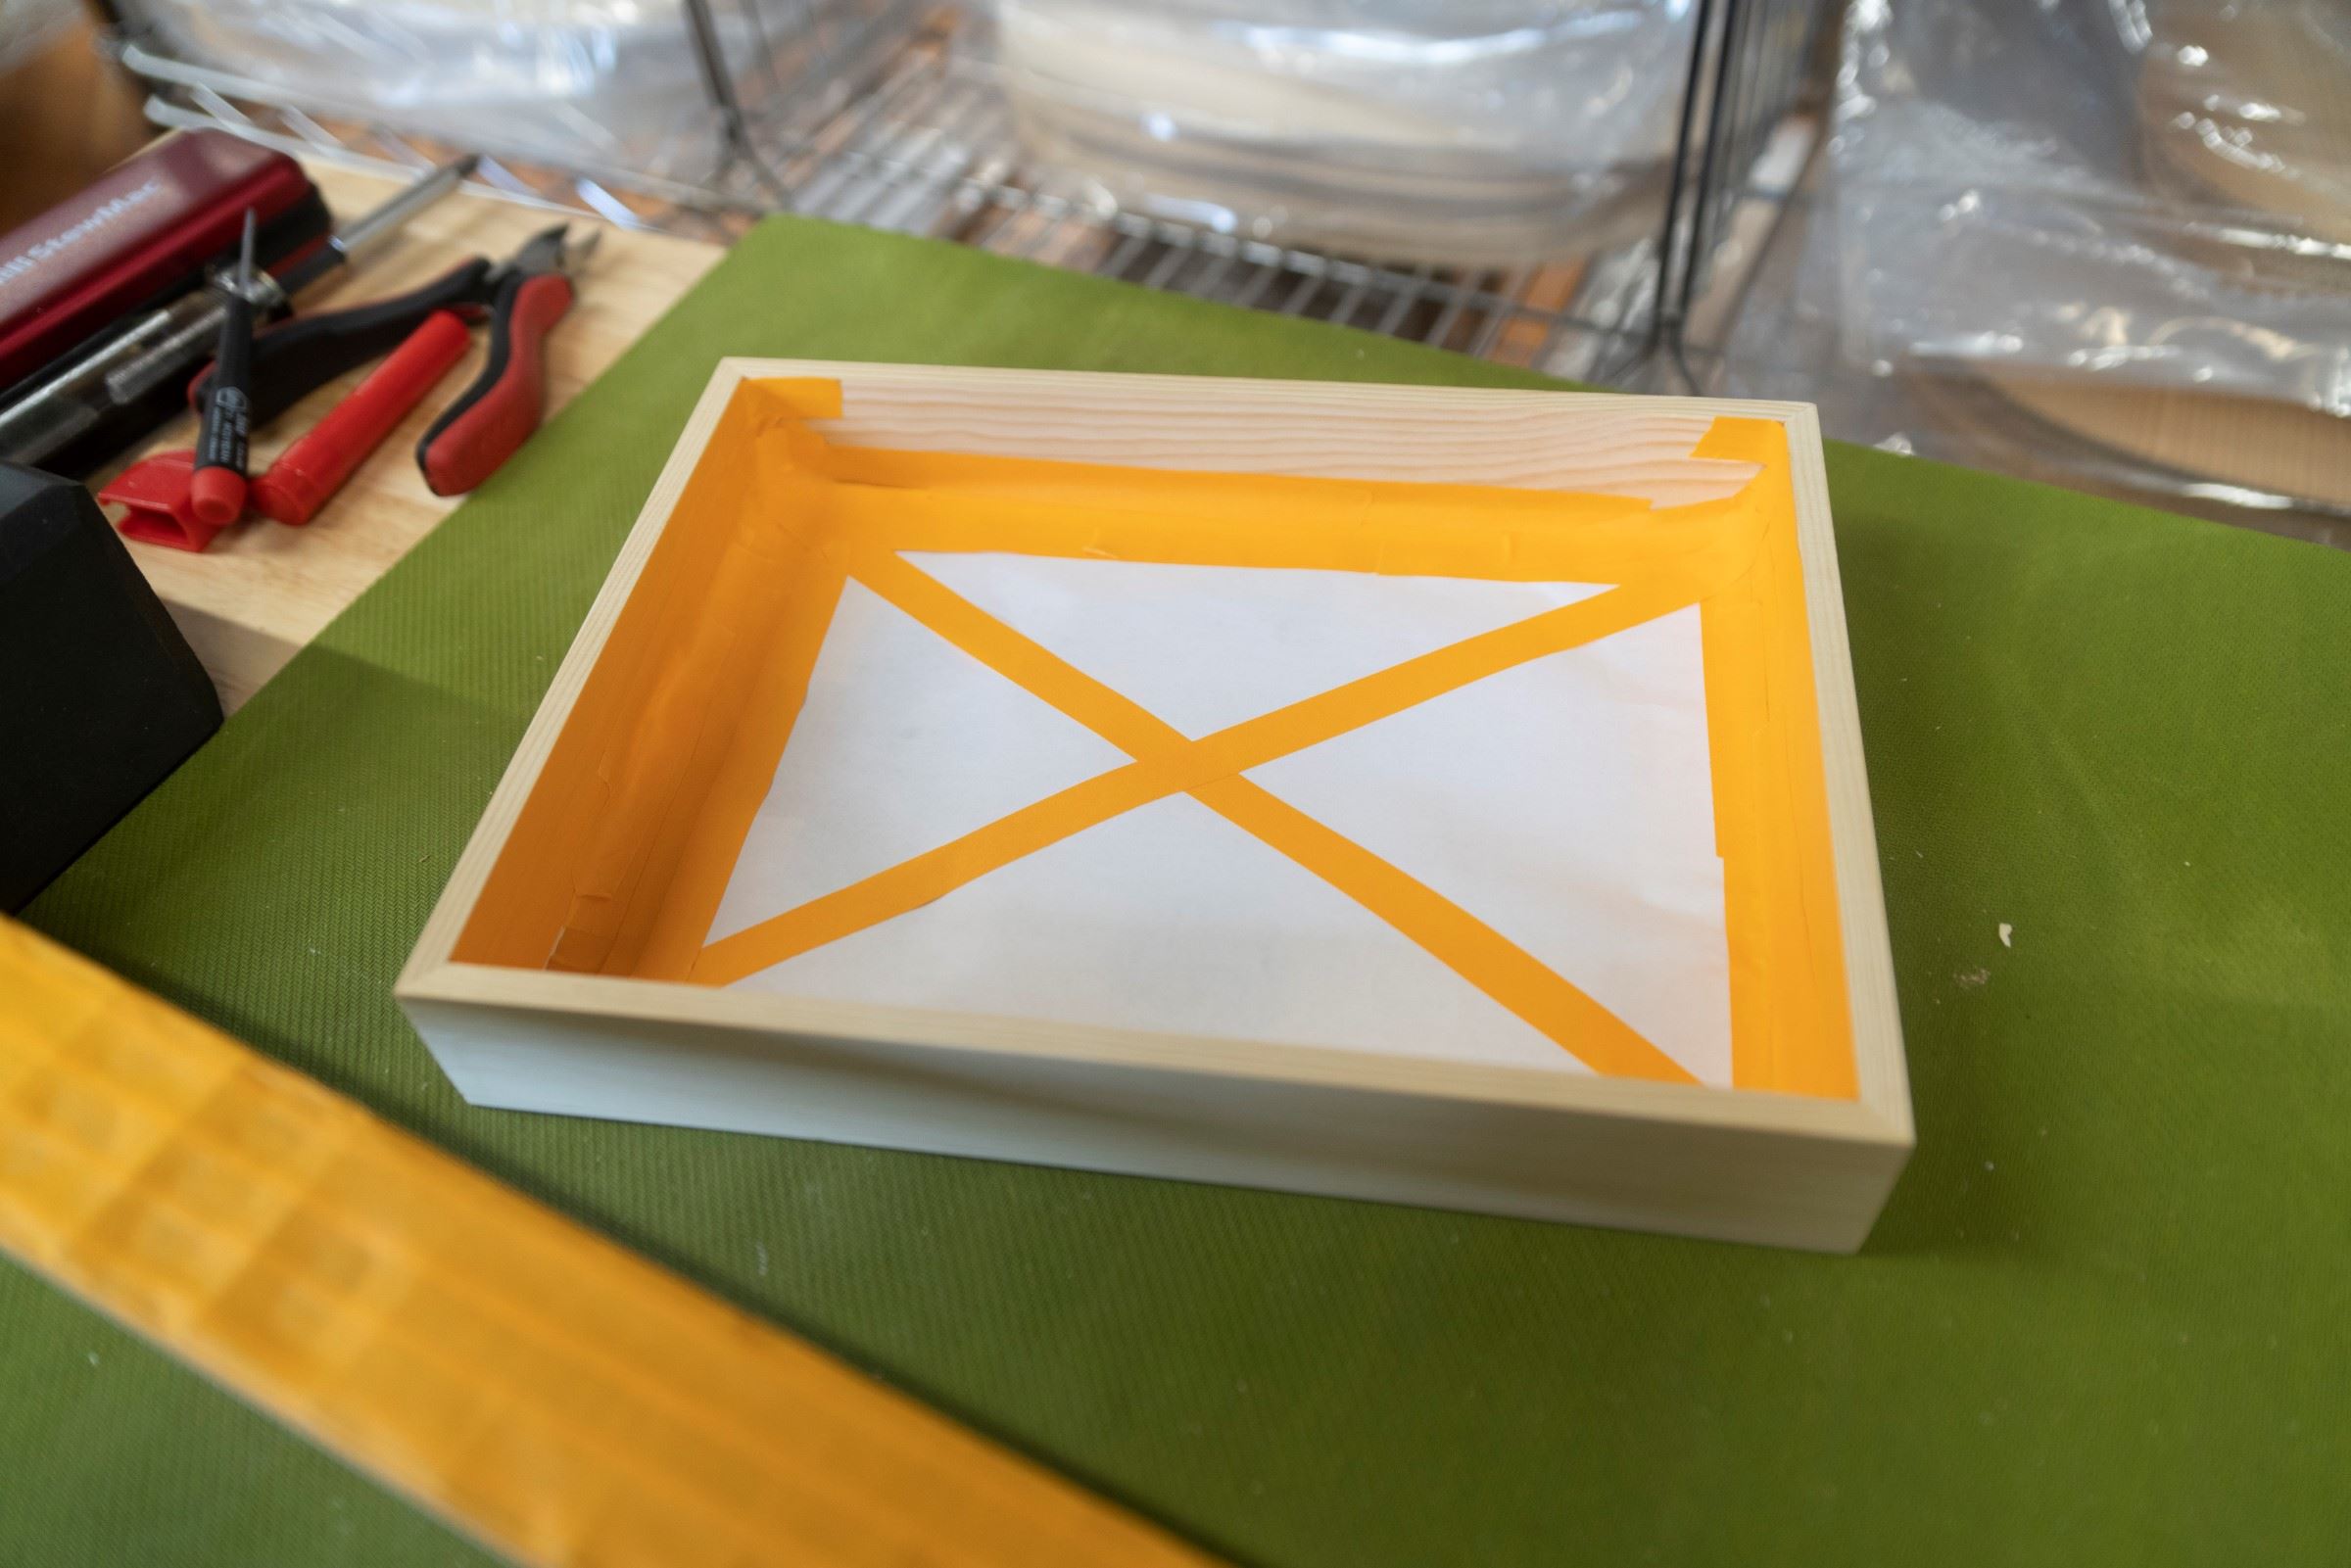
Mask the body and neck
When finishing the neck, only finish the sides of the neck and heel up to the pickup rout and stop. Do not finish the inside of the body. Mask these areas with paper and tape. Mask off the sides and top of the fretboard and the nut, truss rod nut, and truss rod cavity.
Spray schedule with ColorTone Aerosol Lacquer
This finishing process can be completed in as little as three days, followed by a week of curing. Remember that patience is the key to a successful finish job. Don't rush it! Spray the lacquer using light passes to prevent runs. See recommended tools and supplies at the beginning of this book for suggested quantities.
Day 1
Body and neck: spray 1-2 coats of ColorTone Sanding Sealer on the body, waiting 1-2 hours between coats.
Next, spray color coats (optional). We used ColorTone Tinted Lacquer in Red Mahogany, spraying 2 coats, waiting 1 hour between coats. Remember to test on scrap!
Let dry overnight.
Day 2
Body and Neck: Spray 2-3 coats of ColorTone Clear Satin, 1 hour apart.
Let dry overnight.
Day 3
Body and neck: lightly sand the body and neck with 400-grit sandpaper to remove any finish spatter or dust.
Spray 2-3 additional coats of ColorTone Clear Satin, 1 hour apart.
Allow the finish to cure for a week in a cool, dry room. Around 70° at 50% humidity is recommended. For a nice satin appearance, after the finish has dried for 1 week, go over the entire instrument lightly with Light Duty 3M Scotch-Brite Pads or 0000 steel wool.
|
Tips for spraying Use warm lacquer, not cold. Cold lacquer spatters, requiring extra sanding. Warm up your aerosols before spraying by placing the cans in a sink of warm tap water. When spraying, keep the spray parallelto the surface of the guitar for even coverage as shown. Spray with the can 12"-14" from the surface of the wood. Follow the directions on the can.
|

Final assembly
Now that the finish is fully cured, you can now finish building your guitar. Be careful now that the body is painted, and assemble your guitar on a soft pad or cardboard to prevent denting or scratching the instrument.
Reinstall the blocks and neck
Reassemble the neck and body following the same steps from Building the Body section. Hand-tighten your screws and go slow to ensure you don't scratch the finish. Once the body and neck are again attached, you can now solder the electronics.
Important soldering tips
Plan so each joint is only soldered once. Resoldered joints are more likely to fail. Before using your iron, tin the tip by melting a small amount of solder onto it. This makes the heat transfer faster and the solder flow more cleanly. Keep the tip clean by wiping it between each connection on a damp sponge.
Hold wires in place by threading the leads through the lugs for a solid connection. Your solder joints will make the final connection. Make solder joints quickly, without scorching the components. Feed the solder to the lug, not the iron, using only enough solder to fill the lug. Don’t blow on the hot solder or touch the joint until it has cooled completely. A good solder joint is shiny, not dull.
To learn more, see our Trade Secrets video How to get a good clean solder joint.
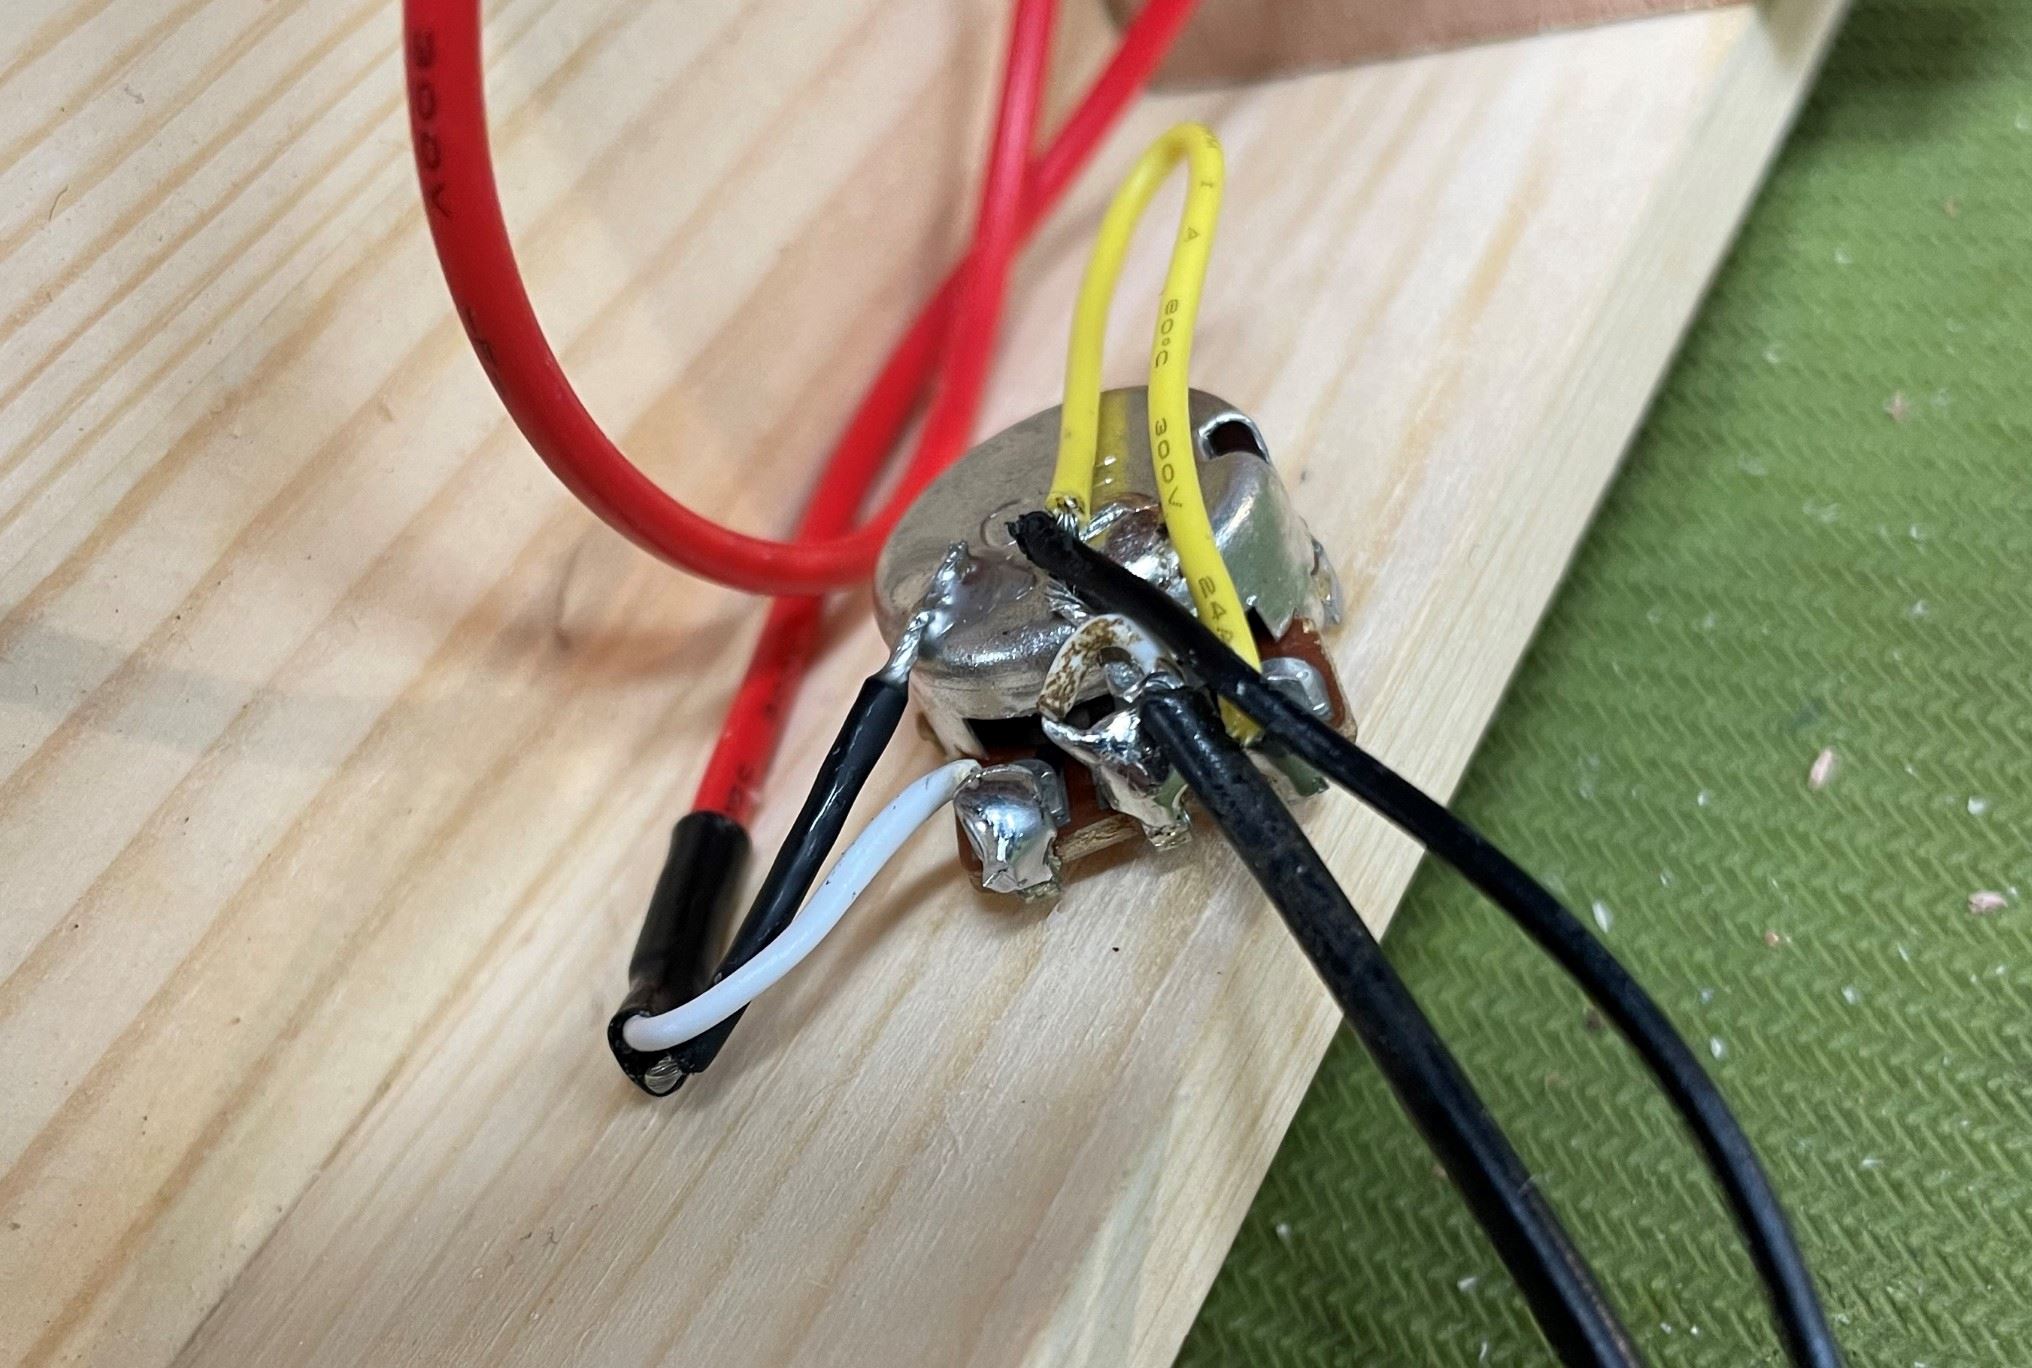
Install the volume control pot
Install the pot in the location you drilled earlier. Inside the body, make sure the lugs are facing out, for easy access when making the solder connections. Tighten the nut using a 10mm wrench. Install the knob on the pot.
Locate the thin ground wire that is pre-soldered to the back of the pot. It is a single wire soldered to the pot with only a bare stranded wire inside the insulation. Run 1/4" of the bare wire through the small hole you drilled for the tailpiece.
You may have to strip some of the black insulation back to expose more bare wire to make a good connection to the tailpiece.
Install the tailpiece, you want the bare ground wire to contact the tailpiece tightly to "ground" the circuit and reduce buzzing.
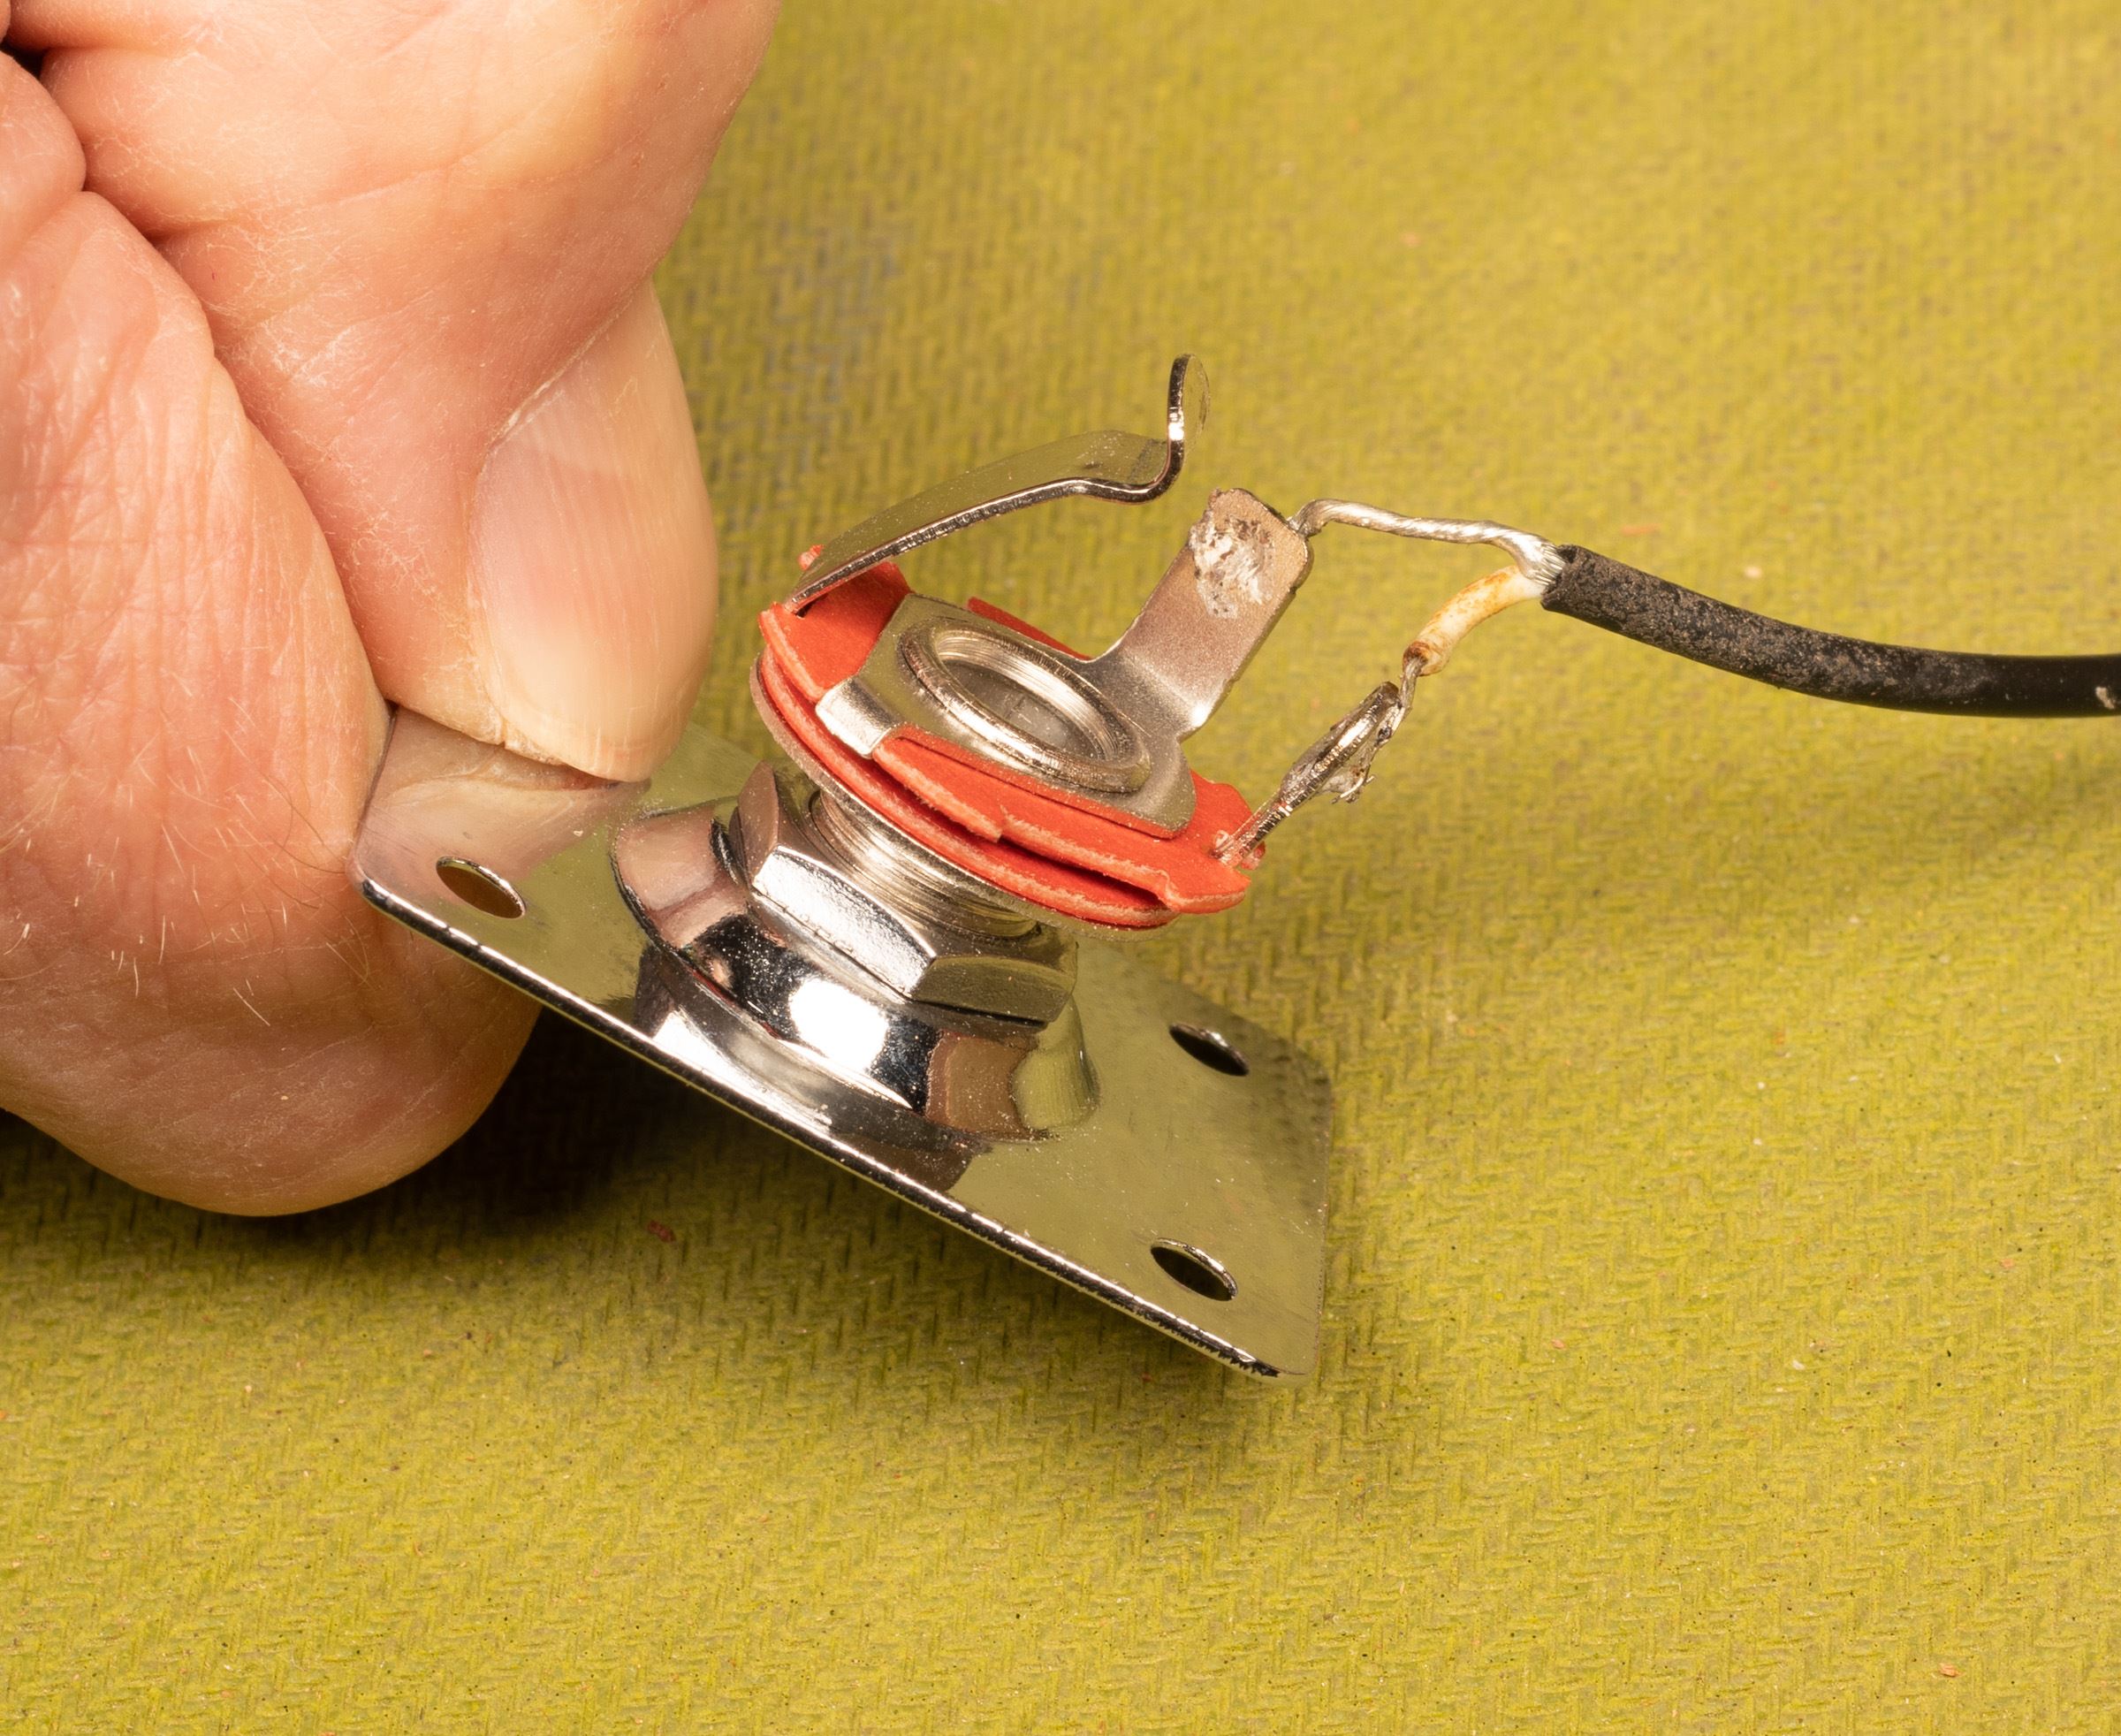
Solder the jack
Take the black and bare wires that are pre-soldered to the volume control pot, and run them through the jack hole to the outside of the body.
Solder the white-jacketed lead wire to the rounded (tip) lug of the output jack. The shield wire gets twisted up and soldered to the squared off (sleeve) lug. Now you can screw in the jack plate to the body.
Install the pickup
Fit the pickup as you did earlier. Screw the pickup down so it is just lower than the end of the fingerboard.

From the pickup, there's a black wire and a white wire wrapped in red insulation. Solder the black wire to the back of the volume control pot. Solder the white wire to the free lug on the pot.
Now test the pickup. Plug a standard guitar cable into the jack and the other end into an amp. Tap on the pickup with a steel screwdriver to hear if it makes sound. If so, it is wired correctly. If not, re-check your solder connections.
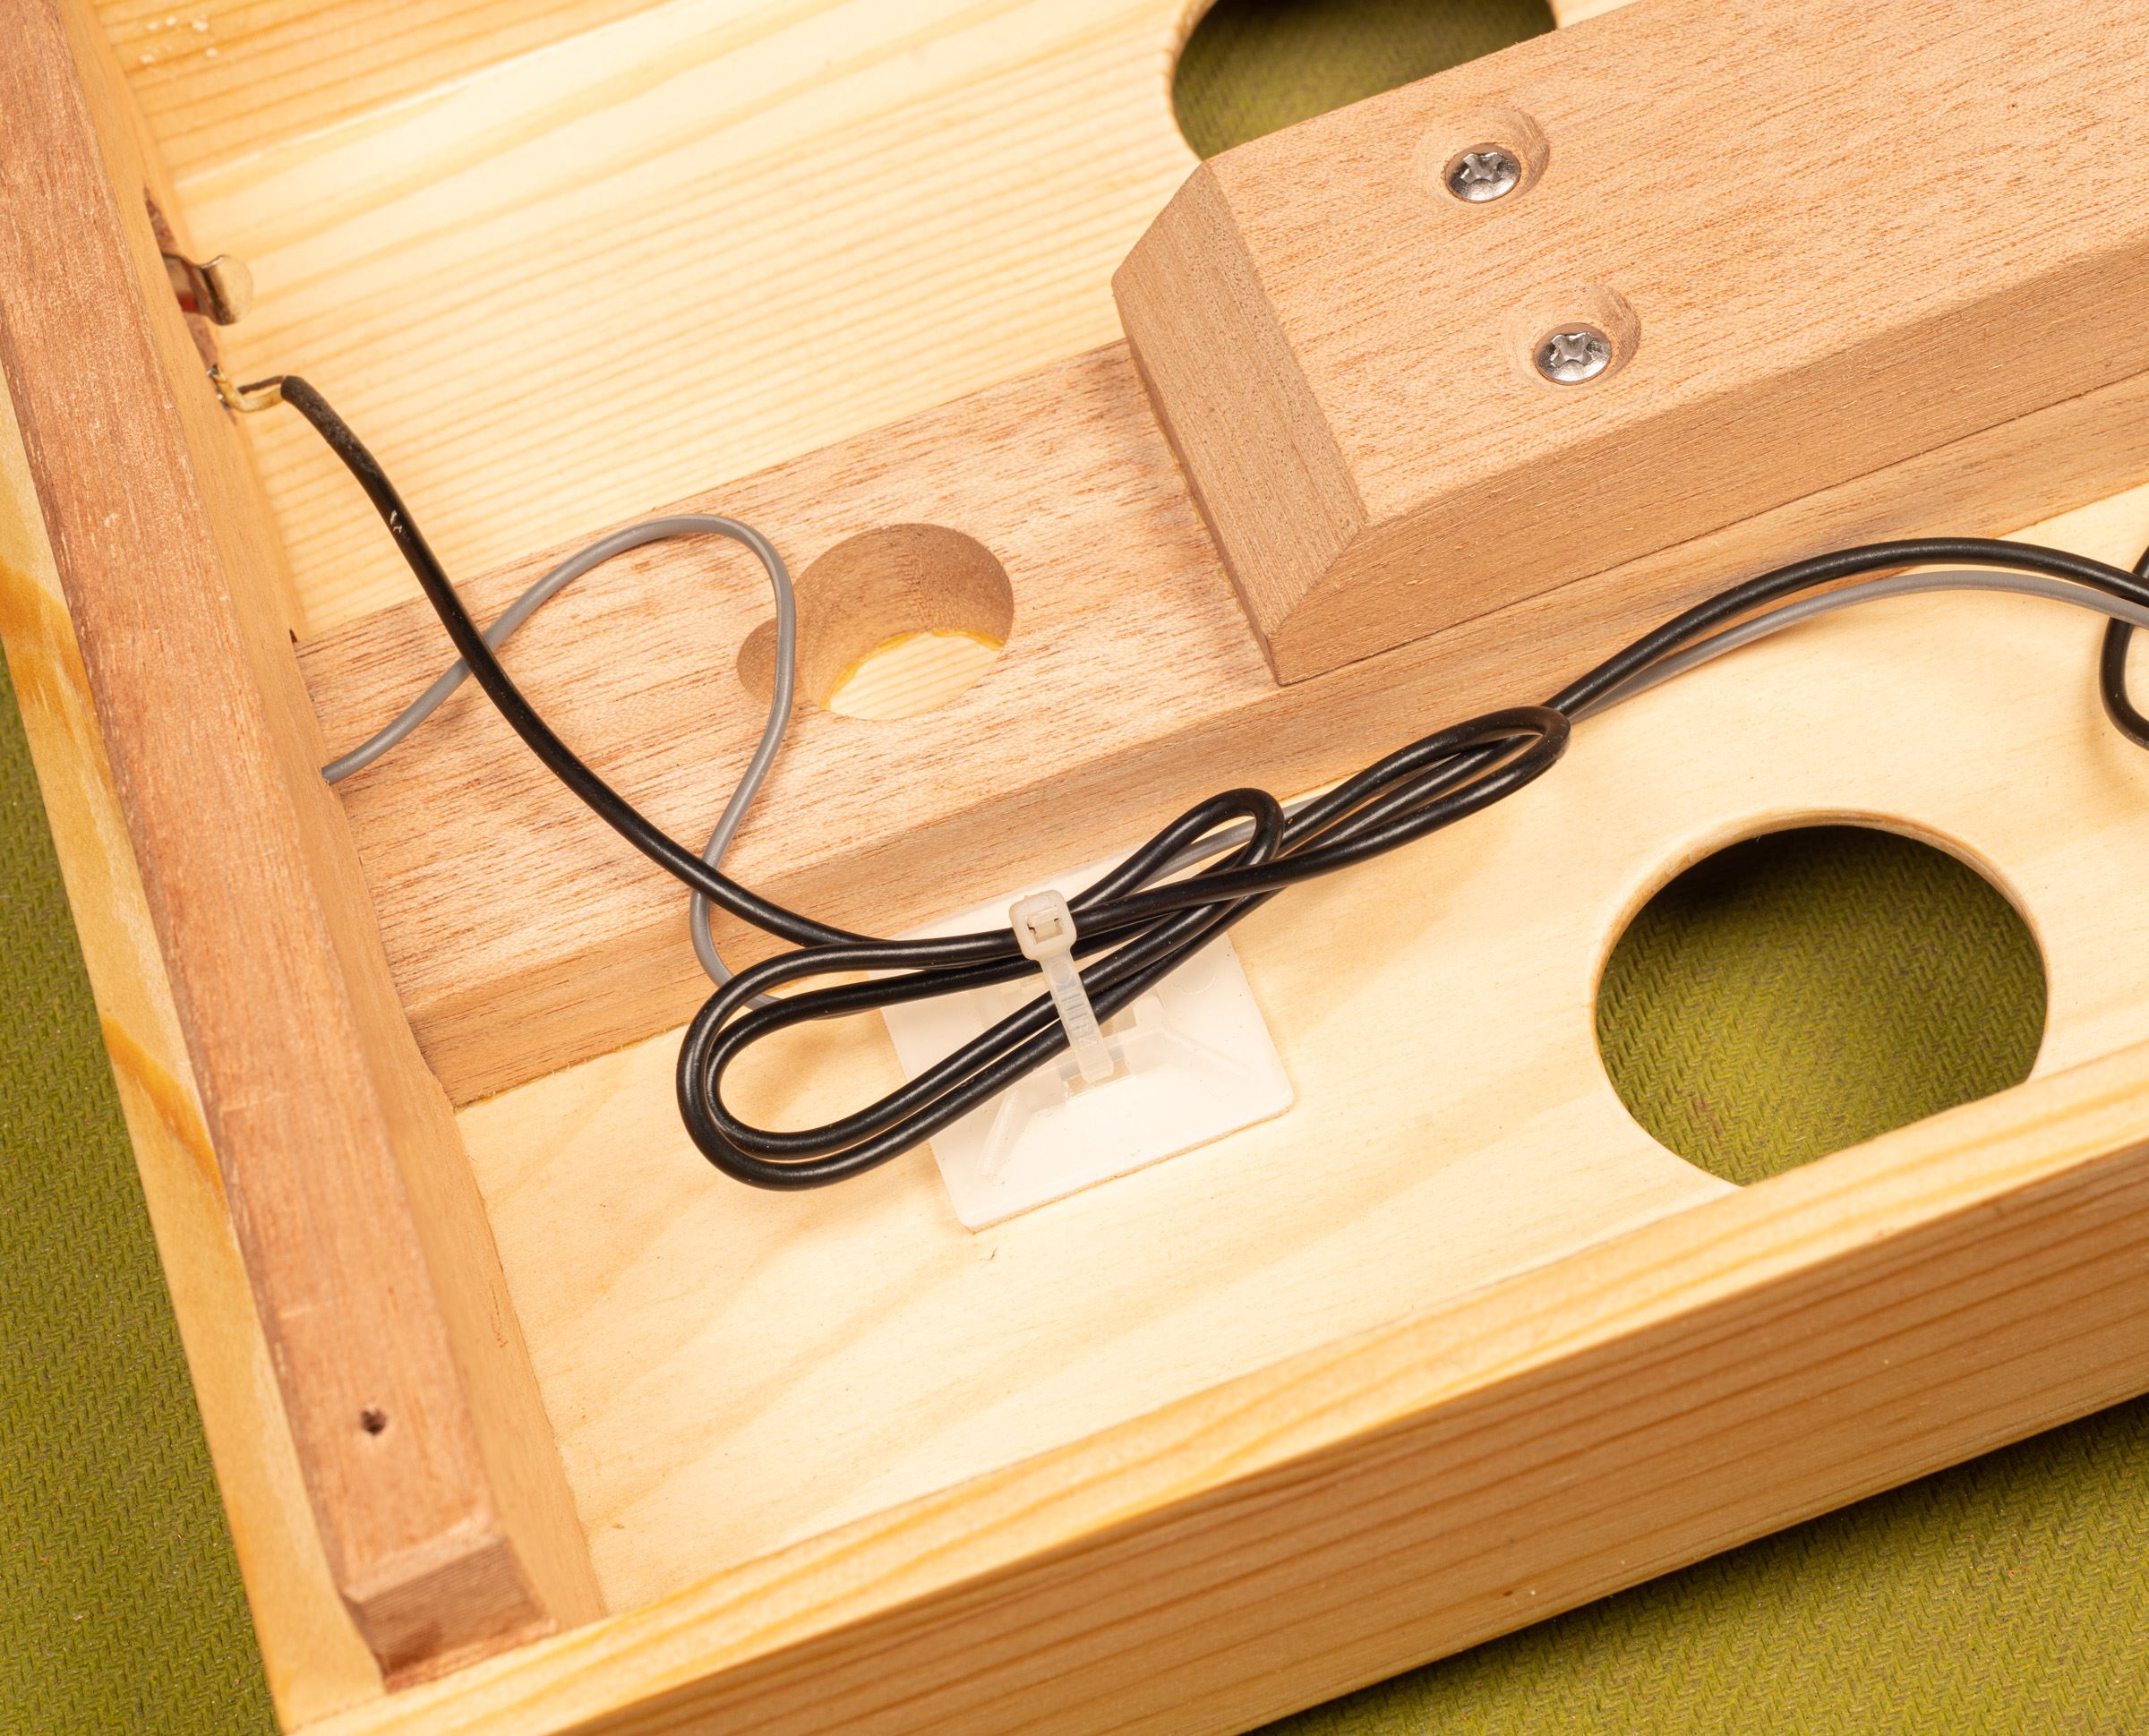
Install the wire clip
The wire clip helps prevent wires from becoming disconnected by hanging loose inside the body. Find the location that works for your volume pot location, and will not interfere with the installation of the back of the body. Feed the zip tie through the clip, peel the adhesive backing, and press down to secure. Add all your wires, leaving just a little slack for possible future maintenance. Pull the zip tie tight.
Reinstall the tuners
Now that all of the internal electronics are installed, reinstall the bushings followed by the tuners. Some finish may have run into the holes. You can remove the excess finish by running a small drill bit through the holes with your fingers or sandpaper.
Install the sound port rings
Gently sand the inside of the sound port holes to remove any finish. Glue will not stick to finish. Again test the fit. While supporting the back of the top with your fingers, carefully press the rings into place. Go slowly! You can crack the top if you press too hard too fast. When the rings slide in easily, gently remove it.
Using a toothpick, put a thin film of super glue around the inside of the sound port hole. Just a tiny bit is all that is needed. Press the ring back into the sound port hole and hold it with finger pressure until the glue begins to tack and hold.
Install the back to the body using a #2 screwdriver.

Final setup
Follow the steps from the Initial Setup: install strings, position the bridge and saddle, adjust the neck.
Now that the body is sanded and finished, the bridge might be in a slightly different location. After finishing you can trace the footprint of the bridge or mark the location with low-tack tape for future reference to quickly relocate the bridge when changing strings or conducting maintenance.
Set the string height and spacing
For slide playing, the string action can be quite high. We suggest starting with an action that is around 1/8", which is where your bridge may initially start. To find the action, measure between the tops of the frets and the bottoms of the high and low E strings at the 12th fret.
You shouldn't need to raise the action, but if you need to lower the action, sand the bottom of the bridge. Remove only small amounts of wood from the bottom of the bridge, a few strokes at a time to prevent over-shooting it.
Remember: Once you lower the bridge you won't be able to raise it. Use 150-grit sandpaper on a flat surface for good control.
To set the string spacing, use the slots in the saddle bolt to find what plays comfortable for you. The middle string should be straight down the center of the neck, the outside strings should widen in spacing towards the bridge, but not fall off the edges of the fingerboard.
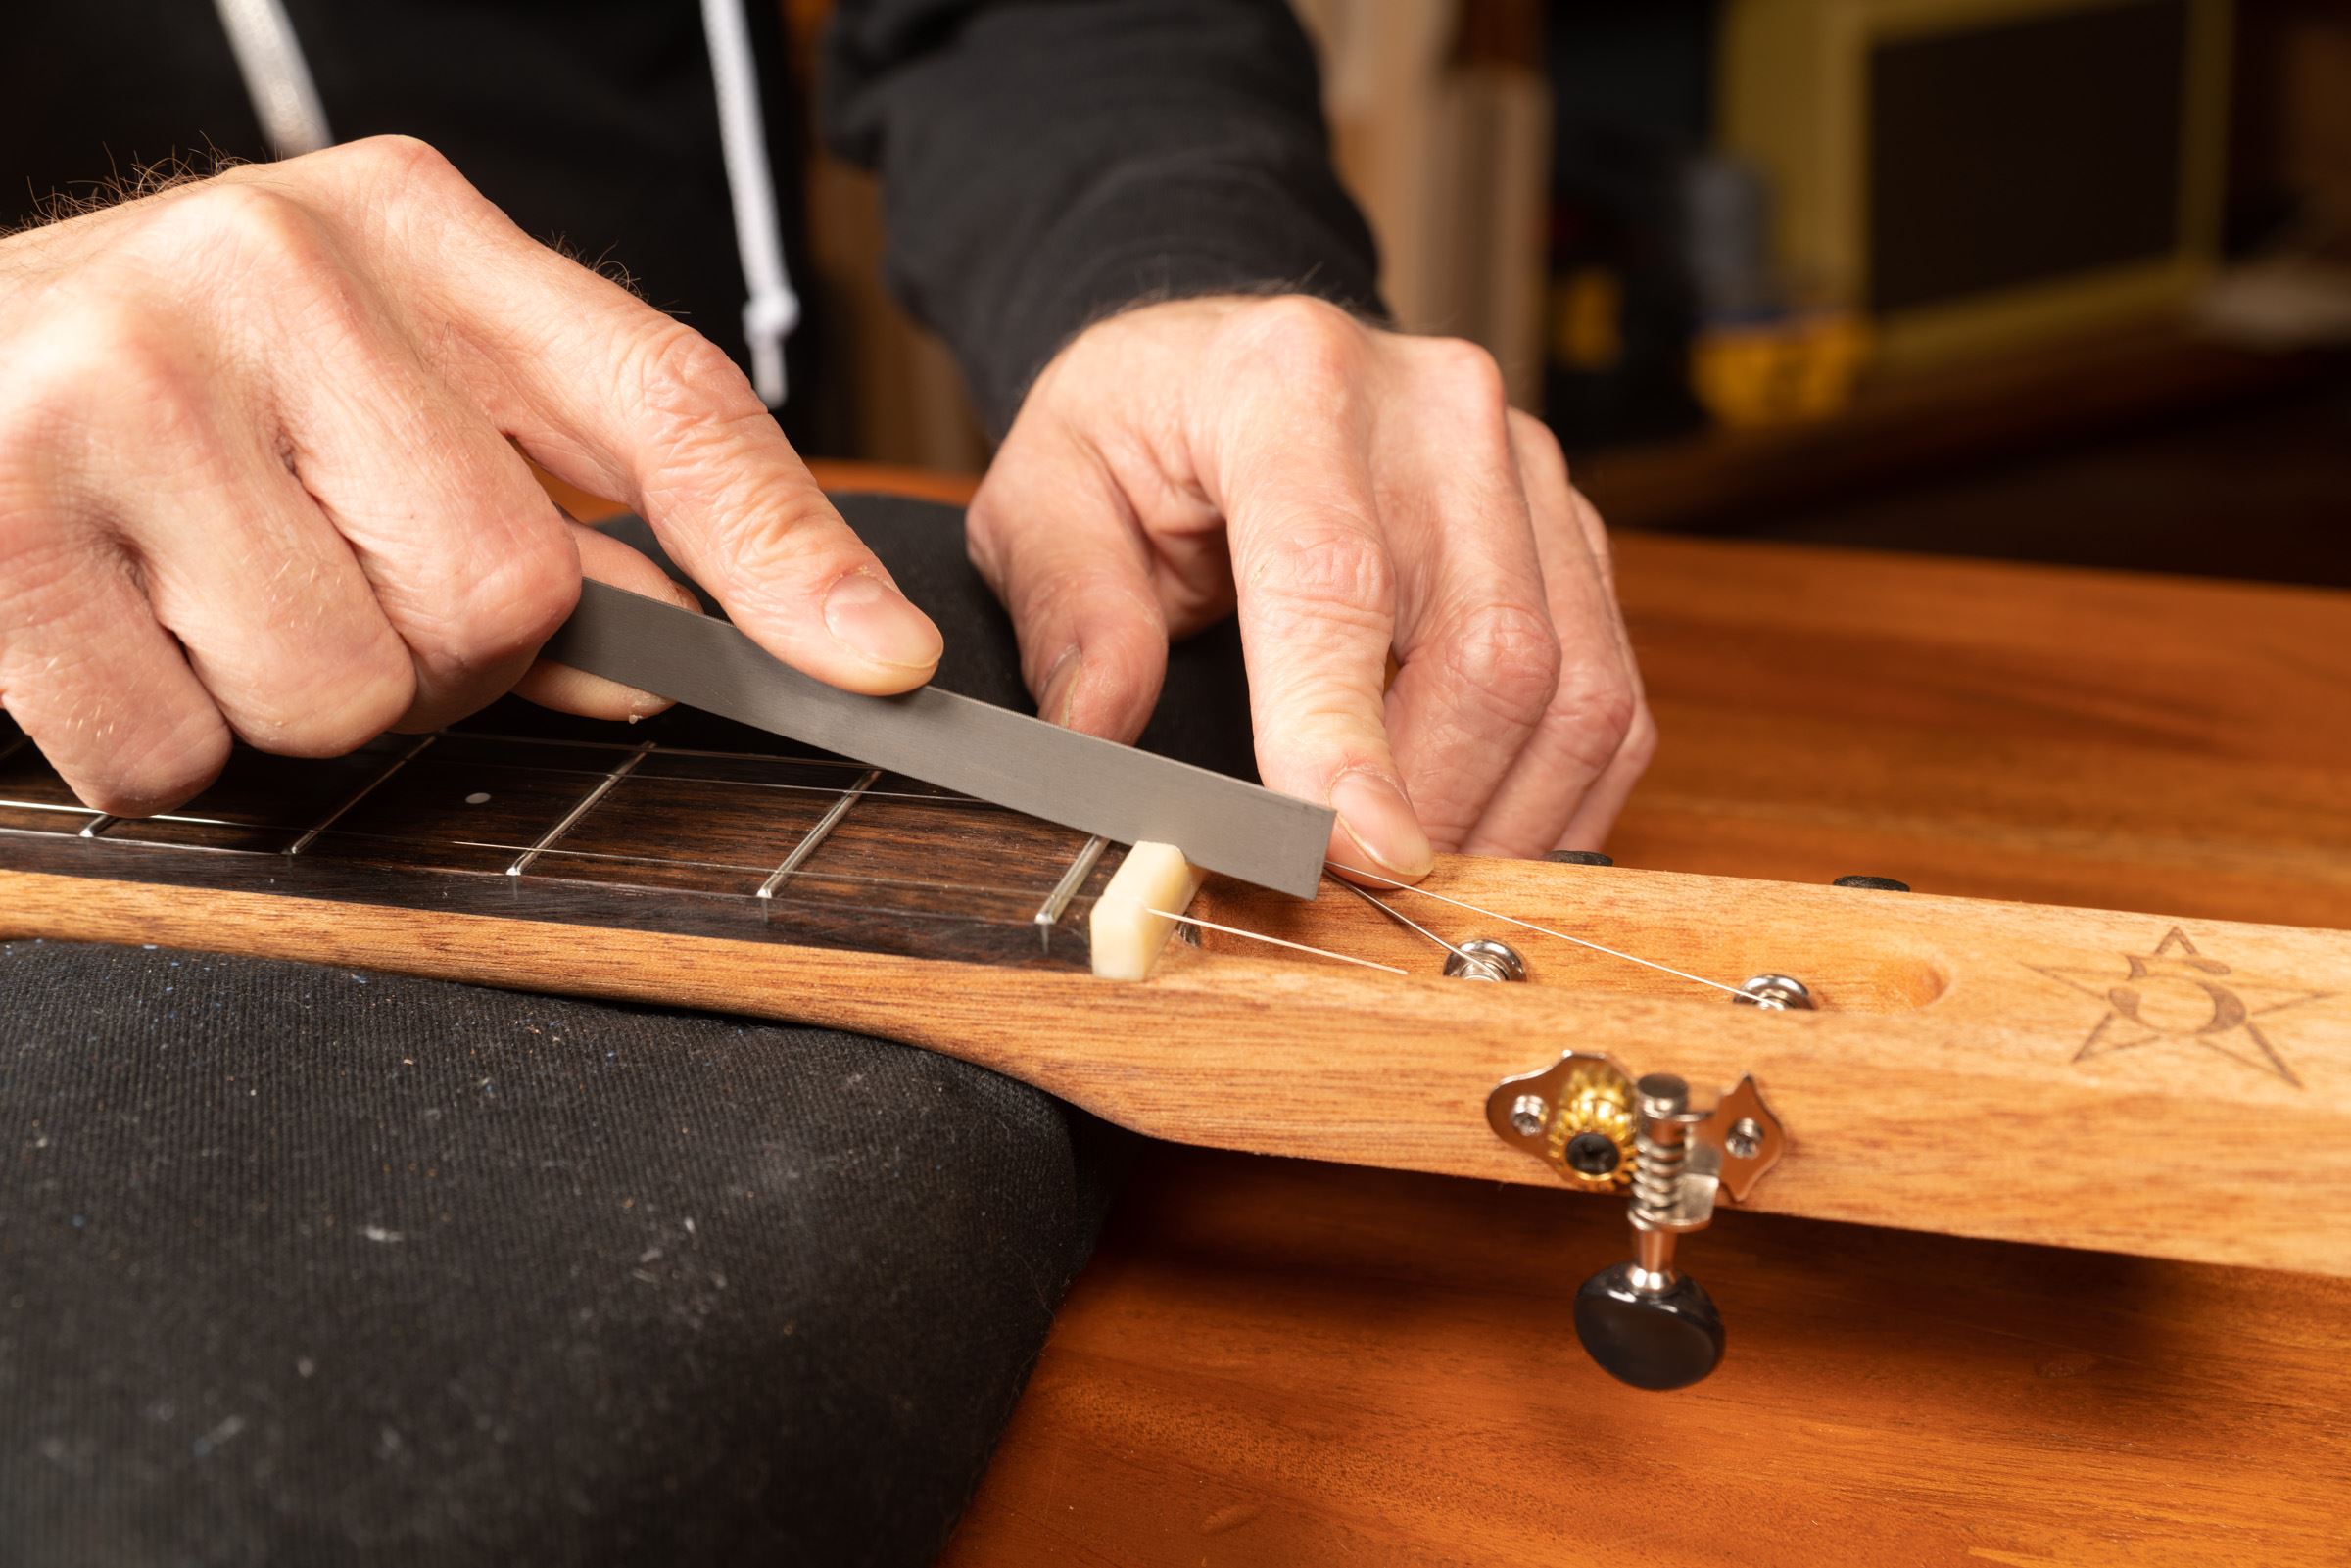
Adjust the nut
Look closely at the zero fret to make sure the string has good contact going over it. If the string is buzzing or has loose contact on the zero fret, slightly lower the string slot in the nut until the string is making good contact on it. Remember, the zero fret sets the string height. Use a nut slotting file and take just a few strokes at a time, checking your work frequently. You want to be filing at a downward angle towards the peghead as shown.
Adjust the pickup height
Now that the pickup is installed and the guitar is tuned and setup, you can dial in the sound of the pickup.
Adjust the height of the pickup by turning the two mounting screws in the center of the pickup. For the bass side, hold down the low E string at the last fret. Adjust the bass side mounting screw so that the top of pickup is 5/64" from bottom of the string you are holding down.
For the treble side, use the treble side mounting screw and repeat process using the high E string. Adjust the treble side mounting screw so that the top of the pickup is 1/16" from the bottom of the string you are holding down. Feel free to experiment with other heights, but the measurements here serve as a good starting point.
The individual polepieces may not perfectly align under the strings. This is normal. To further fine-tune the sound you can adjust the individual polepieces up or down.
Set the intonation
The final step is setting intonation by adjusting the string lengths at the bridge saddle. The saddle is not individually adjustable for every string, but you can slightly rotate the entire bridge on the top to set the intonation. It is a balancing act: the angle will change the pitch of all of the strings. Most players find a spot where all of the strings are mostly in tune when fretted at the 12th fret.
The bridge can also move when tuning. It is good practice to hold it firmly with one hand when tuning up for the first time.
Using a strobe or other accurate tuner, first tune the strings to pitch. Then, press a single string lightly at the 12th fret using just enough pressure to sound the note. Check it with your tuner.
If the note reads flat, the bridge needs to be moved or angled forward towards the nut, shortening the length of the string. If the note reads sharp, the bridge needs to be adjusted back away from the nut, increasing the string length. Repeat until all of the strings are as close as they can be to matching the pitch of the unfretted note.
You're done!
Congratulations! Your guitar is ready to play. We hope this guitar will be the first of many that you enjoy building.
If you've built this kit, consider leaving a product review. Share your experience and show pictures of your custom creation!
Ready for your next build? Don't forget to check out our other kits, tools, and new products. No matter what project—upgrading, building, or repairing—we're here to help you make music.


