Electric Guitar and Bass Assembly Guide, Part 4: Wiring and Shielding
Wiring and Shielding
Wiring an electric guitar can be very simple, or it can get quite complicated dependent on the components used and the amount of custom wiring you wish to do. There are literally hundreds of ways to wire a somewhat traditional guitar depending upon the pickups, switches, and other components used. The player needs to determine what works. If you are unsure of the options you want, a trip to a few large music stores with a good variety of guitars is in order. This will allow you to test many different options, setups, and types of electric guitars and components to find what works for you.
When soldering, practice on scraps of wire and electronic tidbits. This will give you a "feel" for the soldering iron, its temperature, when a component gets too hot, how much solder is enough, etc. Soldering is 80% feel and technique, 20% materials and equipment. You don't need to spend tons of money on soldering equipment to successfully solder your guitar. The higher priced soldering pencils are designed for professionals who use them daily. An $8.00 Radio Shack 40-watt soldering pencil can do the job just fine.
The more experienced and comfortable you are with your soldering pencil, the better your wiring project will turn out. Below is a list of do's and don'ts. They're designed to give you some insight into what can be one of the most frustrating aspects of assembling an electric guitar.
Don't blow on a solder joint to cool it or make it harden faster. This can cause air pockets within the solder joint that will corrode or come loose with time (a "cold solder joint").
Always use rosin-core solder! Standard 60/40 rosin-core is the best. We like the smaller diameters (.032" - .062") for guitar wiring.
Don't strip back too much of a wire's insulation—this can be the root of a troubleshooting nightmare. Just expose enough wire for soldering. Too much exposed wire can inadvertently come into contact with ground or other wires.
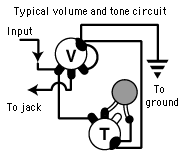
Potentiometers (or pots) used in guitar wiring are generally "audio-taper." A pot will work as a volume or a tone control, since the use of a capacitor makes a pot act as a tone control.
Generally, 500K-ohm pots are used with humbuckers and 250Ks are used with single-coil pickups. You can use any value you like, but a 250K will have a slightly warmer tone than a 500K pot. The 250K resistance between hot and ground bleeds off (attenuates) more high frequencies to ground, even at full volume!
"Tin" the wire and connection before soldering them together. This doesn't mean applying a huge glob of solder, but just a very thin pre-coating.
Always apply heat to the connection first. Then apply the solder and let it flow over the joint. This also helps to ensure that you don't get a cold solder joint.
When breaking-in a new soldering iron or tip, you must tin the tip. This is done right away, as the tip gets hot enough to melt the solder for the first time. Flow the solder over the contact surfaces of the tip and let it sit for 10 seconds or so. Wipe off the excess onto a water-soaked sponge and apply more solder. Repeat this procedure a few times and your soldering tip will be properly tinned.
Use a soldering iron stand (available at most electronic supply houses). A soldering stand ensures the soldering iron has a home (so you know where to find it and so you don't burn yourself, the guitar, your clothes, or your foot—you get the idea!). It usually has a sponge for periodically cleaning old excess solder off the tip.
Plan the wiring ahead of time, so you don't end up soldering beneath wires you have already run.
Give yourself plenty of wire—enough to tidy the wires up and make the whole job clean and neat. Any wires between the instrument and a pickguard or control plate should be long enough for it to be removed for inspection without having to unsolder the connection. A little forethought always goes a long way in guitar wiring.
If you have more questions or interest in guitar wiring, a good book is Donald Brosnac's Guitar Electronics for Musicians #0548. It's a great source for learning the basics, wiring diagrams, pickup information, how volume and tone circuits work, and more advanced information. If you use one of our wiring outfits, specific wiring information is included to help you connect the components.
A special note on pickup height adjustment: Pickups shouldn't be adjusted too close to the strings. Generally for single-coils, there should be about an 1/8" gap between the top of the low E polepiece and the bottom of the low E string fretted at the last (21st or 22nd) fret, and 3/32" for the high E. Humbuckers can be adjusted closer (3/32" - 1/16"), since they don't have as much focused magnetic pull as single-coils. Adjusting pickups any closer (especially with single-coils) can cause false notes or "wolf-tones." If you've ever played a Strat that seemed to produce two notes from one string, usually the wound strings in the upper registers (12th fret and up), you have witnessed this anomaly. It is most often referred to as "Strat-itis" and can cause a lot of head-scratching unless you know what is happening.
Shielding
Shielding eliminates virtually all unwanted interference and hum. All of the shielding must be in contact with ground. There are several ways to apply a ground to a shielding network. When using copper shielding foil, the ground wire can be soldered directly to it. If your volume pot housing is in contact with the foil, a ground jumper to the foil is not necessary. Shielding paint #0029 is also good for shielding control cavities, pickup routs, and drilled holes. The paint is very easy to apply in small tight areas, unlike self-adhesive foils.
It's easy to apply ground to a painted cavity, or an aluminum adhesive foil in a Strat-type guitar. Bring the paint or foil over the top of the body in the area that would be under the pickguard and around the pickguard screw below the bottom tone pot. The foil on the pickguard should surround this screw hole. When the pickguard is screwed into place, the grounded foil on the pickguard will come in contact with the cavity shielding paint. The same will work for a Telecaster control plate/control cavity and a Stratocaster jack plate/jack cavity.
Another method is the use of a solder lug screwed into the cavity's side wall. Make the solder lug out of a scrap of brass and use a small wood screw to affix it to the side wall. Just solder a wire from the volume pot's casing to this lug for a good ground.
More In This Series
| Part 1: | Introduction |
| Part 2: | Recommended Tools and Supplies |
| Part 3: | Hardware and Neck Installation |
| Part 4: | Wiring and Shielding |
| Part 5: | Setup |


