TrueChannel Routing Jig
Assembly instructions for our TrueChannel Routing Jig.
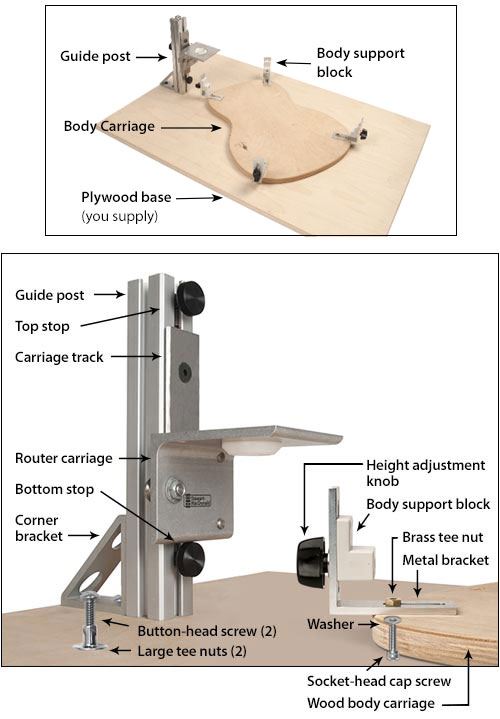
Install the guide post
![]()
The vertical guide post can be mounted to a smooth, flat benchtop, but it's most convenient to create a plywood base board just for this purpose. We recommend cabinet grade plywood, because it's flat and stable.
Cut a 24" x 36" sheet of 3/4" plywood, or prepare your benchtop surface.
A light finish on the plywood base and body carriage will allow it to slide easily. Make the carriage glide even better with a little paste wax applied to both surfaces. Wipe off the excess.
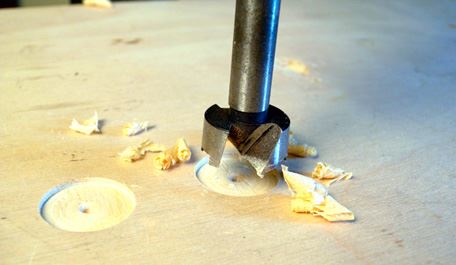
On the underside of your workboard, mark your holes for the corner bracket that supports the guide post. The two holes are 1-1/2" apart. The hole nearest the edge of the board is 1" in from the edge. Use a 7/8" Forstner bit to create a recess for the large tee nuts, at least 1/16" deep.
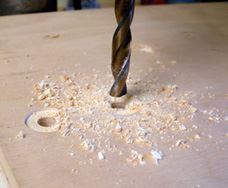
Using the centers of the tee nut recesses, drill 3/8" holes through your plywood workboard. Use a backer board to avoid chipping out the wood on top.
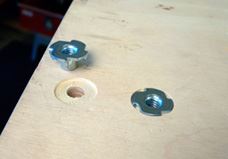
Insert the large tee nuts from the bottom, and tap lightly to seat.

Attach the guide post assembly to the base by tightening the two button-head mounting screws into the large tee nuts.
Mount the body support blocks
![]()
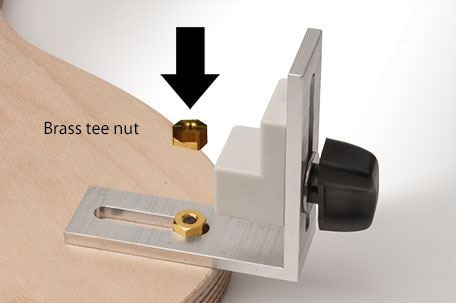
The narrowed side of the brass tee nut fits in the groove in the sliding bracket. Insert each socket-head cap screw and washer through the bottom of the wooden body shape (with the counterbore side down). Feed through the sliding bracket, and into the brass tee nut.
Mount the sliding brackets in the outermost holes on the body carriage for large instruments. The inner holes fit many smaller instruments.
Attach the guide post
![]()
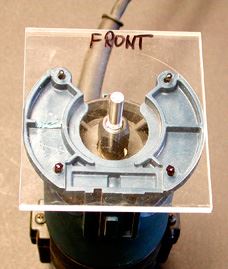
The router carriage rolls vertically on the guide post, and holds your laminate trimmer. It fits the Bosch Colt laminate trimmer. You can also add holes as needed to accept other brands of trimmers.
Mounting the Bosch Colt Router: Remove the baseplate from the Colt base (held by four screws). Mount your Colt to the router carriage, making sure that the bit will go through the center of the cutter depth ring. Reuse the screws that held the baseplate to the Colt base.
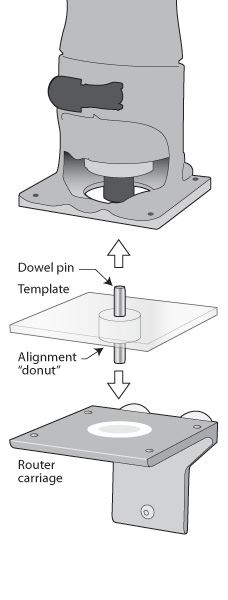
Mounting a different brand laminate trimmer: If your laminate trimmer/router doesn't line up with the mounting holes, use the Router Mounting Template (sold separately) to help locate and drill new holes.
- Position the template on the jig's router carriage. The 1/4" dowel pin and alignment "donut" will keep it centered.
- Label the template's front edge. Mark the carriage's mounting holes on the template so you can avoid drilling new holes close to those spots.
- Fasten the dowel pin into your router, and slip the template onto the pin. Align the front of the template with the front of the router. Mark your router's mounting holes on the template.
- Remove the template and use a center punch to mark each hole location before drilling. Clamp the template securely, and drill the holes.
- Place the drilled template on the router's pin to double-check the hole locations.
- Place the pin and alignment "donut" on the template, and clamp this assembly to the jig's router carriage. Use your drilled holes as a guide to drill new mounting holes in the carriage.
- Remove the template and mount your router to the carriage.
Setting up the guitar body
![]()
If you are routing a large-body guitar, mount the sliding bracket bolts in the outermost holes on the body carriage. The inner holes fit many smaller instruments. For very small or unusually-shaped instruments, cut a custom plywood carriage. Make it a bit smaller than the instrument's outside dimensions, so it won't touch the guide post while routing.
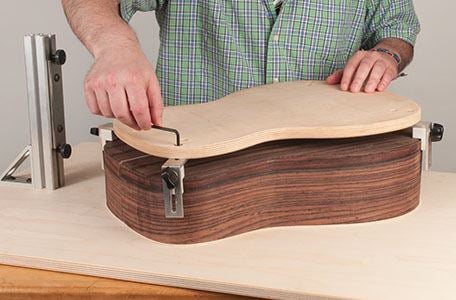
- Leave the brackets slightly loose and position the carriage base evenly over the body. Slide the brackets in until they contact the sides, then tighten them. Make sure the body is resting on the height adjusters.
- Remove the body and turn the carriage over onto the base board, then reinsert the body in the carriage.
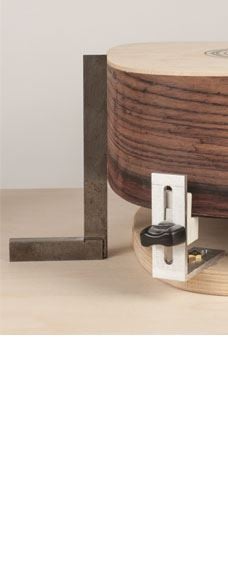
- Using a square on the base board adjust the blocks up or down until the sides are as close to square as possible. Check for squareness at the neck and tail end, and around the sides.
If your top and back overhang the sides, it will prevent you from checking the sides with the square. In this case, file a notch so the square can rest flush to the sides.
You can trim off the overhang with a sharp knife and a file, or get in close with hand tools and flush-cut with a ball-bearing router bit.
When you turn the instrument over to rout the other side, use your square again to make sure the sides are as square to the base board as possible.
Setting up the laminate trimmer
![]()
The cutting bit must extend far enough to accommodate the depth of the guide ring on the router carriage. For safety and for good results, be sure to leave enough of the cutter shaft in the router for a secure hold.
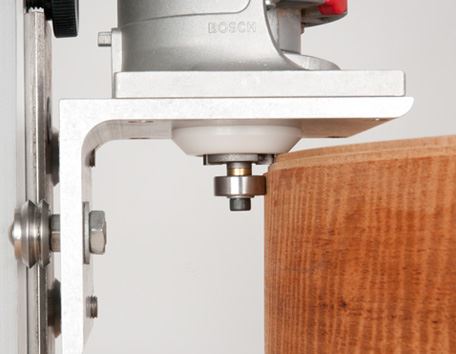
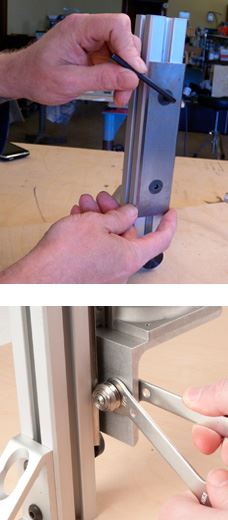
Using a 3/16" hex wrench, set the carriage track 1/2" lower than the lowest position the router carriage will require for the cuts you are about to make. This keeps the router carriage up and away from the base board, so the router never drops far before reaching the bottom stop.
To adjust the tension of the carriage on the track, use the included wrenches. The single bearing has a cam-type shaft that is slightly offset, so you can adjust the pressure of the bearing riding on the track. Adjust the bearing so the router rides up and down freely on the track. Then install the top stop.
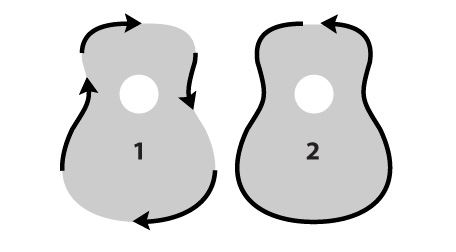
Routing tip
![]()
Wood tear-out is always possible when routing, especially on long-grain, quartersawn tonewoods. Therefore, start with four "climb-cuts," so-called because the router is "climbing," or being pulled along as the bit grabs the wood.
Begin at the centers of the top and lower bouts on both the treble and bass sides (illustration 1), with the router base moving in the direction of the rotating cutter (clockwise). Rout up to the areas indicated by the arrows. When all four climb-cuts have been made, you can move the router in the opposite direction (counterclockwise), cutting into the wood rather than climbing (illustration 2). Make one continuous pass around the guitar. When you reach the areas that were already climb-cut, the router will pass without tear-out.