Robbie O'Brien Demonstrates the StewMac Side Bender!
Luthier and Instructor Robbie O'Brien demonstrates how to use the StewMac Side Bending Machine.
Video Transcription
Robert O'Brien: Hi, folks. Robert O'Brien from O'Brien Guitars, and someone has sent me a set of sides asking me if I would please bend them. And I said, "Sure, why not?" So I'm going to walk you through the process. I'm going to be using the brand new StewMac side bending machine to do that. Let's do it.
Building the sandwich
So the first thing I'm going to do is build a sandwich, as we like to refer to. That's a piece of spring steel. Then I put the side that's been spritzed inside some paper. I put another piece of spring steel on top of that. Then I put a blanket on it. Then I put spring steel on top of that. It's very easy to get two left sides or two right sides. So I like to put my form on the bench in the same direction as my bending machine. And even then it's very easy to get two left sides or two right sides. Don't be that guy.
[Robert grabs a spray bottle filled with water and sprays the entire board]
I like to put a little water on there, a little moisture to help the heat penetrate. Got my form here. I notice that my waist needs to be bent that way, so that's the way I'm going to put it into the Side Bending Machine. I've already thicknessed and profiled my sides to make it a little bit easier. And I'm going to clearly mark where that waist is [Robert draws a line at the waist on the paper]. And put a piece of spring steel on the bench. Spritz the outside of the paper. So spring steel, another piece of spring steel on top of that, making sure that you clearly mark the waist and I've got it clearly marked on my steel there. Put another piece on top. And then we're going to go with the blanket on top of that. And then I'd like to put another piece of spring steel. Also have my center line clearly marked right there.
I like to put some metal spring clamps on there to keep the sandwich together [Robert places a spring clamp on each end of the sandwich]. Then I'm going to walk the whole thing over to my bender. Make sure you double check with your form before putting it in the bender, so make sure you don't have two left sides or two right sides when it's all said and done. Happened to a friend of mine once.
Installing the bender
I've already preset my adjustable waist caul so that it matches the form here perfectly. I now take my sandwich, place it in there. Center line is clearly marked. I line it up with the front of the bender, make sure that your sides are not in there skiwampus or cattywampus, those are technical terms. And then I come in, just show it a little bit of love in here [Robert lowers the bending machine press down onto the sandwich]. By the way, I'm bending these sides at about 2.3 millimeters. If you guys are working inches, go ahead and convert that. So show it just a little bit of loving there at the waist to lock it into position.
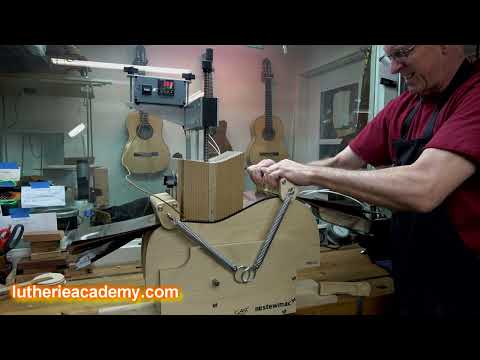
I've already plugged in my heating blanket here. Now I'm going to pull this waist clamp over and very carefully place it onto here. That's what's going to bend the lower bout here. Have one for the upper bout as well. The bender comes with a thermal couple and onboard electronics to control your temperature. I usually place this in from the back side. I'm going to put it on the front side here just so you can see it a little bit better. I place it on top of the wood and under the blanket. I try not to put it under this because if you mash too hard you can dent the wood obviously. So just place it in there like that. I then come in and place this part down here like so, being very careful that you don't ricochet this into you. There we go. And it's also good to clamp it to the bench so that when you're pulling this, it's not moving back and forth on your bench.
So there's two switches, one on the back, one on the front. And you want to make sure that you have both of them on. This is a safety feature. I've got my temperature set to 300 and notice that the red temperature climbs very quickly, that's your blanket temperature, and the green is what you've actually set your temperature to bend at. So a word of caution at this point here folks, make sure you don't turn your back on the bender. Any time you have a heat source in your shop, don't go check your email or answer phone calls. Pay attention to what you're doing.
Once I get to about 240 or 250, I go ahead and start bending. And usually I'm done bending by about the time I hit my target temperature, which is 300. I start at the waist, but I guess it doesn't matter. Some people will do partially the waist, then do the upper and lower bout and then come back and finish the waist. So whatever suits your fancy there.
Now for the lower bout, I like to pull it forward a little bit, let it stop, get hot and then continue pulling. What you're seeing folks is steam, not smoke. That's a good thing. Good. And then let's do the upper bout as well. Once again, I like to pull it forward and stop. Let it get hot there and then continue. It's not a bad idea to wear some gloves as you do this. Sometimes that steam will come out of there and get you. There we go. Life's good.
And you'll notice I did all this right before I hit my target temperature. What I like to do now is drop the target temperature down to about 250 and I'll set my timer for about 10 to 15 minutes and let it go through a heat cycle. Once the timer goes off and I go ahead and turn the heat source off, I'll let it come back to room temperature.
Conclusion
So what do you think, folks? Pretty easy, huh? The StewMac Bender makes it nice and easy. However, we're not done. Today is no surprise Saturday in my shop. So when I take this thing out of here, I expect no surprises. I'll see you in about 10 minutes.
Okay? It's been about 10 minutes. Moment of truth here. And there we go. There we go. Perfectly bent side, no spring back.
By the way, if you want to do a cutaway, swap out the molds for the cutaway shape and then just attach the cutaway arm onto the jig and you're in business. And you can have several different types of shapes, dread, OM, classical, small, jumbo, you name it, you can do it. All I have to do now is the next side and be sure that I don't get two left sides or two right sides. Happy building, folks.


