How to shape a custom guitar peghead

Issue 335 August 08, 2019
Make a signature peghead! Learn how to make a custom guitar peghead that can give your guitar a unique vibe. Using a pattern, a jigsaw and a router, see how easy it is to make a peghead template and rout a custom peghead shape into your guitar's headstock, just like the professionals.
- Our Otter Portable Router Table creates a stable and safe router base
- Making a good template nearly guarantees you a predictable, professional result
- A bearing-style router bit follows the template for a smooth edge that’s clean and true
- Check out our FREE peghead template pattern or design your own unique peghead shape
Shaping a Custom Guitar Peghead
Download this PDF to support StewMac Trade Secrets Video #335.
Here's what's covered in the video:
How to make a custom peghead
This T-style guitar kit that StewMac sells is a really great and fun project and it's mostly about assembing and not about shaping or woodworking or anything like that, except for the peghead. This is an unshaped peghead. I think a lot of people that put these kits together just draw a shape on it and start sawing away and that's risky. The saw can wander off and you can end up with something pretty funky. It's worth your while to take a few extra steps to make sure that doesn't happen.
Work out the kinks in the template first
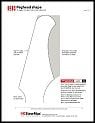
Today I'm going to show you how to create your own custom peghead with smoothly shaped edges just like this. The secret is that I'm going to be making a template and working all the kinks out of this shape before I ever cut the peghead. Once this is done, we're going to attach it to the back of our peghead and then we'll use a router to run it against the template and that'll leave us a nice clean edge instead of cutting with a saw leaving teeth marks. Work out your shape on paper or computer. So, this is my shape that I'm going to be using it's actually made to fit right inside this blank peghead shape. If you want to use this one too you can click the link in the video description and we'll take you to StewMac.com where you can download a PDF that looks just like this and cut it out to make your template.
Using a pattern takes the guess work out of your project
We're going to be using a piece of poplar you can get at any hardware store. Poplar is great because it cuts really easy, sands really easy, there's not a whole lot of knots in it. it's just awesome stuff to have laying around. So, I'm going to fasten this template pattern to the poplar. I'm using Titebond glue. I'm brushing to the edges to make sure that we don't have any corners pop up while we're standing and working.
Cut and prepare your template before you rout
Once the glue dries, we can cut out our shape. I'm using a jigsaw where a band saw is great too if you have one don't cut on the lines cut a little bit outside so you can sand into them later now that we have our template rough cut just outside the lines we're going to start sanding into those lines and smooth out this shape with a flat sanding block that's a piece of poplar that I cut off and this dowel that we had laying around the shop. I'll be using some 80-grit. I'm just going to tear a little piece off, slap it on my little flat sanding block and I'm going to get a little bit on my dowel - and then we'll get started.
A perfect template makes a perfect peghead
You're going to need to get it so you really like it because any glitches on your template will transfer your peghead. I'm going to call that good. So, now that we have our smooth template we're going to trace a nice little pencil line on this edge that we're going to cut. So, I'm lining up our flat edge; that's the easiest indexing point. I'm going to take a little pencil and I'm going to lightly scribe and, now we know what we have to cut to the outside of. Now we have our peghead roughly cut just outside the line so the router doesn't have to do too much. It's more of a skim cut and we're going to double-stick tape this guy to the back of the peghead. So, I got some double-stick tape and put it down. Trim it back just from the edges so the router doesn't catch it. Line it up . Okay, so now that our template is stuck to the back of this peghead, it's time to start talking about our router.
Check out the Otter Portable Router Table you can use with any bench
We have this awesome Bosch Colt 1-horsepower router that we use all the time in Dan’s shop and we are going to be using this nice little bit here with a bearing. You want to choose a router bit with a cutting depth that matches your head stock material. In this case, our head stock is just about a half-inch. Now the way that these bearing bits work is that they run flush against our template and trim this peg head flush to the template. It leaves behind no saw marks. It's going to leave us a very little sanding to do. The way that we're going to be mounting this router is we're going to be using the StewMac Otter Table. This Otter Table screws to the router base and then we will wood screw the base to the edge of the table, just like this, so it'll be nice and sturdy and we can trim around it.
Plan your cut route and make a test cut
Now, before I ever touch my peghead, I would go ahead and test one a scrap piece of poplar; maybe just a cut off that we have left over from earlier. Okay, here we go. Time to cut. The router bit is turning like a wheel. Choose the direction of each cut so you're not following the pull of that wheel. You don't want the router controlling the cut. Make your cuts in the opposite direction. Cool. I'm pretty happy with this shape. I'm going to do a little finish sanding with some 120 grit sandpaper. It's just to smooth out any imperfections I might see. Hey, Blake. I can't wait any longer. What's up, Dan? Wanna check it out. Yeah, I do. Pretty smooth. That looks like it came off a CNC machine. You think? Yes. It’s smooth and beautiful. I love that shape. You can do this - just like Blake showed you. You can download our PDF if you like this shape, or make your own shape up. Work out the kinks on paper then, the same on your template. Then once you go to the router, take your time and don't be scared. Just be firm and you'll have it.