How to get two more sounds out of your Fender Telecaster

Issue 340 October 17, 2019
Turn your Fender Telecaster into a workhorse that covers pretty much every sound you would need at a gig where you have to play lots of different kinds of music. Learn how to get two more sounds out of your Telecaster. A nice fat humbucker sound by using both pickups in series, and the bright, nasal out-of-phase humbucker like you’d hear from James Burton or Brian May.
- The difference between 3-way and 5-way Tele wiring
- How to add two humbucker sounds to your Tele
- Get the additional hum-cancelling benefits too
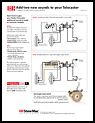
Wiring diagrams for Telecaster Super Switch mod
Download this PDF to support StewMac Trade Secrets Video #340.
Video Transcription
[on-screen text reads: StwMac tools + ideas for guitarmaking. How to Get Two New Sounds from your Fender Telecaster]
Fender Tele mod: Get two new sounds!
Paul Lampley: Here's how to give your Telecaster more sounds, making it a lot more versatile. The Fender Telecaster is a very simple guitar design that has stood the test of time. It has two single coil pickups and two knobs: one master tone and one master volume. You've got a three-way switch that gives you three sounds: the neck pickup for warm mellow tones, the bridge pickup for bright, aggressive tones, and the middle position combines both pickups together and parallel.
They're really great sounds, but I'm going to show you how to upgrade your Tele to be even more versatile. By replacing this three-way switch with this five-way super switch [on-screen text reads: Oak Grisgby Super Switch - stewmac.com], you get two more really useful tones. That's what I did with this Tele. It's got a fat humbucker tone by wiring the two pickups in series, and it's hum-canceling too. The other sound it gets is an out-of-phase humbucker, bright and nasally, just like you'd hear from James Burton or Brian May. This mod makes your Telecaster an incredibly versatile workhorse. It's perfect if you were playing a set full of covers, you could get any sound you need. From funk to punk, you can get the tone.
Let's upgrade this one to show you how to do it. The first thing is to take a look at the neck pickup. Most Tele neck pickups have two leads like this, a white active lead and a black ground lead. If you look closely, there's a small wire here, grounding the metal pickup cover to the eyelet where the black ground lead is attached. See these little metal tabs? That's part of the cover. For this mod, you need a separate ground lead running from the pickup cover to the back of the volume pot, since the black lead connects to the super switch.
Setup pickup with three leads
On the red Tele I showed you earlier, you can see the neck pickup has three leads: a white active lead, a black ground lead, and a yellow ground lead connected to the pickup cover. So on this butterscotch Tele, I'm un-soldering this little wire that connects the cover to the ground lead... And now I'm soldering about 10 inches or so of yellow wire to the cover tab. Now I have a pickup with three leads, like my red Tele. If your neck pickup already has three leads, you don't need to worry about this step, you're already ready for this mod. Before we get too much further into this mod, please hit that subscribe button. It really helps us out and keeps us making these videos. So I'm just taking off the bridge so I can feed this new ground wire to the control cavity.
Remove the old switch
So now I'm going to put the neck pickup back in and put the bridge back on, and get ready to swap the switches. First thing, we got to de-solder these three leads from the old CRL switch in order to detach it [Paul quickly touches each lead joint with a soldering iron]. I'm just giving a gentle tug as I'm heating up the joint. So now we have the old switch out of the circuit and we can start wiring our super switch. It's a good idea to label your leads, neck and bridge, so you don't get confused later.
And now I'm going to de-solder the ground leads from the pots [Paul touches the ground lead joints with the soldering iron and gently pulls them off].
Install the new switch
Now here's the super switch, and we'll pre-solder as many leads as we can, just so we don't have to do it over the guitar body. This is the order I soldered the wires onto the super switch [wiring diagram displayed]. Where two wires meet on one lug, I soldered them both at the same time. This way I'm not reheating the joint to add the second wire. This prevents having the first wire fall off as you go back to solder the second wire. By the way, you can find a link to this wiring diagram in the video description below, and it shows how to wire this switch and how it connects to the existing controls, so you can print it out and wire your own Telecaster. So now I'm at a point where I can't really solder anything outside of the guitar anymore, so I'm going to bring the guitar over and solder the switch into the rest of the harness.
The black lead from the neck pickup goes onto the zero lug of pole number one, the white lead from the neck pickup goes onto the zero lug of pole number three, the yellow lead from the neck pickup cover goes to the ground on the volume pot, the white lead from the bridge pickup to the zero lug of pole number four, the black lead from the bridge pickup to the ground on the volume pot, the black jumper from the volume pot to lug one on pole number one, the white jumper from lug three on pole number four to the number three lug on the volume pot. And then we're all connected. All right, so I have my last wire soldered up, so now it's time to flip it back into the cavity. Now I'll string it to pitch, test that the switch does what I want it to, set my pickup height and put the pickguard back on.
[Paul is playing different style riffs on the guitar on an amp]
That's the neck pickup only. That's the neck and bridge pickup, wired in series, creating a humbucker. That's the neck and bridge pickup in parallel. This is the neck and bridge pickup in series and out-of-phase. And this is just the bridge pickup. Cool. There we go. It's a success and it works exactly as designed. You can get the Super Switch at stewmac.com, where we have more instructions and more wiring options for it there too.


