TheGuitarGeek builds and demos the StewMac Two Kings Boost Pedal Kit
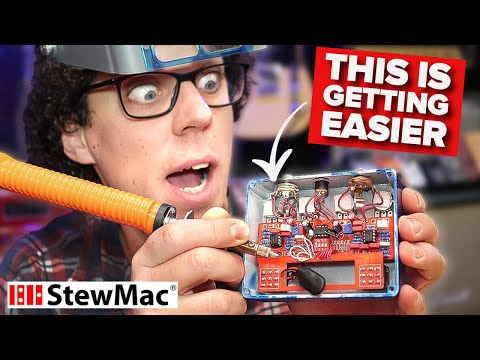
In this video YouTuber TheGuitarGeek builds and demos the StewMac Two Kings Boost Pedal Kit. Inspired by the legendary and incredibly hard to get Analogman King of Tone, this 2-in-1 pedal does it all. It's packed with plenty of boost, overdrive, and distortion—all while keeping the core tone of your guitar and amp. Plus you don't need to wait 5 years to get one! TheGuitarGeek walks you through his build process and shows off all the sounds you can get from this coveted circuit.
Video Transcription
Andy Ferris: Hello, fellow guitar geeks. In this video, I'm going to be building this, the StewMac Two Kings Boost Pedal Kit. So if you've ever wanted to build one of these StewMac rare pedal kits and you want to know how easy it is and how good the pedal sounds, stick around because that's exactly what we're going to find out.
What is included in the kit?
Right. Let's see what you get in this box. The all-important instruction guide in full color, the PCB and daughterboard, stickers, the back of the enclosure painted white, all the components you need to build the pedal, and the enclosure itself also painted white. The first thing to do is to move the enclosure and stickers to one side. We don't need them yet and I want to keep them in pristine condition just like I did with the Ghost Drive Pedal Kit, which by the way, if you haven't seen that yet, I will link to that at the end of this video and I recommend you do check that out.
The Two Kings Boost Instruction Guide. Right, there we go, heart on their sleeve again, based on the Analogman King of Tone, no guessing games there, even talks about the Marshall Blues breaker overdrive. Good stuff. Right, here are the recommended or required tools, and I have some, if not most of these, but not all of the ones that I have are from StewMac. Then over the other side, we've got tools and supplies and in the Ghost Drive build, I said that this was extremely important, so I'm going to be using that today to make sure that I can see all the parts numbers. And in fact, I'd said the multimeter is also required. So if you don't have one of these or indeed any of these tools, I'll put some links in the video description so you can know where to get them on stewmac.com.
Now, StewMac provides all the parts in these bags. They're already kind of separated, but what I would really recommend you do, as StewMac do, is list all these parts and check them against the parts list in the manual. And furthermore, I would recommend making yourself a list of resistors because there's loads in this build, and putting the list of resistors on a piece of paper, checking the resistors with a multimeter, and taping them next to the values.
Actually, I had a much better idea than that, and that was to go to stewmac.com and download the PDF of the manual for the Two Kings, then print out the parts list pages, and then stick the parts to the parts list pages. I'm really happy that I went the extra mile this time when organizing my parts because in the previous build with the Ghost Drive, I did actually make a mistake with a resistor and it caused me to have to remove the resistor, which was quite a lot of work, and I was in danger of damaging the PCB. And even though organizing these parts actually took me about 45 minutes of my time, I hope it's going to make the rest of the build easy and therefore more enjoyable and closer to actually making some music with it.
Also, massive thanks to the comments section for pointing out that if you leave the PCB and breakout board in this outer board without snipping it out, you can connect these wires much easier at the end of the build, which I'll show you later on, but that's why they're not broken out or cut out of this outer stuff.
Installing the diodes
I'm ready to start building. So, onto page 15. First up are the diodes which need to be inserted in the correct direction. Luckily, the instruction manual being fully color is very easy to see, but it's also printed here on the board itself. Make sure you check this before doing any soldering.
Installing the resistors
Time for the resistors, baby. Installing the resistors is probably the easiest part of the board population. You just have to make sure that you put the right resistor in the right place, and if you organize them properly before you started doing this, you shouldn't make a mistake. But again, it's always best to double check and thankfully the manual and the circuit board is extremely clear on this.
Now that page of resistors is done, but now in the manual you get to make a choice, like a choose your own adventure, which honestly I almost wish I didn't have. [on-screen text reads: Install two more reistors - either 1K (stock Analogman setup) or 100K. For higher gain, install two 100K resistors.] The Analogman King of Tone can have a higher gain version on one side. So even though the overdrives are identical, or they can be, you can also have one with a higher gain. So I've decided to put the higher gain version on the right-hand side just so we can hear the difference between the two circuits made by possibly just one resistor. And if I don't like it, I can change that resistor back at some point in the future. So yeah, I've gone for choosing right-hand side, higher gain, left-hand side, stock lower gain. See how it goes.
How to have higher gain on one side
So according to the instructions, for higher gain on the right-hand side, put the resistor on this side. So left is right, right is left because the board is upside down. So I'm going to go stock on the right side, which is actually the left side. So that's the 1K resistor just there. And then I'm going to go high gain on this side, so that's the 100K resistor, and it's actually really well labeled just on the board there. It says 1K/100K. Here we go. So, higher gain, stock gain. I really don't know if I made the right choice there. I think I want higher gain on one side. I mean logically, yeah, I do want high gain on one side. I wonder, what do you have? If you have a King of Tone, do you have high gain on one side? Let me know in the comments.
More resistors. And again, super simple. Just make sure that you double check you're putting the right resistor in the right place.
Up next are trimpots, and if you're a regular viewer of my channel, then hello, and also you'll know that I don't like trimpots very much because I like all my control to be on the outside, but this trimpot apparently adjusts presence. So I'm going to put the trimpots in and at some point I'm going to adjust them to my taste, which I think gives me far too much responsibility, but there we are, I'm going to do it anyway.
Up next should be a DIP switch and I can't seem to find it, so either I've lost it, which is possible in this room, and I will find it in a moment, or it wasn't included in the first place, which is more serious. I'm going to do other stuff, the rest of the things, and then I'll put the DIP switch in at the end once I've tidied everything up. Looking at the layout of the board, there is enough space on the board for me to do this later, it's not going to hinder my soldering should I do it later or now. So, we'll do it later. Let's move on to the next page.
Installing the IC sockets and chips
A pedal builder friend of mine advised me to put the IC chips in at the very end of the build. So just put the sockets in at this stage and then when you're almost finished, put the chips in. Naturally, I forgot to do that and put them in at the same time as the sockets. Putting the capacitors in was fairly fiddly for someone with big fingers like me, and you might have trouble if you're of the larger handed variety of person. However, they went in and I decided to put the project aside for a day and come back tomorrow.
And now the manual says that I should attach the breakout board to the main PCB, and I'm so happy that I've left it in its entirety because the lead wires connect from here to here. And last time when I did the Ghost Drive, I had trouble holding this in place, so it was just short enough and close enough to get this connected. Now, as you can see, with it still in its surrounding, all I have to do is put wire to wire to wire to wire to wire, easy.
I hit a snag, no DIP switch!
I had to tidy up and sadly I couldn't find the DIP switch anywhere. So that either means that StewMac did not include it, which I feel is unlikely, or more likely whilst tidying up and doing this over several days, I accidentally threw it away. So, here's a top tip, don't throw away your own parts, maybe. Maybe use the box that the kit comes in to keep all the parts in until you need them unless you've stuck them to a piece of paper.
I figured the easiest way to rectify this was to order some DIP switches online, which I did, and they arrived in three days, which meant I had to wait with my build, but it gave me time to do this.
Painting the enclosure and adding stickers
I made myself a little spray booth out of these cardboard boxes and applied three coats of paint with about an hour and a half in between each coat. I oversprayed on the sides of the blue a little bit, so I sanded back after the first coat on there. Then I started adding the included stickers, and then finally sprayed over that with two coats of clear spray.
So finally, here's the DIP switch. I can just drop it in like that and then turn it over and solder it. Little bit of tape to stick it to the board so it doesn't fall out when I turn it over. Now time to put the board into my beautifully painted enclosure, and I want to protect this, so I'm going to put a piece of paper on it and tape that to it whilst I lay the pieces in.
I actually have quite a bit of overspray in these holes just here. I hope that's not going to cause too many problems.
Pots make it real
There's a lovely diagram on page 26, or graphic I should say, where it lists all the different values of the different pots. So this is an A100K, it's written just here on the brown part there, which means that I can use it as a drive pot. Bearing in mind that this will be reversed. So drive, when you're upside down, is on this side. You'll also need to break these tabs off just here by getting long-nose pliers and bending them off.
According to the instruction manual, any pot that doesn't have a plastic cap attached to the pot also needs one of these little adhesive pads. But I've only got four adhesive pads and there are six pots and none of them have these plastic caps. That's a bit of a shame. It turns out that the two pots that could touch the board when I've soldered it all together are the two pots that I haven't put those adhesive pads on. These two just here. So thankfully, in my dad box, I've got some tape here that I can use. There we go. That should stop any grounding issues of the pots touching the board.
I was just about to attach this to the pots and I realized that I haven't put all the lead wires on. Whoops. Then pots, which were a little bit fiddly but manageable once the board was in the right place. And finally, I could snip out the PCB and breakout board and solder in the foot switches.
Even though I'll power this with a power supply, it's nice to have a battery option just in case. Ripping off the paper to reveal the pedal and then install the LED sockets and holders and marry all that hard work with the enclosure, which was not easy.
Putting the pedal circuit into the enclosure
Getting that completed circuit inside that enclosure is one of the most difficult guitar project things I've ever had to do, and I'm pretty sure it's because I cut those lead wires from the PCB to the breakout board too short, giving me not much wiggle room between what is essentially the foot switches and the rest of the board and you need more cable to give you more of a bend. But I did it, it worked out okay, and that enabled me to solder in the power socket and the output and input socket, and then finally adjust the DIP switch to the same settings as the Analogman Standard. And I think that's it.
But before I screw the backplate onto the enclosure and put the knobs on, I'm going to test it. So, here we go.
Does it work?
Output jack. Input jack. And power supply. Where is it? There? Okay, turning this side on. It doesn't work. Nope. Ah, okay. LED works on that side. LED does not work on that side. I wonder if it's passing sound at all. All right, put that there so you can see it. Custom Core 150 Heritage guitar.
[Andy strums his electric guitar]
Whoa. That's working, although the LED is not, so I'll have to address that in a bit. Let's see if the higher gain is working. The LED is working on this side. It's working. It's working. Okay, so I have an issue with the LED, but it's working. Right, back to the soldering testing thing. Exciting times.
Reflowing the solder on the LEDs
It's working. All right, let's put the enclosure together and put the knobs on. The drive and volume knobs can get in the way of installing the tone knob, so I recommend you do the tone knob first.
Alrighty, it is a finished pedal. It looks like this, and I'm very happy with how it contrasts with the back with my little Guitar Geek logo on there. I think that looks super cool.
Does the StewMac Two Kings sound good?
Before I turn it on, here's the clean tone of the deluxe reverb. [Andy plays his guitar softly] Right, let's turn on the low gain side [Andy plays a slow song on his guitar]. Let's put that volume up about halfway. Oh, it's very low volume. I hope that's supposed to be like that. Drive [Andy turns the Drive up].
[Andy plays a slow song]
Sounds good to me. I love the fact that you can just have that little [Andy plays slowly]. And then dig in [Andy plays a blues song].
Right, let's try the right-hand side, the higher gain side [Andy turns up the volume and drive on the righ side]. That's not what I was expecting. There's a fizziness to it, to both sides in fact, that I don't dislike, but on that high gain, I'm not a fan. It's still, I hate to use the word transparent, but you can still hear that original guitar coming through [Andy strums the guitar]. I think maybe I should be driving, putting the left-hand side on and then driving that, driving it with the right-hand side so there's really... I think with this guitar, it might be better on the neck pickup.
[Andy plays a fast song on the guitar]
I keep forgetting that I've built this pedal because, for you, this is just a linear video from beginning to end, but for me, this is several sessions over more than a week, and I keep forgetting, I keep thinking this is the real Analogman King of Tone, and it isn't. It's a $100 kit, so I should be really, really pleased. I need to try the real Analogman King of Tone. I've never played one, so I don't know, please let me know if this sounds anything like it. What I will say is that even if it doesn't sound anything like it, I like what it's doing on the left-hand side with that little clean gritty bluesy-ness. And then on the right-hand side, I like that more driven with both sides. I don't like just the high gain on its own. I feel that is used in combination with that to give this boost, this big throaty boost.
My review of the Two Kings Pedal Kit
But let's not forget why we're here. The sounds and my opinion of the sounds of the pedal are definitely secondary in this video. The primary function of me making this video is to talk about the build process and my experience with this kit. And even though my experience building this was very positive, I should say that if you have never built a pedal before in your life, this is not the first project for you. That's not to say that you can't do it, but I think there are better projects to begin with. And this is, I think, my 11th pedal build and only the past three have worked because my soldering, my parts collection, my general skill of building pedals was not up to scratch until about three pedals ago. And I would really recommend you check out one of StewMac's Fuzz Pedal Kits or something like that, or another kit from somewhere that just does something very, very simple. And I'll link to the ones that I recommend for beginners in the video description, of course.
But I am nowhere near an expert. I am still, I'm probably approaching intermediate hobby enthusiast pedal builder now, and a big difference was that since I did the last build, which was the Ghost Drive from StewMac, I bought a new soldering iron and the last one was about 50 Euros and this one that I bought is about 150 Euros, and I don't know if it's the soldering irons or my skill, but the whole combination with this build felt a lot more comfortable than it did with the Ghost Drive even, even though the Ghost Drive worked and everything was fine and that was enjoyable, this one I enjoyed more.
And the main reason I enjoyed it is because of this, this manual is the reason this pedal works. I'm just the monkey with the hot thing in his hand. This is the brains here. Without this, which is so in depth, so detailed and almost idiot proof, it would be like buying a car and not knowing how to drive it. These are the driving lessons, the instructions, the guide, the way to pass your driving test and get that license to build this pedal. I may have pushed that metaphor too far, but hopefully you understand that this is where I think the money is going in the kit. The components seem to be good to high quality. Everything works as it should. There are no duff components, but this thing, this is the reason that I recommend you try building the Two Kings Boost.
I even enjoyed reading it. How weird is that? How nerdy and geeky is this? I enjoyed looking at these pictures and felt that it was holding my hand as we were going through the pedal build. And yeah, I hope StewMac released more of these kits and include something just like this, because I had a really fun time building this pedal.
That's not to say that everything was positive. None of the pots had those plastic covers on the back, which stopped them being grounded accidentally, so they recommend those adhesive pads, and as I said earlier in the video, there are only four included pads, and I needed six. So maybe StewMac need to take a look at that.
Also, was the DIP switch included and did I lose it or was it not in the box in the first place? We will never know, and I am fully prepared to take responsibility for this having a third party DIP switch in it, but I would like to think that if the DIP switch was missing in the first place, that StewMac would replace it without any quibbles because I've seen some really good stuff around the internet about StewMac's quality service, and if their tools break or something, they will replace it with a lifetime warranty, which is a pretty amazing deal that I think should also extend to their pedal kits. That's not saying that if you burn through a diode, they're going to send you a free diode, but I'm sure they're nice people to deal with. And certainly the people that I've talked to at StewMac have been very pleasant and very helpful.
All right, what else? Oh, yeah, installing the actual circuit board into the enclosure was one of the most painful things I've ever dealt with in my life of guitar projects, and that was, again, down to my fault of having the lead wires too short, I'm sure of it.
How long does it take to build the Two Kings Pedal Kit
A big question that some of you asked for Ghost Drive was how long did it take? And this build, including the trying to get it in the enclosure, took me in total build time, probably six hours, plus spray painting the enclosure, which is not necessarily required, but I had fun with it and I had spare time waiting for the DIP switch. If I wasn't making a video, I probably could have done it in three or four I think. I'd like to test that one day actually.
A little review of my painting experience was that I made a mistake and it should be quite clear. I should have painted it and then when it had dried, put the pots in and then put the knobs on the pots, then put the labels on, then taken the pots off, and then clear coated over top of it. I didn't do that and that means you can't see the word drive or volume or drive, you can't see the labels. Totally on me, that.
And let's round this off by saying, you're not buying a pedal. Okay? Some of you commented on the Ghost Drive video that you can just buy a Klon for 50 bucks. That's not what you're buying. You're buying the experience of building your own pedal kit. Again, you don't go to a Lego shop and buy a built model, or maybe you do, but you shouldn't. The experience or the thing you're paying for is the fun, the experience of doing, the journey, not the destination.
That is the end of the video, which means you are in the End of the Video Club and to prove that you are a member of this prestigious elite, when you leave a comment down below telling me what you think of the Two King's Boost Pedal Kit, please also include your favorite Kings. I'm going to go for Elvis and Stephen. And when I read those, I'll know that you watched this part of the video and I can have a jolly good chuckle, and Google will also rank this higher in the YouTube results. Thanks for doing that.
Right. There are videos over there. One of them is the Ghost Drive build. If you haven't seen it already, I recommend you watch that. It's fun and informative. Otherwise, there's a subscribe button down there and everything you need to know will come to you in a dream. I'll see you soon. Bye-bye.


