Fret Removal - Luthier Tips du Jour Mailbag
In this episode, Robbie O’Brien addresses a viewer’s question about how to remove frets from a fretboard.
Video Transcription
[on-screen text reads: Luthier Tips du Jour Mailbag]
Mailbag question: I am getting a lot of chip-out when removing my frets, am I doing something wrong?
Robert O'Brien: Today's Tips du Jour Mailbag question comes to us from Italy.
"Dear Robert, I am trying to remove the frets from my fretboard. However, I'm getting a lot of chip-out as the frets are removed. Am I doing something wrong? Please help. Massimo in Italy."
Well, Massimo, removing frets from an old fretboard can create a problem, and the problem you are finding is you get chip-out. Let me show you a couple of things I do to help minimize this as I'm removing frets.
Heat the frets
The first thing I like to do is heat the fret and I'm just using a little soldering iron here, and I run it along the fret. Make sure that you have some solder on the tip there so you don't ruin the tip.
What that's doing is heating up that fret and perhaps helping loosen any adhesive that was used in there to hold that fret in. I don't know if there was any adhesive used. Perhaps there was, perhaps there wasn't. But if you heat the fret, it will help break down any adhesive that was used in there.
It also helps shrink the wood just a little bit from around the fret as it's drying out. It gets hot and it will help relax that slot just a little bit.
Pull the fret out with special pliers
Next, I'm going to come in with a pair of cutters like this. Now, these cutters I've put on a grinder on my disc sander and have ground a flat surface on there. So what I'm going to do is come in, start at one side here and press down with the pliers as I start to get those pliers up under there and squeeze and there you go. You have very minimal chip-out, if any at all.
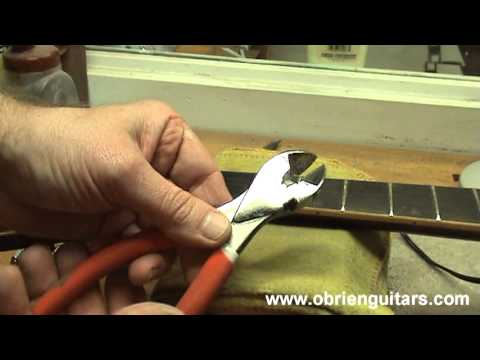
The Scott Baxendale trick
Now, let me show you another pair of pliers here that I have and this trick I learned from Scott Baxendale of Baxendale Guitars. I want to give him credit for this. What this is, is just a pair of cutters I went down to my local hardware store and bought, and then I put on a edge grinder to grind that edge flat [Robert points to the backside of the cutters]. I then took a Dremel and opened up the area there in the middle [Robert points to the front of the cutters in the middle at the base of the cutting edge] with the little grinder and then recessed this area here just a little bit [Robert points to the very edge at the tip of the cutters on the backside].
Now, let me show you how I use these pliers. Now, according to Scott, you can use this without heating up the fret slot. That's the beauty of this design. However, as a little security, I like to go ahead and heat the slot just a little bit by heating the fret and let it dissipate down into the slot.
I then come in with the tool and start on one edge. I'm just going to apply lateral pressure like this. As I'm applying lateral pressure, it's forcing the fret up. But because the bottom of the tool is flat and I'm only applying lateral pressure, I'm not pulling up on the fret, in theory, it should help hold all of that ebony down in there. Now you notice the fret goes right through the underside of the tool and comes out the back side and there you go.
So here it is again. Start with the tool. Just get under the edge there. Work the tool right on across the fret and the fret goes under the tool and out the back side. You can remove frets very quickly by doing it this way with little chance of tear-out.
So Massimo, I hope you found this information useful and happy fretting.
[on-screen text reads: More Luthier Tips and online courses available at www.obrienguitars.com. Private and small group guitar building and finishing instruction available.]