Pickguards - Luthier Tips du Jour Mailbag
In this episode, Robbie O’Brien answers a viewer’s question about how to make and install pickguards.
Video Transcription
[on-screen text reads: Luthier Tips du Jour Mailbag]
Mailbag question: How do you make a pickguard?
Robert O'Brien: Today's Tips du Jour Mailbag question comes from Alaska. "Dear Robert, I have just finished making my guitar following your online videos and it came out great. I'm worried about scratching it and want to make a pickguard. Can you show me how this is done? Tom in Alaska."
Well, sure, Tom. Let's get right at it.
Purchase some pickguard material
This is Pickguard Material that I got from LMI. It comes with several different designs, from clear to your vintage tortoiseshell look. It comes with adhesive backing or without. So let me show you how to make a pickguard using these materials.
Figure out the shape you want
The first thing to do is know the shape you want, and I'm going to use an old pickguard to make a new one. You can also go to LMI's website where there are downloadable PDF files with various pickguard shapes.
Use a template to trace and cut the pickguard material
I'm going to start by placing my template on my pickguard material and tracing around it. Because of the paper backing material, it's somewhat hard to see your line, but if you catch it just right in the light, you can see it. And you want to turn this over to cut it. That's why I traced it on the back side. For some reason, the scissors seem to cut better if I'm cutting from the back side. So I'm going to cut up close to my line, but not quite all the way to it. I also want to be very careful that I try not to leave any sharp edges. The procedure for cutting out the clear pickguard material is the same.
Sand the edges
Now, just to clean up the edges a little bit, I like to come in with a small sanding block and make sure that there's no sharp edges on there.
[Robert is holding the pickguard down on his workbench with his left hand while slowly rotating the pickguard 180 degrees and working the sanding block back and forth on the edge of the workbench]
Everything's nice and round. You can also sand right up to your line that way, if you like. For the inside radius here, I'm just going to use a piece of my spindle sander to come in and do that.
[Robert sands the inside radius of both sides of the pickguard with the spindle sander]
And this pickguard is ready to go.
How to make a pickguard using tortoiseshell material
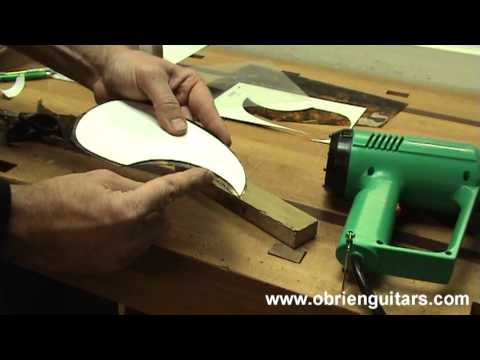
Now, the tortoiseshell material is a little harder to work with. In order to cut it, it's very brittle, so you have to heat it up.
Heat up the material
Now, I'm going to use a heat gun. You could also use a hairdryer. And I've heard also people just drop it in a pan of hot water for a few minutes. I'm also going to double-side tape my template onto this material, and I'm doing it from the back side because that's where I'm going to be cutting it from.
Now, you want to be very careful when you heat this. You don't need a lot of heat because the material will shrink [Robert briefly runs the heat gun around the entire area of the pickguard material]. That's usually about all it takes.
Cut out the template and sand the edges
I'm going to come in with my scissors and I'm going to cut it oversize. With my template cut out, I'm now ready to take it to my sander. I'm going to use a spindle sander and sand right up to my template outline there. Once that's done, I'll take the template off and then finish it by hand. I now have the pickguard material sanded flush with my template, so I'm going to remove the template, and now use my sanding block to remove any little sharp tips left by the sander.
[Robert is holding the pickguard down on his workbench with his left hand while slowly rotating the pickguard 180 degrees and working the sanding block back and forth on the edge of the workbench]
Now, if you're making a replacement pickguard for your guitar and the soundboard has oxidized with the ultraviolet light over time, then you need to be really tight on your pickguard tolerances on the size so that you don't have any of that discoloration showing around the edge of the pickguard.
Scrape and bevel the edges with a razor blade
Something else you can do is come in and use a razor blade like a scraper, and just scrape the edge slightly. Make sure it's at a 90-degree angle and just clean it up. Some people also like to put a bevel on the edge of the pickguard because this pickguard material is a little thicker and it looks a little more refined if you just bevel the edge slightly. So come in with your razor blade, hold it at a slight angle, and just scrape that bevel into it. If you wanted to, you could also make a template out of plywood or MDF or something. Stick this to it, take it to your router table and run a chamfer bit around it. But this bevel gets scraped in very quickly, so it's not a big deal.
Something else to be careful with with this pickguard material is that it scratches very easily, so if you happen to get scratches on the top of it during the manufacturing process here, you just take it to your buffer and buff any of those scratches out of it. You can also get a little shinier edge on there instead of a dull edge if you do that.
Buff out the scratches
Okay, I'm going to go to my buffing wheel and get some of the scratches out that I put on it during the manufacturing process. If you don't have a buffing machine, you could also use a clear plastic polish or cleaner to buff it by hand [A bottle of Meguiar's Clear Plastic Polish and Clear Plastic Cleaner are shown]. To hold the pickguard, I just double-sided tape it to a piece of plywood. That allows me to come in and use it on the buffing wheel without worrying about getting my fingers.
[Robert buffs out the pickguard on the buffing wheel]
I now have a nice shiny pickguard that's ready to be installed on the guitar.
Install the pickguard
Now, if you're installing this pickguard material or the clear pickguard material [Robert holds up pickguard material with self-adhesive already attached], it already comes with a self-adhesive on the back. You just peel and stick. Once it's on the guitar, then you peel the film off the top side, revealing a nice shiny surface.
This pickguard material is a little different [Robert grabs the tortoiseshell pickguard]. There's no adhesive on the back. So you can either use a spray adhesive or a transfer paper. First of all, make sure the back of the pickguard is clean. You don't want any cling-ons or any goobers, and those are technical terms. Those will show up through the pickguard later. So now I take the transfer paper that I got from LMI. Peel and stick to the back of the pickguard. I can now use my razor blade to trim that right up next to the pickguard.
Now to place the pickguard on your guitar, there's more to it than just peel and stick. You want to be very careful with placement. You also want to be very careful that you don't get any air bubbles or debris under there, so make sure that the guitar is clean. You then take your pickguard material. I'm not going to do it on this guitar because this guitar is already sold and the guy doesn't want a pickguard, but I'll show you how to do it. I'll talk you through it.
First of all, position the pickguard where you want it. Next, come in and place a piece of tape along one edge. That's going to work as a hinge. You can now lift the pickguard like so, and when you flop it back down, it's going to go right back in place in the correct position.
Something else you want to do is take a spray bottle has a couple drops of liquid detergent in it, and just spray it on the surface. Remove your adhesive backing, and then just flop the pickguard over into place. Lay it down. There will be water under there. If you want to place a paper towel or something inside your guitar, that's a good idea because some of the water will drip down into the soundhole, and if you have a label in there, it could be bad news for that. It could also leave marks in the guitar.
Once the pickguard's in place, you've sprayed the soapy water on there, you've removed the adhesive backing, you've flopped it over back into place on your tape hinge, I then come in with a hard rubber sanding block and just remove the water out towards the edges. This helps keep you from getting any air bubbles or anything in there. So just work the water out towards the edges like that [Robert presses the sanding block down against the pickguard and works it out towards the edges]. When you're all done, clean up the excess water. Remove your tape. And then just peel the clear cellophane cover off the top, and you've got a brand new shiny pickguard on the guitar.
The process for the tortoiseshell pickguard is exactly the same. Position it where you want it. Place a piece of tape as a hinge. You're then able to lift it up, remove the covering over the adhesive backing, spray a little water on there, flop it right down into place, and then squeegee out the excess. And you, once again, have a nice shiny pickguard.
So Tom, as you can see, making a pickguard is not a big problem. I personally find it more difficult to install it correctly. Anyway, I hope this information helps, and happy playing.
[on-screen text reads: More Luthier Tips and online courses available at www.obrienguitars.com. Private and small group guitar building and finishing instruction available.]