Fretboard Binding - Luthier Tips du Jour Mailbag
In this episode, Robbie O’Brien answers a question about how to attach binding to the side of a fretboard.
Video Transcription
[on-screen text reads: Luthier Tips du Jour Mailbag]
Mailbag question: What is the best method for attaching bindings to the side of the fretboard?
Robert O'Brien: Today's Tips du Jour mailbag question comes from Washington. "Dear Robert, I want to bind my fretboard. What is the best way to attach the bindings to the side of the fretboard? Thank you for your videos. John in Washington."
John, I use CA glue for this step, and let me show you a couple of ways to do this.
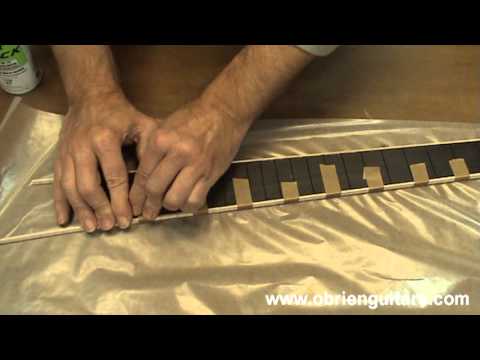
Gluing the binding
So I have a fretboard here that I want to bind, and that means I need to stick this binding to the side of it. There are a couple of ways I can do that. I can use white glue, yellow glue, polyurethane glue, epoxy. A bunch of different types of adhesive would work here. Since I'm in a hurry today, I'm going to use CA glue or a cyanoacrylate glue, and the brand that I'm going to use is Hot Stuff. This is what I use in my shop, comes from Satellite City.
I'll show you a couple of different ways to do that. One way is to apply your glue to the side of the fretboard, quickly place the binding there and then push it up against a solid surface. I have a piece of wood here clamped on my bench. I'll show you here in just a minute. Push it up against the side of it. As the glue dries, you can also hit it with a bit of accelerator to get the job done. So on one side, I'll do it that way. The other side, I'll clamp the binding on there first and then use the CA glue to wick in through the top.
Applying the binding
So what you want to think about when you're doing this is the binding needs to be flush with the bottom of the fretboard. The fretboard's just a little proud of the binding. I'm going to radius it, bring it down to the binding later, but it's got to be flush on the bottom. So when you put this thing on here, make sure that binding stays down. You have to work fairly quickly since we are dealing with the cyanoacrylate glue. I'm using the, once again, the medium viscosity. You don't want to get happy with the glue either, because if you run it down inside your frets there, technical term for that is bad.
[Robert applies the glue along the entire edge of the fretboard]
So with the glue applied, very quickly place your binding on it, push it up against the flat surface, make sure the binding is all the way down, and your binding is now applied to one side and it's flush on the bottom. If you want to, you can come in and hit the glue on the other side real quick with the accelerator, make sure it's drying.
Attaching the binding
So I've just shown you one way you can use CA glue to attach the binding to the side. On this side. I'm going to go ahead and clamp the binding on there first with some binding tape, and then, wick the glue in from the top side and from the bottom side with a pipette. For this next step, I'm going to be using the thin-viscosity CA glue, and I'm going to be using the accelerator as well.
Now, what I'm going to do is take some binding tape and start just by putting the binding tape on the back side, like this [Robert applies small strips of binding tape all the way down the fretboard about 2 inches apart]. Okay, that's our clamp. So the binding now goes on like this [Robert presses the binding up against the edge of the fretboard]. Make sure that you're pressed all the way down, you got to be flush on the bottom, and then just roll your clamp over or your tape [Robert pulls and presses the tape down over the top of the fretboard securing the binding to the fretboard]. When you do this, make sure that the binding is pulled all the way up tight against the side of the fretboard.
Gluing the binding onto the other side of the fretboard
So here we go. I've got my CA glue. This is the thin-viscosity glue. Once again, I've got it in a little pipette. That way, I can strategically place it.
Now, I always want to have at hand super solvent, in case you decide to glue yourself to the fretboard or your fretboard to the bench or you to the bench or you to your tools. Believe me, folks, it does happen. So have some of this handy so you can deglue yourself if you need to. I'm now going to come in with the thin-viscosity glue and just wick it in from the top side, and it could just go right down inside there like that. I can skip over my tape for now, unless you want to glue that to your fretboard. Maybe you do, but I don't. I also don't want to get real happy with the glue because if you get it down inside your fret slots there, then you got work to clean that out when it comes time to do your fret work.
But the thin-viscosity glue like this, it's like water, so it just wicks right down in there and gets the job done. And I'm going to quickly hit that with a shot of accelerator. And if you want to turn it over from the back side, do the same thing [Robert applies the thin-viscosity glue to the edge of the binding and fretboard on the other side using a pipette]. I know. I know what you're thinking. You're thinking is that glue really getting down in there, between that binding and the side of that fretboard? Yes, folks, it is. It will go right down in there, and you don't have to worry about it delaminating. In a previous video I showed you how to do the same method to install bindings on your guitar. So it does work. Here comes some more accelerator.
Now I can peel the tape off, and I'm going to come in and put glue where that tape was. Notice I have a piece of wax paper on my bench as well. "Why did he do that?" You ask. I tell you what, I'll let you guys figure that one out. If you have a question about that, send me an email. I'll be happy to answer that question. Once again, a little shot of accelerator, and I'm going to do the same thing on the backside after I remove the tape there, just a little over the top of that binding is all it takes. Just wicks right down in there.
Removing the excess glue with a scraper
Now, CA glue dries very quickly, but if you're in a hurry like I am today, I'm going to hit it with some more accelerator. After the glue is dry, I come in with my scraper, remove the excess glue. Also, if the binding is not quite flush with the fretboard, it will be when you get done running the scraper over it. By the way, here's another little trick for you. As you run your scraper over things, it creates friction, it gets hot. Put a little magnet on there, and that helps dissipate the heat before it hits your fingers. And if it's a Crested Butte Colorado picture magnet for my friend J.C in Crested Butte, it works even better.
Once you get done scraping the bottom of the fretboard, that's what it looks like. No gaps. Binding is attached to the side. It's not coming off of there. Now I can go ahead and glue it to my guitar, and then I'll come in and level the radius from the top side.
So John, thank you for your question, and I hope you find this information useful next time you need to attach the bindings to the side of your fretboard. Happy binding.
[on-screen text reads: More Luthier Tips and online course available at www.obrienguitars.com. Private and small group guitar building and finishing instruction available.]