CA Glue - Luthier Tips du Jour Mailbag
In this episode, Robbie O’Brien answers a viewer’s question about CA glue and provides examples of its use in lutherie.
Video Transcription
[on-screen text reads: Luthier Tips du Jour Mailbag]
Mailbag question: Can you show me some examples of when you should use CA glue?
Robert O'Brien: Today's tips to your mailbag question comes from California. "Dear Robert, I have heard you mention CA glue in your videos before. Can you show some examples of when you would use it? Glenn, in California."
Glenn, CA glue is a very powerful, quick drying adhesive that hardens immediately and therefore has many uses in Lutherie as well as in woodworking in general. It will bond anything to almost anything, including your fingers or other body parts to your project, and therefore I recommend having some solvent nearby when using it. Also, all CA glues are not created equal. When I need a reliable high strength permanent bond, I use a brand called Hot Stuff that I get from Satellite City. It comes in several thicknesses and even user-friendly odorless versions for those that are susceptible to the irritation of regular CA glue.
When I use CA glue in my shop
So here are some examples of when I would use CA glue in my shop.
Repairing hairline cracks
All right, I just got done thicknessing, a beautiful set of Honduran rosewood, and I found a very small hairline crack right along there, so I need to fix that. First of all, I'm going to mark it so I can see it clearly, and if you catch these things before you start working the wood, you can go ahead and fix them and continue working with the wood. To fix the crack, I'm going to use thin viscosity CA Glue. This is called Hot Stuff. It's made by Satellite City and I get it from LMI. I'm also going to use their accelerator. I'm going to place a piece of newspaper under the board, that way I don't glue it to my bench. To apply the glue I'm going to use this special applicator here. Just goes on the top of the glue bottle. It allows you to strategically place just a very small drop. You could also use a pipette.
Let's find the crack and just put some of the glue on. It will wick right in because it's a very watered down glue. It's thin viscosity. Just let it work its way right down in there. You may find that it even comes out on the other side a little bit, which is fine. That's what we want. Now I'm going to hit it with just a little bit of the accelerator. I'm not going to get right on it like this because the quicker the glue dries, it has a tendency to create heat and bubbles and creates little white voids in there. I'm going to back up a little bit and mist it, and that's all it takes. I might as well hit the other side while I'm at it, and that's all it takes. Now if you want to take your scraper, come in and clean off some of that glue before you put it to your sander, your sander will thank you.
That piece is as good as new. That same trick also works well for the edges. Like on the end here, I found a little hairline fracture there. Let's go ahead and hit that as well. Just let the glue wick right down through there. If you want to separate the wood just a little bit, it allows that glue to go down in there and then come in and mist it with the accelerator from a distance. That's all it takes. It will dry. I can also hit it from the other side. Notice how it goes right on through there because it's a little hairline crack. The glue dries instantly with the accelerator. I then come in and hit it with the scraper. All right, I'm ready to continue sanding. This is going to make a nice guitar back.
Cracked sides from side bending
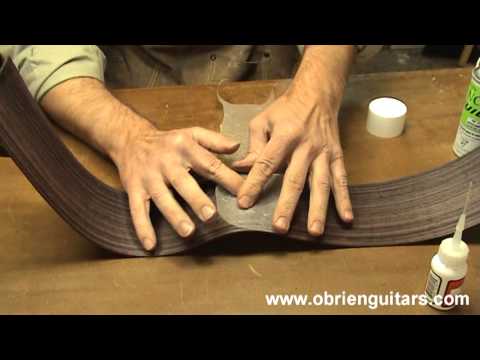
You cracked your sides when you were bending them in the side bender. It's not the end of the world. This side here, the fibers are just starting to open up on the other side. It's good enough that we can still go ahead and use it. What I do is I open the fibers just a little bit. I'm going to be using thin viscosity CA glue, and I'm going to let it run right down in to the grain there. I'm then going to put a piece of wax paper around my fingers and lightly press the fibers into place. If you want to use a little shot of accelerator, you can. I don't like to get right on top of it. I mist it from a distance, lightly mist it, and it should dry very quickly, and there you go. Now it's visible. It's on the inside though. However, with a little sanding that'll go away and will disappear. There you go. Good as new. We can now use that side.
Bindings that are starting to open up
The same little technique will work for bindings that are starting to open up. For example, these maple bindings are starting to open just a little bit, so I'll do them one at a time here. Run a little glue in there, close it up. This one I'm going to hit with the accelerator. It's going to be on the inside of the guitar or on the inside bend there, so you won't see that at all. Here's another one. The grain is just starting to open up. Now this trick works really well in darker colored woods. The lighter colored woods tend to leave a little line. However, the figure in the maple will help that disappear and it will be virtually invisible even if it were on the outside.
Gluing heel caps to the heel block
Another area where you can use CA glue is gluing a heel cap to the actual heel block. For this step, I'm going to be using the thick viscosity glue. So I'm just going to apply a little bit to the area and you've got a little bit of open time there. So come in, place this on your center line of the guitar [Robert sets the heel cap on the glue placed on the heel block] and then I like to hit it with a shot of the accelerator so things dry quickly. Now I can get right into carving the neck.
Gluing in fret markers
Another thing you can use the CA glue for in guitar building is to glue in the fret markers. This is quarter inch mother-of-pearl fret markers. I'm going to come in with the thin viscosity CA glue this time and just drop a little bit on there and just wick itself in down under and around that quarter inch mother-of-pearl dot. You can then mist it with a light coat of accelerator and it's dry and ready to go. Those dots will not come out. Glenn, thank you for your question and I hope you found this information useful.
[on-screen text reads: More Luthier Tips and online courses available at www.obrienguitars.com]