How (and why) to use templates to rout control cavities
Build yourself a custom solidbody

A clean rout isn’t so tough when you set yourself up for it beforehand.
Turning a wooden blank into a slab-body electric is a good way to build your first guitar. It’s not as easy as assembling a ready-made body but it’s not overwhelming, and you’ll build more skills.
When you feel like giving it a shot, here are some tips to help you with routing control cavities, which might be your main challenge.
If this’ll be your first time building, maybe you want to focus on the body only, and use a ready-made neck.

Anyway, here we go with some tips:
Copy a reference guitar.
If you haven’t already got your heart set on a custom body shape, think about making a knockoff of a classic.
That’s what I’m doing — I'm building a Musicmaster style bass for my wife, Missy.

I've got an actual Musicmaster to take measurements from, and that’s really handy. Unlike a Les Paul, this body won’t have a carved top. It’s a simple slab (faster and easier).
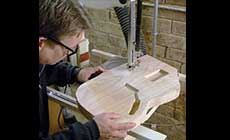
Don’t cut the body shape yet!

I know you want to start by heading to the bandsaw and making that body blank look guitar-shaped, but hold off. After laying out your centerline and drawing the body on the blank wood, your first cuts should be routing the cavities for the neck and the electronics.
I got this tip from seeing an old photo that showed how the Gibson factory worked. It makes sense: do your routing while you’re still working with a rectangle of wood. This way, if you make a little slip-up in routing, you can just shift your centerline and readjust, so things wind up where they ought to be on the body.
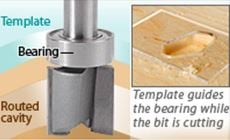
Use a routing template.
Don’t expect to freehand-cut with that router! You need a template to guide the cut. A bearing above the router bit rides along the template’s shape while the bit is cutting. I didn't have a template for this bass, so I’ll show you how I made one.
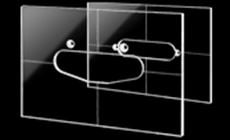
I started with a piece of clear template material, positioning it over the control cavity in the bass I was working from. Looking straight down from above, I traced the cavity with a permanent marker. The shape has to be just large enough to hold the pots and the jack, and small enough to hide under the pickguard. I laid a pickguard on my drawing to check the size before cutting the template.
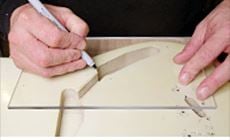
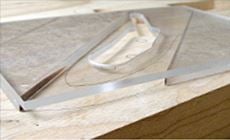
I started the cutting with a Forstner bit, drilling out the lion's share of the material on my drill press. Be careful! Use goggles and clamp the acrylic in place before cutting — drill bits can suddenly grab in plastic. Then I switched to a coping saw to remove the remaining material, following the line I traced.

After roughing out the shape, I used a file to clean up the edges so the router bearing rides on a nice smooth surface.
This’ll make the actual routed hole clean and factory-like, with no cobbled “did it myself” look.
Here’s my template. Let’s go rout!
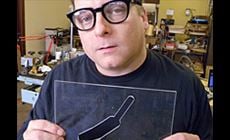

Check it out!
Most templates are already available.
We have ready-to-use templates for pickups, tremolos, neck joints, mandolin building and much more. Check them out.
Shim the template.
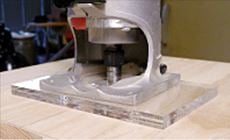
The first cuts are easier if the template is raised up a bit. That way, the bearing rides on the template while the tip of the cutting bit makes a shallow cut. You can see I shimmed my template with scraps of the same clear material, but the shims could be made of anything. Double-stick tape holds all this together while I rout.
When you have two of the same template, that’s a great situation. Double-stick tape them together and use them as one — you won’t need to add any shims. At left is a double-template from a different project.
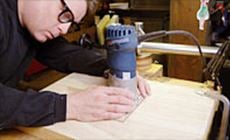
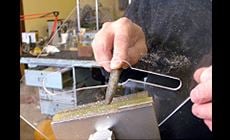
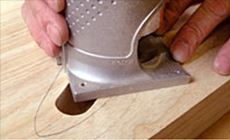
With the template secured to the wood with double-sticky tape, it's time to set up the router for the job.
I drilled a hole about 1" deep to give the bit a recess to fit into to start. With the cutting blades right at the top of the body blank, be sure that the bearing meets the template. Then lower the bit for your first shallow cut.
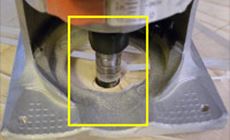
Notice the three stacked bearings highlighted in the yellow box. The ball bearing router bit comes with one bearing that can be positioned up or down the shaft by inserting a spacer. I’ve got extra bearings, and I use them all at once. This way, I don't have to stop and reposition the bearing height as the cut goes deeper.
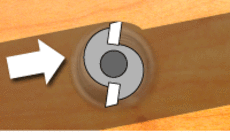
Don’t let the bit pull you.
When routing, move the spinning bit into the wood as indicated by the arrow at left. If you moved the router in the opposite direction it would grab the wood and pull itself forward — called “climb cutting.” A climb cut is useful on delicate spruce guitar tops, but for a heavy cut in solid wood like this it can make the router jump or chatter, damaging the work.
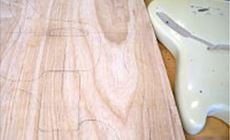
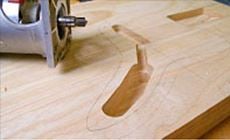
After a couple of passes you can remove the template and lower the bit and bearing into the cavity. The sidewalls you’ve already routed now act like the template, guiding the router as you cut to the final depth of 1-1/16". The shallower channel for the connecting wire is 3/4" deep.
Woohoo! There it is: my clean custom control cavity!
Finally, it’s bandsaw time.
With all cavities routed in their correct spots, it’s time to saw the body shape. This is starting to look basslike at last!