How to Measure Neck Relief on a Guitar
A properly adjusted neck is one of the keys to a guitar that plays clean, stays in tune, and feels great in your hands. At StewMac, we created the Neck Relief Gauge to make that process quick, consistent, and repeatable—whether you’re setting up a customer’s Strat, tweaking your own Les Paul, or working through a full refret in your shop. All measurements below assume the guitar is tuned to pitch and supported in playing orientation.
This guide walks you through exactly how to use the gauge with the instrument tuned to pitch and supported in playing orientation, what neck relief really is, and how to diagnose neck problems before they become fret buzz or tuning headaches.
What Is Neck Relief?
Neck relief is the slight forward bow that lets strings clear the frets as they vibrate. It’s not the same as action or fret height—though it directly affects both.
Too much relief and the guitar feels high and stiff; too little and buzz shows up around the first frets. The goal is a neck that’s nearly flat, with a controlled hint of curvature.
Typical starting points:
- Electric: .004–.008" (0.10–0.20 mm)
- Acoustic: .006–.012" (0.15–0.30 mm)
- Bass: .008–.015" (0.20–0.38 mm)
Adjust for touch, string gauge, tuning, fretwork quality, and playing style.
How to Measure Neck Relief (String Method)
Relief is commonly referenced at the 7th–8th fret, where curvature peaks. To check neck relief with the string method:
Step 1 — Capo the 1st fret
Make sure the guitar is tuned to pitch and supported in playing orientation. Capo (or lightly fret) the 1st fret.
Step 2 — Fret the highest fret on the E 6th string
Hold the string down slightly past the section of the neck you would reasonably expect the neck to stop being affected by string tension. On acoustics, this is usually in the area of the neck where the barrel starts to become the heel, or to be safe, where the neck and the body join. On electrics this can be a few frets further down, typically where the body joint is on set necks or where the first set of bolts are positioned on bolt ons.
Step 3 — Measure the gap at the 7th/8th fret
Eyeball the gap between the top of the 7th or 8th fret and the E 6th string. Then select a feeler gauge you feel would most closely fit the gap as your starting point. Change feeler gauges until you find one that just slides between the gap with a slight friction on the strings, but does not displace the string's position. Check both bass (low-E) and treble (high-E) sides and note the values.
Pro tip: Check both E first and E sixth strings to detect a possible twist in your neck (when there is substantially more relief on one side of the neck or the other). Most guitars for most players would actually do well with more relief on the bass side of the neck. This makes a bass side twist, in some circumstances, preferrable. On the other hand, a treble side twist can make a guitar quite challenging to set up and in extreme circumstances be addressed with either a fret level or a refret using a tool like the Erlewine Neck Jig to simulate string tension.
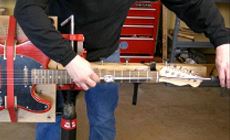
How to Measure Neck Relief Using the StewMac Neck Relief Gauge
The Neck Relief Gauge is a quick and easy way to measure a guitar's neck relief/curvature when adjusting the truss rod. The two feet and the indicator tip sit on the top of the frets, and the indicator reads the amount of bow in the neck. Adjusting the truss rod increases or decreases the amount of this relief in the neck.
Step 1:
Zero the Neck Relief Gauge on an accurate flat plate. A machinist's granite flat plate would be the most accurate way to zero this gauge. Here we are using the next best thing: the steel surface of a quality jointer. In a pinch you can also use a granite countertop, or even plate glass. To zero the dial indicator, loosen the dial lock (located at the approximate 1 o'clock position of the dial). Turn the knurled dial face so the zero mark is lined up with the needle and re-tighten the dial lock. Note that for most applications, the zero will not be in the 12 o'clock position.
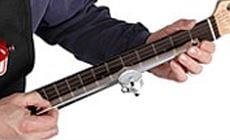
Step 2:
Place the tool on the guitar neck with one end on the first fret and the other end on the twelfth fret. As you adjust the truss rod, the dial will read the relief in thousandths of an inch. A reading of "zero" means that the fret tops are flat (zero relief). The indicator is off-center so it will sit on the fifth or the sixth fret. Adjust the truss rod until you reach the desired relief. Check out our resource on how to adjust your truss rod without breaking your guitar.
A professional set up:
The guitar is secured in our Neck Jig, and held in the playing position. Now the hands are free to adjust the truss rod while reading the relief.
Why Use a Neck Jig?
Having a hard time switching back and forth between reading the relief and adjusting the truss rod ? Many professional guitar techs often choose to perform tasks like this in the Erlewine Neck Jig. Neck relief is measured in thousandths of an inch and a single thousandth of an inch can produce a big change in how the guitar plays. Adding this level of accuracy is worth considering.
Tips for Accurate Measurements
- Check relief with the guitar in playing orientation. Any gravity effects on the neck will produce a false reading of relief. This includes laying the guitar on its back with a neck rest placed at the headstock. The weight of the guitar body will induce more bow in this position. Any adjustment to the instrument in this position will certainly lead to less relief in playing position, including potentially a back bow and excessive fret buzz.
- Use light, consistent pressure: with the string method, touch the string to the fret without pushing it down; with the gauge, let the feet/tip sit—don’t preload the dial.
- Measure both bass and treble sides; the treble side often likes ~.001–.002" (0.03–0.05 mm) less for clean bends.
- Pick one method (string or gauge) and use it consistently—expect small numerical differences between methods.
- Get accustomed to checking relief with similar measurement locations on like-instruments. This will give you experiential knowledge you can draw on when setting up the various different guitar makes, models and types.
Avoid These Common “False Reading” Traps
- Pressing too hard when fretting the last fret (it can deflect the string and inflate relief). Use normal playing pressure.
- Heavy capo pressure causing a slight back-bow near fret 1. Set it just firm enough to fret cleanly. Heavy capo pressure can also cause an inflated reading. Be sure to set the capo to normal playing pressure.
- Measuring the wrong fret (e.g., at 5th or 12th) will misrepresent the neck’s curve.
- Leaning on the neck or body while measuring—your arm weight changes the measurement.
- Dented/kinked strings can also cause a false reading. For best results, measure relief with a fresh, but stretched-in set of strings.
- High/loose frets or gunk on the board: a single high fret mimics excess relief. Tap-test for loose frets and clean excessive finger residue or oxidation from the frets before measuring.
When to Adjust the Truss Rod
Use your relief measurement to guide small, controlled adjustments:
- To reduce relief: tighten the truss rod.
- To add relief: loosen the truss rod.
- Most rods tighten clockwise, but verify your rod type and nut orientation before turning.
- Work in 1/8–1/16-turn steps. Re-tune to pitch and re-measure after each change. Allow time for the neck to settle.
Don’t rush. Let the neck settle a few minutes (longer for dense necks). If the truss rod nut is frozen, seems overly tight, does not produce expected results, or is at the end of its adjustment, consult a professional. A broken truss rod is an expensive repair.
Learn more about how to adjust your truss rod in our comprehensive guide.
Want a Guitar That Plays Perfectly Every Time?
Measuring relief is only one part of a great setup. But it’s a critical one. Whether you're dialing in a new build, adjusting for seasonal changes, or chasing the elusive “perfect” feel, using a relief gauge lets you work with precision—not guesswork.
And if you haven’t tried the StewMac Neck Relief Gauge yet, you’ll find it faster and more repeatable than improvised spacers (cards/plastic) and more convenient for quick re-checks than a fussy, difficult to read feeler gauge set.
Want to get serious about setups? Combine this gauge with our Truss Rod Wrench Set, Precision Notched Straightedge, and a Fret Rocker for a complete neck-diagnostics toolkit. Because knowing your numbers makes every guitar better.