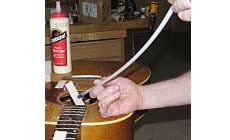
How would you reach inside a guitar to do this gluing?
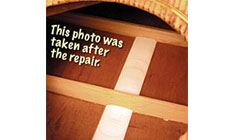
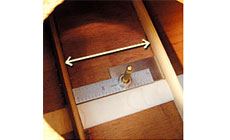
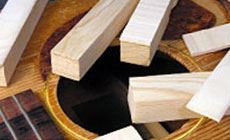
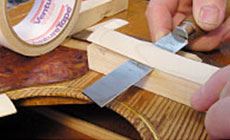
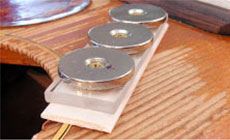
Center strips are those thin pieces of wood reinforcing the glue joint between the two book-matched halves of a flattop guitar back. Installing them is easy when you’re building a guitar, before the body is assembled. They weren’t meant to be installed after the guitar is built, which is what I had to do here. This 1950s Gibson J-50 needed the center strip reglued, which meant reaching the parts inside through the soundhole. That’s like building a model ship in a bottle! This guitar was in bad shape, with poorly glued braces and crack repairs. Three of the main back braces had actually fallen out and were missing altogether. I had to make and install new ones. These structural repairs took days to complete, because every piece had to be installed by reaching it in through the soundhole. This Trade Secret describes the last step of the job: measuring and fitting replacement center strips. It includes some useful tips for working inside a guitar body. I needed an exact measurement of the gaps between the braces, but how to get a ruler down there between the braces? I laid a small piece of aluminum (which just happened to be a ruler) onto a piece of steel, and slid the two apart to span the gap between the braces. Then I put a magnet on top and lifted these pieces out together. Measuring my little “metal sandwich” told me the length I needed to cut this piece of center strip. See that little handle fastened to the magnet? That’s a new idea from Al Rorick in our R&D shop. It lets you grab and move a magnet without having to pry it up with your fingernails. It’s brass, so magnets don’t stick to it. A screw in the end goes through the magnets’ center hole. It’s so handy that it’s now a new product: I already have a gazillion uses for our magnets in my shop, and now they’re even handier. This new, simple brass handle provides a grip for lots of new tasks. Center strips are generally spruce, basswood, or a similar soft, light-colored wood, with grain running across the joint (cross-grain to the lengthwise grain of the back pieces). I cut these strips from poplar. It looked and machined much like the basswood I believe Gibson used. I cut them 1/8" thick, and double-stick taped them to pine blocks to hold the strips as I shaped them on a belt-sander. After sanding a slightly crowned shape on the surfaces, like the original centerstrips, I removed them from the tape with a seam separation knife. For a gluing caul I used a piece of clear acrylic with three 1" repair magnets screwed to it. Another piece of acrylic with double-stacked magnets provided the attraction from the outside, clamping the centerstrips tight while the glue dried. Shown below is a mockup of the gluing setup, with acrylic scraps standing in for the guitar back panels. I used Titebond to glue the strip directly below the soundhole first. That was the good one to practice on, since it was simple to reach. You can just see the tip of it in the photo below. Each subsequent piece was farther from the soundhole, and more awkward, as I had to reach deeper and deeper into the body to work on them. I didn’t want to fumble with a glued-up strip, sliding it around until it looked okay; I wanted all the strips as nicely aligned as when the guitar was new. My magnets helped me with that, too: To line up each piece, I first positioned my magnet cauls next to the gluing location. With the caul in place, I can set the glued-up poplar right against it, and it’s properly located. No muss, no fuss. And getting the magnet caul into position is easy because I can slide it with the matching magnet caul outside. I made myself a flexible spear: threading a nylon rod into the head of an X-Acto knife. I brush on the glue, spear the part, and let this nylon flex-shaft do the gymnastics needed to position the part. Reaching in with my spear, I place the glue-laden strip of poplar against the caul. When the piece is in position, my alignment caul becomes my gluing clamp: I remove the outside magnets to free it up, carefully lift the caul onto the center strip, and and gently re-attach the magnets on the outside. The piece is now clamped, and I leave it alone while the glue dries. Replacing these center strips took some time... Man I'm glad to have them installed at last! This is one of the most weather-beaten guitars I’ve ever seen, but it sounds great, like these light, dry old Gibson flattops so often do. I’m a fan!Here’s a puzzler! How to glue a center strip inside a guitar?

Talk about working in a tight space!
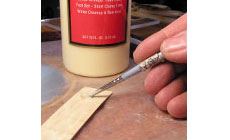
How I measured between the braces

Check It Out!
This handle makes repair magnets even more useful.

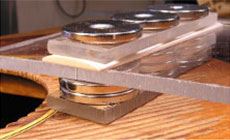
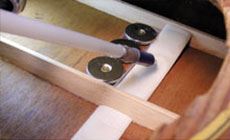
The first one’s easy
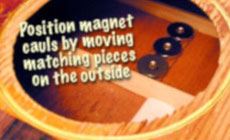
Here’s the tricky part