Paint Your Own Frankenstrat
Capture the look of the guitar that changed everything
There may be no guitar more iconic in the history of rock than the famed Frankenstrat of the 1970s and 80s. Even better (beyond the chops to play it) is that its iconic black, white, and red paint job is all DIY.
This is a perfect project for a backyard refinish, inspired by the original. You don't have to strive for a "picture perfect" finish to get the vibe and look of this iconic guitar. There are only a few ingredients required, and some nice-to-have tools and supplies that make the finishing work even easier. What makes this project even more approachable is that the exact shades of color and widths of tape are up to you. You can shoot for a perfect homage or make your version as unique as you want. These are our suggestions, but the final design is up to you.
Essential Tools and Supplies
-
Respirator, this should be an NIOSH-approved organic vapor filter
-
Nitrile or latex gloves
-
ColorTone Vinyl Sealer or Zinsser Aerosol Shellac, sealer coat if using a bare wood body
-
ColorTone White Vinyl Sealer or ColorTone Vintage White Aerosol Guitar Lacquer, 2 cans
-
Aerosol Spray Nozzles, 6 Pack for quick replacement of dirty nozzles, or upgrade for standard white nozzles
-
Tape for Line Pattern, your choice of sizes
-
3M Gold Fre-Cut Sandpaper, 220-grit, 320-grit, 600-grit, 800-grit, or Sandpaper/Finishing Paper Sampler
-
Micro-Mesh Foam Sanding Block and Sanding Block for Self-adhesive Sandpaper
-
Tack cloth
Nice-to-have Tools and Supplies
-
Freehand Holder for extra control when spraying
-
3M Scotch-Brite Pads for aging the finish
-
Guitar Finishing Step-By-Step provides tips and tricks for great results
Basic Finishing Outline
Only the original painter was in the room when this iconic guitar was being formed. Fortunately, there are countless forum studies on what paint was used, with a pretty solid consensus on the order of operations and the layers of paint originally applied.
Prepare the Body
-
Sand the bare wood
-
Seal the wood for finishing
Spray the Body and Tape
-
Spray the black base coat
-
Apply the first tape pattern
-
Spray the white layer
-
Pull first tape pattern
-
Apply next tape pattern
-
Spray another white layer (to help the red pop)
-
Spray the red layer
-
Pull the last tape pattern
-
Rock on!
Safety First
You can't be too careful when working with instrument finishing chemicals—from shellac and nitro, to solvents such as denatured alcohol and lacquer thinner, these are serious chemicals that must be handled with care. Protect your lungs, protect your health, and please wear a well-fitting organic vapor respirator. Bandanas are OK for the show, but to filter out the airborne solvents used in these guitar finishes, you want the real deal, respirator cartridges that are rated for the finishes and solvents that you are working with. Respect that solvent-based fumes are flammable and be aware of any sources of ignition: pilot lights, electric motors, exposed incandescent lights—work well away from any of these sources of ignition.
- Work in a well-ventilated area
- Wear a respirator rated for the finishes and solvents you are using
- Keep a fire extinguisher nearby and check that it is working
- Wear a dust mask when sanding wood or finishes
- Wear eye protection
- Wear rubber gloves when handling solvents or finishes
Setup Your Spray Space
Before you start opening the cans and spraying, you need to make sure you have an appropriate place to spray your finish. Make sure you have plenty of room to move around, you can reach all surfaces of the guitar body easily, and that your overspray is contained. Many people choose to spray outside or hang up plastic sheeting on the walls if they are spraying indoors. Make sure you are in a well-ventilated area if spraying indoors.
To hold the body for spraying, you can simply hang it from one of the neck mounting holes. For even greater control we recommend the Freehand Holder. It gives you 360 degree access to the body for precise control.
Prepare the Body
Spraying a new, unfinished guitar body with aerosol can be pretty easy, but prep-work is key for a great paint job. Keeping the unfinished body clean, and free from oils/dirt is essential. While this is a great backyard or garage project, don't take shortcuts in these first steps, and you'll be rewarded with a much easier paint application, and a better looking finished project.
Sand the bare wood body smooth with 220-grit 3M Fre-Cut sandpaper and wipe clean with a naptha-soaked paper towel or lint-free rag. This helps remove any dust and also de-greases any areas that may have had contact with oily skin. Hang or suspend the body in a clean, low-dust area with good ventilation as you prepare to seal the body.
Seal the Body
While the original was more than likely not sealed, this step is up to you. If using a vinyl sealer as the sealer/base coat, spray it in 2-3 light coats, watching that no runs develop. Give the sealer an hour or so dry between coats. An efficient way to ensure you get good coverage with each coat is to develop and stick with a specific spraying pattern.
 One proven pattern is to work first with the back of the guitar facing up/toward you. Spray along the outer edge/side starting from the lower cutaway side of the neck pocket, counter-clockwise along the outside of the body to the upper cutaway side of the neck pocket. Then, using an overlapping zig-zag pattern, spray an even coat across the entire back of the guitar body. Flip the body over so that the front is now facing you, and start to spray the upper cutaway outer edge/side of the neck pocket, continuing around the body counter-clockwise to the lower-cutaway side of the neck pocket area.
If using shellac as a sealer coat, rub it on using a lint-free rag or towel. Either spray aerosol shellac onto the cloth or, if using freshly mixed shellac, wet a small area of the cloth and rub it into the body, going with the grain. Shellac applied in this way dries very quickly and creates a great seal coat.
Just like with the vinyl sealer, there is no need to build any thickness. The intent is to seal the thirsty wood and to help fill/level any small grain voids in the body. This prevents the wood from soaking up as much lacquer when spraying the color coats. After spraying/sealing, very lightly sand with 220-grit to remove any dust specs and level the surface.
Tips for Spraying Guitars with Aerosol Cans
Dan Erlewine shares the secret to guitar finishing using spray cans.
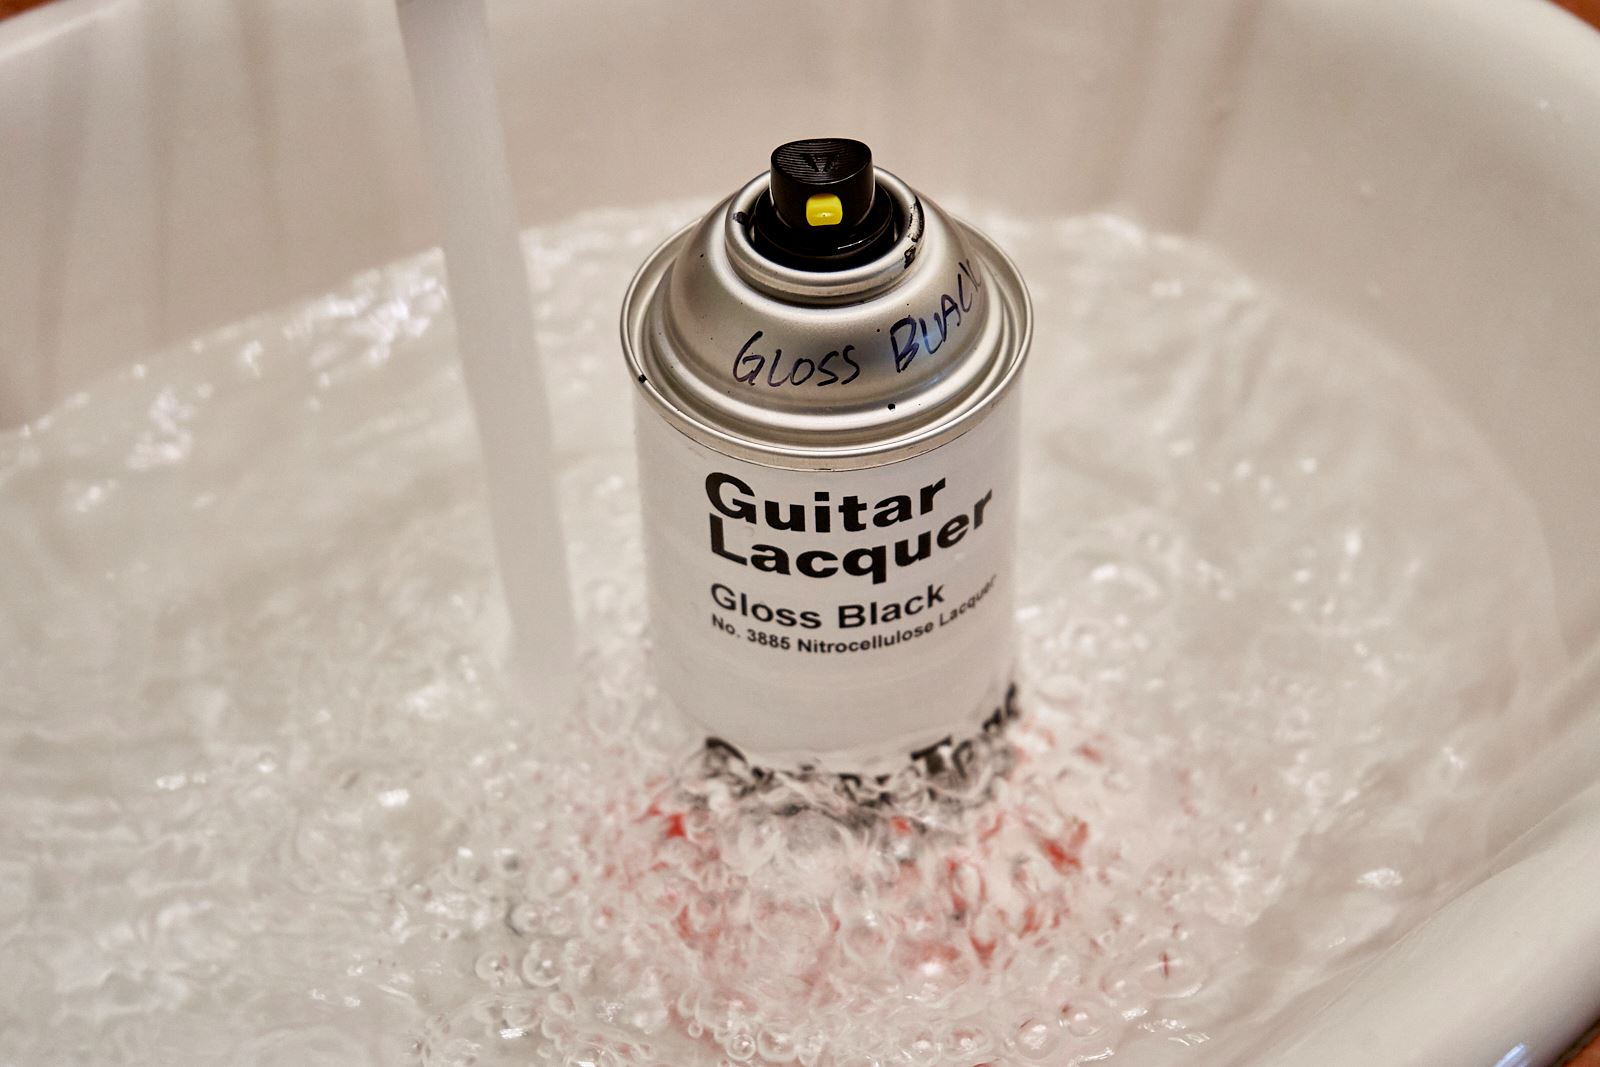
For the best results with nitrocellulose aerosol cans, warm the lacquer cans slightly in a water bath. This can be as simple as running warm (not hot) water into a sink and letting the can sit for a few minutes. The warmed lacquer with atomize better, sputter less and flow out even more smoothly. Don't over heat, and never use boiling water. Dry the can thoroughly before spraying to ensure that you don't get any water droplets on the finish.
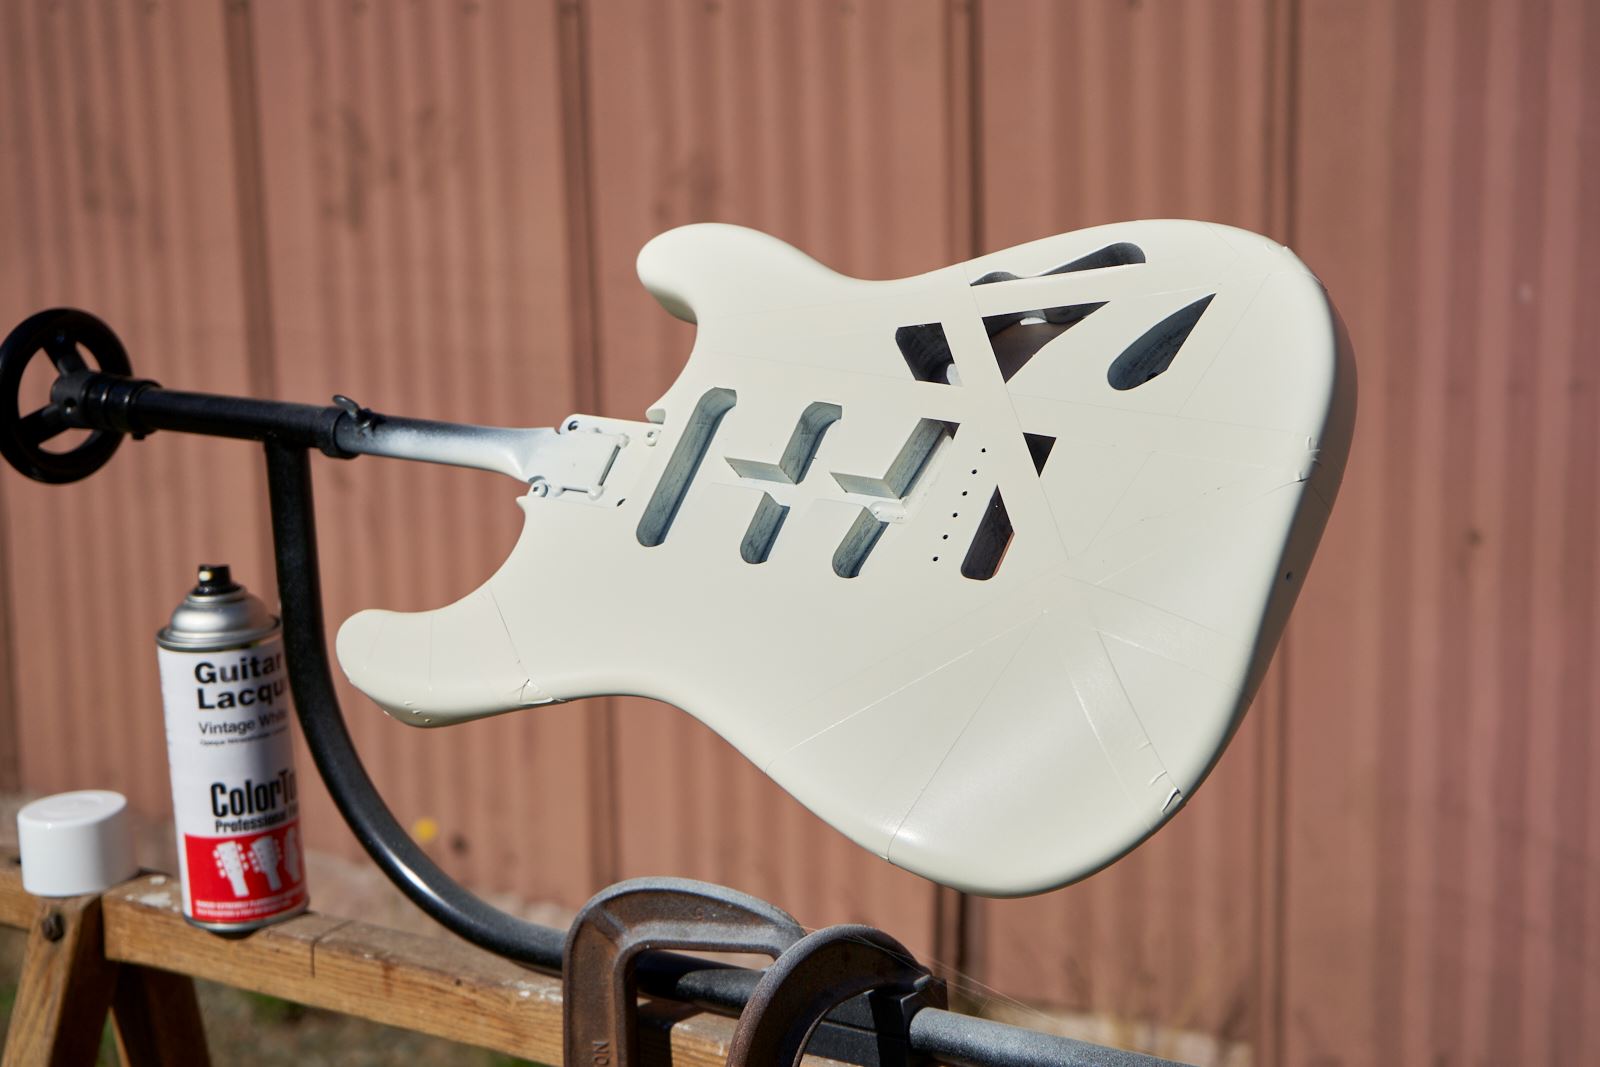
 Spray the Black Layer
 Spray the Black Layer
Black is the first color layer of lacquer to spray. Aerosol cans have a nice heavy load of lacquer, so care must be taken to avoid runs. Start by spraying the perimeter of the body (the side edge), going all the way around as you did with the vinyl sealer. Then spray the back in nice complete even zig-zag passes. To get the most even coat, without runs, start spraying just before the fan of paint would hit the body, and continue spraying for a split second after the fan of paint passes off of the body—do this, rather than starting and stopping the spray pattern over the guitar body.
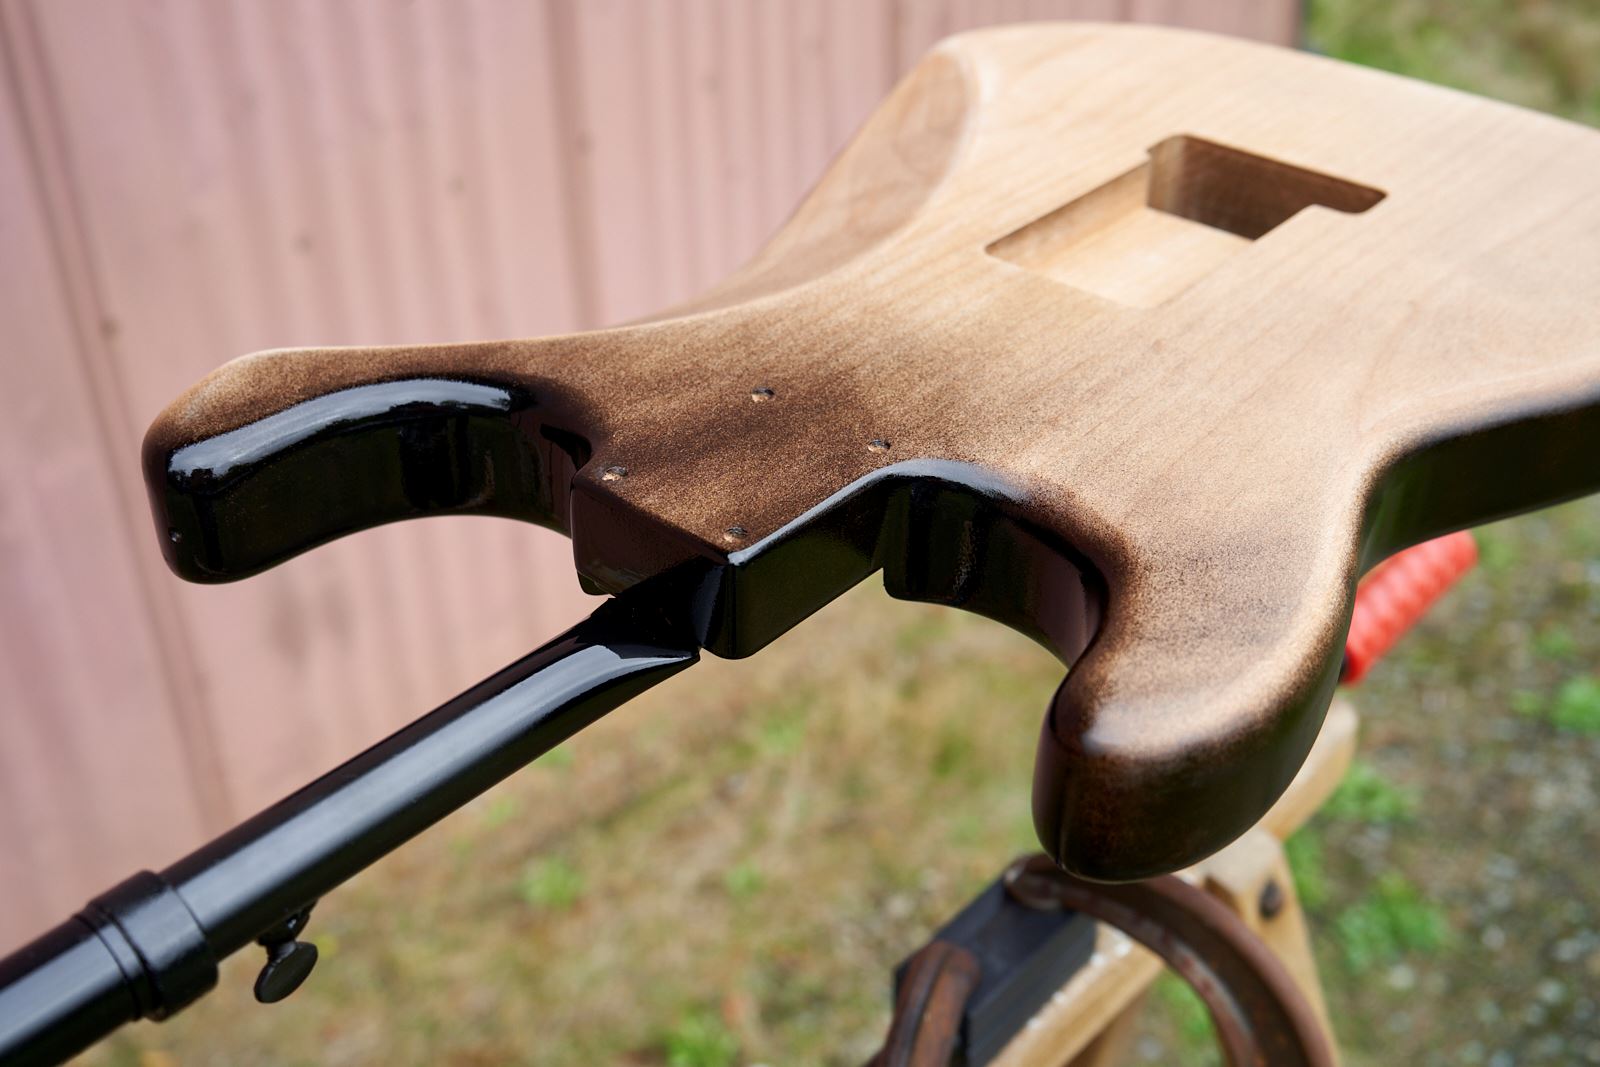 The black layer can be done in 2-4 coats depending on how heavily you are spraying it. Allow for at least an hour of dry time between coats, and then hang the body in a warm, dry area to dry for at least another 24 hours, if not a couple days, before taping and moving on to the white layer.
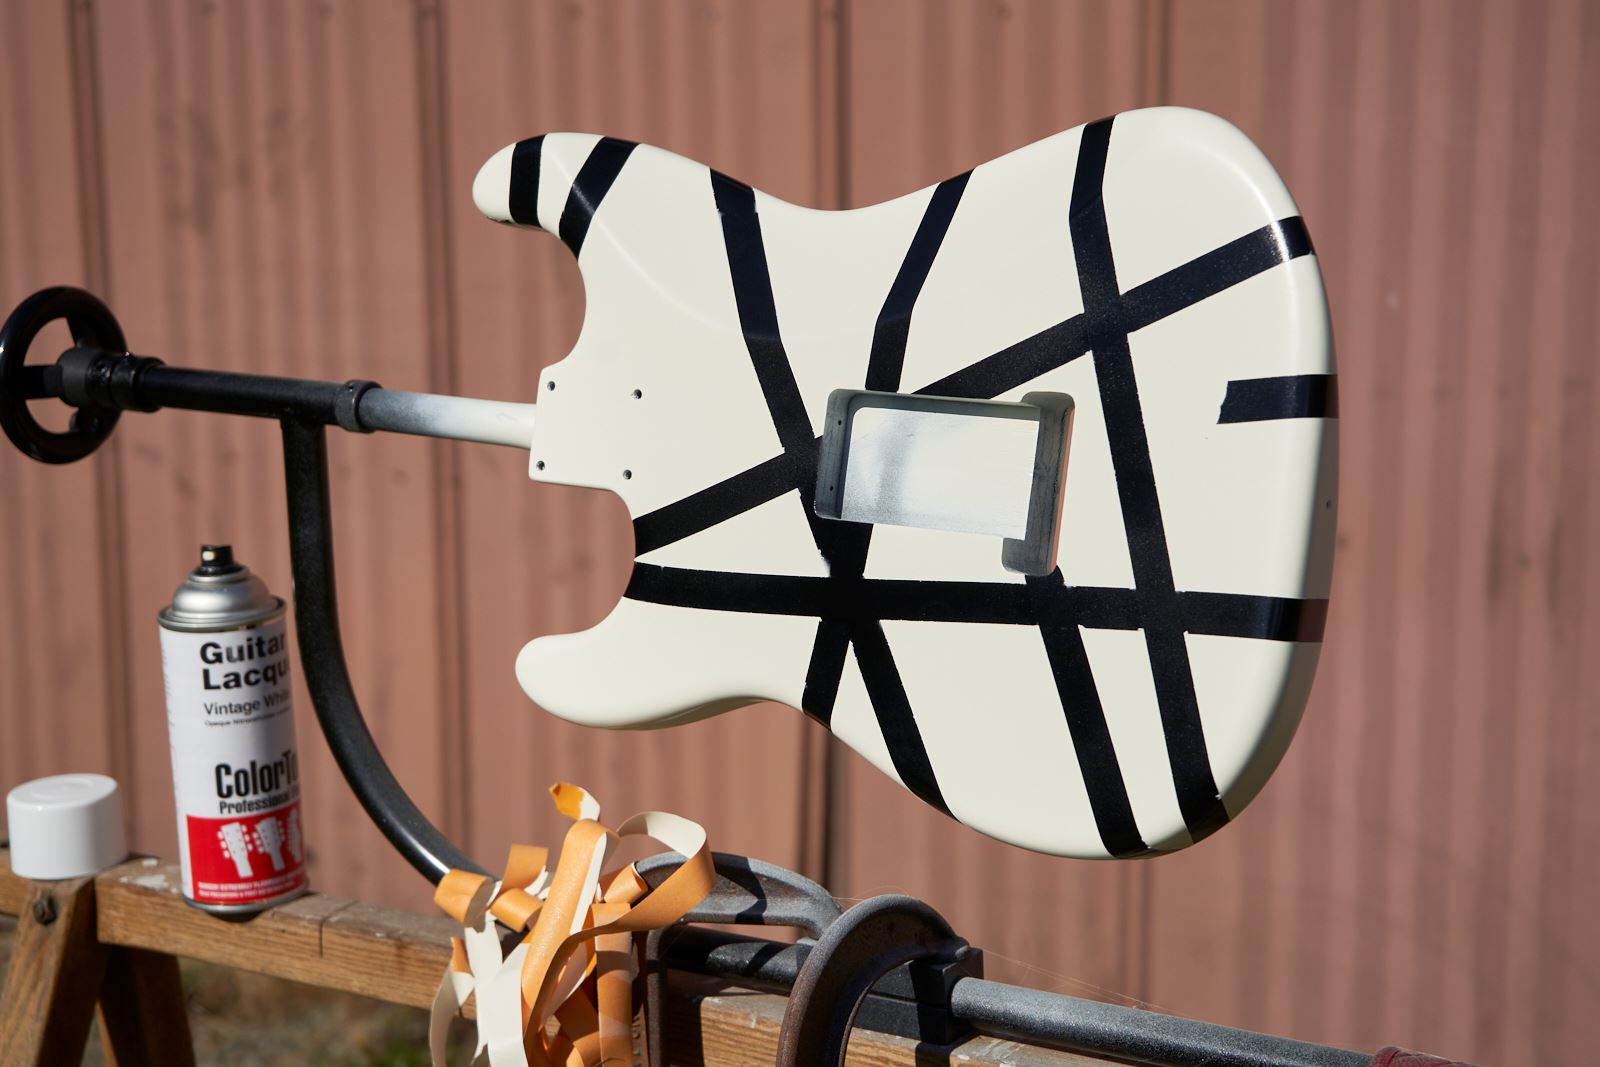
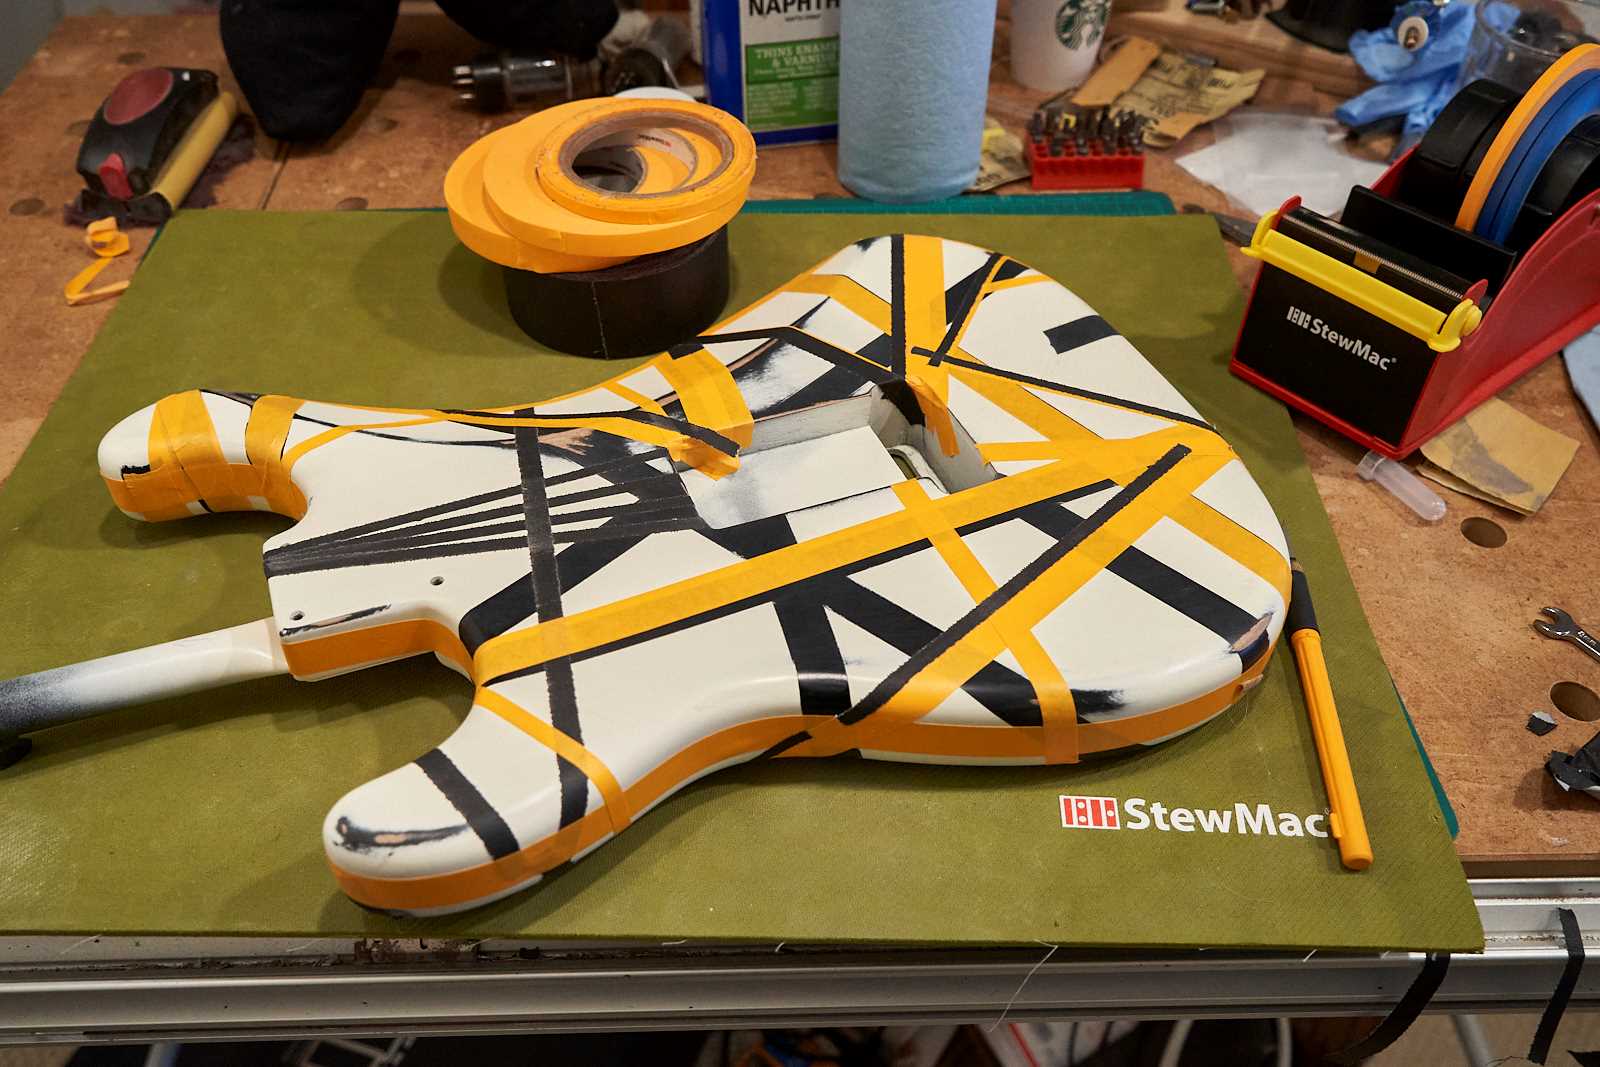
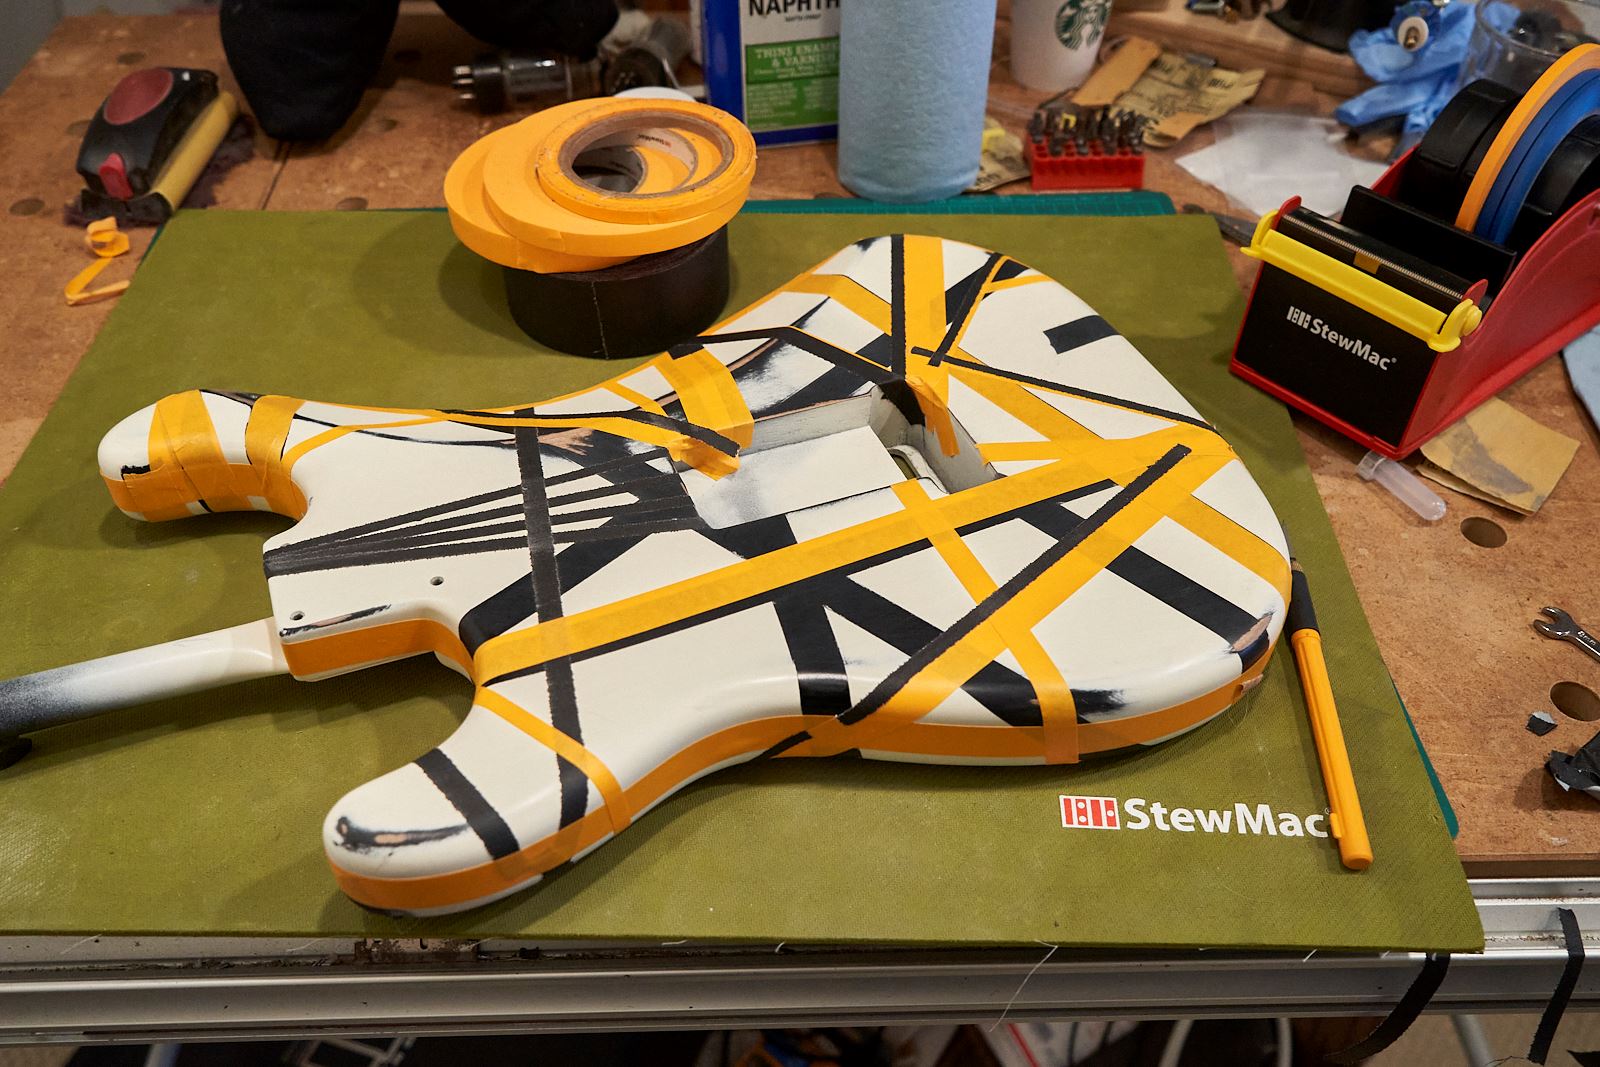
Apply the First Tape Pattern
Whether you're starting from a bare wood body we just painted black or you're starting from a pre-finished partscaster body, the first step is to clean and degrease with naphtha. A quick wipe with a naphtha-soaked lint-free rag or paper towel will clean off any hand-oils or contaminants. Naptha is an ideal cleaner, it's safe for almost any finish, and quickly cuts any dirt or grease that could cause issues when spraying the additional color layers.
Using a finished body? Lightly scuff sand the entire body with 220-grit 3M Fre-Cut sandpaper then clean with a naptha soaked rag to remove the dust. This will allow the new finish to adhere to the old finish.
To keep more finger-prints or dirt from contaminating the body, it's helpful to wear nitrile or latex gloves while applying the first tape mask pattern. (No, the original painter probably didn't wear gloves, but keeping your painting projects clean is a good habit to develop.)
Have some fun applying your first stripe pattern with tape. There are many sites dedicated to the exact pattern that some might like to follow, but this is your guitar, find inspiration where you will, and discover a pattern that speaks to you.
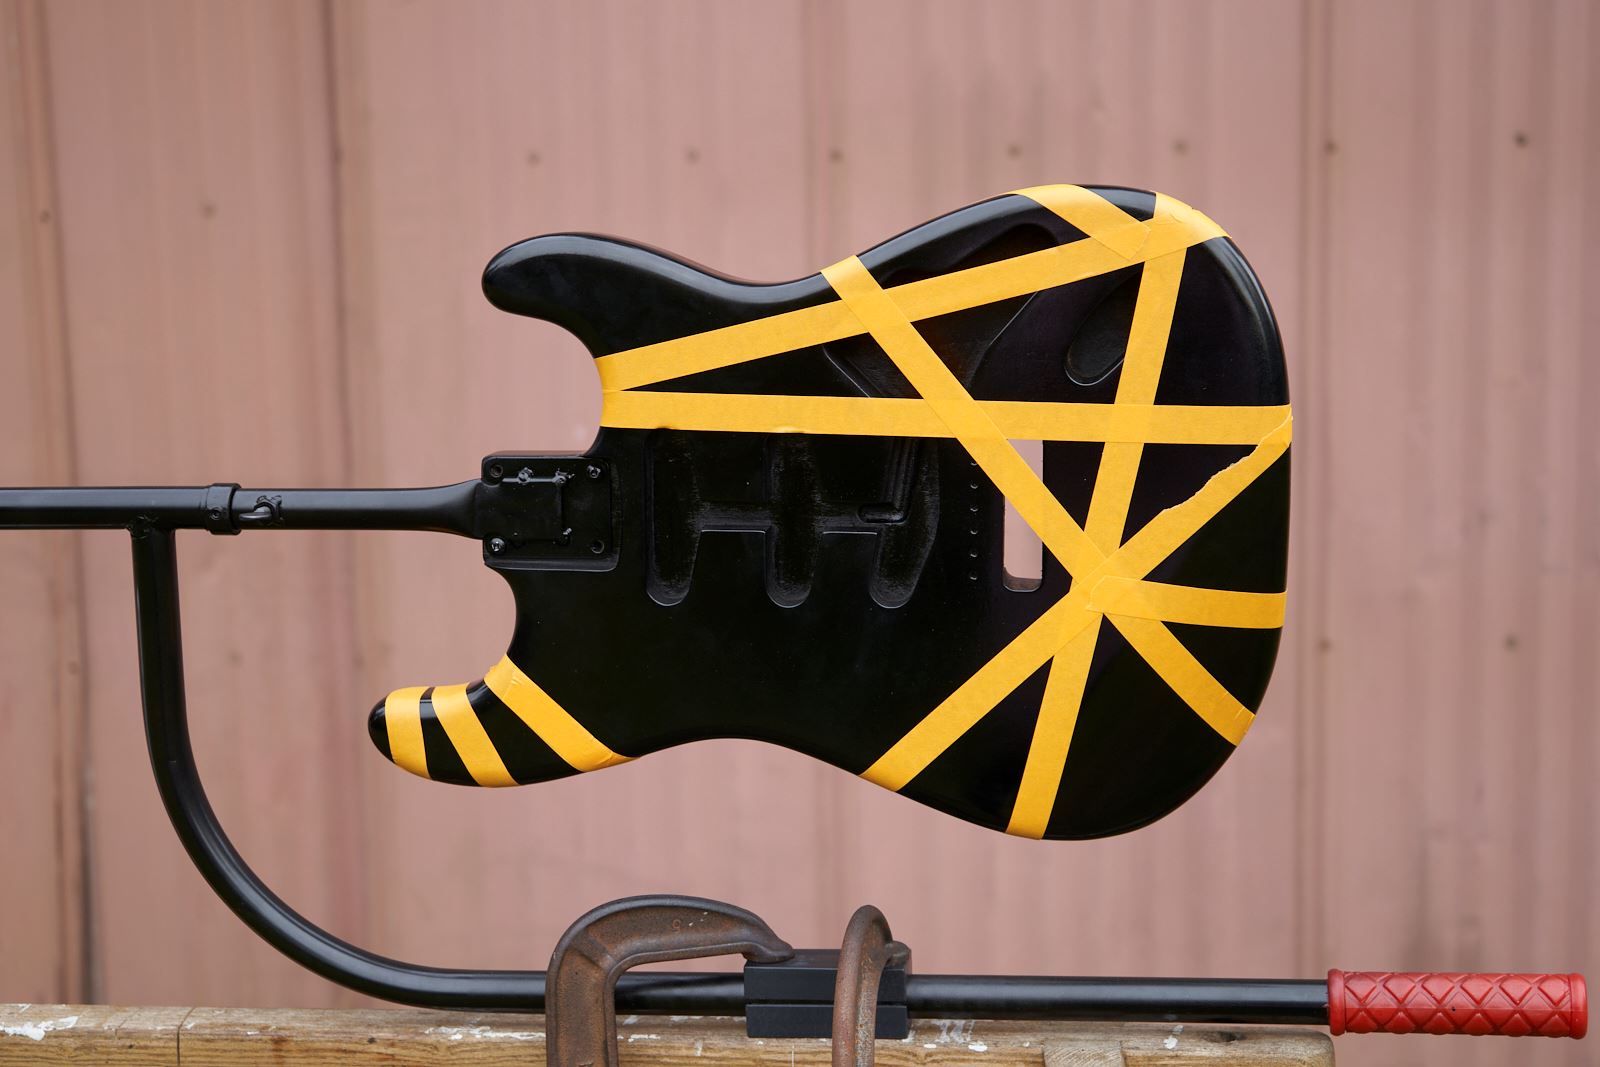
Tape in the 5/8"-3/4" width will give you a more traditional look. The small black line details on the original were pin-striping tape applied after painting. One great reason to use orange/blue/white masking tape, rather than electrical or gaffer tape, is that the stripe pattern will be more visible before spraying. Don't hesitate to pull the tape and start over if you want to experiment with different patterns—nothing is permanent until the white lacquer goes on.
A brisk wipe-down with a tack cloth will remove any last bits of lint or dust, and then the body is ready for its white layer.
Spray the White Layer
To spray the white layer, set your body up as you've done for the sealer and black coats, and spray your white lacquer in the same spraying pattern that you've established with the sealer and black lacquer. The first pass will likely appear a little mottled and transparent, that is OK! Resist the urge to lay down a heavy first coat of white lacquer. Too heavy of a first coat is much more likely to lead to drips and runs. Just go for a nice, light, even coat and let it dry for an hour or so. The second and third coats will fill in and build opacity—trust me on this. Because the white provides a little less coverage than the black, I like to lay down at least one extra layer. This will also give you just a little additional lacquer thickness to allow for sanding down some of the tape line ridges.
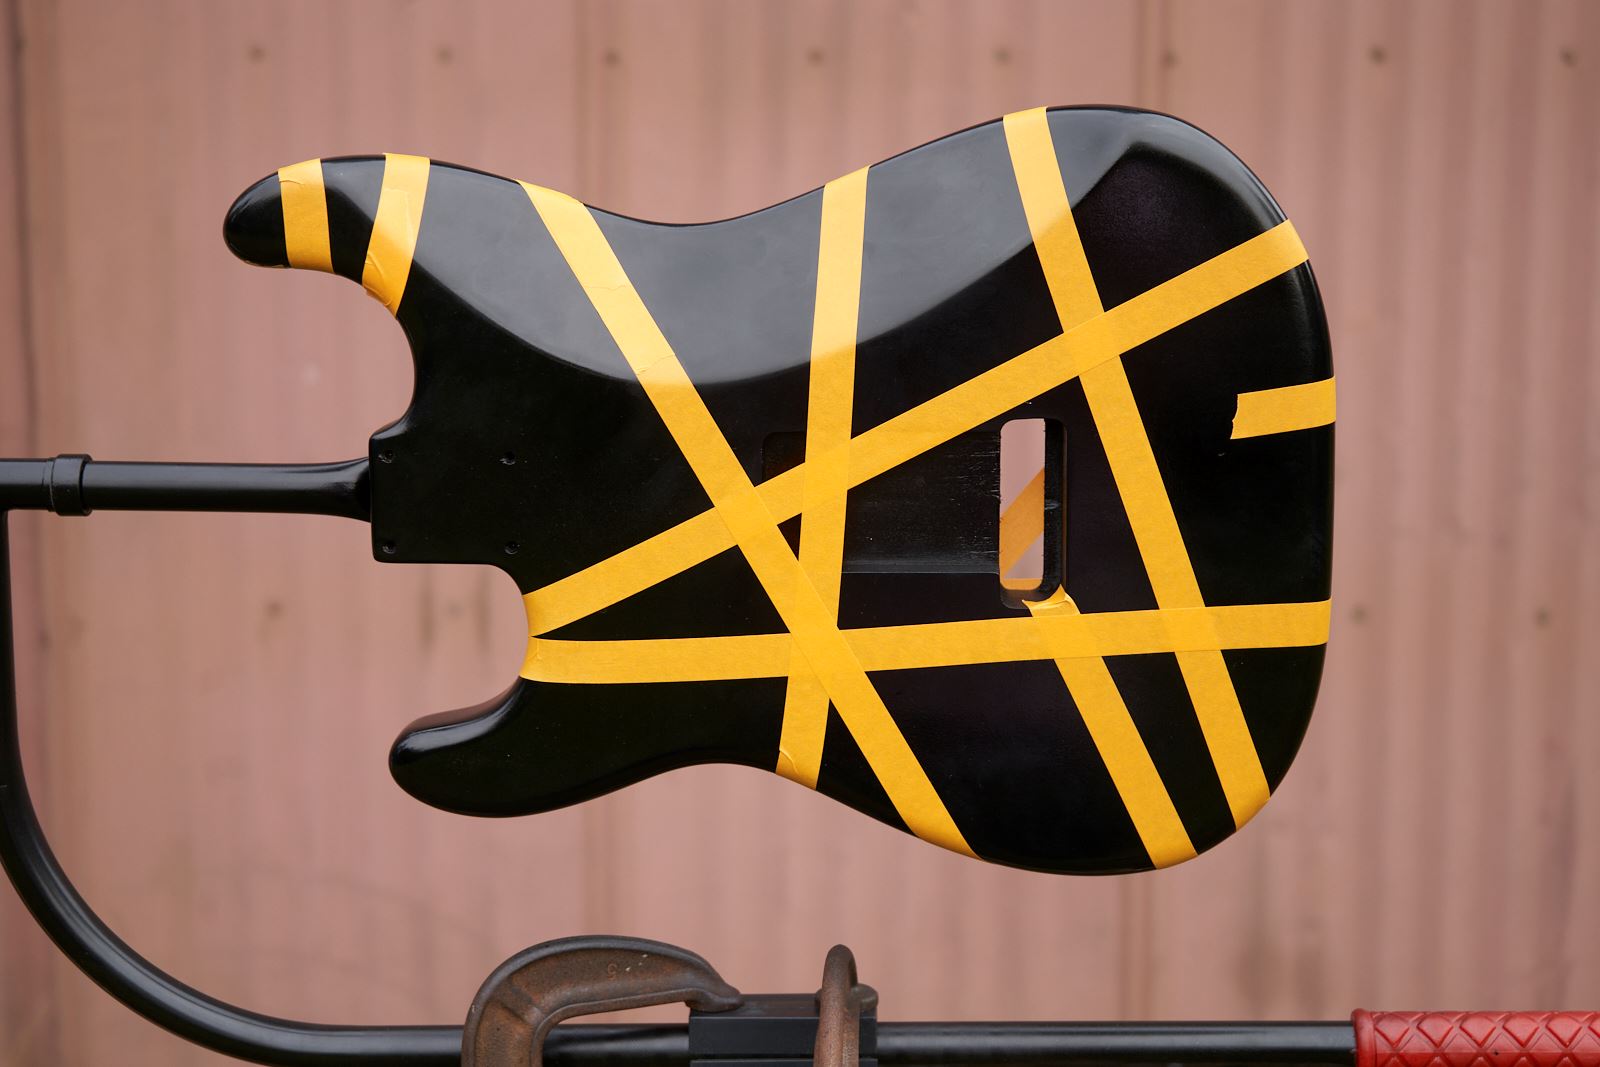
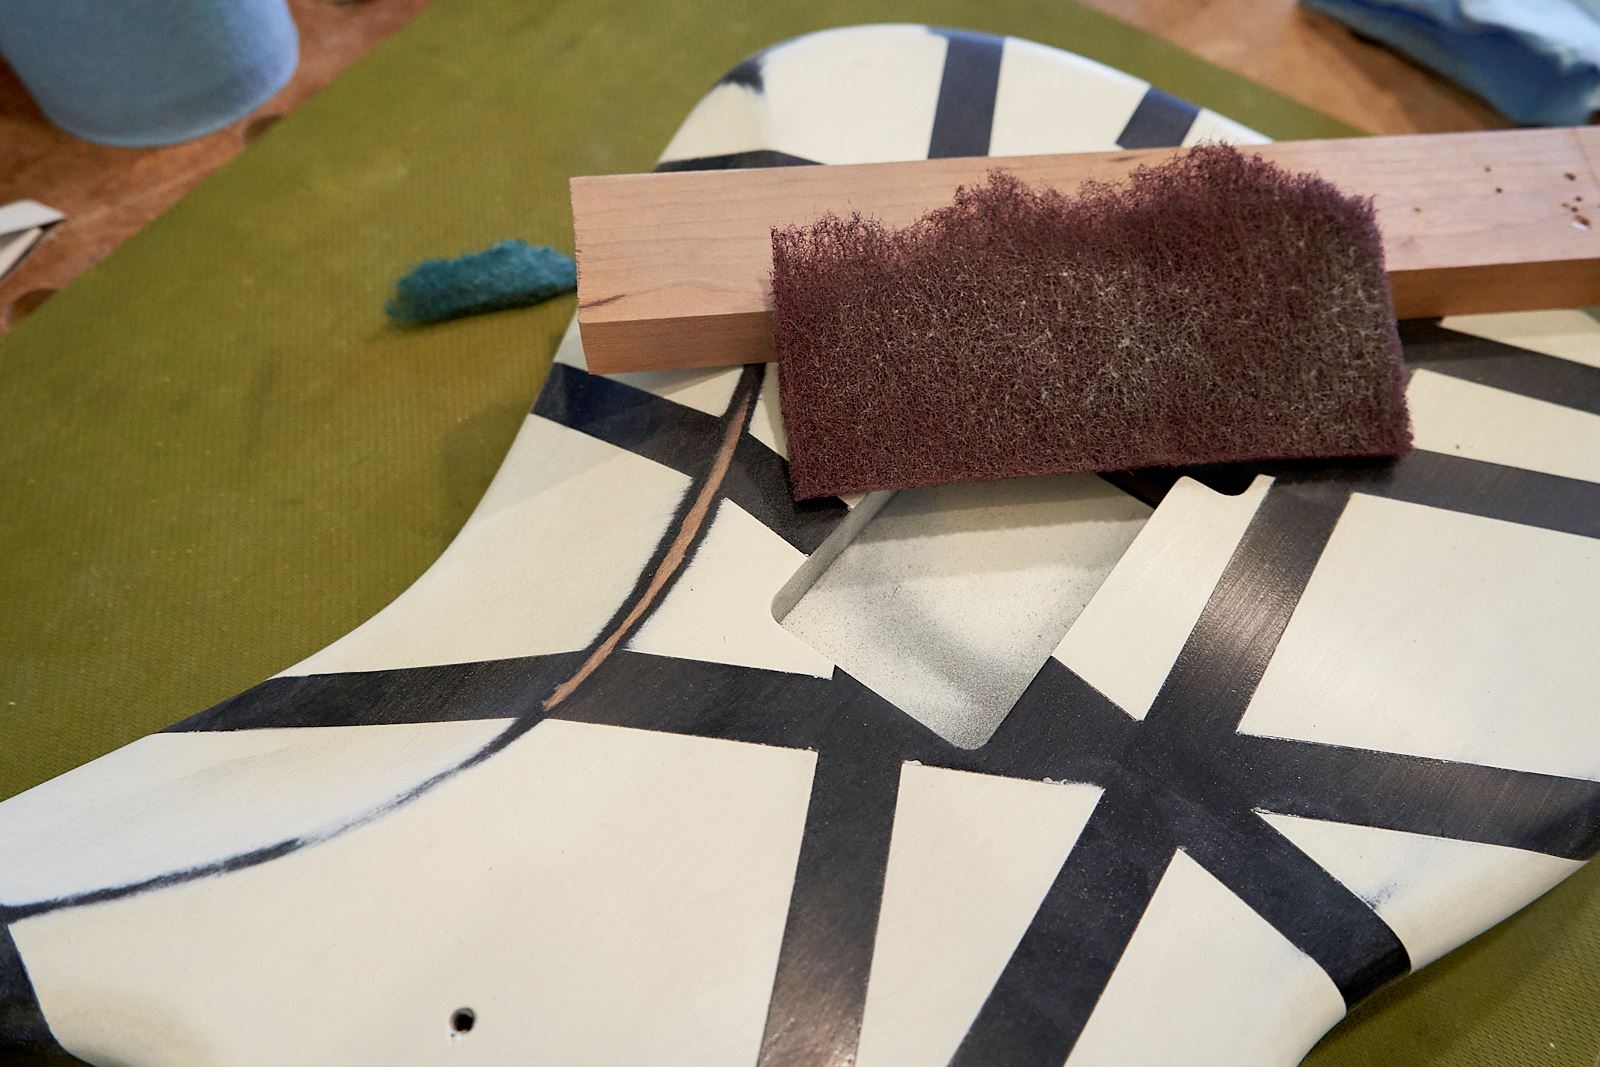
Pull the First Tape Pattern
Pull the tape pattern about an hour or two after your last coat of white, and let the body dry for at least 24-48 hours before handling.
 There will likely be slight ridges of paint along each masked stripe. These can be knocked down with a very light sanding with 220-320-grit 3M Fre-Cut abrasive, even more precisely with a very light pass with a razor scraper.
Fun fact! The red, white, and black Frankenstrat we all know and love was ALSO the famous black and white guitar seen on stage from before March 1979. If you like this look, you can skip the red coat altogether.
Optional: Adding Some Wear to the Body
At this stage the body can be roughed up a little if you're looking for more of a worn-in, well-played look. The original guitar was played for a number of years before the red coat was added. The original was sanded with 80-100-grit paper, leaving noticeable scratch patterns, far beyond what most of us would consider for a relic look. For more of a traditional road-worn look, a combination of 180-320-grit abrasives and Scotch-Brite pads can be used to strategically wear away lacquer in key areas around the body. Scotch-Brite, wrapped around a small wooden block or firm sanding pad, works great for wearing away lacquer on the edges of the body.
 For a more refined, smooth finish in the finished guitar, the body can be lightly scuff sanded with 220-grit Fre-Cut, taking care not to sand through to the bare wood along the edges of the guitar.
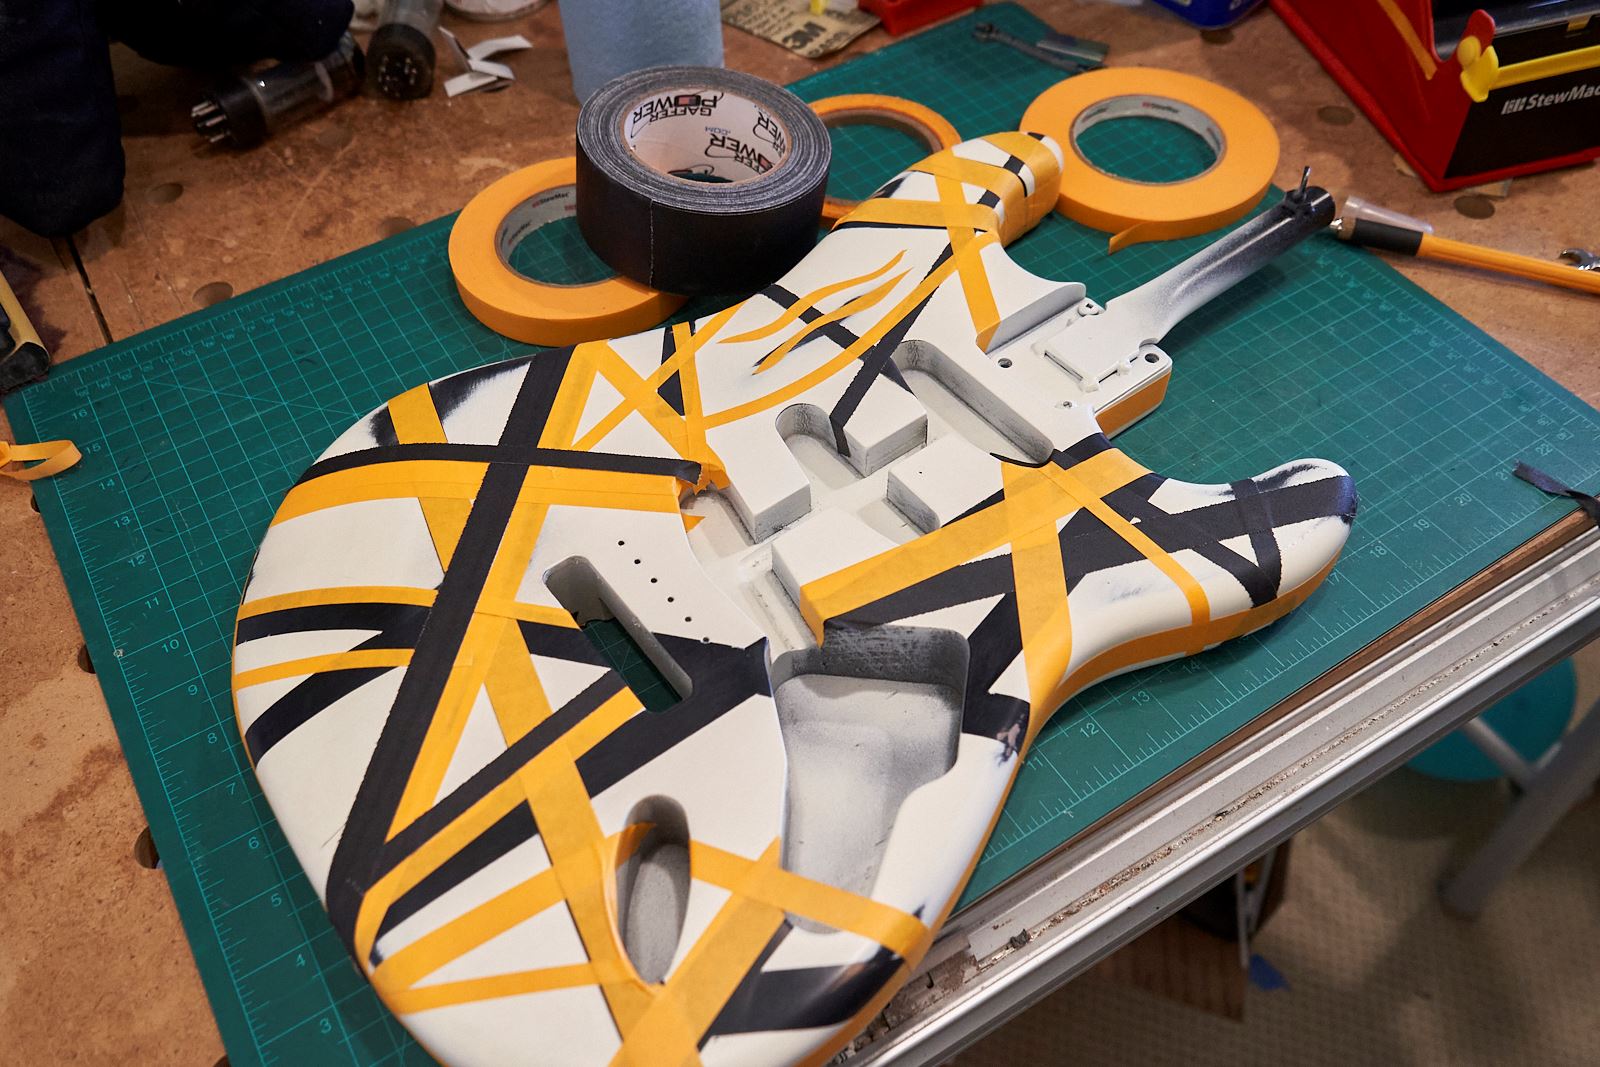
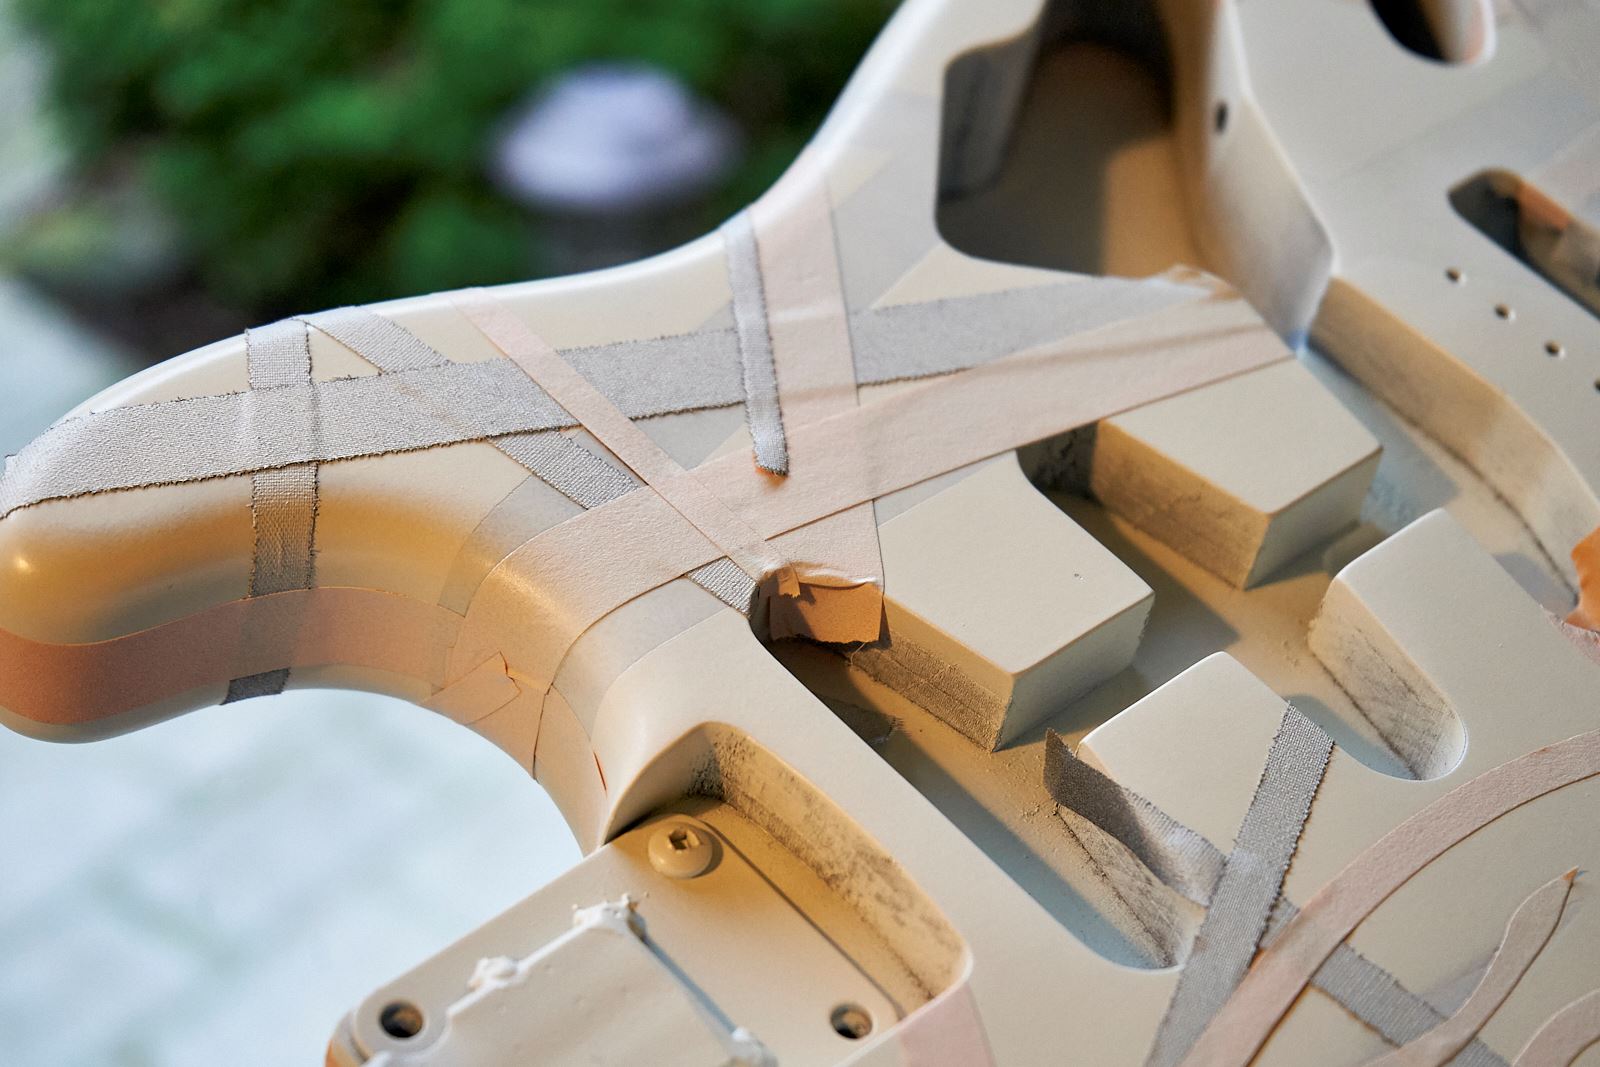
Apply the Second Tape Pattern
Wipe down the body with a naphtha dampened rag to remove dust and de-grease the surface, and wear gloves while applying the masking tape pattern.
This is the pattern that will really show on your finished guitar, so take your time and dial it in. For this layer a combination of 1/8", 1/4", 1/2", and 3/4" widths tape works well, although the final widths are up to you. These can be masking tape, or for the rough-edge look, torn black Gaffer tape. We prefer to use our Stripers Tape or our Orange Multi-Purpose Tape, but the original was done with gaffer's tape. Gaffer tape is cloth, and when torn lengthwise into thinner strips, one edge will have the short cloth strands sticking out—these give a nice textured edge to the paint. For some more organic shapes, masking tape can be lightly tacked to a safe cutting surface (like a cutting mat) and cut to shape with a sharp razor blade. The free-form shape is then gently lifted from the cutting mat and applied to the guitar body.
 Spray the Red Layer
 Spray the Red Layer
As with each previous paint layer, start with a tack cloth wipe down and hang or suspend the body for painting.
Step 1: lay down a light base coat of white. The red bicycle paint used on the original Frankenstrat would have been backed in white, and this is a key to help the red lacquer color pop with the right intensity (just like candy apple red, or other transparent or semi-transparent reds). This white layer does not need to be a full opaque white, but just enough to provide a brighter backing color for the final red lacquer. If it's a nice light coat, you can follow with the first red layer without waiting a full hour for it to begin drying.
Step 2: lay down the first layer of red lacquer. As with the original white layer, the first coat will likely look a little mottled, thin, and light, this is OK, resist the urge to lay down a heavy first coat of red lacquer. Too heavy of a first coat is much more likely to lead to drips and runs, and can puddle up around the tape lines. Just go for a nice, light, even coat and let it dry for an hour or so. Then begin building more red color density with the second and third coat, each being allowed to dry for at least an hour or so.

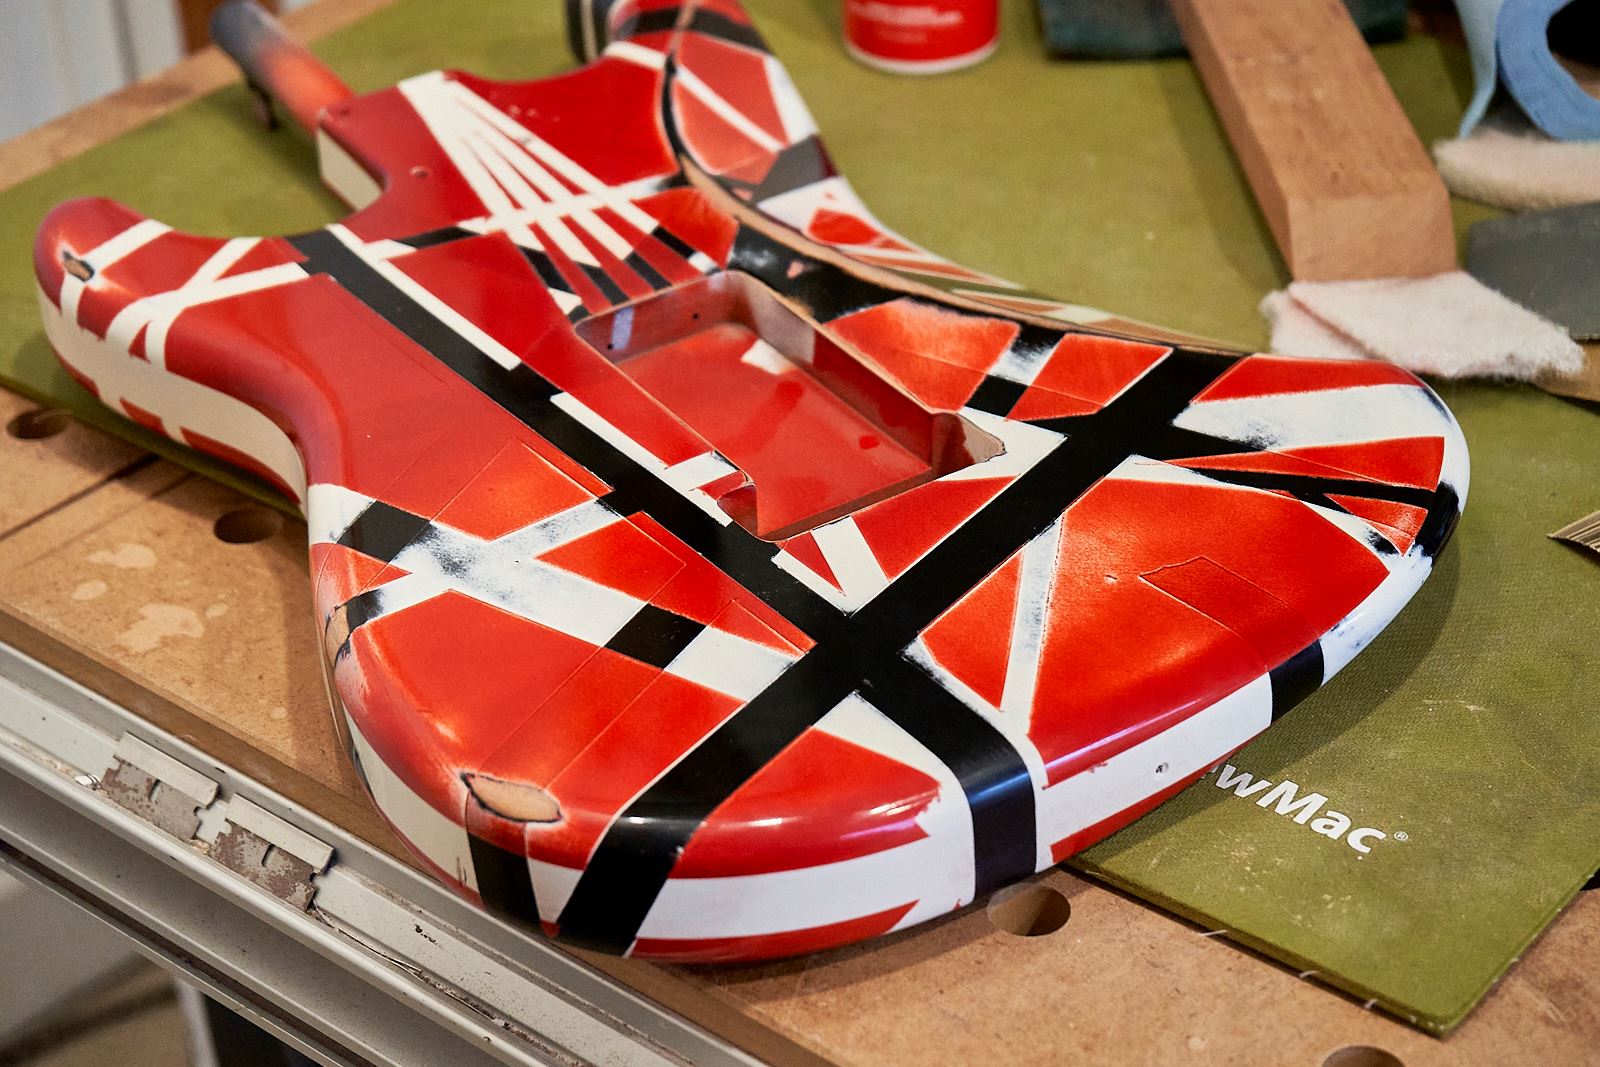
Pull the Final Tape Pattern
Once the final coat of red lacquer has had about an hour or two to dry, you can very, very carefully pull the tape. Pulling it before the lacquer fully cures helps ensure that the tape will come off more easily. Pulling it too soon after spraying makes for a higher risk of handling marks or accidents that could mark the finish.
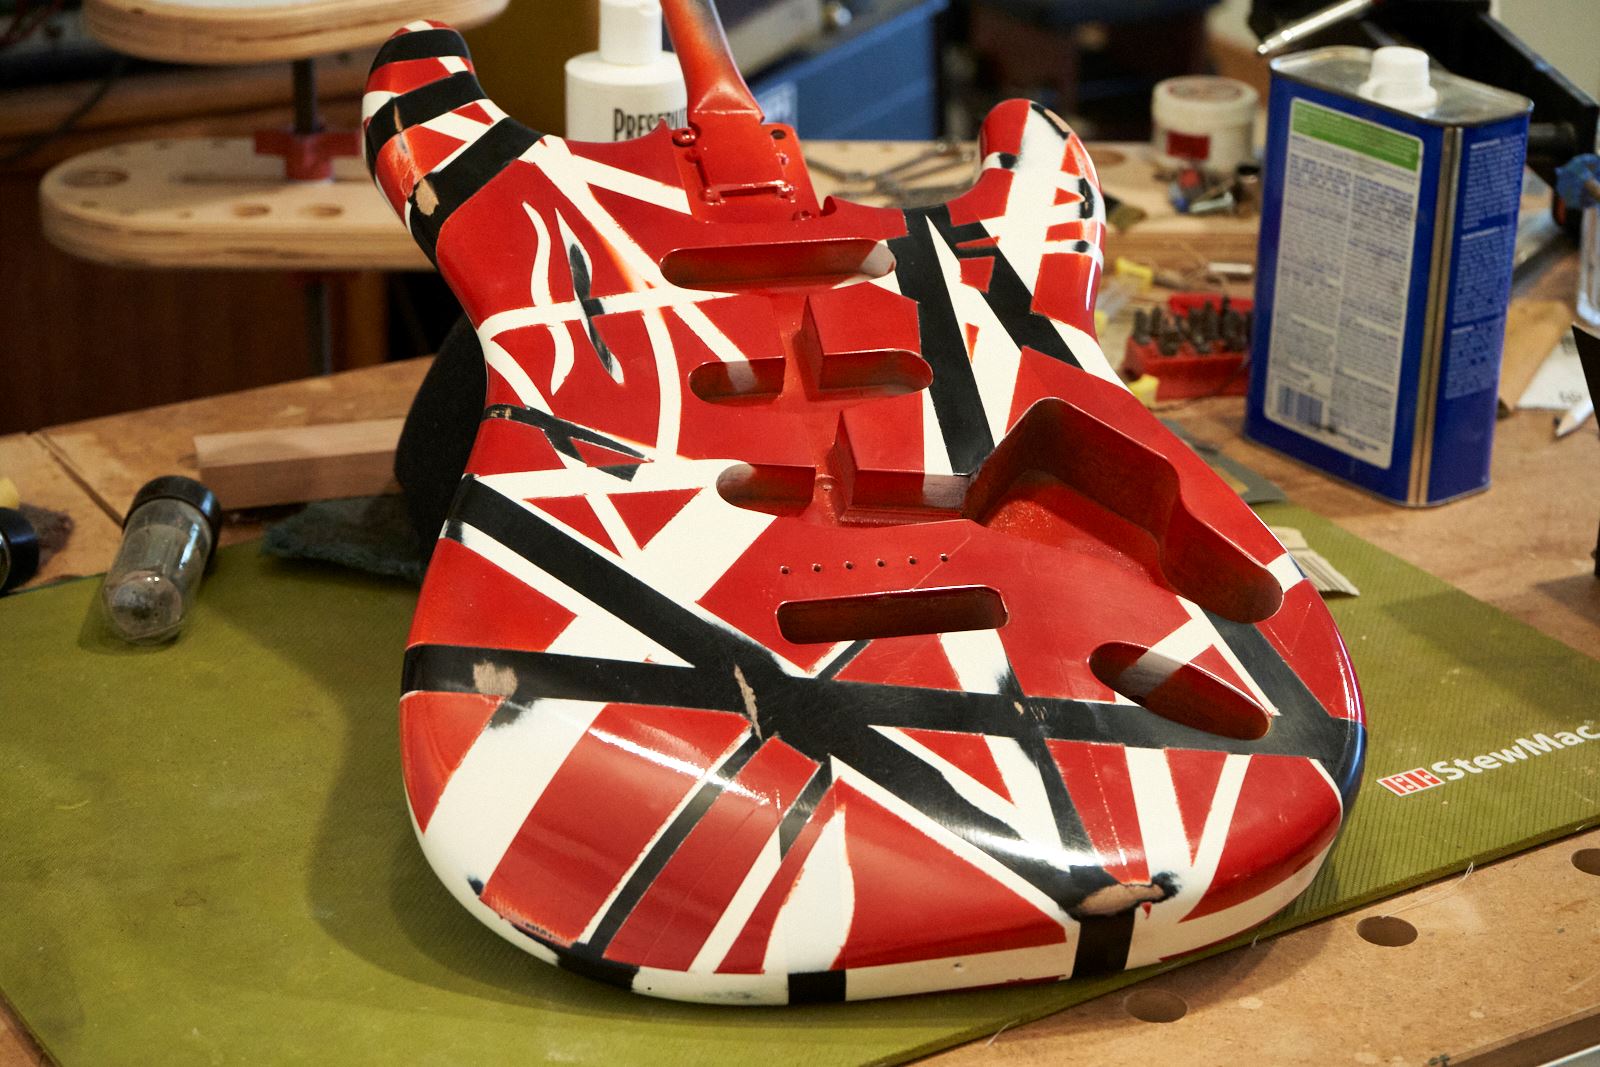
After at least a week of drying (ideally two to three weeks) you can proceed to the final clean-up and light sanding if you wish. It would be totally fine to leave the body as-is, with the tape removed and start the final assembly of your Frankenstrat. A razor blade scraper can be used to gently clean up any areas of red lacquer that bled past the masking tape and the slight ridge of paint that likely formed along each masked line can be gently knocked down with 800-grit abrasive paper. If you want to make your new Frankenstrat look like it's been on tour since the early 80s, you can relic the finish with Scotch-Brite, fine sandpaper and heavy-handed buffing.
Our article, How to Build a Partscaster will give you a great step-by-step process for assembling your freshly finished metal machine.
Rock on!