Fixing a small chip in your guitar's finish
Issue 174 September 27, 2012
This issue of Trade Secrets is a video: Dan Erlewine demos three of his favorite finish repair tips: 1. Super glue drop fills. 2. Frank Ford's razor blade trick. 3. Strip-sanding with fingertip pressure.
- Matching the guitar's blue finish with ColorTone Stains
- Placing the finish exactly with drop-fill toothpicks
- Hot Tip! Finish buildup leveled with a razor blade
- Strip sanding, then wet sanding with a rubber block
Video Transcription
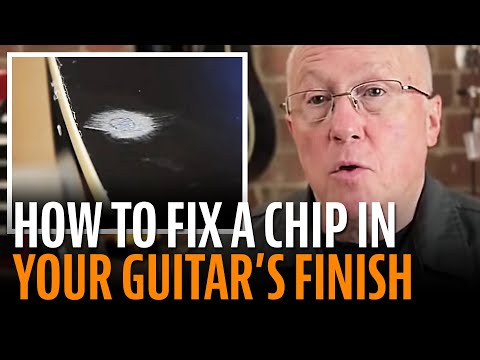
Dan Erlewine: Drop fills are tiny finish repairs. When you get a chip or a ding in the finish like this, and you have to touch it up. I drop fill with lacquer, Super Glue, polyester, epoxy. Super Glue's my favorite because it's the fastest and that's what I've been doing here.
Super glue drop-fill
I took acetone and poured it into a little cup and I took some blue Colortone stain, and I wasn't being too worried about it. And I touched color to that chip and it sort of ran into the surrounding polyester. You don't have to know a ton about finishing to do drop fills. We're not spraying anything and we're not applying a finish. We're just fixing it. Then I covered that with Super Glue. I'll let this dry for a little bit and go on to one of the other ones. With that dry, drop fill it some more until it builds up above the surface.
The razor blade trick
The razor blade trick is something I learned from Frank Ford, Mr. frets.com. Here's a single edge razor blade and you strike it along a piece of cast iron, can turn that little bur, there's a tiny sharp glistening edge there now. And you very carefully wrap it with the tape. You want it to fold right over equally on both sides, leaving only as much blade exposed as you need to cover the width of the fill and maybe a little extra. Cellophane tape is 2007 inch thick. So, that's my depth stop. I'm not using a lot of pressure. I'm just letting that blade trim down that glue. I'm not going to go all the way down because I can't get there. I'm starting not to get anything anymore. So I'm going to quit soon and go on to strip sanding.
Strip sanding
Strip sanding happens in less than a minute. It's so quick, you have all your strips in order, just a couple of pieces and you keep changing direction.
I'll cut strips of all the different grits. And I marked the grit number on the paper because otherwise you might not know. And the key is to know what grit to use and when to switch them. I'm starting out with 400 grit and I'm not pulling it in just one direction. I'll switch directions and you press down from the top with your finger to put pressure on the fill. That's all it's going to get. I don't want to go too far because a lot of the color will be right on the surface of these things. And of course I'm going to hit the outside area a little teeny bit, then 600, go to 800. You might want to come in and look at that. At that point, I'm going to quit with the strip sanding and go to block sanding, which means I'm going to take a small block.
Block sanding
It could be wood with leather. It might be rubber, put double stick tape on it and put my smooth sandpapers on that. Keeps it flat. I don't want any sandpaper rounding up over the edge of the sanding block. If you just wrap a block like that, you've got these rounded edges, no matter what you do. And when you sand that's going to hit first. Take the time to do this with the double stick tape and you have a perfectly flat sanding block. It takes time. If you're too lazy to do it, you won't get as good a result. What I'm doing is moving my scratches away from the area out onto this area.
I'm going to go up to 2000, wipe the paper off. You're trying to keep those little speckles off of it. I'm going to go up two, three and 4,000 in a different kind of paper.
Micro-mesh finishing
Now I am using water, micro-mesh paper. It's less important to be perfectly flat at this stage. There's 8,000, dry it off. Look at the scratches. When you wet sand, you're really supposed to take the sandpaper and put it in water 24 hours before you use it. We've used it for years before we knew that. That's an auto body trick. The whole idea is the paper absorbs the water and it gets spongy. It's designed for that. 12,000, that's as fine as this micro-meshed paper goes. You can feel the grid it's cutting, but it's super fine. If I was going to use a buffer, I could have stopped earlier.
Buffing it out by hand
I'm using a medium paste compound to buff this out by hand. Use the palm of my hand if I can, because I can get a lot of pressure, bringing it up to a nice shine. I'm not going to fix every drop fill on this. I'm just using this as a guinea pig to show you a technique. And my trade off was, "Hey, I'll glue your neck for you, if you let me take my razor blade and do some scraping on this for a video I'm doing."


