"I wired this guitar, but it didn't work. Can you fix it?"
Even though I do guitar repairs professionally, I like it when players work on their own guitars.
It’s good for guitarists to know about maintenance and to experiment for themselves on upgrading components.

If they feel comfortable with setup and electronics work on an inexpensive guitar, I say go for it. It doesn’t really cut into my repair business: if they get into hot water they’ll bring me the work anyhow.
That’s what happened with this Les Paul Studio model.
The owner, Jon, decided to swap out the electronics himself. He followed a wiring diagram, plugged it in and got... nothin.’ No sound. So presto, I’ve got the job.

I couldn't quickly find where he went wrong, so I decided it would cost me less time to rewire it than to troubleshoot it. A total rewire also gives me peace of mind, too: when every joint’s made by me, I can stand 100% behind the work.
Let’s pull the wiring and get started.
Let’s pull the wiring and get started. Since I was gutting the guitar anyway Jon asked me to drop in a new set of Parsons Street humbuckers and wire the circuit the same way Gibson did in the ’50s. (As a side note he also wanted a Bigsby B-5/Vibramate setup installed while I had the guitar apart.)
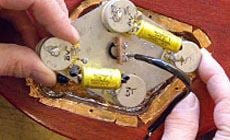
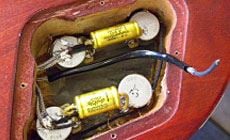
Jon had also shielded the control cavity with copper foil; let’s talk about that:
To shield or not to shield?
Jon did a nice job of lining the control cavity with copper foil. That’s good for cutting back on 60 cycle hum from electrical interference. And in these days of cell phones, computer monitors and whatnot, we have more sources of interference than ever.
This humbucker-equipped guitar really didn’t have problems with 60 cycle hum. And the goal of this rewire is to create a more ’50-like guitar, so we decided to strip out the copper foil after all.
Is this a good idea?
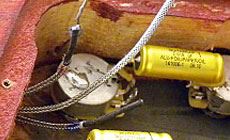
After all, on some Les Pauls, Gibson even went to the trouble of shielding the electronics in metal cans inside the guitar — like the ’81 LP Custom in this photo.

I’d say the question of whether to shield is a judgment call. Since the idea behind Jon’s rewire job is “back to the ’50s roots,” he decided to go commando, shielding-wise. That works for me; I'll bet the old Les Pauls responsible for the recorded tones I love most were unshielded.
To wire up a true-to-50s circuit, I followed the diagram that’s included in the instructions for our Parsons Street humbuckers.
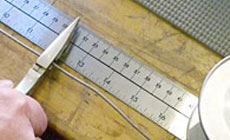
Prep the wires
I used single conductor shielded wire for most of the work. Three lengths were needed: about 12" for the run from the neck pickup volume pot to the switch, 13" from the bridge volume pot to the switch, and 16.5" from the switch to the output jack.
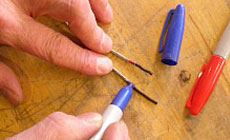
Color-code them
To avoid mixups, I colored both ends of the pickup leads with Sharpie markers. I use red for the neck pickup and blue for the bridge. This way, when I push the leads through the channel into the control cavity, I know which is which.

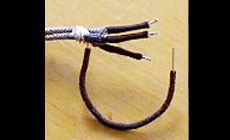
Add a ground jumper
Using a 4" section of push back wire, I strip back enough insulation to allow 2-3 wraps around the neatly bundled lead wires.

I solder this to the braided shield to have one neat grounding wire for soldering to the switch.
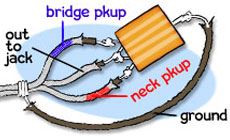
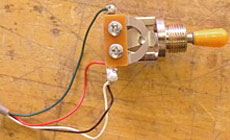
Wire up the switch
Follow your color key on the lead wires and solder it up!
Some imported LP style guitars have a wiring channel that’s too narrow to fit the bundle of 3 braided leads. In that case, use our four-conductor lead wire to connect between the pots, switch and jack.
Rewiring the controls
I put the pots into a wiring jig I made for Les Pauls: a piece of pickguard plastic with holes to match the LP control arrangement (cardboard works just as well). This lets me do my wiring outside the body, and everything fits back in neatly.
The guitar’s controls were on a metal mounting plate. We decided to ditch the plate, sticking with the ’50s theme.
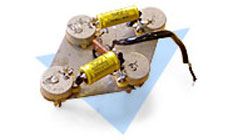
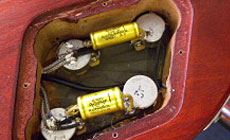
The 500K CTS pots Jon used were in fine working order, so I cleaned them up and reinstalled them following the 50s diagram for our Parsons Street humbuckers.
With the circuit wired up I dumped the harness into the guitar and secured the pots.
Before doing any soldering inside the cavity I installed the pickups and trimmed their leads to length. Now it's time to wire the pickups and switch to the harness.
Here are the shielded leads snaked through into the control cavity.
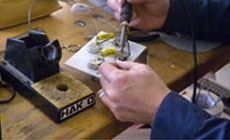
First I soldered up the outputs of the pots to the switch, then the pickup leads to the inputs on the pots.
The final step is to run the output from the switch to the jack. I reused the guitar’s black insulating tube, but if I didn’t have that a length of heat shrink tubing would have done the trick.
Ready to rock!
Jon's guitar is wired up in the ’50s fashion, and much cleaner to boot! Now to give it a test drive.
Encouraging my customer to do the work himself could have cost me an installation job and the profit from parts sales, but it worked out in the long run. Jon was happy to get some experience, and I'm happy to get his business!