Using Feeler Gauges to Control Nut Slot Depth
How to use feeler gauges to control nut slot depth.
These instructions are condensed from the Dan Erlewine's book Guitar Player Repair Guide. We're assuming that you've already roughed-in your nut blank, and have laid out the string spacing. The feeler gauges let you cut the string slot depths quickly and accurately, without going too low.
When the nut slots have been started just deep enough to hold the strings, switch to your nut files and X-acto sawblades. File at a back angle to the nut's front edge, so that the string will have sufficient downward pressure. To play properly in tune, the string's actual contact point should be at the front of the nut (the fretboard side). On guitars with angled headstocks, follow the angle of the headstock itself. On Fender style guitars, you won't need a steep back-angle; just file the appropriate angle for each string post.
For proper string nut slot depths, use the feeler gauges.
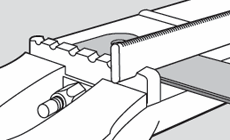
1. Measure the height of the first two frets by laying a straight edge across them and sliding different combinations of feeler gauge blades under it until they touch the straight edge. Record this measurement (let's say 0.035" for an average, somewhat worn fret height). 2. Add 0.005" to 0.010" (or any figure you come up with after experimenting) to this measurement. New total: 0.040" (the 0.035" frets, plus 0.005"). 3. Stack a combination of feeler gauges equaling the total measurement (0.040"), and hold the stack down against the fretboard and up against the front edge of the nut. Continue filing until your file contacts the gauges.
0.002" or so can be added to the measurement as you go across the fingerboard toward the bass side, slightly raising the bass strings.
When the string slots are properly spaced and filed, the nut can be shaped and finished. Mark off the excess material on the nut blank and remove it with a razor saw, file and sandpaper. Leave a bit of the pencil line showing so that you can file and smoothly sand it away without chipping. Sand down the top of the nut to eliminate excess slot depth, finish rounding and shaping the nut, and remove scratches with 320, 400 and 600-grit finishing sandpapers, in that order. The slots should be only deep enough so 1/3 of the string is above the top of the nut and 2/3 in the nut.