Tune-o-matic installation and set up tips
Tips for installing and setting up a Tune-o-matic bridge using Tune-o-Medic Bridge and Tailpiece Tools.
Most Gibson electric guitars (and many others) use adjustable Tune-o-matic bridges with stud-mounted "stop" tailpieces. Installing, adjusting, and replacing these parts is regular daily work in busy guitar shops, and our three Tune-o-Medic tools make the work faster and more precise.
The tools are each described below, but first let's start with some information about setting up Tune-o-matic bridges:
The intonation adjustment screws on a Tune-o-matic bridge should face the neck and pickups, not the tailpiece. If they're reversed, the adjustment screw heads may interfere with the strings coming off the saddles. When this happens, it alters the string angle and can cause rattling or other problems.
The position and depth of the string slots in the saddles will determine whether the bridge holds the strings in an arc that matches the curved radius of the fingerboard surface. Many Gibsons have a 9"-10" fretboard radius, while most Tune-o-matics have a 12" radius, and this is often overlooked when setting up Tune-o-matic bridges. Use Radius Gauges to determine the fingerboard radius, and match it when shaping and slotting your saddles. Often the string slots need to be off-center in order to get the proper radius.
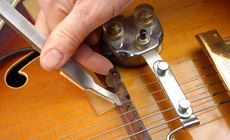
The Tune-o-Medic Bridge Jack is a tool that was used at Gibson's original factory in Kalamazoo, Michigan. It raises and lowers Tune-o-matic bridges without loosening the strings. Lift a bridge with this jack to adjust the thumbscrews up or down freely. Without pressure from the strings, you'll no longer damage the plating on the hardware.
Fasten the self-adhesive felt to the underside of the Jack (it's cut to match the shape of the Jack). Always keep the felt-covered surface in full contact with the guitar top; tilting the tool could put the metal in contact with the finished surface.
Use the Jack from either side of the bridge — whichever gives the best access. Depending on the height of the bridge, you may need to place a shim of rubber or wood on the guitar top to gain height. (Choose a shim material that will protect the guitar's finish.)
Once you're familiar with using the Bridge Jack, you can hold the guitar in the playing position and jack up the bridge with one hand while watching the 12th-fret action — when it looks right, spin the thumbwheel to hold that height.
Tip: keep the bridge level
For a good, solid setup, the bottom of the bridge must lay flat on the thumbwheels, not tipped at an angle. This means the thumbwheels at each end need to be at the same height.Use the saddle slots to fine-tune the string heights.
When a guitar ships from the factory, the strings are typically well adjusted, but with room for fine-tuning to suit your preferences. Two key points to check are the string spacing at the sides of the neck and whether the strings align with the pickup polepieces. The spacing at the sides of the neck is a matter of personal preference, and often there's a compromise between this spacing and getting the strings to properly align with the pickup polepieces.
Strings that are equally-spaced mathematically won't feel equally-spaced. The thicker bass strings will feel a little crowded, while the thin treble strings seem too far apart. Space your strings so the bass side strings are a little more widely spaced than the treble. Our String Spacing Rule is a convenient way to properly space the strings.
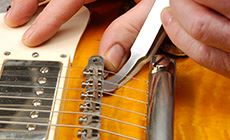
We prefer to start with unslotted saddles so the saddle slots can be cut wherever needed for proper string spacing on the Tune-o-matic bridge. You can slide the strings across the unslotted saddles until you've found the proper spacing. When they're positioned, a light tap on the string with the plastic face of our Fretting Hammer will leave an impression on the saddle to show where to cut the slot.
Cut the slots to a depth of one-half the diameter of the string. Angle the slot on the tailpiece side, "ramping" slot toward the tailpiece at an angle similar to the tailpiece.
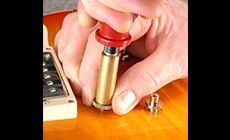
The Post Tool makes it easy to remove or install bridge posts, and to straighten bent posts. Two threaded inserts snap into the tool's handle — one is a 6-32 thread (for Gibson), and the other is an M4 x .7 metric thread (for imports). A properly installed Tune-o-matic bridge post extends 1/2" above the top of the guitar, with the other half of the inch-long post screwed into the body.
Thread the tool onto the post until it is flush against the thumbwheel. Tighten the thumbwheel against the Post Tool, and hold the two together to turn the post into or out of the guitar.
When screwing posts into or out of the guitar, keep them perpendicular to the guitar top and don't allow the post to wiggle as you turn it. Wiggling will wallow out the post hole, making it a loose fit when you replace the post (wiggling also might chip the finish). With the post removed, you can straighten it or replace it. You can also reinforce a damaged post hole in the wood with super glue or TiteBond.
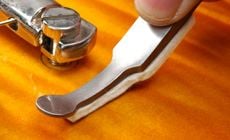
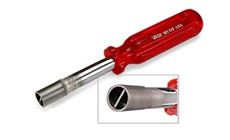
The Stop Tailpiece Wrench has a screwdriver tip recessed into a smooth-walled socket that fits the 1/2" diameter of the tailpiece stud. The socket keeps the wrench centered on the post, preventing slipping which would mar either the plated studs or (even worse) the guitar top. The tool's blade is thicker than a normal screwdriver, so it's a snug fit in the slot. This wrench is great for tightening TonePros® Locking Studs.
For good tone, the components should be solidly connected, and the strings should be properly "terminated" at the saddles and tailpiece. There should be sufficient downward force and string angle over the saddle to properly "note" the string — like a properly fretted note.
A good string angle from the back of the saddle to the stop tailpiece is in the range of 13-17 degrees. Some players prefer a shallower angle, sometimes players even wrap the strings over the top of the stop tailpiece (this is "reverse-wrapping" made popular by Billy Gibbons). This is a matter of finding a compromise that suits your preference; a shallow string angle makes it easier to bend strings, while a steeper angle improves the solid transfer of energy into the bridge/body. Consider the angle of a violin's strings as they pass over the bridge to the tailpiece. Ultimately, your preference of string angle might be based on how the components feel under your playing hand.
Replacement parts for Tune-o-matic bridges and tailpieces are available at stewmac.com/tuneomatic
Adjustment screws face the neck
Note the string radius
Using the Bridge Jack to set string height
String spacing
Using the Post Tool on posts and thumbwheels
When the threaded posts supporting a Tune-o-matic bridge become bent, the bridge leans out of its proper position. Intonation suffers, and so does tone. It becomes difficult to turn the thumbwheels and set the bridge height. Bent posts should be straightened or replaced. Bridge posts should be long enough to reach the top of the bridge they're supporting, but they shouldn't protrude above the bridge. If they're too high, they're probably not set far enough into the wood of the guitar top. Also, too-high posts are uncomfortable against the player's hand.
Tips on Tune-o-matic posts:
Stop Tailpiece Wrench
Keys to good tone
