Using a "swiss cheese knife" to fix the back on a 1923 Gibson
How I fixed this guitar with a bad back

No, not my back! The guitar’s back! This 87-year-old Gibson has started coming apart at the seams.
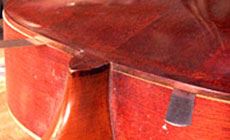
This 1923 Gibson L-1 archtop has back trouble. The glue joint has come apart between the back and side, and it looks like it’s been that way for a long time. After shrinking and expanding through many seasons, the sides have taken on a shape of their own — no longer quite matching the shape of the back.

You can see it in the lower photo: a sliver of exposed wood where the two curves don’t line up.
I’ve learned from bitter experience that no amount of squeezing is going to get these parts to line up after being separated for so long. The glue joint between the neck block and the back is still holding fine, however.
Major surgery? No thanks.
I'm not going to break out the big tools this time. Reconstructing this guitar body would be way too expensive for this customer.

But if I leave it alone, it’ll only get worse.
Let’s compromise.
I’ll do a partial, reversible repair: something that’ll keep the guitar playing for years, but can still be disassembled in the future if someone wants to correct this problem more completely.
We’ll give it a dose of hot hide glue.
Hide glue will hold this joint together, yet it can be heated apart again at any time. This way, the bad back gets the medicine it needs to keep it stable and playable, while avoiding the risks and costs of back surgery.
Open wide...
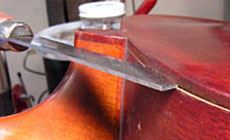
Here I’m using a wedge-shaped seam separation knife to open the joint wide enough to clean out the space between the back and the kerfed linings on the side.
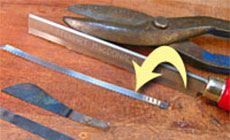
When I’m able to fit it into the seam, I use a thin piece of saw blade to remove dirt and dried glue. I make this by cutting the toothed edge from a .010" gauged saw using tin snips. In this instance I used a saw blade strip that’s about 1/4" wide, but I’ve made lots of different shapes and sizes that have lasted for years.
A desk lamp warms the wood
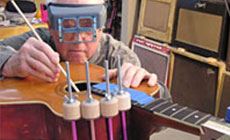
When the area to be glued is accessible, I warm it with a desk lamp. I use a 75-watt bulb, placing it about 8 inches away and monitoring the temperature with a surface thermometer. In a few minutes, the wood temp will be up to 100°-108° Fahrenheit — warm enough to provide a little extra gluing time, since hot hide glue sets at 95°.
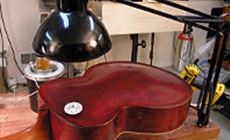
Don’t overdo it, and certainly don’t walk away from the work without turning off the lamp. Even a low-wattage bulb can blister the finish!
Check It Out!
Mini Cam Clamp
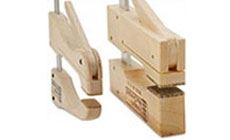
Developed by Dan Erlewine. As easy to use as traditional cam clamps, but slimmer and lighter so you can fit more clamps into tight spots. And they’re strong!
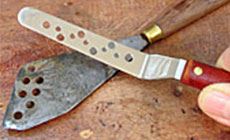
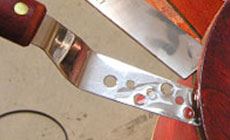
My swiss-cheesy knife idea
I get glue deep into the seam by brushing it onto heated bridge/fingerboard removal and offset disassembly knives that I’ve drilled holes through. With the holes, the knives hold glue and carry it into the joint rather than smearing off as the blade slides in. Clamp the knife blade to a hardwood backer board while drilling, because the drill bit can easily catch and throw the metal blade at you. De-burr and chamfer the holes with a countersink so there are no rough edges. The drilled holes get the glue deep into the seam, then if you work the blade up and down a little the glue works its way out of the holes and remains inside.

With hot hide glue, two minutes is the maximum “open time” before the glue cools and starts to gel. Your time’s up when the glue turns rubbery and lumpy like tapioca. If you’ve never eaten tapioca, you could compare gelled glue to caviar. Not caviar either? How about tadpole eggs? My friend Frank Ford (a great repairman) says it’s like cottage cheese. I guess we hide-gluers are big eaters.
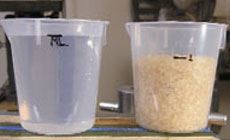
Mixing the dried glue with water
Glue manufacturers recommend a 1:1 ratio of dry glue to water measured by weight. Glue mixed this way has the consistency of heavy molasses, which I think is too thick. I prefer a 2:1 water/glue ratio, which is more like maple syrup. I weigh this out on a digital scale. You can match my mixture by looking at this photo of stain mixing cups: fill a cup to the 1 oz. mark with dried hide glue and fill the water cup to the top of the ‘ML’ (milliliter) scale. This gives you my 2:1 ratio by weight. Double or triple these amounts for a good-sized batch of glue.
Mix glue in a pint-size jar and keep the lid on tight. Open it only briefly to dip out the glue. Hide glue thickens from repeated heating, and you’ll need to thin it with water if the lid’s open a lot. Write down the times when you’ve heated it; after 120 hours or so, throw it out and mix a fresh batch.
An electric glue pot is designed for furniture making, not lutherie, so it holds more than you or I will use in a year. Don’t fill the pot with glue, fill it with water and warm your glue jar in that. I keep my glue application knives hot in there, too. The heated rim of the aluminum liner is a good place to warm parts or small tools.

Get ready to work fast!
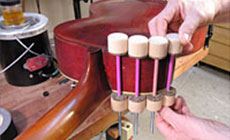
Before applying glue, adjust your spool clamps so they go on quickly. You’ve got that two minute window to be clamped and pretty well cleaned up before the glue gels. At that point, the glue’s done even if you’re not. If a joint gels before you’re done clamping, you can heat it with a hair dryer or heat gun and re-clamp it. (Don’t overheat a delicate finish.) I put these spool clamps on “upside down” so the long threaded shafts won’t be in my way as I flip the guitar over to reach in the soundhole and clean up glue squeeze-out on the inside.
I did the inside cleanup with a glue brush. I trimmed its bristles to a short, pointed shape and super-glued a dowel to the handle for extra reach. (My arm didn’t fit into the small soundhole.)
After gluing, the edge of the guitar side jutted out slightly, showing a sliver of exposed unfinished wood. I didn’t want this edge exposed to wear and tear, so I shaped a strip of maple to cover it — like a bit of binding. I glued the strip with hide glue, let it dry for eight hours, then scraped and sanded it flush with the guitar back. It was easy to make this “disappear” with a minimal amount of brush touchup using shellac tinted with cherry red and tobacco brown Colortone concentrated stain. This was followed by a thin dry coat of shellac applied by French polishing with a rag.

This repair took about a half day (not counting glue drying time). It’s not perfect, but it’s barely visible and it’s sturdy enough to keep the guitar playing for years. If someone in the future wants to rebuild that back/side joint, he just needs heat to disassemble my glue-up — and a whole lot of patience to wrestle those warped sides into shape!


