StewMac Safe-T-Planer Instructions
Setup and operation for instrument makers.
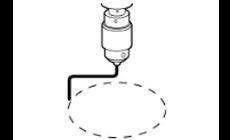
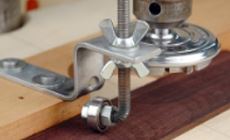
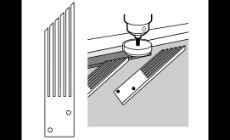
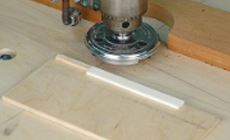
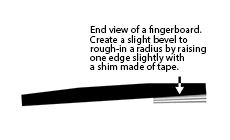
Here's how to make the most of the StewMac Safe-T-Planer in a lutherie workshop. You will need to make a planing table to increase the size of your existing drill press table. We suggest laminating two pieces of good quality plywood together (pattern maker's plywood is ideal). Be sure that it is glued up to minimize any warp that the individual pieces might have. Drill holes for carriage bolts, and bolt it to the table. Locate the holes that mount it to the drill press table as far from center as possible; this gives the best stability. If needed, flatten at least the upper surface of this table. It's important that the table is level, so it's parallel with the Safe-T-Planer's cutters. An easy way to check this is to put a bent rod into the drill press chuck and spin it around to find the high and low places. The bent rod should cover a circle of 7 or 8 inches. For more accuracy, use a dial indicator on the rod. When you find the low side of the table, fasten a shim under it. Repeat this procedure until the table has been leveled. For safety and control, you'll need to make a guide fence. A good piece of hardwood about 3/4" thick x 3" wide and long enough to span the longest length of the table will work nicely. Pivot one end by bolting it, and you will only need one clamp. Always use the fence when feeding work into the Safe-T-Planer, and feed the wood into the side that is rotating toward the fence. The fence will need a semicircular cutout to allow the Safe-T-Planer to cut pieces of wood thinner than the height of the fence. We'd always advise using a shop vacuum to keep the work area clear of chips and to keep the shop air clean, but planing makes it important for another reason: if dust isn't drawn away from the work, it can build up under the workpiece. Even a slight buildup can lift the piece up into the cutter, affecting the depth of cut. On thin work like a guitar top, this can significantly affect the accuracy of your cut, creating a variation from cut to cut on the multiple passes needed to plane wide boards. Fashion a dust hood from a plastic drain and adapt it to your shop vac hose. Run the vacuum whenever making a cut. We've removed our dust hood for these photos, but we always use it for actual cutting. For added accuracy, especially for planing thin wood for tops, backs and sides, you can make a hold-down from a bent angle bracket, a bent bolt, a couple of wing nuts, and a ball bearing. This makes a very effective roller hold-down. Adjust it so the wheel is angled slightly, pushing the workpiece toward the fence. A featherboard is helpful for keeping the workpiece in contact with the fence. With a table saw, cut several saw kerfs into pieces of hardwood. Cut the end of the pieces at an angle. Fasten these boards to your planing table using screws or clamps so the "feathers" lightly press against the workpiece as it passes under the cutter. To reduce friction, apply a light coat of paste wax to the table and thoroughly wipe off the excess. Don't apply a heavy coat; you don't want to rub the wax onto the planed wood since it could cause problems when applying a finish later. Make sure that most of the planer's shank is inserted into the chuck, and tighten it well. Run the Safe-T-Planer between 2500 to 3000 RPM. This minimizes vibration, for the smoothest cut and best results. Excess vibration could also loosen the chuck's hold on the tool's shaft. Use the drill press's quill lock to set the cutter height. Some presses have a micrometer adjustment on the quill stop, and that can be used to make small accurate height adjustments. Consider using a dial indicator to get the finest accuracy for adjusting the depth of the cut. With one end of the fence pivoting on a carriage bolt, a clamp on the other end is all that's needed to secure it. For general thicknessing, exact fence location isn't critical. Set the fence by eye to cut the width desired, and clamp it in position. Be sure to feed the work into the cutter so that the leading edge of the cutter is rotating toward the fence. That will naturally keep the workpiece against the fence. Set the fence for the planer to make a cut 2-1/2" to 2-5/8" wide. The planer has a maximum cut width of 2-3/4". Take small cuts, gradually, especially on expensive tonewoods. If there is any cupping in the board (curvature from the edges toward the center), run your first passes with the cupped center upward. On thin wood this isn't as critical as with thicker material. Plane one edge, rotate it 180 degrees, and plane the other edge with the same side up. Now move the fence so that the next cut overlaps the first by 1/8" - 1/4" and run both edges again. Keep moving the fence until the entire surface is planed, then flip the piece over and level the other side before planing to final thickness. It is very helpful to have a hold-down for this work. You may notice the overlap between the cuts. This may be very slight or quite pronounced. Pronounced steps between cuts probably indicates that the cutter head is not level to the table. It could also indicate that the cutter head is able to float upward even though the quill is locked. This is due to endplay in the drill press spindle, and can happen on both new or old presses. To minimize this, be sure that the cutter is sharp, and that chips and dust don't get between the cutter and the wood, or between the wood and the table. The first step in making a neck is to flatten and square the billet of wood. Start by turning the wood to find a side that does not rock on the table. Make your first cuts with the wood in that position. Flatten the topside using the fence, and adjust the cutter height as needed. Once the top is flat, flip the piece over and plane the opposite side until it's cleaned to the desired thickness. Turn the billet 90 degrees, and check it with a machinist's square. If it is not quite square, place pieces of tape where needed to support it on the table so it is square to the cutter. Now run that side until flat, taking small cuts for best results. When this side is done, flip the billet over to flatten the fourth side. Draw the neck side profile on the billet, and cut it with a band saw. Flatten the peghead face with files and sandpaper, and mark the nut line on the front, back and sides. Plane the back of the peghead using a stop on the fence to end the cut safely, so you don't cut into the neck. Do this in several cuts, and end with a final light cut. Make a tapered shim to raise the nut line up to accomplish the desired taper for the back of the neck. In several light cuts remove the wood necessary to bring the back of the neck to its proper shape. Again, use the fence and the stops to limit the length of the cut. To thickness bone for nuts and saddles, you need to make a holding board. Start with a piece of good quality patternmaker's plywood at least 5" x 8". Be sure that it's flat; if it isn't, use the Safe-T-Planer to lightly plane it. Attach a stop block to butt against the end of the bone workpiece, pushing it into the cutter as it sits on the holding board. Use double-stick tape to attach the bone to the board, so that its end is against the stop and its edge is against the fence. Make light cuts and mill the nut or saddle to the desired thickness. Mill both sides. Minor cutter marks will need to be sanded out, so be sure to allow for light sanding when figuring the thickness. Feed the work slowly, use a sharp cutter, and you should get excellent results. Note that bone will wear the cutting edges more quickly than wood. You can take a rough fingerboard blank, clean one surface, and machine it to final thickness using the standard procedures described so far. It's also possible to create the start of a radius: a level plane in the center of the board, with two subtly beveled planes on either side. This roughed-in shape can be quickly radiused using a radius block and sandpaper. Accomplish this by placing a thin shim of tape under the fingerboard, running the length of the board. The tape can be added in layers until you've built it to the height needed to lift one side of the board up for cutting. As with any sharp cutting tool, you need to be safe and aware at all times. 1. Always use the fence so that the cutter won't grab the work and pull your hand into it. Free-handing of the workpiece is not recommended. 2. Take light cuts. There is less likelihood of grabbing when the cutter is lightly working. 3. Keep your hands back, and always be aware of where they are in relation to the cutter. 4. Wear safety glasses or a face shield. 5. Keep the work area clean. 6. Be sure cutter is mounted securely in the drill chuck. 7. Maximum safe speed is 3000 RPM.Part 1: Preparation
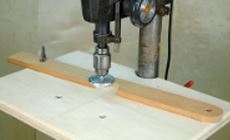
Make a plywood planing table
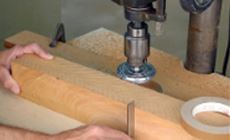
Make a guide fence
Use your shop vac, for two reasons
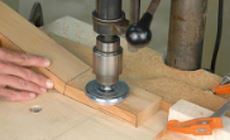
Add a hold-down
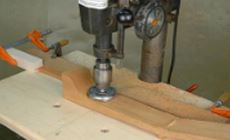
Another option is a featherboard
Wax the table
Part 2: Operation
Adjusting the height
Using the fence
Planing tops, backs and sides
Making a neck
Cutting bone
Making a fingerboard
Safety

