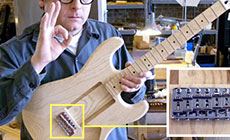
How to install a Strat tremolo and get it right

Positioning a traditional Strat bridge is tricky. You can’t just eyeball it. Here’s how to place it exactly.
When you’re building a guitar, you want to get the hardware positioned perfectly.
And installing a Strat bridge is tougher than most, thanks to the six pivot screws at the front.
How about this?
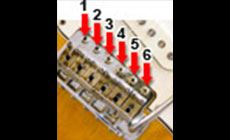
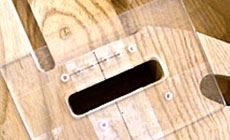
The holes in Photo 1 look pretty good. They seem nicely aligned.

But they’re not. The problem appears when you try to install the bridge. Look closely at Photo 2 to see that the holes aren’t really lining up with the screwholes on the bridge.
If just one of these holes is out of alignment, like the G string hole shown here, it’ll mess up the function of the bridge.

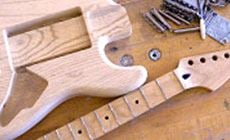
Let’s see how to avoid this problem and install a whammybar that we’ll be happy with. We’ll start over on an undrilled Strat body.
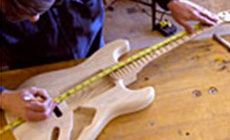
The first step is to mark the centerline on the body. I’ve put masking tape on this unfinished body to avoid marking the bare wood. A centering rule laid across the pickup cavity makes it easy to locate the center.
Attaching the neck is the next step. I marked out the pocket and drilled the holes using this Bolt On Necks article from our free info pages online.

With the centerline marked out and the neck attached, I can now measure for locating the tremolo pivot screws: 25.25" from the string nut (info from our online Electric Guitar and Bass Assembly Guide). This locates the centers of the bridge pivot screws.
Here’s where things go wrong: your drill bit starts wandering
Drilling holes for the pivot screws is really tough if you don’t give yourself some help. The grain of the wood makes the drill bit wander; the spinning bit hits a hard grain line and veers off into softer wood. You wind up with misaligned holes (like the photos above). To avoid this you'll need a drill guide.

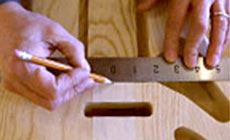
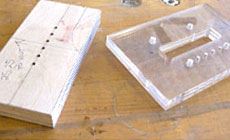
And here’s what you need: a simple drilling template
To get the holes right the first time, use a six-hole template so the drill can’t drift off center. This is what I use: a tremolo routing template for Strat. It was intended for routing the body cavities, but it has the six perfectly positioned pivot screw holes, and they’re what I need right now.
I line it up on the centerline, with the forward edge of the cavity rout aligned to the body’s trem cavity. This puts the pivot holes exactly where they need to be. Double-stick tape holds the template in place for the drilling.


No drill press? No problem.
I’m using a drill press, but if you'll be using a handheld drill, a thicker drill guide is helpful to support and guide the bit.
You can make one out of plywood using the acrylic template as a guide, or you can even stack three templates to get the same result.
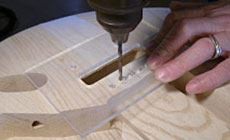
Ready, set, drill
With the template double-stick-taped to the body, the six holes are right on target. My drill press ensures they’re plumb and straight; if you made yourself a thick template, it’s doing the same thing.
The bridge went on perfectly. I’m ready to install the remaining hardware: the string claw and the rest of the parts. Then on to prepping the body for finishing...