How to install a Fender style (bolt-on) neck
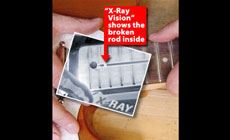
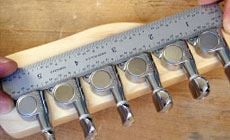
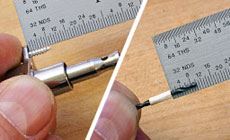
The truss rod in this Tele neck is a goner. It’s snapped deep inside. This neck’s not vintage enough for major $urgery, so let's just give this guitar a spankin’ new replacement neck. I’m using a set of Gotoh oval knob tuners (the pegholes on our replacement necks are 10.5mm, to match most sealed-back tuners). The bushings that screw on over the string posts will hold the tuners in place while we determine where to drill for mounting screws. Place a ruler against the tuner housings to align them. With a sharp-pointed scribe, mark the screw hole locations. I’ll use a 1/16" drill bit, but the screws you’re working with may be a different size, so choose a bit to match. Make it small enough that the screw threads bite into the wood, but not so small that it’s difficult to drive the screw. To keep the bit from wandering off your mark, first run the drill in reverse for a moment, then switch it to forward and drill the hole. Measure how far the screws will extend into the wood, and mark that depth on your drill bit with masking tape. Drill the hole a little deeper than the screw length — you don’t want to force the screw into undrilled wood. This makes them turn easier into the hardwood neck, and makes it less likely that you’ll break a screw. For this same reason, I drill each hole twice: a shallow second pass with a larger bit accommodates the wider, unthreaded screw shaft. Match your screwdriver to the size of the screws, so you don’t damage the heads. The neck should drop right in the pocket, or be just a little bit snug. Don’t force it. I used a camless clamp and a couple of padded cauls I made, carefully clamping the neck into position. Don't clamp too tightly: you don’t want to damage the frets or crunch the body. Just snug enough to hold the neck in place as you position it. Use a piece of string (flyfishing line is perfect), and run it from the low E nut slot to the bridge saddle of the same string. Inspect how it rides along the neck and over pickup polepieces, and then do the same for the treble side. The idea is to have the strings positioned evenly on the edges of the fretboard or to the preference of the player (some may prefer more room on the treble side for better bending or vice versa). You can use a neck attachment screw as a center punch to mark the screw hole locations, or run an 11/64" drill bit through the body in reverse to give you nice divots to guide your bit when you drill the neck attachment screws. This piece of wood is about 1" thick, with an 1/8" hole made on a drill press. Determine how deep you need to drill your holes by measuring how far the attachment screws protrude through the body, then chuck your bit in the drill so only that length comes through the block. This works as a depth stop, and it helps you hold your hand drill perpendicular to the neck. Clamp the neck to your bench as you drill the holes. Use your soap or wax on the screws, and run them into the neck holes to thread them before attaching them to the neck (they'll go in easier, and the holes will be sealed against moisture with the wax). Locate the string retainer (often called a “string tree”) in the same place as on the neck being replaced, or refer to a neck like the one you're installing for placement. Attach the retainer and string your guitar up. Tightening the truss rod pulls the neck backward, so simply tighten the adjusting nut to straighten a neck that has an up-bow. Loosen the nut if the neck is back-bowed. A top-notch straightedge is the best thing for judging a neck, but you can get a good approximation by sighting down your low E string to see where the neck is settling once it's strung up. Press the string down firmly at the first, and up around the 19th fret. Now the string’s acting as a straightedge to show whether the neck is up-bowed or back-bowed. If you like to set your string action low, you may find you have some buzzing frets on your new neck. In that case, your frets need to be leveled and dressed. This opens up the subject of fine-tuning your setup and action: check out Dan Erlewine’s book, The Guitar Player Repair Guide for details on fret leveling and dressing. Follow these steps and you’ll have your replacement neck playing great!Broken neck? What the heck! Replacing a bolt-on neck
3 steps: Install the tuners, bolt the neck on, adjust the truss rod
1. Install the tuners.
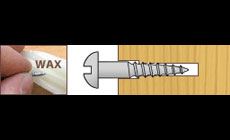
Tip
Scrape the screw threads on a bit of candle wax or bar soap.
Bolt the neck on.
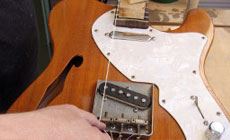
Position the neck:
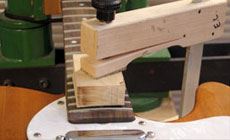
Mark the neck for drilling:
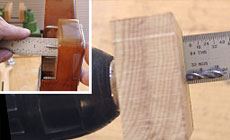
This guide block is handy:
Attach the neck:
Add the string retainer:
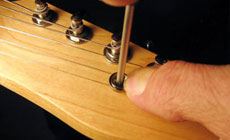
3. Adjust the truss rod.