Do-It-Yourself Resophonic Guitar, Part 1: Constructing the Body
Al Rorick guides you through constructing a 1920's National Triolian-syle resophonic guitar while saving time and money.
Part One: Constructing the Body
IN THIS ARTICLE
| • Choosing a body shape • Making the form • Bending the sides |
Choosing a body shape
"The body shape I'm using was taken from a 1930 National Style O."
The body shape I'm using was taken from a 1930 National Style O, which was 3/8" longer than a 1929 wood-bodied Triolian. Otherwise, the shape is the same. The Dopyera brothers were metal workers who probably designed arcs and circles using dividers, so I did, too.
Three arcs make the body shape: 1. The lower bout is a compound arc with two radii; 2. An outside arc shapes the waist; 3. The top shoulder is a circle. Two straight lines join the upper and lower bout to the waist.

Making the form
Instead of solid wood or plywood, the body form is built simply from double-thickness corrugated cardboard. You could also laminate two single thicknesses together with Titebond glue. Two double-thick pieces of cardboard are required; one each for the top and bottom edge of the rims. They should be at least 20" x 26" to provide good lateral strength.
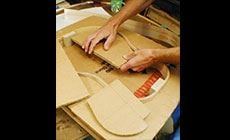
1. Tape the two pieces together. Draw a centerline on the top piece and lay out the body shape.
2. Start at the neck block or tailblock and cut out the body shape with a sabre saw. Go slowly with a "finishing" blade, letting the saw blade cut exactly on the line.
3. Remove the center sections, re-tape them to line up, and saw carefully along the centerline and laterally at the narrowest point of the waist. No further trimming should be required. The four sections jam into the mold against their cut edges, and the gap from the saw cuts allows room for the sides to fit in the form snugly.
All that remains is to notch the center sections for neck block and tail block clearance. The form remains around (and inside) the guitar throughout body construction. The interior pieces can easily be removed through the hole in the top for the sound well. If you're building a flattop guitar and wish to use a similar form, the cardboard sections can be cut in pieces and removed through the soundhole.
Bending the sides
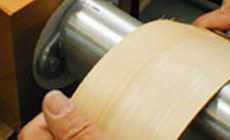
The sides are bent "dry" from .080" flatsawn maple. Sponge water only where the bending iron contacts the wood.
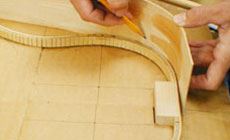
In the photo below, the sides are already fit but I'm demonstrating how I mark the damp sides where they need to be bent, before using our bending iron. It takes me an hour or so to shape and fit the sides perfectly. Let the sides overlap the centerline at both the neck block and tail block. Trim off the excess until the two sides meet on center as you fit them into the form.
The neck and tail blocks are maple, but mahogany or poplar would work as well. Orient the grain with the direction of the side grain (wood expands across the grain; if you have one piece going one way and another crossgrain, you could pop the glue joint).
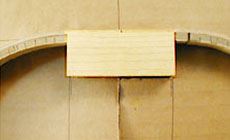
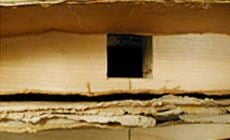
I cut the hole in the neck block for the neck "stick" before gluing the sides to the block. After the sides are glued I remove the portion of maple covering this hole with a razor saw, file, and chisel. This rectangular hole (shown below) is a snug fit side to side, but slightly larger top to bottom so I can maneuver the stick into it.
I make the kerfing, the back and the top from 1/4" plywood, either Lauan or birch (this one is birch). I glue the top on first and then go about shaping the neck. Next, we'll make the neck.
More In This Series
| Introduction | Do-It-Yourself Resophonic Guitar |
| Part One | Constructing the Body |
| Part Two | Making the neck |
| Part Three | Final assembly |