Do-It-Yourself Resophonic Guitar, Part 2: Making the Neck
Al Rorick guides you through constructing a 1920's National Triolian-syle resophonic guitar while saving time and money.
Part Two: Making the Neck
IN THIS ARTICLE
| • Re-imagining the "neck stick" design • Building the neck • Cutting and drilling the peghead |
• Attaching the fingerboard • Shaping the neck |
Re-imagining the neck-stick design
In Part One: Constructing the body, Al Rorick showed how to make a simple form for building his version of a 1929 wood-bodied National Triolian resophonic guitar. Al's differs slightly, with its lighter and thinner hand-bent .090" solid maple sides (versus the Triolian's 1/4" solid maple sides) and his altered "neck stick" design.
Here's why Al changed the neck:
"My goal was to make the entire neck out of one board that I could buy at a good lumberyard. This neck is made from three pieces sawed from a 6" x 42" x 1" slab-cut maple board, surface-planed to 1" on both faces, and with both edges jointed to become the neck's fingerboard surface. I used maple, like the old Triolian. I made the neck this way because I'd never seen one removed from the body. I knew the neck stick must 'step down' under the cone well, but I wasn't sure of its size or shape in the neck block area. After seeing an original, I may build my next one somewhat like it.
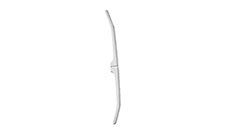
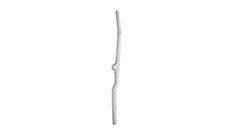
The National's neck stick is mortised and glued into the neck as in the drawing, and is installed through a neck block slot measuring 5/8" x 2-1/16". By comparison, my neck stick runs the entire length of the neck. Since it has no mortise joint, it's easier to make!"
The stick is 1" wide x 1-1/4" tall at the heel where it fits in the block, then becomes 1" tall (because of the angle) so it can pass through the hole. The hole matches the stick at 1" x 1-1/4". I've included a top and side view drawing of the National's neck for those who'd like to build one like it. I plan to 'stick' with my neck-through-body version for extra sustain.
My necks have a wider and simpler heel than National's smaller 'French heel,' which measures 2-5/8" tall (minus the fretboard's thickness), and matches the shape in the drawing. If you plan to copy that, I'd recommend a 3/4" center laminate, and thicker pieces for the outer two laminates; otherwise, the glue joint will lie right on the edge of the heel as my copy here did!

Building the neck
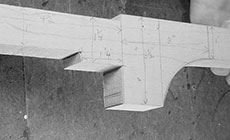
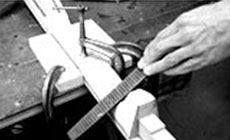
Cut the three pieces an inch or so longer than the specifications, and trim them to size based on the layout. Glue them together, aligning the heel and fingerboard surfaces carefully. (I popped 1/4" staples into the gluing surfaces, and snipped them to 1/32"—their sharp edges kept the slippery glued parts aligned while clamping.) Let it dry 24 hours.
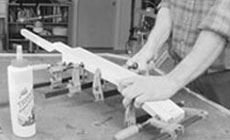
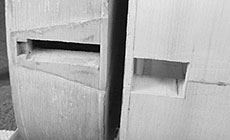
Next day, test-fit the neck blank to the body. File a slight angle at the bottom backside of the hole—toward the inside of the body—to allow the angled corners to pass by, and/or round the sharp corners of the angles until the neck slides in easily. Cut the end of the stick squarely—work slowly, in several cuts—until the neck heel fits tightly against the body. There should be a 1/32" gap between the tailblock and the end of the stick. This gap closes when the neck/tailpiece screw is tightened.
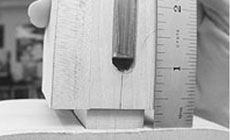
I installed our Martin-style Non-Adjustable Truss Rod (a 3/8" square steel tube) into a channel sawed or routed in the center section. I chose a fixed rod because it requires neither adjustment nor an adjustment access hole, and retains the vintage 1920s look. Aim for a tight fit, with the tube's surface flush or slightly below the fingerboard surface. Clean the truss rod with solvent and epoxy it into place.
The neck specifications in Part One were for a 25-1/2" scale length. I now use the 25" Triolian scale, and the new drawing (see diagram/ .pdf file above) reflects this minor scale length change. Mark the nut line 12-1/2" from the heel for a traditional 25" scale, or at 12-3/4" for the 25-1/2" scale. Add 3/16" for nut thickness, and mark a second line, for the backside of the nut.
Cutting and drilling the peghead
Flatten and smooth the face of the headstock. Work to the rear nut line, but not beyond! Saw the headstock to a length of 6-1/2" from the rear nut line. Lay out and saw the neck and peghead to approximate width (leave room for final sanding), as in the diagram. The width at the nut on the original guitar is 1-7/8", and 2-1/4" at the 12th fret. Mine is slightly narrower: 1-3/4" and 2-3/16", respectively. Smooth and flatten the back of the headstock, but not quite to its final 3/4" thickness.
I cut the peghead slots by first drilling a series of holes—the unfinished rear peghead surface minimizes drill bit tear-out. Drill both ends of each slot with a 3/8" brad point bit (this is the final slot width), and drill between them with a 5/16" bit. This peghead is approximately 3/4" thick per the National, and our Economy 3-on-Plate Tuners match the National's in width, length, and post-to-post spacing.
Remove the waste and trim the slot walls with a mallet, chisel and rasp, but not quite to the final dimension. This helps avoid drill bit tear-out when the tuner post holes are drilled.
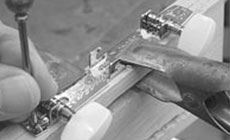
Draw centerlines on both sides of the peghead, and mark them 1-3/8" from the end of the peghead. This is where the D and G tuner posts will be, and the others align on 1-3/8" centers. Obviously, our self-aligning Tuning Machine Drill Jig for Slotted Peghead is ideal for this task.
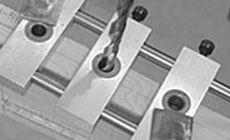
An easy jig-free method is to disassemble one tuner plate and use it to lay out and centerpunch the holes for the posts and the mounting screws. Then drill 1/16" holes on the punch marks—they're perfect for the mounting screws, and serve as pilot holes for drilling the tuner post holes. I drilled the holes in increments, starting small and ending with an E 'letter' bit (1/4"), when the tuners dropped right in.
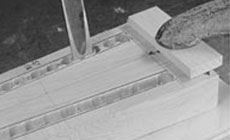
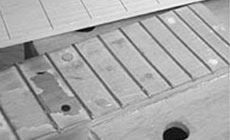
For bottleneck style, use a flat (non-radiused) fingerboard. I made this 25"-scale fingerboard from 7/32"-thick maple like the original (left), using our Fret Slotting Miter Box, our fret saw, and our 25" Scale Dual Fret Scale Template. The Triolian's fret scale measured 12-29/64" from nut to 12th fret, and 25-9/16" at the saddle's center when at optimum intonation. That's about 1/8" of compensation added to the actual string length, for correct intonation. By shifting the cone, you can adjust the scale length almost 1/16" flatter or sharper, depending on the brand and gauge of the strings you use.
Attaching the fingerboard
The Triolian had four countersunk screws holding the fingerboard 'tongue' to the top. These were drilled toward the fretboard edges, perhaps to prevent upward warpage. The screw holes were filled and painted to match the fretboard. I preferred to drill three mounting screw holes, on center at the 15th, 17th and 19th frets in normal 'fret marker' fashion, and then fastened screws into the maple stick through clearance holes in the body. I hid them with 1/4" pearl dots. I've had no warpage yet, but if I do, I'll lightly glue the fretboard down with hide glue, per the Triolian.
Drill the fretboard mounting screw holes only to a depth that accommodates pearl dots or filler. Centering in these holes, drill through the fretboard. I used a .128" bit for easy clearance of 1/8"-diameter screws. In Part Three: Assembly, when the neck is final-fitted and adjusted with the soundwell, we'll take a closer look at drilling and installing the mounting screws.

Glue the fingerboard on with the trimmed staple tip to keep it aligned. I used Titebond™ glue and eleven clamps, staggered on opposite sides of the fretboard to keep the edges down. I also used our Professional Fret/Fingerboard Leveler leveler as a gluing caul, but any stout flat board will work. Let the glue dry overnight.
Shaping the neck
When dry, shape the neck to your preference. The shapes and measurements shown here were copied from the '29 Triolian. I filed the back of the neck to match the National's thickness (fretboard to back of the neck) measured at frets 1, 3, 5, 7 and 9. At these same points, rough-shape small bands around the neck that almost fit the templates.
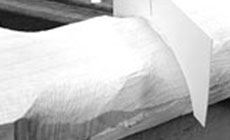
Connect these bands with a sharp rasp until the neck takes shape, and then shape the heel and the peghead. Shaping and final-sanding the neck will take several hours.
When the neck is ready for final sanding, complete the peghead slots, which were left rough earlier for drilling. Also, shape the grooved string 'ramps' from each slot toward the nut, and then final-sand the entire neck, the peghead, and the inner walls of the slots.
You can rough-cut the nut at this point, but don't fit it until Part Three: Final assembly, when we'll install the soundwell, fit the neck, glue on the back, fit the nut, and string up the guitar for the first time.
More In This Series
| Introduction | Do-It-Yourself Resophonic Guitar |
| Part One | Constructing the Body |
| Part Two | Making the neck |
| Part Three | Final assembly |