Tune-o-matic swap: going from Nashville to Kalamazoo
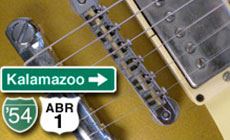
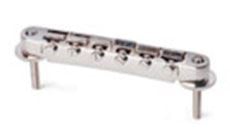
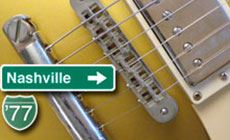
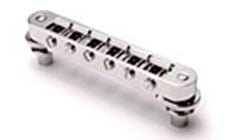
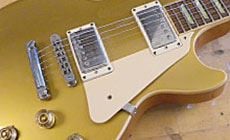
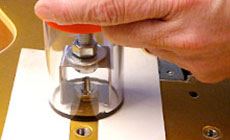
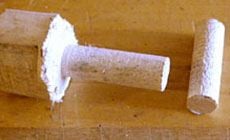
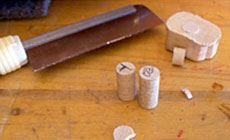
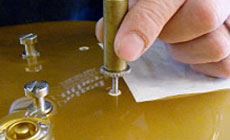
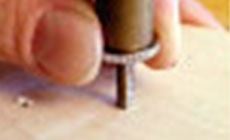
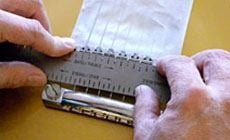
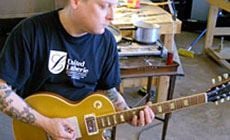
Making a Les Paul Classic even more classic. It has a Nashville Tune-o-matic bridge, but he wants the older style ABR-1 instead. He’s on a quest for tone, and also wants truer-to-1959 specs. I think it’s a good idea, and I’ll show you the steps involved. The ABR-1 is the original Tune-o-matic, designed by Gibson’s Ted McCarty for their archtop guitars. Its first Les Paul appearance was on the Custom model in 1954. It’s a slim bridge that sits on two posts screwed directly into the maple top of a Les Paul. At their Kalamazoo factory, Gibson used this bridge for over two decades. The Nashville Tune-o-matic was introduced after Gibson moved from Kalamazoo to Nashville in the ’70s. It offers a wider range of saddle adjustment than the ABR-1, which is great for intonation. This bridge is a bit larger than the ABR-1, and its support posts screw into metal bushings pressed into the guitar top. The Classic model was designed by JT Riboloff at Gibson, and introduced in 1990. The idea was to recapture the sought-after Les Pauls from late 1959/1960. With its slim neck and vintage specs, it was an instant hit and remained in Gibson’s line until 2008 or so. Riboloff specified the ABR-1 bridge for the Classic rather than using the Nashville. Many players feel there’s some sustain lost when string vibration travels through the Nashville’s metal bushings. I subscribe to this point of view myself, and so does my customer on this job (a certified tone freak). This Les Paul I’m working on probably was built around the time they discontinued the Classic model, since it has a Nashvile bridge, not an ABR-1. Maybe Gibson made this switch to simplify production. The owner has asked me to pull the Nashville bushings, plug the holes and redrill smaller holes to mount an ABR-1 in the maple top. This is easy because the Nashville bushings are pretty short. My knob and bushing puller lifted them out by the thumbwheels threaded onto the posts. I determined the diameter by finding a drill bit that fit nice and snug. This showed me the hole depth, too. Don't monkey around too much! The surrounding finish is delicate. Find the depth and diameter and get out quickly to avoid chipping the finish. The holes on this guitar are a tight 17/64", so that’s the size to make my plugs. I don’t want to plug these holes with a regular dowel, because it will show end grain rather than straight grain to match the top. I need to make my own straight-grain maple dowels. No way around it. To do this, I use a lathe. If you don't have a lathe, a nearby woodworking or cabinet shop will probably make them for you. Be prepared to supply your own wood and have them make a stock of them in case you have to do this job for a future customer! I used a guitar string to double-check the depth of the holes before cutting the plugs to precisely those lengths. This ensures that the ends will sit flush to the surface, and I won’t have to saw or chisel the tips off, which would risk damaging the finish. Hot hide glue is my choice for this job. I pressed the plugs in with the butt end of a drill bit in my drill press, then left the glue to cure overnight. The original bridge holes were a good starting point, but for accuracy I used StewMac’s free online fret scale calculator for placing the ABR-1 bridge. I also checked for side to side alignment to make sure the bridge was positioned correctly all the way around. I drilled 1/8" holes for the bridge posts, and used the posts themselves as a makeshift tap to thread the holes. Before doing this on the guitar itself, I test-installed the posts in a block of scrap maple. I got a nice, tight fit using the post tool for installation — perfect for transfering tone and vibration. I installed the bridge, slotted the saddles and played the guitar for a while. I heard a clear improvement of sustain and acoustic tone. I’m convinced the transfer of vibration through posts screwed directly into the hard maple is the way to go. The new plugs will be concealed by the thumbwheels, but they still need to be protected with finish. I toyed with the idea of touching them up with goldtop gold, but applying the gold followed by multiple clear coats would add considerable time and expense to the job. I talked with my customer about this. Since you can't really see the conversion, and this isn't a vintage Les Paul we decided to seal the plugs with clear lacquer and call it good. If he decides later that he wants them concealed, no problem. Before reinstalling the posts I cut back the finish just slightly with a countersink bit to prevent the lacquer from lifting or chipping around the holes while I threaded in the new bridge posts. The bridge fits great. After doing the setup and intonation, this guitar has better tone with more sustain and resonance. I can't wait to get this one back to the customer to hear what he thinks!Goin’ from Nashville back to Kalamazoo

A customer asked me to replace the bridge in his Les Paul Classic.
First, a little background. A Tune-o-matic timeline:
1954: ABR-1 bridge
1977: Nashville bridge
1990: Les Paul Classic

OK, let’s go to work
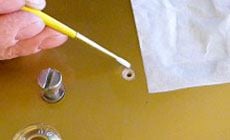
Remove the bushings
Measure the holes

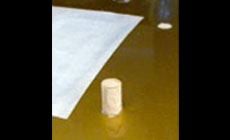
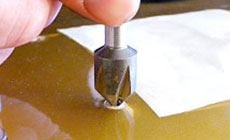
The hard part is making straight-grain dowels
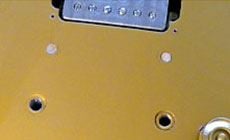
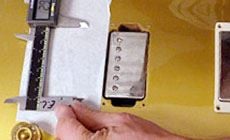
Locate the new bridge

Install the posts
Touch up the finish
That’s more like it!