Custom-shaping a replacement pickguard for a 1990s Gibson
Custom-shaping a replacement for this beat-up Flying V pickguard
![Damaged pickguard](/globalassets/video-and-ideas/online-resources/hardware-installation/custom-shaping-a-replacement-pickguard-for-a-1990s-gibson/96-custom-shaping-damaged-pickguard.jpg?hash=637613111790000000&quality=80)
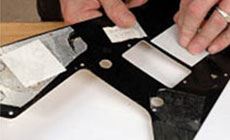
This thing’s seen better days, and off-the-shelf replacements didn’t fit.
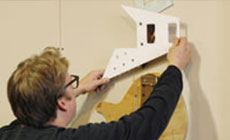
I get a call from my pal Gavin Glover, who recently moved to L.A. to pursue fame and fortune with his band the Apocalypse Dudes. The pickguard on Gavin’s 1990s Flying V was falling apart; he bought two replacements, but neither one fit the screw holes in his guitar.
![Gavin glover](/globalassets/video-and-ideas/online-resources/hardware-installation/custom-shaping-a-replacement-pickguard-for-a-1990s-gibson/96-custom-shaping-gavin-glover.jpg?hash=637613111800000000&quality=80)
I had Gavin send me the original so I could copy it and make him a new one. A few days later the battered guard showed up in the mail.
![Pickguard and mailing envelope](/globalassets/video-and-ideas/online-resources/hardware-installation/custom-shaping-a-replacement-pickguard-for-a-1990s-gibson/96-custom-shaping-pickguard-and-mailing-envelope.jpg?hash=637613111810000000&quality=80)
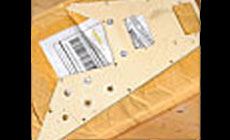
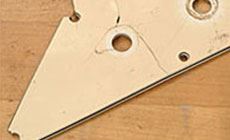
The pointed tips were broken off, and the area where the jack plugs into the guard had multiple cracks—this thing wasn’t going to stay together much longer!
![Broken guard](/globalassets/video-and-ideas/online-resources/hardware-installation/custom-shaping-a-replacement-pickguard-for-a-1990s-gibson/96-custom-shaping-broken-guard.jpg?hash=637613111790000000&quality=80)
The first step in making a replacement was to cut a template to match the shape of this guard. That template will guide my router as I cut the new pickguard.
Making a custom template
I didn’t want to use up a piece of acrylic for a template that I might never use again, and I didn’t have any suitable plywood on hand. But I did have some scraps of .083" pickguard material that were just big enough for the job.
![Guard template material](/globalassets/video-and-ideas/online-resources/hardware-installation/custom-shaping-a-replacement-pickguard-for-a-1990s-gibson/96-custom-shaping-guard-template-material.jpg?hash=637613111800000000&quality=80)
With small pieces of double-stick tape on the back of the original pickguard, I stuck it to one of my scraps.
![Double-stick tape](/globalassets/video-and-ideas/online-resources/hardware-installation/custom-shaping-a-replacement-pickguard-for-a-1990s-gibson/96-custom-shaping-double-stick-tape.jpg?hash=637613111790000000&quality=80)
I scribed the shape of the old guard onto the pickguard scrap.
![Scribing the shape](/globalassets/video-and-ideas/online-resources/hardware-installation/custom-shaping-a-replacement-pickguard-for-a-1990s-gibson/96-custom-shaping-scibing-the-shape.jpg?hash=637613111820000000&quality=80)
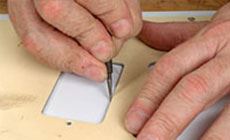
I attached my scribed piece to a second scrap, using plenty of double-stick tape. I want these two pieces to stay together permanently, making a double-thick piece for cutting my template.
Cutting with a coping saw, I roughed-in the general shape. (A bandsaw would have been a lot quicker!)
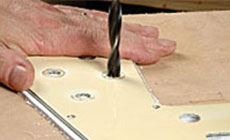
Using the original guard as a guide, I drilled the holes for control pots and mounting screws. Copying the original screw holes means my replacement guard will be custom-fitted to Gavin’s guitar.
![Drilled holes](/globalassets/video-and-ideas/online-resources/hardware-installation/custom-shaping-a-replacement-pickguard-for-a-1990s-gibson/96-custom-shaping-drilled-holes.jpg?hash=637613111790000000&quality=80)
I removed the original guard and used nut shaping files to very carefully bring the edges of the new template in to my scribed lines.
![Filing](/globalassets/video-and-ideas/online-resources/hardware-installation/custom-shaping-a-replacement-pickguard-for-a-1990s-gibson/96-custom-shaping-filing.jpg?hash=637613111800000000&quality=80)
I used an acrylic humbucker template to rout the pickup holes.
I don’t have a fancy setup for this, just a cheapo router table ($25 at a yard sale). It works great!
![Router table close-up](/globalassets/video-and-ideas/online-resources/hardware-installation/custom-shaping-a-replacement-pickguard-for-a-1990s-gibson/96-custom-shaping-router-table-close-up.jpg?hash=637613111820000000&quality=80)
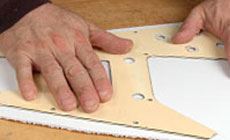
The finished template
My custom template is shaped just the way I want it — a cleaned-up version of Gavin’s original, with all the holes in the right place.
![Finished pickguard template](/globalassets/video-and-ideas/online-resources/hardware-installation/custom-shaping-a-replacement-pickguard-for-a-1990s-gibson/96-custom-shaping-finsihed-pickguard-template.jpg?hash=637613111800000000&quality=80)
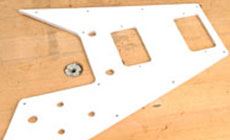
Made of two layers of .083" pickguard material, it's thick enough to follow with a router for cutting the actual pickguard.
![Attaching template to material](/globalassets/video-and-ideas/online-resources/hardware-installation/custom-shaping-a-replacement-pickguard-for-a-1990s-gibson/96-custom-shaping-attaching-template-to-material.jpg?hash=637613111780000000&quality=80)
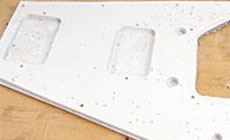
From here on, it’s routine pickguard-making: double-stick tape holds my template to the laminated material, a coping saw roughs in the shape, and a drill press adds the holes.
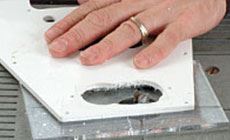
The pickup shapes will be cut on the router table, but first I’m using a forstner bit to hog out most of the material to be removed. This'll make it easier to cut these holes with the router bit.
![Hogging out the pickups](/globalassets/video-and-ideas/online-resources/hardware-installation/custom-shaping-a-replacement-pickguard-for-a-1990s-gibson/96-custom-shaping-hogging-out-the-pickups.jpg?hash=637613111810000000&quality=80)
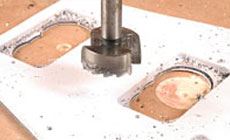
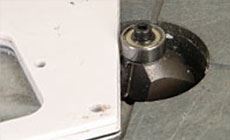
With the holes drilled and pickup routs semi-cleared, we are ready to hit the router table to clean it up.
The ball-bearing guide follows my template while the bit cuts the pickguard.
First I cut the perimeter, then cleared the pickup routs.
![Router cutting](/globalassets/video-and-ideas/online-resources/hardware-installation/custom-shaping-a-replacement-pickguard-for-a-1990s-gibson/96-custom-shaping-router-cutting.jpg?hash=637613111810000000&quality=80)
Another pass with a beveling bit creates the slanted edge that shows the white/black/white layers.
![Beveling bit](/globalassets/video-and-ideas/online-resources/hardware-installation/custom-shaping-a-replacement-pickguard-for-a-1990s-gibson/96-custom-shaping-beveling-bit.jpg?hash=637613111780000000&quality=80)
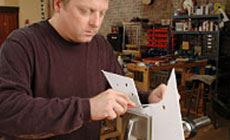
Countersinking the screw holes is the last step, and we have a finished guard!
I popped Gavin’s pickguard in the mail, and it was back in L.A. three days later. He’s a happy customer! And I have a template for a 1990s Flying V pickguard on my wall in case another one ever comes through the door!
![Hanging up the template](/globalassets/video-and-ideas/online-resources/hardware-installation/custom-shaping-a-replacement-pickguard-for-a-1990s-gibson/96-custom-shaping-hanging-up-the-template.jpg?hash=637613111810000000&quality=80)