Guitar bench fret holder: easy DIY gift
Issue 320 December 13, 2018
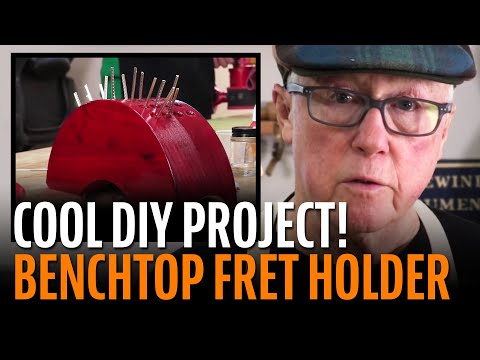
Dan Erlewine's making a Christmas present: Modifying a neck rest to hold cut frets for fret jobs. This handy benchtop helper is easy and quick to make.
Dan Erlewine's modified neck rest helps with fret jobs
- A simple, fun present!
- Aerosol lacquers and a little sanding
- The advantage of brad-point bits
- Simple jig for making this benchtop helper
Video Transcription
[on-screen text reads: StewMac tools + ideas for guitarmaking]
Guitar workshop gift: Benchtop fret holder
Dan Erlewine: Today I'm in the midst of a fun little project. I'm making a present for one of the guys in the shop. When you're doing a fret job, when we're doing a fret job anyhow, we cut all the frets to length and shape before we start fretting them. We store them in a block of wood with holes drilled in it. One of the guys made this one. I've made tons in my life, some of them were quite nice, real shiny pieces of wood that I lacquered.
Recently I've been using our neck rest with holes in the back of it. I really like that because they can get my fingers in between the frets easy because they're drilled in at angles like porcupine quills. I'm making one of these today for one of the guys and I'm going to show you how I do it. There is a new rocker [on-screen text reads: Rock-N-Roller Neck Rest - stewmac.com] that's the center line. All these have a little pencil mark, that's how I laid it out back then and I never sanded them off. On this one, I'll sand them all off because I want this to be a good looking one and it's a gift. I'm going to be drilling across the block so I'm bringing these little marks over, just wrapping around the edge so I can see them.
Making the drill jig
Then I have this little drill jig I made out of wood, super glue and two drywall screws and this has a pencil line on it for center. It's got five sixteenths holes drill through it. I wiped the insides with super glue, number 20, mini coats and accelerated it so it would hold up to the drilling I'm going to do. And if I line that pencil line up right there and clamp this block on, I can drill, blow it out, and this can follow the curve all the way around. I'm drilling holes that are about an inch and a quarter, it's drilling an inch and a quarter deep and that's a flat bottom cut because it's a Brad point bit. So we're going to move up front on the bench here and drill a couple holes.
Drilling the holes
Seven rows of four. [Dan starts drilling the holes into the neck rest through the drilling block guide holes] If you were trying to do this without a little drilling block like that or with a regular twist drill bit, that bit might start wobbling around so a Brad point's the good one to use. [Dan removes the drilling block and scraps the wood shavings off with a Razor File] This is poplar so it's kind of soft and it furs up on the edges. I'll get a few chips as I go, but I'm going to counter boar that with the counter sink anyway, just clean those holes up. They look a little nicer and the fret goes in easier.
Sanding the neck rest
That's good enough. Now we're going to sand it so it's got a little bit of round over on the edges. I've got some 81, 20, 220, 320 paper. I'm just knocking off the hard edges cause I want it to feel good, not making a guitar out of this. Just making it a little bit nicer than raw wood. It fits right in there. New invention, roll sander. 120 all around now. Kind of like to wrap the edges of a block I'm sanding with [on-screen text reads: Micro-Mesh Foam Sanding Block - stewmac.com], because if you just flat sand with the edge hanging out it'll make scratches. I'm going to go to 320 now. What I'm planning to do is put the color on this with an aerosol ColorTone toner, cherry red I think. That's good enough we can go over and spray it.
Apply some sealer
I'm going to turn on the fan and spray all around with some sealer.
That's really a double coat. That poplar is soft wood it sucked it right up so I went ahead and did two coats and it's still going away. I'll let that dry half an hour.
Dust sanding
All I'm doing is scuff sanding or dust sanding. Those little fibers will stand up first couple of coats and you want to just knock them down. This is not heavy sanding it's just, you can feel it. It's like peach fuzz. But if you don't knock it down and it builds up a lacquer or a color, it'll feel like peach fuzz turned to whiskers, so I think I can spray some cherry on this now. Cherry red, here it goes.
Spray painting
[Dan starts spraying the neck rest with red ColorTone Areosol Guitar Lacquer]
I kind of like this right here. That's enough lacquer on this for one day. When you're done with these aerosol cans, you hold it upside down and spray it till it clears just like that and then wipe it off. It's even good to get a little thinner and wipe it really well.
So I sprayed about six or eight coats of clear gloss on this aerosol over the weekend. Sanded it at once after about four coats and I left it right off the gun. This is like a wooden toy. You don't buff it like it was a guitar.
And this is a Christmas present for Steve Miller. My apprentice here in the shop. Hey ho, Steve-a-Rino.
Steve Miller: Oh, hey Dan.
Dan Erlewine: Merry Christmas.
Steve Miller: Oh, whoa.
Dan Erlewine: It's a little, you know what it is.
Steve Miller: Did you make this?
Dan Erlewine: Yeah. Well StewMac made it, but I doctored it up for Christmas.
Steve Miller: Wow. This is great.
Dan Erlewine: Hope you like it because I want you to get right to work on this neck. Cut me a set of frets.
Steve Miller: Fantastic.
Dan Erlewine: Merry Christmas.
So if you like these free videos, you could help us keep them coming by subscribing to our YouTube channel. Merry Christmas.


