Gluing a 1940s Gibson Bridge
Issue 268 August 09, 2016
The bridge on this old Gibson has an unusually low, flat profile. Dan Erlewine shows how he modified a bridge clamping caul for gluing the bridge to the guitar top.
About the guitar in this video: This 1942 Gibson LG-2 is all mahogany. It's often called a "banner" model because of the peghead decal: a banner reading "Only A Gibson Is Good Enough."
Thanks to our friend Dakota Dave Hull for his music in this video.
- Martin and Gibson bridge shapes compared.
- Getting uniform clamping pressure across the bridge.
- An easy, temporary mod to the bridge clamping caul.
Video Transcription
[on-screen text reads: Stewart-MacDonald - Trade Secrets!]
Martin and Gibson bridge shapes compared
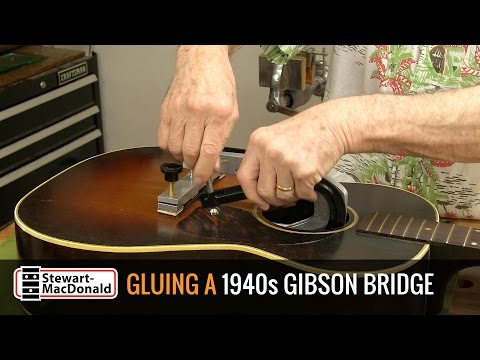
Dan Erlewine: I'm about to glue this bridge I made on an old flat top Gibson guitar from the 1940s, and I want to use our Bridge Clamping Caul to do that with [on-screen text reads: Dan Erlewine - Guitar Repairman, Author]. But it's really made to fit a more modern bridge, like a Martin Bridge and their many copies, which has a very deep belly and a lot of curve and radius to the top [on-screen text reads: Acoustic Guigar Bridge for Martin - stewmac.com]. It makes good contact on all four contact points, but if I put the Gibson Bridge in the same spot because it's thin and flat, the outside of the caul makes contact, but we really need the center to press down also for the glue to get any kind of a good hold onto the wood. I've got a real easy modification that you can make to make this clamp work for both bridges.
An easy mod to the bridge clamping caul
My modification is pretty easy. I took a wood dowel, a half inch wood dowel and cut little sections off the end so it fits inside the holes that come in the cork pads with the clamp. These dowels are cut a little bit taller than the cork, so they meet the bridge top first and fill that space that we saw between the caul and the bridge. These two have the same half inch dowel cut to the thickness of the cork and glued to a scrap of wood. Then I shape that with the curve so that it sits right down into the bridge wings. I now have four really good contact points to clamp this bridge on.
Getting uniform clamping pressure across the bridge
I went ahead and finished up my bridge and glued it on with hot Hide Glue, and gave it 24 hours to dry. And this is my setup for this 1942 Gibson LG-2, which is a pretty rare model because it doesn't have a spruce top. It's all mahogany, and there's such a rich sound. So my clamp setup is what you see here. I've got an Ibex Clamp in the center and two sound hole clamps on either side [on-screen text reads: 5" Soundhole Clamp - stewmac.com]. They actually sit right in the area where I want that extra pressure. And with the sound hole clamps, I put the nylon cauls on the lower jaw [on-screen text reads: Soundhole Clamp Cauls - stewmac.com], and they're padded to protect the top of the bridge plate.
Another thing you can notice is that I've drilled the hole in my clamp, and I popped the nylon cap off that comes with an Ibex clamp, so the two mate quickly, so you're not fumbling when you go in with your hot glue and you don't have a lot of time. The block of wood I taped to the bottom of the jaw is to span that brace and come up against the bridge pad and give the upper screw something to bear against, and this spreads the load. I've got a good squeeze out all the way around the perimeter of the bridge, so it's down nice and tight. I've got a little hot hide glue that's dried on the outside. I can clean that up with real hot water on a little Q-tip.
You might notice these four dots. Two of these are pearl inlays that the original bridge had. Underneath those were machine screws that held the bridge on. I don't think that's a good idea, because often when the bridge wants to come off then it can't because it's held tight. In this case, it fractured the top, which was a big regluing job, but it needed a new bridge pad. I just put them back in for looks, no screws. And these two dots aren't pearl. Those are nylon locating pins [on-screen text reads: Acoustic Bridge Locating Pins - stewmac.com] that we used to locate a bridge quickly so it doesn't go like this when you're lining up your clamps. You cut them flush on the top and flush on the inside so they don't get in the way of the clamps, and you can still pop them out with your little finger and push up into that hole.
Just pop them out later. Good catch. And I'll save these and use them on the next flat top Gibson bridge that I put on. So along with the great results that this produced, this little clamp modification doesn't cost anything. It's completely reversible. You just unplug your little cauls when you're ready for a Martin bridge and you end up with two, two tools in one.


