Acoustic guitar saddle: how to cut the slot
Issue 271 September 22, 2016
Dan Erlewine's working on a World War II era Gibson flattop. He explains that during wartime, some experienced factory guitar makers were replaced by temps. Maybe that's why this guitar's saddle was in the wrong place. Here's how he fixed it.
About the guitar in this video: This 1942 Gibson LG-2 is all mahogany. It's often called a "banner" model because of the peghead decal: a banner reading "Only A Gibson Is Good Enough."
Music: Thanks to our friend, Dakota Dave Hull for the music!
- Repositioning the saddle to play in tune
- Using a jig to guide the router
- Downcut router bit for a clean cut
- Plunge cut: connect the dots
Video Transcription
[on-screen text reads: Stewart-MacDonald - Trade Secrets!]
Cutting a saddle slot
[on-screen text reads: Dan Erlewine - Guitar Repairman, Author]
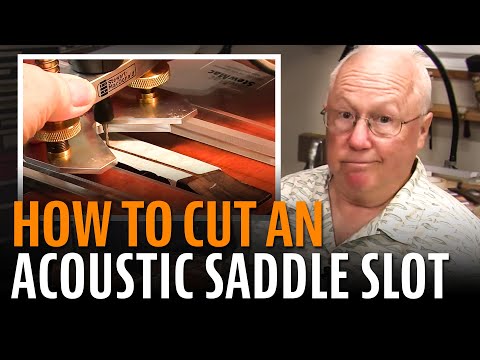
Dan Erlewine: I'm about to route the saddle slot on this bridge on this LG-2 guitar that I've been working on from 1942. Had a lot of extensive repair work, and now I'm actually going to do the routing. And my goal is to route between the dark saddle slot right down the center.
In a previous Trade Secrets, we found out where to cut the slot using the intonator [on-screen text reads: The Intonator - stewmac.com]. Dialing in at exactly where we wanted it, and I marked it. And today I'm going to route it. It's pretty risky to route in a piece of hard rosewood like that on a delicate guitar. With a Dremel tool or a small router you can jump and hog and get crooked lines. But I was really happy when we came up with the saddle slotting jig [on-screen text reads: Saddle Routing Jig - stewmac.com], which makes the job very accurate and easy.
Setting up the Saddle Routing Jig
So, here's how you set this up. That's the main part. I call it the table. I've got it spring clamped through the sound hole. Two spool clamps at this end [on-screen text reads: StewMac Spool Clamp], upside down so there's nothing to catch my elbows. And I've shimmed up that end of the table with a piece of cardboard just to level this.
As far as the bit I'm going to use, it's a carbide down cut bit [on-screen text reads: Carbide Downcut Inlay Router Bit]. Smaller than the slot I want to end up with because, as I said, I want to creep up to the front wall, into the back wall, widen that slot and have a really clean slot so that the saddle goes in with a squeak. It's a press fit.
Using the jig to guide the router
I'm setting my stops now. At this end, if I want to stop there, I slide this forward, and that's your stop. The router can't go any farther than that. There's two ways I'd approach this. One is to route straight through and get the depth a little bit at a time. The other is to do a plunge cut. It's like a hinge, and you walk across and punch a series of holes. That lowers the bit down in, and it can often lessen the chance of wobbling. I think I'll give that my first trial. Do a couple of punch cuts.
[Dan uses the Micro Vacuum Hose Kit to remove all the saw dust from the router]
I'm going to get my ear muffs. This is my second pass. I'm going a little bit deeper. You can see the holes that I plunged, and now I'm connected. It's like connect the dots. That's the full depth.
Now I have two cleanup passes, six thousandths to the front and six to the rear. I loosen the fence, move it forward [Dan moved the routing table forward and measured the spacing change using Feeler Gauges]. There's six thousandths. That moved me forward six thousandths. You'll be hearing a small, easy cut. I'll be running that front wall, and it'll look real nice when I'm done [Dan starts running the Dremel tool through the saddle again using the router jig as a guide]. [on-screen text reads: Dremel 4000 Rotary Tool - stewmac.com] Now I'm going six thousandths the other way.
I'm going to take the silver pencil here and mark down the center of the old saddle slot because I can still see it. And so it's a real different slant and it's much closer to the front. That's why this saddle had started to split. This guitar must have played way out of tune back in 1942. That was war time, remember, and a lot of the main workforce was fighting the war, so the people that were building guitars during those days, a lot of them were new.
Installing the bone saddle blank
And I was thinking about throwing the bridge away, but I thought, nah. It's original, and I saved it. There's a bone saddle blank [on-screen text reads: Bleached White Bone Saddle Blank - stewmac.com], one of the long ones. Shaped it on the belt sander. Then I put it in the Nut and Saddle Vice to do the fine filing on it. But I want to make sure everything's right and string it up before I finish anything. That's a tight fit. Ooh. You hear that? It just popped right in. That's what I want. I don't want to split the bridge, but I want to snug fit. I'm going to string it up.
Whoa. It's a ringer, and it's dead in tune. I got that saddle right where I wanted it. It just rings. You could hit a cord with this, close the case, wake up in the morning, open it and it would still be ringing, I'll bet.


