How to use the Erlewine Neck Jig
V-5399
Simulate string tension with the strings off for the most accurate fret and fingerboard work ever!
Video Transcription
Erick Coleman: Here's the new Erlewine Neck Jig. We've been working on this design for a few years now and we really feel this is the one.
Dan Erlewine: It's the best I've seen yet, and I've had about seven over the years, different versions. What the neck jig does is holds the guitar under the same forces that it is when you play it. You have the truss rod adjusted, string tension, and when you work on the guitar, you tilt the jig over into the playing position for all your setup work. Then you bring it back up to work it. Today Eric's going to show you how to put the guitar onto a jig and get ready for work.
Erick Coleman: And here we go.
Dan Erlewine: Go for it.
[on-screen text reads: How to use the Erlewine Neck Jig]
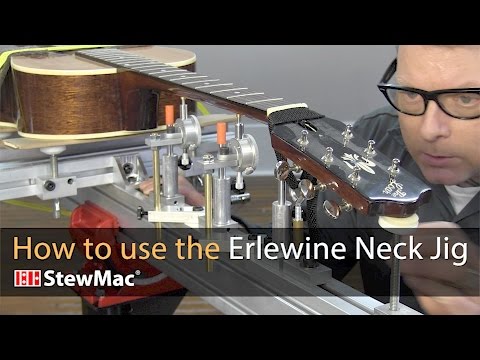
Align the guitar and strap it into the jig
Erick Coleman: Hold the guitar over the jig, paying attention to where the swivel head levelers are and the crossbars. Make a mental note of these positions and then go ahead and make some adjustments to get them into the ballpark [Erick repositions the crossbars and the levelers on the jig to align with his guitar]. Most of the guitars I jig, especially acoustic guitars, I'll use these wooden slats [on-screen text reads: support slats] to help distribute the load. I like to wrap them in paper to help protect the finish. Set the guitar on the jig and then use a sandbag or something to weight the body down so it sits nice and even on the levelers.
I'll then raise the rods to where they're not quite touching the neck, and then I'll align the guitar up to where the rods are centered on the back of the neck [on-screen text reads: Center the guitar]. Place the hold down strap across the guitar's waist [on-screen text reads: Strap it down]. With the mouth of the ratchet pointing towards the floor, insert the hold down strap into the slotted hub and pull it on through so you have just a little slack. Give it a couple tightens to keep it in place. Then I go ahead and put a couple pieces of felt in [on-screen text reads: Pads of felt or paper] where the strap meets the body to help protect the finish.
I'll go ahead and tighten these all the way down.
Some guitars might need two straps depending on their size. This is a small body acoustic and I feel that it's stable with just the one. I like to keep the guitar as close to the cross beams as I can get it [on-screen text reads: Down low for stability] while maintaining a parallel line between the main beam and the neck. Now I'm ready to jig this guitar.
Adjust the neck
With the guitar in the playing position, I'm ready to get to work. One thing I like to do is pay attention to my customer when I'm working on their instrument. If they're a real skinny guy, I'll keep the guitar at a perfectly 90 degree angle because that's the way it hangs on their body. If it's somebody with a gut, I'll kick it back just a little bit to kind of recreate that because every little bit helps. We're talking about gravity here.
So now I'm ready to adjust my neck. I'm going to be leveling and dressing the frets on this guitar, so for this kind of work, I want to have the neck as straight as possible [on-screen text reads: Adjusting the truss rod]. That looks good to me.
Adjust the dial indicators
Now I'm going to adjust my dial indicators. When I raise the dial indicators [on-screen text reads: Position the dial indicators], I like to get a good couple turns of the needle because that's kind of right in the middle of the travel of the gauge.
So once I do that, I'll tighten it down and then zero it out. There's a little thumb screw on the side, you want to loosen that, and then the dial turns. Get it right on zero there and then tighten it up [on-screen text reads: Zero the dials]. Time to do the second one.
[on-screen text reads: Tilted back to the working position]
Adjust the peghead jack
Okay, now the strings are off so the neck has pushed itself into a back bow and I'm going to recreate the straight neck using the peghead jack [on-screen text reads: Lifting up] to bring it all back up to zero. Occasionally you might find that you need to recreate the string tension going over the nut and that's where this hold down strap comes in handy [on-screen text reads: Pulling down], to help dial it in. You kind of go back and forth between the two until you get zeroed out to your satisfaction. On this one, I'm about a half a thousandths on either side of the dial of the zero and that's good enough for me. I'm going to check the neck real quick with my Notched Straightedge just to make sure that everything's the way I remembered it, and it looks good. Now I'm going to raise my support rods [on-screen text reads: Neck support during fret leveling] and these will keep the neck in position while I do my work.
Clamping to a benchtop
The Erlewine ShopStand and the Angle Vice are the ideal setup for the Neck Jig to turn it into the playing position. But if you don't have that, it's no big deal. You can do a makeshift rig with a couple wood blocks and clamps to clamp your jig onto a bench or table in the position you need to make the adjustments. When you go to the working position, the middle set of levelers can be reversed to act as feet to stabilize it while you do your work.
Dan Erlewine: That's perfectly zeroed out and it's rock solid. I can't imagine doing fret work without a neck jig, can you?
Erick Coleman: Me neither.
Dan Erlewine: I mean look, you loosen the truss rod and the strings are off. The neck gets all wishy washy. Then you tighten it, put the strings on and it buzzes and you have to redo it. That's why the neck jig came about in the first place.
Erick Coleman: Yep. It's a great tool. And now I'm going to level these frets.
Dan Erlewine: Be my guest.

