Hide Glue - Luthier Tips du Jour Mailbag
In this episode, luthier and instructor Robbie O'Brien addresses a viewer's question about hide glue, and demonstrates mixing and applying animal glue, along with sharing helpful tips for its use.
Video Transcription
[on-screen text reads: Luthier Tips du Jour Mailbag]
Mailbox question: Could you show us how you work with hide glue?
Robert O'Brien: Today's Tips du Jour Mailbag question comes to us from England. "Robert, I enjoyed your video about the different types of glues and their applications to lutherie. I'm interested in learning to work with hide glue. Could you show us how you work with it?" Bob in England.
Advantages and disadvantages of working with hide glue
Bob, animal glue has been the most common woodworking glue for thousands of years until the 20th century when the PVA glues or polyvinyl acetate glues and other resins became popular. There are several advantages and disadvantages to working with animal glue. First of all, the glue has to be mixed and prepared, and this means cooking it. It has to be applied hot, usually with a brush or a spatula. It's easily reversed using heat and water. Before mixing, it has an almost indefinite shelf life if you store it in a cool, dry place. Anything not used after mixing can be stored in a freezer.
Some of the disadvantages of hide glue, first of all, is the cooking, which I've already mentioned, that can be a nuisance, but if you learn how to work with it, it's not necessarily a problem, the advantages far outweigh the disadvantages.
Another problem could be the open time, the glue must be applied while it's hot. One way to extend the open time is to dilute your mixture slightly. However, I don't recommend that, you're going to weaken the bond somewhat. The best way is to heat your shop, make it hotter that way it takes longer for the mixture to gel. Another way would be heat the pieces you're going to glue together, that extends the open time.
I use hide glue in my shop for restoration repair work. One of the great advantages of hide glue is that if you ever have a brace come loose inside your guitar and you use a synthetic resin or a PVA glue, you must remove that glue. Glue will not stick to glue, however, the hide glue will, it reactivates itself. So if your arm is elbow deep in the soundhole and you're fishing around for that loose brace and you find it, boy, it's a great moment if you discover that hide glue was used, you just put on some more hide glue, clamp it up, it reactivates the old glue. You're good to go. If it's PVA glue, then you got to remove the old glue so the new glue will work.
Hide glue also functions as its own clamp. No clamping required. Apply glue to the two surfaces that you want to join and then rub them together slightly. As the glue starts to dry, it would start to pull the two pieces together so they suck themselves together.
Hide glue can also regain its working properties after cooling just by being reheated. Another huge advantage to animal glue is no creep. Sometimes a bridge that is under tension and you use PVA glue, it will start to creep. There's no creeping when you use animal glue.
Hide glue is sold in what is known as gram strengths. The higher the gram strength, the less open time. Most luthiers that I know use the 192 gram strength. However, hide glue is available from 30 up to over 500 in gram strength. Traditionally, the 192 gram strength was used for veneer work, but it also works in lutherie. The higher the gram strength, the tackier the glue is and the stronger it is. You also have less open time, this works to your advantage if you're doing repair and restoration work and you just want to glue a purfling or something on, the higher the gram strength, the quicker the piece will set.
So besides being reversible, which makes repair work easier, there's no creep, it's non-toxic, it sands easy. And it's also transparent under most finishes, this can be a huge help if you're doing crack repair through finishes.
Hide glue gram strengths I use
So I talked about gram strength, the two that I use in my shop are 192 and 315. The 192, my general purpose glue, the 315, when I do my repair and restoration work. Also, the higher gram strength is great for gluing on bridges where it's always under stress because of the strings. Keep in mind though, you have to work very quickly with the higher gram strengths because of the open time.
How I mix and use hide glue in my shop
So let me show you how I mix and use hide glue in my shop, and hopefully, you can find a couple of tips that you can use in your shop. To mix the hide glue, I'm going to mix one part glue to 1.9 parts water by weight. I'm then going to set this aside for about a half hour to an hour so that it's fully absorbed. Now that the water's been absorbed by the glue, I have to heat it to 145 degrees Fahrenheit.
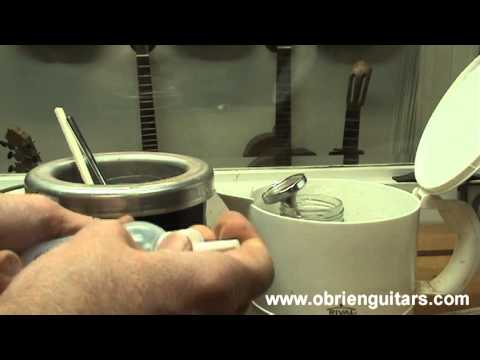
There are several ways you can heat the glue and let me show you a couple of them. Here's a simple baby bottle warmer. Fill it with water, place the jar in it, dial in the thermostat here. If you place a thermometer in it and you notice it gets to 145, put a little mark on your baby bottle warmer and it will maintain that temperature constant for you.
You can do the same thing with a little pot like this. I drill a hole in it, place my thermometer in there, mark it when it gets to 145 so it maintains it constant. You can also just float your jar then inside the pot.
And yet, another way to do this is with a commercial glue pot. Fill it with water. It has a thermostat in it that constantly maintains the temperature at 145 degrees Fahrenheit. Float your glue in it. So with water in the pot, I'll go ahead and place my glue inside it like this. And I like to place a cap on it, but just leave it on there loosely, don't tighten it. That keeps the water from evaporating off and the glue thickening.
Now, it's important, as you're cooking your glue, to avoid loss of strength, to not heat the glue for long periods and also don't get it above 145 degrees.
So once the hide glue is cooked and hovering around 145 degrees Fahrenheit, what I like to see for the viscosity is it just starts to drip off the brush like that. It's just starting to drip off the brush there. That looks about right.
Now, with hide glue, the temperature is very important. So there's a few things you can do to help maintain the temperature. One is come in and place a few marbles inside the jar. That way if you ever have to remove the jar from the glue pot, it helps maintain the temperature.
To use the glue, you could just use a glue brush, but there's some other little things you can do as well. For example, a little container like this, fill it up with hide glue and you've got a dispenser just like a glue bottle. If you find you're going to be using more, you can use a container like this, a little larger, fill it up with glue, and then you have a glue bottle.
Once you're done working with the hide glue for the day, you can simply just put the cap on it and put it in the fridge, and it'll last for several weeks that way. When it starts to create mold or smells bad, then you don't want to use it anymore. Now if you think it's going to be longer before you can get back to it, pop it in the freezer, it stays fresh. Then when you need to use it again, heat it up, you're good to go. Here's another quick little trick. You can mix up a big batch and put them in an ice cube tray, put it in the freezer. When you need one, pop one out, put it in your jar, you have one ready to go.
Situations where I would use hide glue
So here's one of the situations where I would use hide glue. This is a guitar that came in for repair, it's dried out and there's hairline cracks along the fretboard. Now I was able to humidify the guitar and close the cracks, I've done the cleaning underneath, but I'd still like to stabilize it from the top side a little bit better.
So here's what I'm going to do. I'm going to take my hide glue, I'm going to use the 192 strength and just run a little bit right inside the crack there. It's a little hairline crack. Do the same thing on both sides. And the glue being low viscosity like this will run right down inside there. If you want to try and close the gap a little bit better or level it, you can because the glue will dry quickly.
Another benefit of hide glue is that it cleans up very easily. This glue has already gelled, so I just run along there and it just peels right off like gelatin. So the cleanup with hide glue is fantastic.
This is an old 1890 Martin guitar that came into the shop, and the X brace is broken here and here. And since this is a high-stress area, I'm going to glue it with 315 gram glue. Also, it's going to gel very quickly and allow me to just hold it in place and make that repair. And you don't want to worry about getting sloppy here, you want to get it in there, make sure that it gets all inside that crack. And then, come in and just hold it in place. As the temperature... and the glue starts to dry, it starts to gel, then you're good to release it.
So Bob, as you can see, there's a bit of a learning curve in working with animal glue or hide glue. Once you learn how to work with it, though, I think you'll enjoy working with it, and the advantages will far outweigh the disadvantages.
Alternative to hide glue that doesn't require cooking
Now, for you folks watching this thinking, "Man, this is just too much work, I'm going to have to cook the glue, et cetera," here's another alternative, it's called fish glue, and it has all the advantages of hide glue without having to cook it. It's ready to go in the bottle. The problem is you got a long open time and a long clamp time, unlike hide glue. But if you think that cooking is too much of a disadvantage for you, then try the fish glue. And I hope this helps.
[on-screen text reads: More Luthier Tips and online courses available at www.obrienguitars.com]