Shellac and Sawdust Pore Fill - Luthier Tips du Jour Mailbag
In this episode, luthier and instructor Robbie O’Brien answers a question about how to use shellac and sawdust as a pore filler.
Video Transcription
[on-screen text reads: Luthier Tips du Jour Mailbag]
Mailbag question: Can you explain your shellac and sawdust pore filling method?
Robert O'Brien: Today's Tips du Jour Mailbag question comes to us from North Carolina.
"Dear Robert, I'm interested in learning more about your shellac and sawdust method of pore filling. Could you explain how you use this technique? David in North Carolina."
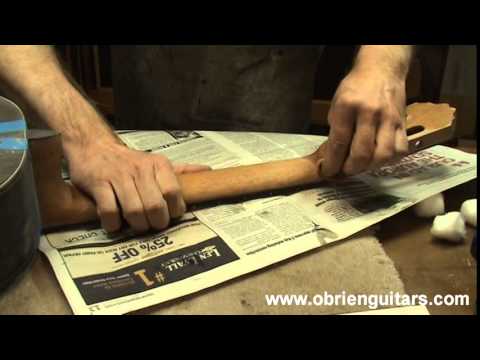
David, there are many ways to fill the pores before you do your finished work. I actually think that filling the pores and surface prep is part of the finish because the finish is only as good as what's underneath it. Now, over the years, I've used many methods for pore filling. One of my most popular videos on YouTube is how to use drywall compound for the pore filling process. To fill the pores, all you need is a resin and some type of binding agent. You're going to need to make the resin or the filler. In this case, I'm going to use end grained sawdust. Now the beauty of that is that it always matches the color of the species of wood you're using.
You always have scraps laying around of rosewood, mahogany, Spanish cedar, so you use those to fill the pores and you have an instant color match. All I do is use my sander. I wrap a piece of newspaper around the dust port and I sand the end grain so that it's collected onto the newspaper. I then put that into some type of salt shaker or spice shaker type thing, and that's what I use to fill the pores. Let me show you how I do that.
Make fine sawdust using the end grain
This is a piece of Spanish cedar. I'm going to be using the end grain here, not this side or this side, but the end grain and it makes a very, very fine powder. The dust that is collected is then placed into some type of salt type shaker and I'm ready to go to work.
Apply the end grain sawdust and shellac
All right, so I'm going to start just by taking my end grained sawdust and just sprinkling some across the neck like that. I then come in with a one pound cut of shellac. If you go with anything higher than that, the two pound or three pound, it gets a little gummy on there and you don't want to get it gummy. That's a technical term, so I take a little bit on a cotton ball. You don't want to work too wet. If you get it too wet, you get sticky, and then just put it on there and rub it into the pores like this.
[Robert rubs the shallac in using a circular motion]
When you do it, you want to not leave any residue on there because if you leave a big buildup of residue, you have to sand pretty aggressively to get that off. If you sand aggressively, then you wind up just taking it right back out of the pores and that is counterproductive. Along the heel here, you've got the open end grain so it needs to be filled at least two or three times. It's pretty porous along there. You can also place a little bit on the cotton ball itself and rub it in like that. And this dries very quickly. It's another benefit to this method because you can lightly sand it. You can rinse and repeat, do it again, and things get filled up really quickly here. It's a really nice method and I already mentioned the fact that the pore filler matches the color of your species of wood you're working with perfectly every time because you're using the same species of wood for your filler.
I'm going to add just a little bit more shellac. Same cotton ball. Notice how I'm kind of doing circular motions going across the grain, making sure it all gets worked in there really well. I'm working pretty dry with this cotton ball here. Notice I've only charged it up a couple of times and don't forget to do across the end of the peghead here, have some pretty porous grain up there. And there we go. So it's already pretty much dry to the touch.
Lightly sand
So now that it's dry, just take some 220 or even 320 and just lightly hit the area that got the pore fill. If this is on the lightly, you don't want to yank it back out of the pores.
Once you get done lightly sanding it, don't blow the dust off. You want to use that dust to your advantage.
Apply more sawdust and shellac
So then we're going to come in again and put another little light coat of the end grain sawdust on there. A little bit of one pound shellac again. Once again, just work it into the pores. If we were washing our hair, we would call this the wash, rinse, and repeat stage here. Now this pore fill works good under any type of finish. Oil, water-based solvents, lacquers, any of that kind of stuff. One of the cool things about it is it's very quick so you don't need overnight dry time on your pore fill like an epoxy or oil-based pore fillers or something like that so you can just move forward very quickly. There we go. It took me all of what about five minutes? I'll let that dry for a couple seconds. I'll come in and lightly hit it again with the 220 and I'm ready to proceed with the finish.
David, thank you very much for your question. I hope you find this information useful.
[More Luthier Tips and online courses available at www.obrienguitars.com. Private and small group guitar building and finishing instructions available.]