Finish Repair - Luthier Tips du Jour Mailbag
In this episode, Luthier and Instructor Robbie O’Brien demonstrate how to repair a finish using CA glue.
Video Transcription
[on-screen text reads: Luthier Tips du Jour Mailbag]
Malbag question: Can you repair a finish using CA glue?
Robert O'Brien: Today's Tips du Jour Mailbag question comes from Michigan.
"Dear Robert, I have seen you use CA glue to repair cracks while building guitars. Is it possible to repair a finish using CA glue? Thanks for all the videos, John in Michigan."
Yes, it is possible to use CA glue or Cyanoacrylate glue as a finish. In fact, I've got a guitar on my bench right now that is a perfect candidate for using CA glue as a finish repair. What are the chances of that?
The problem
This old timer came into the shop recently and looked like it had been ridden hard and put up wet. Apparently it had been dropped somewhere along its life and I've already addressed that. This crack was so large I could stick my hand inside through the top of the guitar. The crack extended around the purflings and binding to the backside of the guitar almost down near the end wedge. So it was a pretty nasty break. I bet it has a story to tell.
So with the inside repairs taken care of, the structural elements have been addressed. Now I'm left with the finish issue. The client for this guitar did not want to refinish the guitar and I also recommended against it. So what can be done? If you look closely at the crack, there's some areas where the finish is starting to chip. I want to save as much of the original finish as possible. And what I'm going to use is a thin viscosity CA glue to wick in under that finish and help secure the parts that are wanting to flake away. Afterwards, I can come in with a medium or thicker viscosity and use that as a leveling agent. If done properly, I can sand and level and it will pass as a high gloss finish.
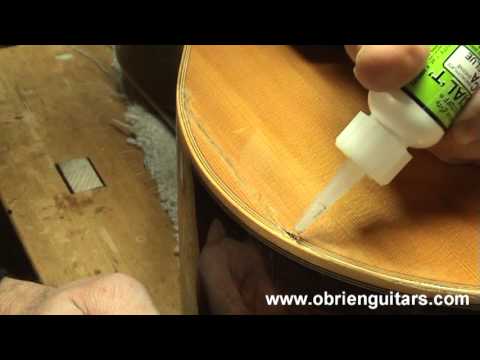
Applying CA glue
Of course, it's always a patch, but much better than the alternative. I'm going to be using a very thin viscosity CA glue from a brand called Hot Stuff and to apply it, I'm going to use a small pipette, that way I can strategically place the CA glue exactly where I need it. So here's a small area where the finish is starting to flake off and I'm going to use this very thin viscosity glue to wick in under the existing finish so that I don't lose the parts of the finish that are wanting to flake off.
Now you don't want to use very much CA glue because I'm not worried about leveling right now. I'm just trying to get this thin viscosity glue to wick under the existing finish. Here's some more of the finish wanting to crack back here so I'm going to put just a little bit back here as well. And along the crack itself, there's some chipping going on, so I'm going to wick just a little bit in there. Now remember, this crack's already been fixed from the inside.
Now that's going to help stabilize the existing finish. I do not want to hit that with accelerator. I want it to dry very slowly. If you're using fresh CA glue, it shouldn't take very long. I want that to dry on its own. If I hit it with the accelerator, the tendency is for it to dry too quickly and it can boil, get little air pockets or bubbles in there or turn a whitish color. So I'm just going to let that dry all by itself, shouldn't take very long.
Using CA glue as a leveling agent
So now that the thin viscosity coat has dried, it's wicked under there. I'm not going to lose any more flakes of the finish. I'm now going to use a medium viscosity CA glue and I'm going to come in with a pipette and use that as a leveling agent across the finish there. So this is a little bit thicker CA glue. It's still thin enough that it's going to flow and I want it to work as a leveling agent along that crack and that way I can fill in the finish that's missing.
Now, ideally you want several very light layers. You want to keep putting on very, very light layers until you build that finish up so that it's level with the finish that surrounds that area that's missing a finish. And it may take several applications to be able to do that, but if you keep working at it, you'll eventually get it level.
Now this type of repair works really well on your catalyzed type finishes. If this were a lacquer finish, I would probably be doing this repair with lacquer. It would take a lot longer to do because the lacquer has a longer cure time, but on your catalyzed finishes, this works very well to repair a finish.
Using thick viscosity glue
I am going to come in and use a little bit of the Hot Stuff, thick viscosity glue. I have a little area here that's missing a small piece of the binding and I'm going to put a little bit of the thicker viscosity glue in there and try and level that area.
Now, once again, I'm going to let it dry on its own. I'm not going to try and cure it for the reason I've already described. If you cure it too quickly, it gets little air bubbles in there and turns a little white. Also, sometimes the chemicals in the accelerant can damage a finish and the technical term for that is bad. So I'm just going to let that dry on its own. Now that the CA glue has dried, all of the voids have been filled, the CA glue is actually riding proud of the surface a little bit. So now I need to level that.
Using a razor blade
What I'm going to use is a razor blade. If I come at it and just scrape the edges of the razor blade could hit the existing finish. So what I'm going to do is just use some small pieces of thin tape and wrap them around the edges of the razor blade out here. This leaves the middle part open and so as I run this along the surface, all it's going to do is scrape the high spots of the glue. If you use the clear cellophane tape, you can get down even lower you almost right to your existing finish. So I'm going to take some quality time here and just very carefully and gingerly scrape that CA glue fill that I used down flush with the existing finish.
And as you do this, you want to be very careful that you don't take any of the existing finish. All you're trying to do is level the CA glue fill [Robert continues to gently scrape the entire glued area with the razor blade]. Now, once I get the CA glue just about level with the existing finish, I'm then going to come in and wet sand the area.
Sanding and finishing
To wet sand. I'm going to be using a thousand grit paper to begin with and a hard rubber block.
[Robert is gently sanding all of the areas on the guitar body that he glued]
So I've run through a series of grits on my sandpaper here. This one is two thousand. And then after this, I'll run a little micro mesh on there and perhaps even put it on my buffing wheel if it needs it. So after two thousand, I'm going to start with some micro mesh and buff it up to a little higher gloss. And I'm just going to run through a series of grits here. And I find that when I use micro mesh, you can extend the life of the micro mesh if you use water as a lubricant. And now I'm up to the 12,000 grit micro mesh.
Now that's starting to get a pretty decent shine back to it. However, I'm going to use some Clear Plastic Polish and some Clear Plastic Cleaner. It's a Meguiars product that I got from LMI and a little bit of cotton and buff that on up to a gloss that matches what was already on there. Now, if you have a buffing wheel, you could also do this on your buffing wheel, but I thought I'd show you go ahead and how to do it by hand. And if you want to make the client really happy, go ahead and do the rest of the guitar. Go ahead and clean up the whole soundboard.
Now I'm using a little finer grit. I'm going to be using the cleaner. And there we go. So here's the finished product. Now keep in mind this is just a patch. It's a finished patch. All we did was secure the flaking off of the finish that was already there, and then we leveled and buffed the area so that now you have a gloss and it's structurally sound.
Conclusion
So there you go, John in Michigan, as you can see, it's a patch. It's not a cure-all. However, it has stopped the existing finish from flaking off anymore, and it's leveled the crack area in the gap area so that you have at least a level shiny surface. So I hope this information helps and happy finishing.
[on-screen text reads: More Luthier Tips and online courses available at www.obrienguitars.com. Private and small group guitar building and finishing instruction available.