Hygrometers - Luthier Tips du Jour Mailbag
Join luthier and instructor Robbie O'Brien as he explores the significance of monitoring changes in relative humidity throughout the guitar building process. He offers practical guidance on crafting a simple yet precise homemade hygrometer tailored for this purpose.
Video Transcription
[on-screen text reads: Luthier Tips Du Jour Mailbag]
Mailbag Question: Is there a way to accurately measure changes in relative humidty in my shop without a hygrometer?
Robert O'Brien: Hi, I am Robert O'Brien from O'Brien Guitars. Quite often I get emails from people around the world asking questions about the information I provide in my very popular YouTube series called Luthier Tips du Jour. So I'm going to start a new segment called Luthier Tips du Jour Mailbag. And the first one is from a viewer in Spain named Pedro. "Dear Robert, is there a way to accurately measure changes in relative humidity in my shop without a hygrometer? Love your videos. Keep them coming. Saludos, Pedro."
Well, Pedro, yes, there is a way to measure changes or swings in relative humidity in your shop. The most important thing is that you recognize that there are changes and you need to address the problem. Fortunately, in my shop, I run a constant 35-40% relative humidity year round in the shop. Now behind me here, you see a humidified room. If I'm building for an environment where I know the guitar is going to live, the end user is going to be an environment that has a higher relative humidity, then I bump up the relative humidity levels in the controlled environment behind me there.
There are some stages in the guitar building process that I think it's very important to control or know if there's a change in relative humidity. For example, I like to join my tops and backs, brace them, voice them, and install them on the rims of the guitars at the same RH level. So you need to know what that is, or at least know if there is a variation from when you did the previous step.
So let me show you how to make a very simple homemade hygrometer that is very accurate and will let you know when there's changes in the relative humidity in your shop. It's rumored that Antonio de Torres, the father of the modern-day classical guitar used something similar in his shop.
Preparation
To start with, I'm going to take a soundboard cut off and then cut a piece off about three-quarter inches wide from the end grain. Now it needs to be the end grain. Grain's running across like this, there's a lot of end grain exposed on this piece of wood. I'm then going to take a thin piece of veneer, and this is just a piece of mahogany. This happens to be Sitka spruce, but it doesn't matter, it could be Engelman or cedar or any type of wood that has end grain exposed. Then you're going to take this piece of thin veneer, in this case mahogany, and just glue it to it like this. Now, when I glue this to the piece of spruce, I don't want to introduce any moisture into it, therefore, I'm going to use CA glue or epoxy to glue that down. You also want to do this step when you have a fairly constant relative humidity level in your shop.
Building a homemade hygrometer
So I'm going to start by placing a little wax paper on my bench to protect it, so also I don't glue this to the bench. I'm then going to take a little bit of CA glue and I just happen to be using medium viscosity here. Place it on the strip like that. Then place the veneer over the top, place another piece of wax paper over that, and then I'm going to put a little bit of weight on it as it dries [Robert sets a low-angle block plane on top]. And since it's CA glue, it shouldn't take very long to dry at all. Once the glue dries, you can remove the weight and the wax paper and you now have a homemade hygrometer. And let me show you how this thing works.
Testing the homemade hygrometer
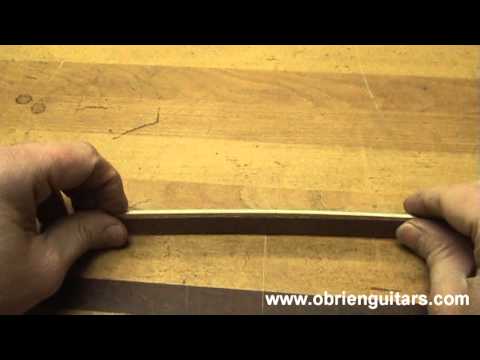
So I'm just going to take the homemade hygrometer here, place it into my bench vise to hold it. Once it is exposed to humidity changes, watch what happens [the hygrometer bends to the left about 3 inches. on-screen text reads: Elapsed Time 15 minutes].
As you can see, when the piece has been exposed to moisture, it starts to incline one way or the other. As you can also tell, the movement is quite severe. I would hate to have that kind of movement in my guitar, top or back. As the relative humidity level in your shop starts to drop, then it will swing back the other way. If you wanted to, you could even make yourself a little stand to help hold your hygrometer. If you have a hygrometer in your shop, you can even use that to calibrate your homemade hygrometer by making marks on the stand. So this little tool could become one of the most important tools in your shop. It will help you know if there's a change in relative humidity. So take a look at your homemade hygrometer when you join your backs, brace them, voice them, and install them on the rims and make sure that the indicator is relatively constant when you do those steps. If you do, I think you'll avoid future problems. Thank you, Pedro, for the question and happy building.
[on-screen text reads: More Luthier Tips and online courses available at www.obrienguitars.com]