Saddle Routing Jig Instructions
The Saddle Routing Jig lets you slot a new bridge with a traditional single saddle or 2-piece compensated saddle, fill and move an existing saddle slot, widen a saddle slot for a compensated saddle, or flatten the bottom of the slot for a saddle transducer pickup.
This jig lets you slot a new bridge with a traditional single saddle or 2-piece compensated saddle, fill and move an existing saddle slot, widen a saddle slot for a compensated saddle, or flatten the bottom of the slot for a saddle transducer pickup. The jig includes an adapter plate for attachment to the bottom of our #5260 Precision Router Base (shown below), a special adapter plate for the #0488 Bosch Colt Router, and an adapter for our #5900 Tilt Router Base for routing angled back saddle slots.
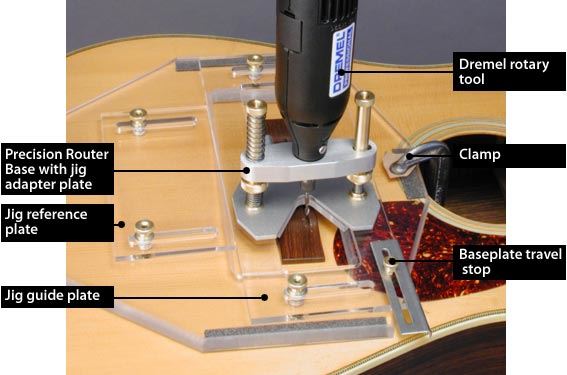 |
1. Mount the adapter plate to the bottom of your Precision Router Base or Bosch Colt router using the included screws. (The adapter plate will also fit on the bottom of Dremel's router attachment, using their screws.) Chuck the proper size router bit into the rotary tool collet (we recommend a sharp downcut bit for cleanest results). Use of an adapter collet is necessary to use our downcut bits in the Bosch Colt or other router with a 1/4" collet.
If using a Dremel, remove the threaded collar from the "nose" of the tool, and thread the tool into the Precision Router Base.
2. Adjust the jig's guide plate (the 4" x 11" piece with slots on each end) to the center of its travel, and retighten the thumbnuts. Set the jig over the guitar bridge, and center the opening of the adjusting plate over the spot on the bridge where the saddle slot is to be routed. Clamp the jig to the guitar, using a small C-clamp through the soundhole, and a larger clamp (such as a wooden cam clamp) at the tailblock. Be sure to place padded cauls between the clamp jaws and the guitar surfaces. The foam padding on the underside of the jig will cushion and level the jig on the guitar top.
3. Place the tool, router attachment and/or baseplate in the guide plate. With the cutter bit raised, slide the tool back and forth. It should slide freely, but without looseness. (Note: After repeated jig usage, a bit of household furniture wax applied to the bottom edges of the guide plate will help the acrylic plastic move more freely.) As you move the tool, loosen the guide plate adjustment nuts and position the guide plate so that the cutter bit follows the line of the bridge saddle. Once aligned, tighten the thumbnuts and recheck the alignment. Readjust if necessary. Bring the jig reference plate in contact with the guide plate and tighten its thumbnuts.
4. Set the baseplate travel stops by loosening their small brass thumbnuts. Move the angled-aluminum stops to limit the tool's movement. This is necessary with modern Martin-style bridges, as well as many other types.
5. Lower the cutter bit and begin routing the slot. This should be done in several steps, to reduce the tendency of the cutter to stray off course in heavy cutting. To make minor adjustments to the width of the saddle slot, use feeler gauges between the reference plate and the guide plate, to help precisely realign the guide plate.


