Acoustic Neck Joint Routing Template Instructions
Routing instructions for acoustic neck joints.
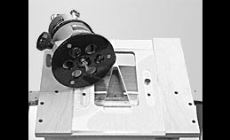
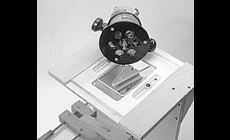
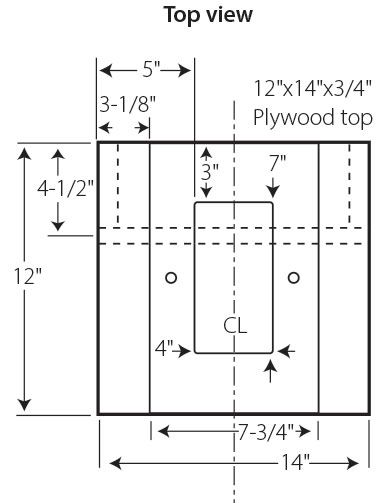
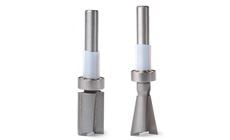
These templates are made of extra-thick acrylic for sturdiness, and they're clear for easy alignment. Available for a Martin-style dovetail, or for a straight mortise and tenon. Each set includes a template for routing a tenon on a guitar neck heel, and a template for routing a matching mortise in the guitar's neck block. We developed these Neck Joint Router Bits for cuttng accurate neck joints with the Acoustic Neck Joint Routing Templates. Use the templates with your homemade jig (plans provided at the bottom of this page). You may wish to expand or improve it to meet your particular needs. The jig will hold a guitar body or neck in the proper position for routing, while the cutter's guide bearing follows the template. The jig should be made of 3/4" plywood, preferably birch or a similar good grade which is flat. Refer to the jig plans. Notice that the 20" x 14" upright has a 1" x 4" notch at the top end to allow the router bit to pass. Two 3/4" plywood gussets hold the upright and the top perpendicular to each other. Drywall screws and glue hold the jig rigid. The top, also of 3/4" plywood, has an 7-3/4"-wide central section which is thinned to 3/8". This is where the template rests. The width is critical so that the template can slide but not twist. The template's position in this slot controls the width of the dovetail. There is a 4" x 7" opening in the top for the bit to extend and make its cut. Observe all safety precautions with power tools. Wear eye protection and a dust mask, dont' wear loose clothing, and unplug power tools during set-up. Test your cuts on scrap! Each template has two slots for supplied attachment hardware that clamp it at the desired location. The female threaded T-nuts are for installation in the plywood. The machine screws and washers go through the recessed slots in the template and thread into the T-nuts to hold the template. When the jig is completed, mark a centerline on its top and upright. Be sure this aligns with the center of the templates. The centerline is helpful in positioning the body or neck when clamping it in the jig. The jig holds the neck or body at a 90-degree angle to the cutter bit. When the guitar body is clamped onto the jig, with the soundboard against the jig's upright, the mortise in the body's head block can be cut properly at a 90-degree angle to the soundboard. However, the neck heel of most acoustic guitars is angled 1-1/2 to 2 degrees relative to the fingerboard (see the illustration; 1-1/2 degrees is most common, but may vary on your particular guitar). A shim should be placed between the neck and the face of the jig's upright, to hold the neck at this angle before clamping it to the jig. Heat-resistant tubing is supplied with the cutter bit to keep the bearing from riding up the shank. You can also use the tubing below the bit to raise the bearing to a height that will ride against your template should this become necessary, but always take up the gap between the bearing and collet with more tubing. Be sure to cut the ends squarely. Keep at least 1/2" of shank in the collet at all times. It may also be necessary to raise the entire template with shims to make contact with the bearing for shallow passes. It is always better to make several shallow passes as opposed to fewer deep passes. Once the cavity is deep enough to allow the bearing to ride against the wall of the cavity, the template can be removed for additional depth if necessary. With the proper template in the top of the jig, adjust the router bit height. When using the cutter bit, there should be a gap between the template and the neck or body, to ensure proper contact of the bearing against the template, and the correct depth of cut. It may be necessary to use two pieces of tubing on the cutter bit, one above and one below the guide bearing. The neck tenon is usually 5/8" long, and the body mortise is generally 3/4" deep, leaving a 1/8" gap between the end of the tenon and the bottom of the mortise joint. This gap is useful for final fitting and for steaming the neck loose if future re-setting should become necessary. Dovetail mortise template in position over the neck block. Guitar body is clamped in the jig. Dovetail tenon template in position over the guitar neck heel. Neck is clamped in the jig. With the proper template in the top of the jig, slide it to a position where it will make a preliminary cut, safely away from the desired finish point. The tenon will be larger than desired at this point, and the mortise smaller. Tighten the template clamping screws and make your first test cut cautiously. Re-adjust the cutter height and the template position as necessary, and cut again; two or three adjustments may be necessary. You may wish to scribe a line on the jig and a corresponding labeled mark on the template as a reference for simplifying future set-ups.


These templates are designed for use with our Neck Joint Router Bits.