Make custom labels for your guitars!
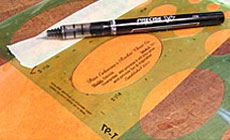
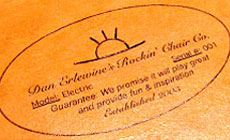
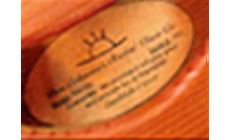
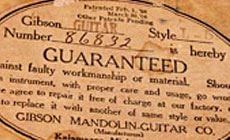
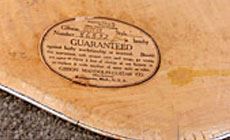
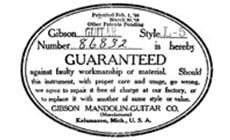
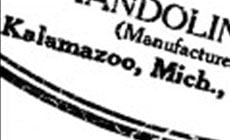
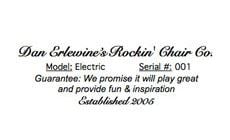
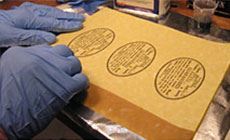
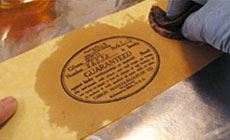
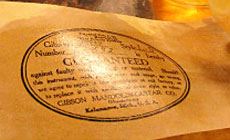
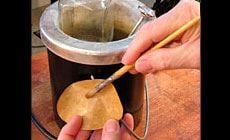
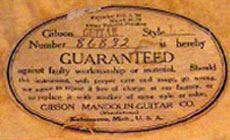
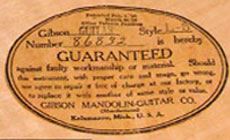
With a little care and ingenuity, you can create a label that makes a positive statement about the quality you build into your guitars. The arched back of this 1928 Gibson L-5 was caved in and warped beyond the point of reattaching it. I had to replace the back entirely. In my next Trade Secrets, I’ll show how that new back went on, but first I’ve got a smaller problem: replacing a vintage paper label. The ruined back had Gibson’s great old “GUARANTEED” label on it, and I wanted to keep that touch of class on the replacement back. That old paper would crumble if I tried to remove and reuse it, so I needed to make a replacement that looks just like it. This prompted me to call my brother Tom — the best graphics man I know. Together we create these Trade Secrets newsletters (he’s the editor and designer). Tom took a closeup photo of the old label and erased the wrinkles, stains and bulges using Photoshop. The final artwork is plain black and white, no color. He carefully kept the bits of broken type unchanged, so it will look old when printed. To show that you can make yourself a custom label without help from a graphics guy, I also made my own “layman’s label,” just by typing on my computer. I used a couple different typefaces, which is fancy stuff for me. This label is for my Rockin’ Chair guitar, which I don’t think I’ve shown you before. (I’ll show you a picture of it in a moment.) I printed the labels on my computer’s laser printer. A photocopier is also good for label printing. If you have an inkjet printer, its ink will probably fade too quickly — so make a photocopy of your printout and use that. At Staple’s, I found gold-colored parchment paper with a mottled coloring a bit like the the old Gibson label. Printed on this paper, the labels were still too new-looking. The old label had a hint of red, so I colored my paper by wiping it with medium-brown Colortone stain. I squeezed 3 or 4 drops of stain into a mixing cup with 3/4 oz. of Behkol solvent. I applied the stain with a cotton ball, while wearing nitrile gloves. I go through lots of these gloves when I’m gluing or staining. Print out plenty of practice sheets, because some of them will smear when you add the stain. Blotting, instead of wiping, gave me good results. After the stained paper dried thoroughly, it still needed something — so I blotted on a coat of clear fresh-mixed platina shellac. This did the trick: the shellac gave the paper a translucency and sheen that looked great (and old). I had a convincing label! I coated the back of each label with hot hide glue and let it dry. Later, I’ll simply wipe it with warm water and stick it on — like licking a postage stamp. The glue pot is designed to be filled with glue, but it holds way more than most of us need. Instead, fill the glue pot with water and set a small jar of glue in there. Keep a lid on when you’re not dipping out glue, or it’ll cook away and get thick. And don’t heat the glue any longer than you need to. After many days of repeated heating, hide glue loses its strength. I’ve heard that it should be discarded after 200 accumulated hours of heating, but I never push that envelope since mixing new hide glue doesn't cost much. The new maple back was very white; so before installing the label, I aged it by hand-wiping Colortone tobacco brown stain mixed with Behkol. I used a very weak solution, mixing up plenty so I wouldn’t run out halfway through coloring the back. The label looked great against the aged wood — almost like the real thing! I drew an oval around my typed message, using a draftsman’s elipse template. I had to experiment to find a pen whose ink didn’t bleed; what worked great was a Pilot brand Precise model with a rolling ball tip. The ink wanted to spread under the template until I added some tape as a shim to lift the template up off the paper surface. Hoping that I wouldn’t ruin my work, I used the templates to draw my simple Rockin’ Chair logo on the label. Thanks to my pal Eliot for thinking up that logo: a rocker with a rising sun made of a D and an E. And here’s where my label went: it's inside the bass-clef-shaped soundhole of my Rockin' Chair guitar. I love this invention because it’s so comfortable: the guitar’s neck is angled toward me (my left wrist loves that), and half the body is angled for comfort to my right arm. And I mounted the guitar on a tripod chair with a practice amp built in. I had a ball making this, and I have a ball playing it. With its TV Jones Classic pickups, it definitely rocks!It's easy to make a good label

The method we used to replicate this old label is one you can use for your own custom labels using paper, a little stain, and some hide glue. Here’s how we did it:

How to stick ‘em on
Why waste glue?
Okay, back to my Rockin’ Chair label: